


Unreal Tournament 3 marks the return of the world's première first-person shooter. It unleashes the full power of Unreal Engine 3, taking graphics, gameplay, and challenge to a whole new level. Players engage in intense battles with other human players online, or against Unreal artificial intelligence that sets the industry standard. With the most powerful futuristic weapons and vehicles available, this is FPS action at its best!
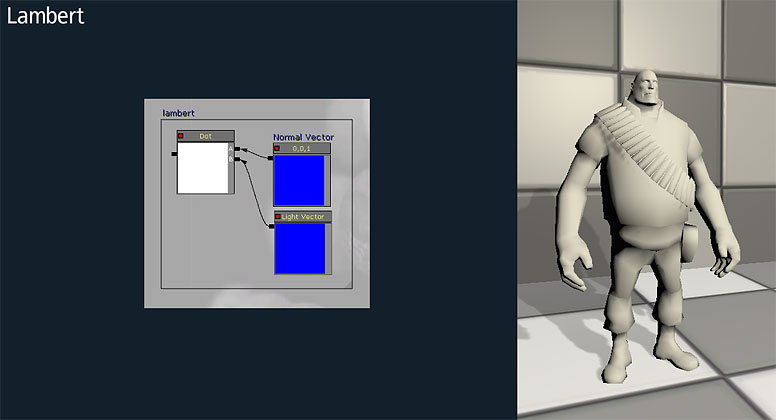
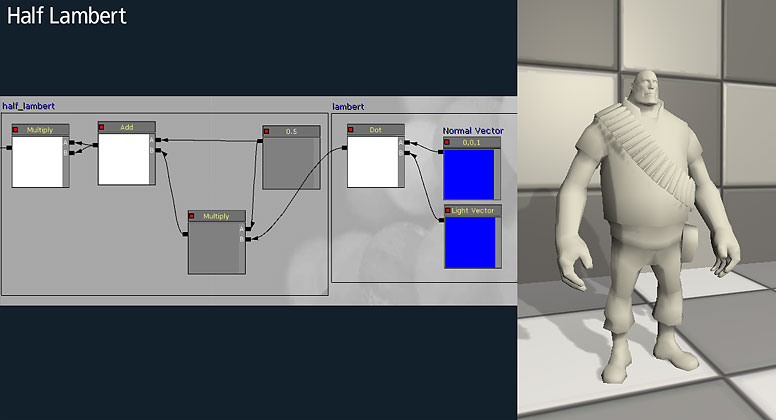
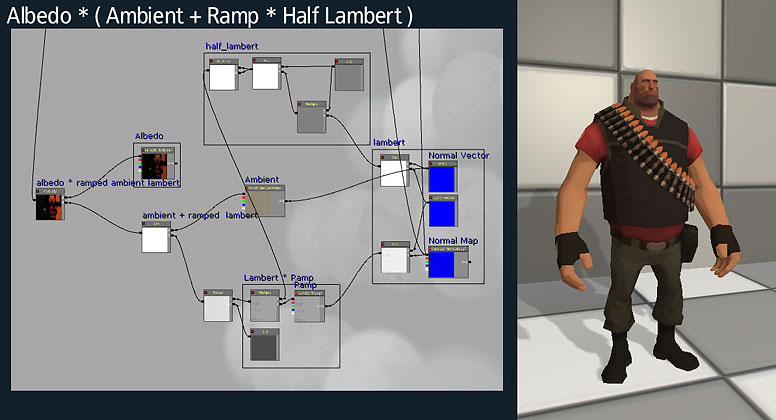
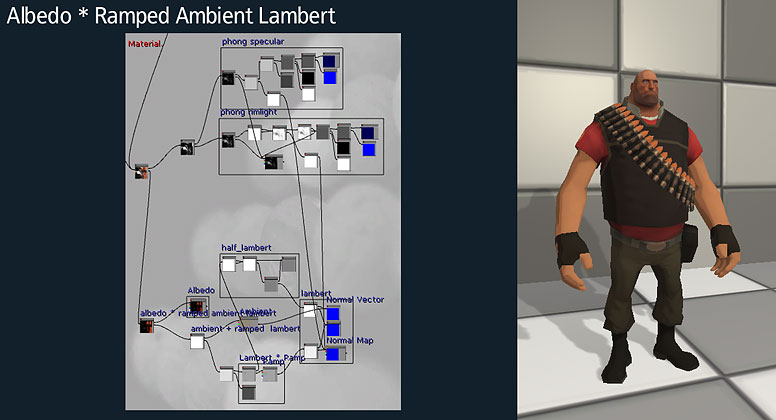
I'm not going to write much as this should be self explaining to anyone knowing the UT3 materialeditor, all this is based on valves techpapers on TF2
Posted by polyphobia on - Intermediate Textures


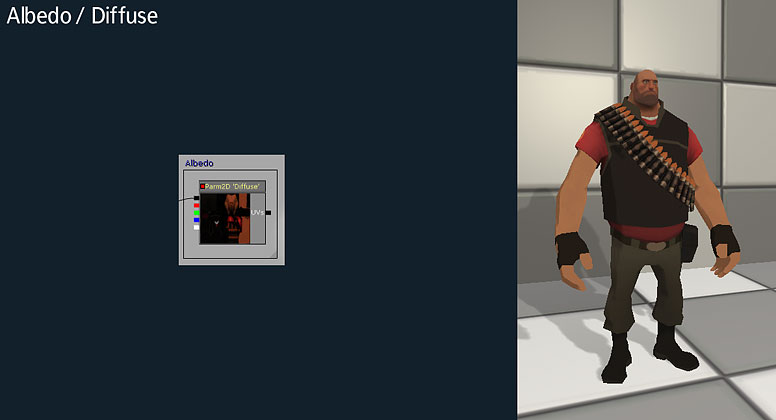
WOW! IT LOOKS JUST LIKE THE HEAVY!
Man, this is a well made tutorial. Showing it rather than telling, I must give props to this. Someone can even reproduce this in Maya or 3D Studio Max based on this tutorial. Brilliant!
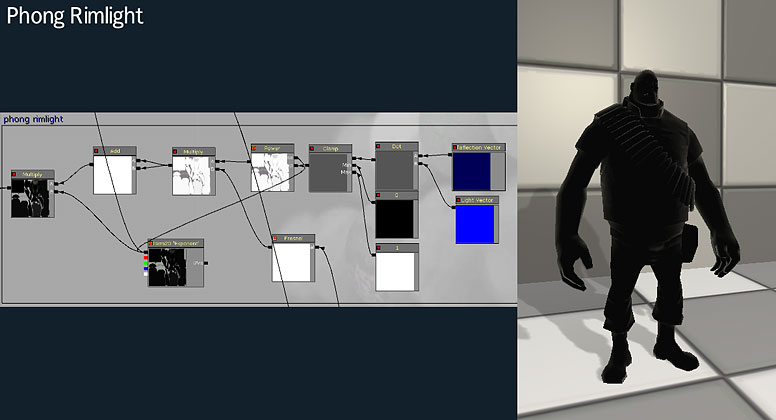
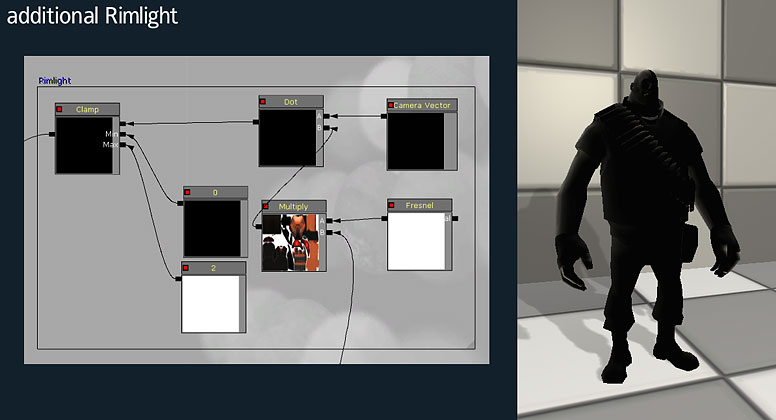
back when i made it i didn't know how to create an upvector to limit the phong rimlight to only faces that are looking upwards, this is how you do it
vector3 of 0,0,1 > Vector Transform set to WORLD > Component mask set to B > Constant Clamp
this multiplied with the phong rimlight limits the effect on the uplooking faces...
wacky, i'll keep this in mind
Nice work :)
Shame the image resizers make it difficult to see. Fortunately, you can still save the files to your machine to see 'em.
Drag the image into the browser's address bar. Let go and press enter...unless it automatically goes to the link automatically like in firefox.
Hmm, I just gave it a whizz with a stock mesh, and couldn't replicate the effect; it's just coming out black. It'd probably help to have a little text in there explaining the settings for certain things, such as the material node settings themselves, and such like.
I set the BSP lighting channel, and it seems to be visible now :)
sure the lighting channel of the object should use a lightchannel the actual lightsource emits light to. i.e. dynamic on both the lightsource and the object
and keep in mind a lot of the optic is made because of the ambient cube they use
I'm aware of that. Perhaps my mesh requires use of a light environment, however, as it wouldn't allow me to use a static lighting channel; it will still appear black and unshaded in-game; setting the BSP lighting channel is only a temporary solution.
Incredible, if you can create material setups like this, I don't want to know what your kismet sequences look like. It's really sweet to learn using Unreal ED from nice people, who take the time to break up something complicated into small enough chunks.
Thanks!
well i'm totally stupid with math, wish i had learned more back in schooltime xD
So the only thing i could do with the formula that valve has give, is to break it up into smaller chunks and reverse build it up to get the look i was aiming at. For Airborn we changed a lot on the shading but it was good to learn how the math behind TF2 works.
Materials are so much easier to understand than Kismet. Everything in the material editor is a named term that does exactly what it says on the label. Kismet is a mish-mash of apparently random expressions that may or may not do what you want them to...
right-click > view image works too ;)
nice tut anyway , I love this kind of shading , probably use it sometime
I've made it so that the images are clickable now, should help you get a bigger view.
They were clickable. For example though, try the last image. It is still resized by the scripts, and cannot be read.
thanks for your help :)
Wow! Good job! He looks like the HWguy! Lol, UT3 will now be = to TF2 =p
Never was < than TF2. :P OH GOOD A HALF-YEAR LATE COMMENT DON'T YOU LOVE THEM!
DUDE this is ******* brilliant :D !!!
Nice good information about this.
I need to cry some more.
Funny!
First Toturial i have sean on the newsboard
soo cool
Impressive!
so simple and yet so kick *** :D well done mate :D
I FAILED!!! I TRIED IT AND FAILED lol
i dont know why i followed your tut exactily and all i got was a black object? any tips?
did you say the shader that it is an custom lighting model and not a phong etc?
sorry mate i dont know what you mean. i just took a model from unreal (mineing bot) and copied the material editor stuff you have there (except the cubemap thing cause i did not understand it)
but it just came though black.
sorry for the hastle :D
because you're plugging my shader into the custom lighting node so you have to tell the shader that it is an custom lighting shader, just cklick in a empty region in your shader, and use the bar on the bottom of your material editor, there you can change it from phong to custom lighting
now i feel really stupid. thanks and i will need to reset it all up :D lucky me :D
thanks again i will let you know how i get on.
one other thing what do i do about the prameter cubemap thing
i dont know what im supposed to attach to it
thanks :D
a cubemap ;) thats basicly a ambient color, in case of a cubemap you can control more then just one color, so you can fade between a skycolor and a ground color, so it will be birghtened from the sky in another color then from the ground. In TF2 they just calculate that cubemap out of the level... you could use a simple color too, just less control
i think someone should post a tutorial on scripting npcs to be friendly to you or attack only certain things. also how to make scripted animation for npcs to walk to a certain place, stop, do something, walk somewhere else, etc.
ive been wanting to do this for a long time but i cant find information anywhere on npcs in ue3.
why not just do it via matinee? playing a given sequence should be way easier to do, especially for someone with limited scripting knowledge.
well, i dont know how to use matinee and i didnt know you could do it that way. i guess i need to learn about matinee now.... :P
matinee is used for moving elevators in ut, i guess you'll be able to move anything with it :)
i cant figure out how to get something to play an animation. i can view the existing ut3 animations in the viewer but i dont know how to get them to play on a static mesh or whatever using matinee or kismet or anything.
for example: i want just a plain ut3 human model to stand there and play a looped idle animation. the model and the animation is built into ut3 and i can view them in the editor but i dont know how to get the animation to work. ive messed around with matinee and can do things like lights, doors, and elevators, but i dont know anything about animation and i cant find any docs or tutorials on it.
ok... i figured out how to get it to animate finally. for anyone who'd like to know, do this:
1. select and place a human SkeletalMesh in the map. I used CH_AnimHuman.Mesh.ImportMesh_Human_Male
2. go to Properties-> SkeletalMeshActor-> SkeletalMeshComponent-> SkeletalMeshComponent-> add a new AnimSet in the array and set it to CH_AnimHuman.Anims.K_AnimHuman_BaseMale or any other animset you want.
3. then go to Properties-> SkeletalMeshActor-> SkeletalMeshComponent-> SkeletalMeshComponent-> Animations-> AnimNodeSequence-> and set the AnimSeqName to CC_Human_Male_Idle or any other sequence from the animset you selected. then, make sure you check bPlaying. if youre going to use the idle sequence you could check bLooping, but that's really just for whatever you need.
you may also want to set some sort of physics attributes so you cant walk through the guy. you'll also need dynamic lights if you want your guy to be lit properly.
i hope this helps anyone who was wondering how to do this.
how do you make the character move around? like i can make the animation of him running, but he doesn't go anywhere
ditto dude, i can't find out how to make animations in game cinematics
Thnx for the tutorial Polyphobia! I made a material exactly how you did it although the results are not the same. Is it possible to show me all the textures that you used so I can fully understand them?
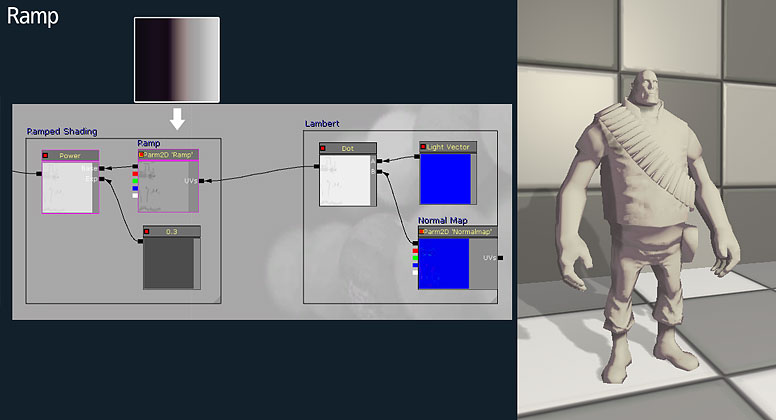
When i insert the Ramp texture I get wierd blocks in the material editor??
Example: Nani-yo.com
I just went through this... had some of the same problems listed here. First, the weird blocky shadow is probably just in viewer... try building a room with a couple of lights, be sure to turn composite shadows on when you put your model in the room. That's what fixed it for me.
I also had a problem with the shadows looking like I had 2 textures on top of each other... sort of rectangular light and dark shadows phasing in and out of each other which the composite shadows fixed.
I still get some harsh black shadows, but maybe I just need to tweek the numbers a bit, I dunno.
Anyone here get those pitch black shadows? is it just the way this shader works or can i do something to lessen that straight light to black shadow?
For everyone who has this problem with recent UDK builds -- It seems like they've introduced a rendering bug with the blend mode "opaque" for custom lighting.. Use the blend mode "SoftMasked" and it will be fine.
~B
Sidenote - Make sure you CLAMP the gradient texture in texture properties, otherwise, you will get weird results.
Hey guys, I have been at this for a while now... but I am still getting really dark shadows, as if my half lambert isn't working right. Any suggestions?
One more question, what do you have in the "Parm 2D Exponent"... I made an image up to resemble what you have there, but I still don't know what exactly is supposed to be there.
Thanks.
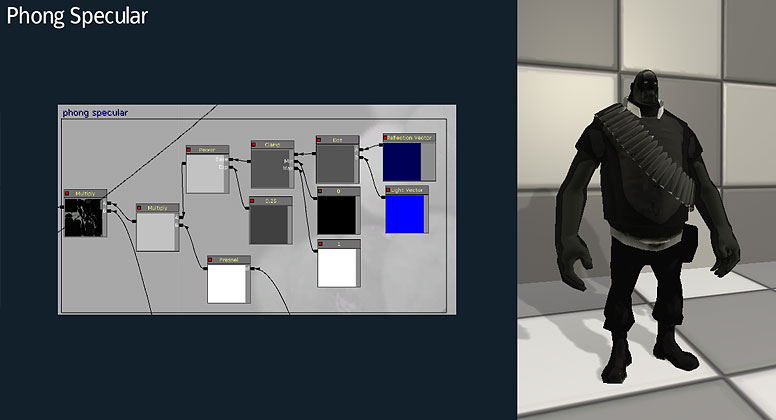
it's a mask for the specular, black is no specular, white is a lot of spec
This is brilliant. Great article.