My Blogs
Hello everyone!
In this tutorial, you will hopefully gain knowledge of how to work with static meshes for BF2Engine, namely its uv texturing system, interesting tips, and some procedures to help you create them!
I trust, that you have at least some knowledge in the department of modeling, so what I will focus on here is uv texturing, lightmapping, lods, cols, proper exporting, and coding .staticmeshes in BF2Editor. There is a plentiful amount of tutorials of creating statics on the internet, so I will just cover what is not out there. Let's start, shall we?
In the Forgotten Hope 2 development team, we use 3ds Max 9 & the Poe Export tools to create our 3d models and exporting respectively, some of you may know that already.
Unfortunately, newer versions of 3ds Max do not work properly when we export them, so we have to make do. Also, getting the 3ds Max 9 "service pack 2" is a necessary patch, it is not required, but essential in the long run.
Another software that is highly recommended is "BfMeshview", this allows us to view our exported models with ease. You can view your meshes, generate samples/lightmaps, but more on that later.
Moving on here, we will examine the various types of tasks involving static meshes down below.
Uv Texturing
In static objects/meshes, we mostly work with re-usable textures, meaning that we can have a plentiful amount of textures in just one file. For an example, we have a single texture that has four brick ones stacked vertically, meaning we can have one single file to use for various uses. One thing to note, we use textures in the power of two - 256x512, 512x512, 1024x512px etc. We avoid using something like 1053x985 for instance, so using proper sizes is crucial here.
Texturing our static objects to make it work properly, we need to set up the correct materials. To do this, we press "M" on the keyboard in 3ds Max 9 and select one of the unused slots. By default, your material should have "Standard" setting on the right. Click on that and there should be a variety buttons in that panel, but what we want specifically is "Bf2StaticMesh 2". Like this:
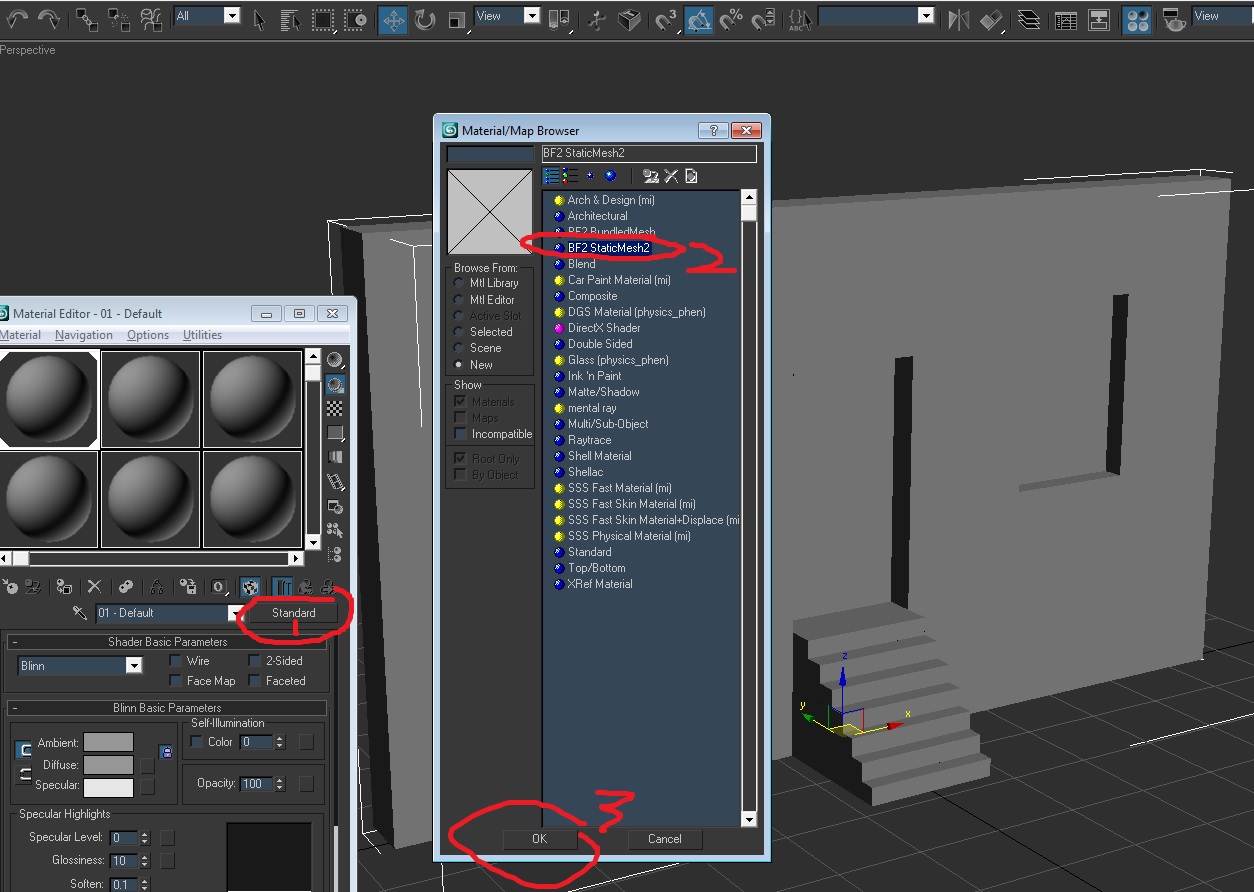
If this material does not appear, make sure you installed Poe Tools export plugin correctly, but just ask if you have any trouble. We then rename this material to whatever you like, such as "brick", "roof", "wood", but it does not matter, just so you know to keep organized.
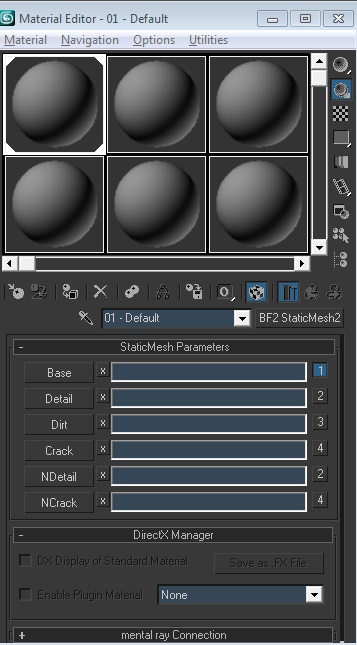
As we see, there are four different texture slots with two additional normal/bump maps:
What do these mean? Let us go into a bit more depth:
Base (_c)
This is basically a color overlay, it modifies your existing detail map's color appearance.
Detail (_de)
The detail slot is going to be your main "background" shall we say. It is going to be your solid foundation of the four textures, the others will overlay on this.
Dirt (_di)
This layer makes the detail come to life and reduces some of the tiling. This is great for walls or roofs, but it can be used pretty much anywhere. This gives each individual object character!
Crack (_cr)
This layer provides "decals" and will hide some tiling and possible seams in your detail layer. For an example, the crack layer is great for adding "broken" parts around a blasted hole in a house, this is essential because it will make things more believable and much more spicy. The opacity in the alpha channel is how this works.
Normal/bump (_deb)
The normal/bump layer is for your detail and crack layer. Normal/bump maps make these layers more realistic as in providing "fake lighting" or shadows without using more polygons. Think of brick, the normal/bump map creates shadows or extra details onto the surface, making it an appearance as if the bricks are separating from the middle mortar.
As you see on the right of these layer slots, there are buttons with numbers labeled on them. What are they? They are channels for operating the four fundamental textures and viewing each layer.
This is where BfMeshview is really nice, because when you export it, you can see all the layers blend on top of each other. In 3ds Max 9, you just see the layers individually with no alpha blend on them.
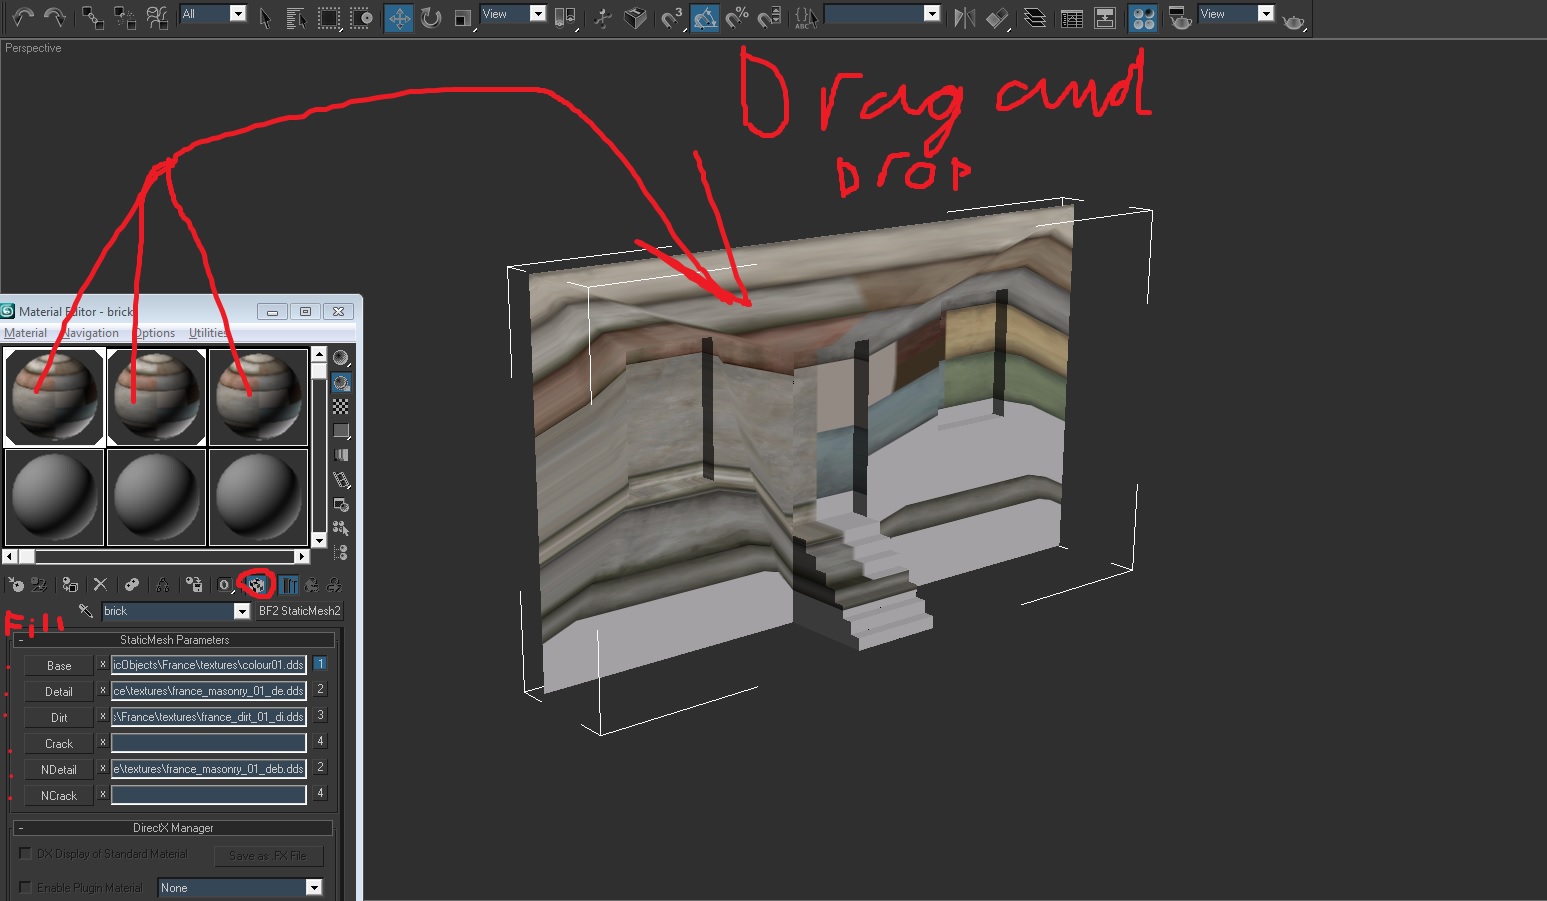
To operate it, drag the material onto your polygon surface (also click "view in viewport"), by a default setting the button "1" (base) will appear: (note: you have to drag these materials on a specific polygon spot to make it work properly)
Once this is done, we begin texturing by the either "Uv mapping" or "Unwrap UVW" modifiers, I prefer the latter because it is easier to work with and quite frankly, much more stylish. Lastly, just make sure your object is in one object, if this is the case, just select your object and "attach" your various objects. Below, are some examples of accomplishing uv texturing:
Unwrap UVW
Pre-setup:
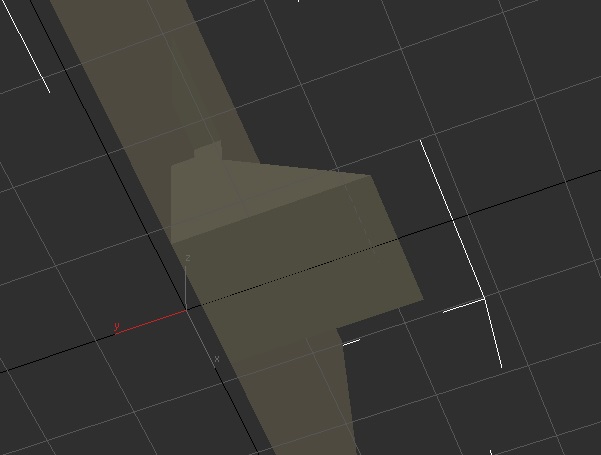
Once this modifier is added, we select the channel we want either 1 or 2 or 3 or 4, and hit the "Edit" button:
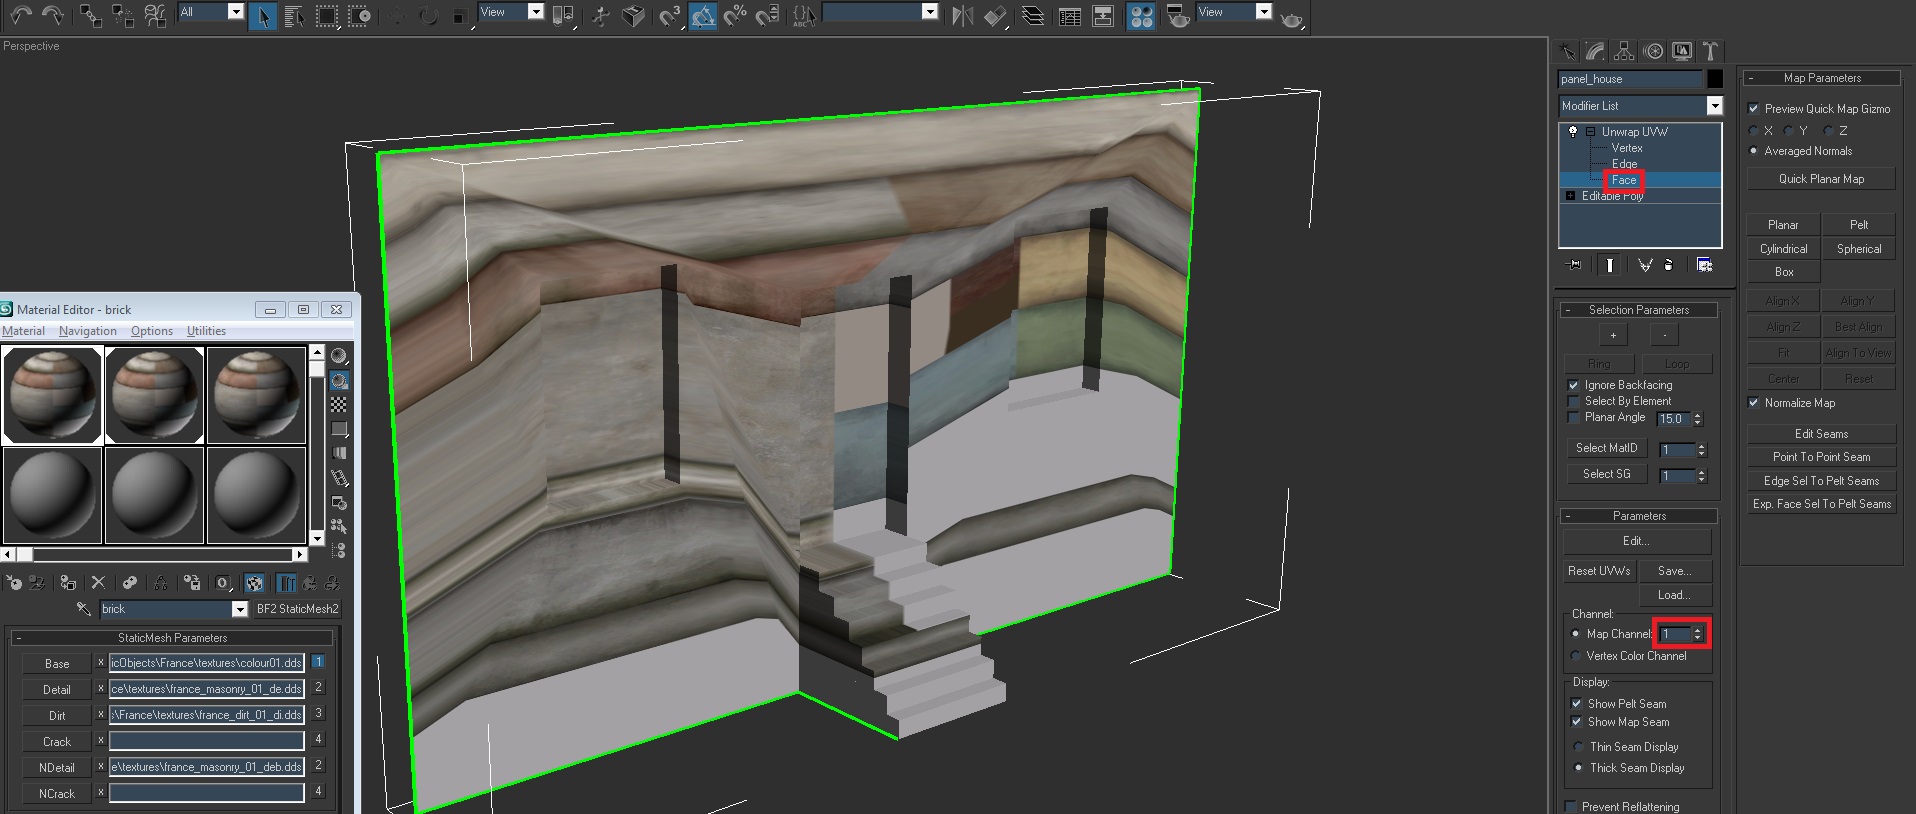
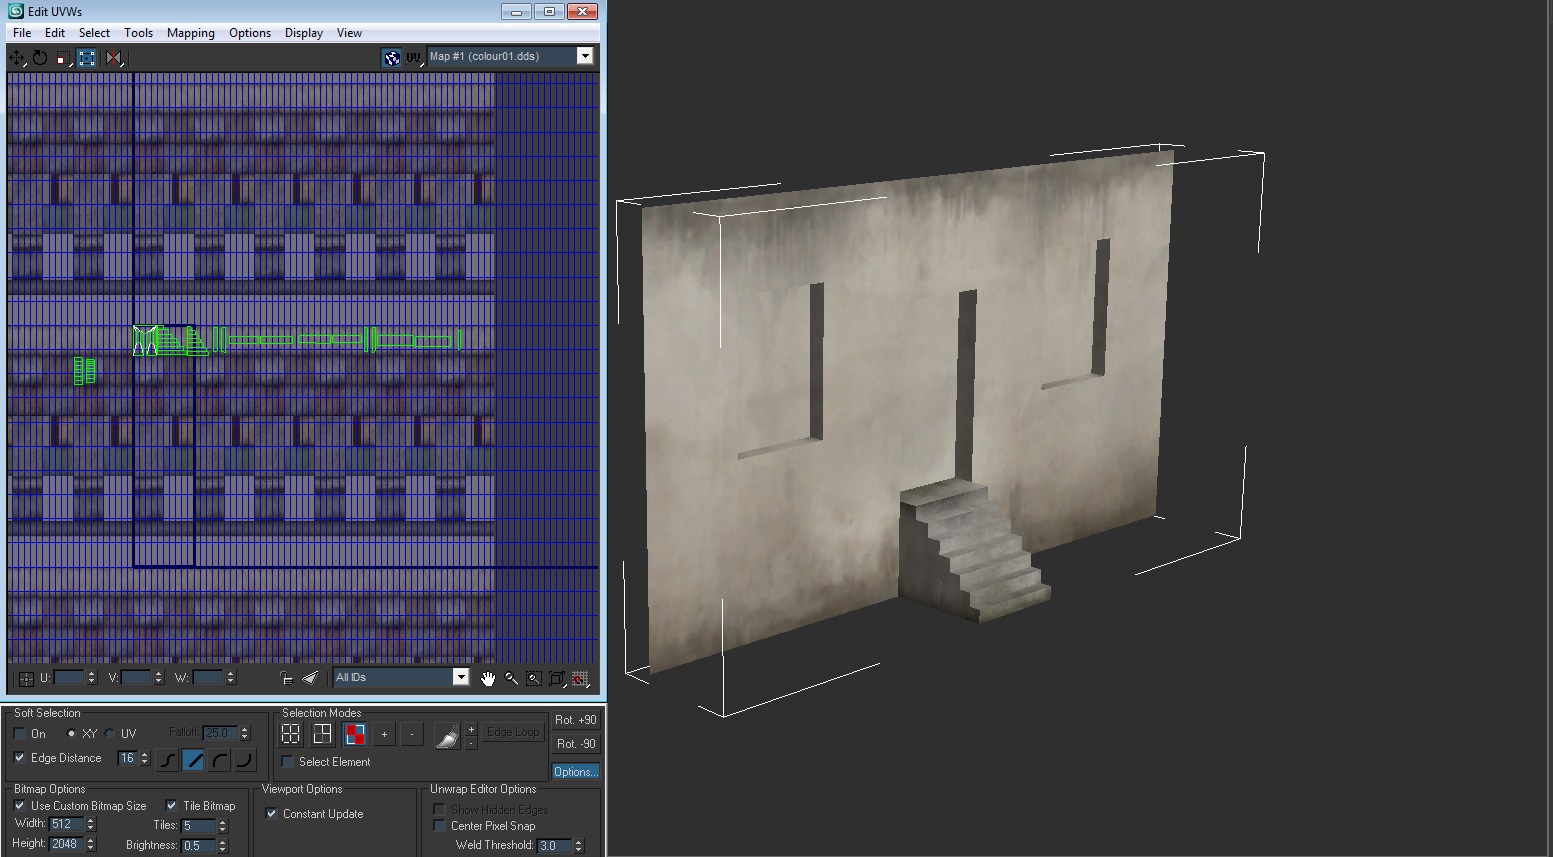
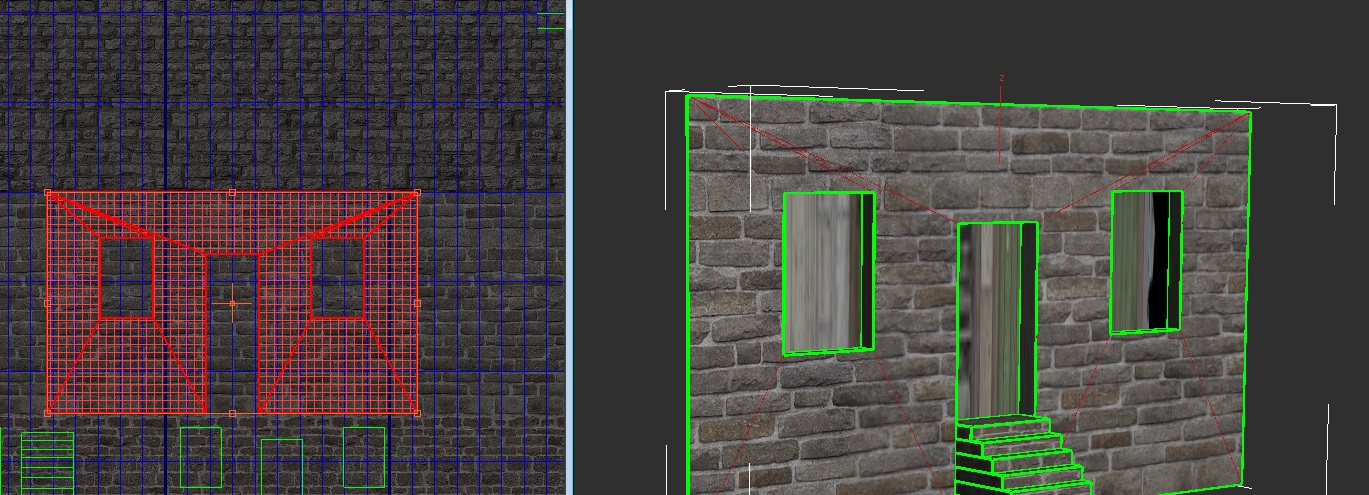
Here, I did a quick planar map on the y axis, on the front of it:
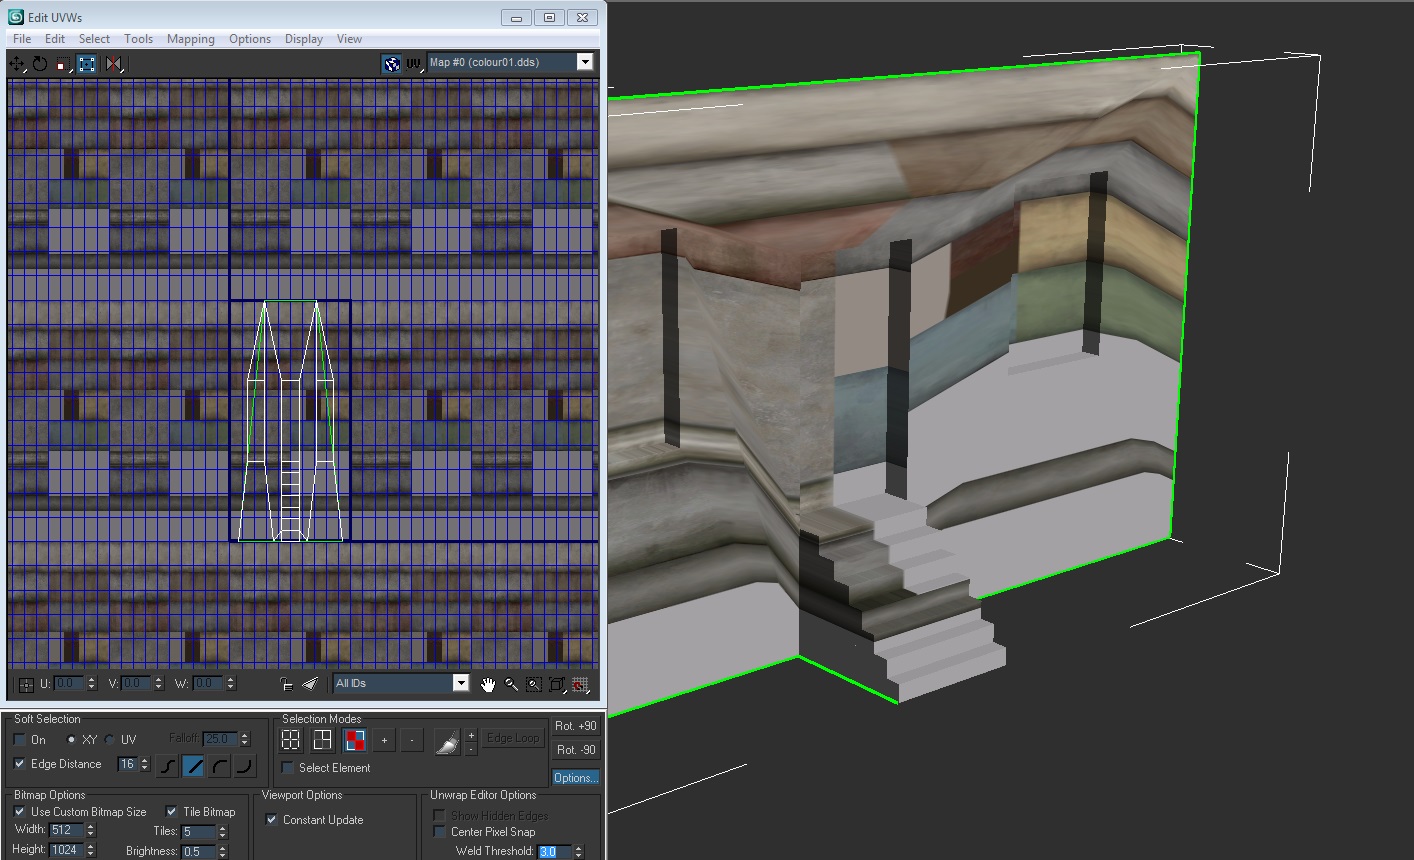
Now scaling it proper:

Done:
Now the "base" is all unwrapped, select all of the polygons, and copy it. Collapse your modifier and start again, we then paste these polys into the dirt channel (3):
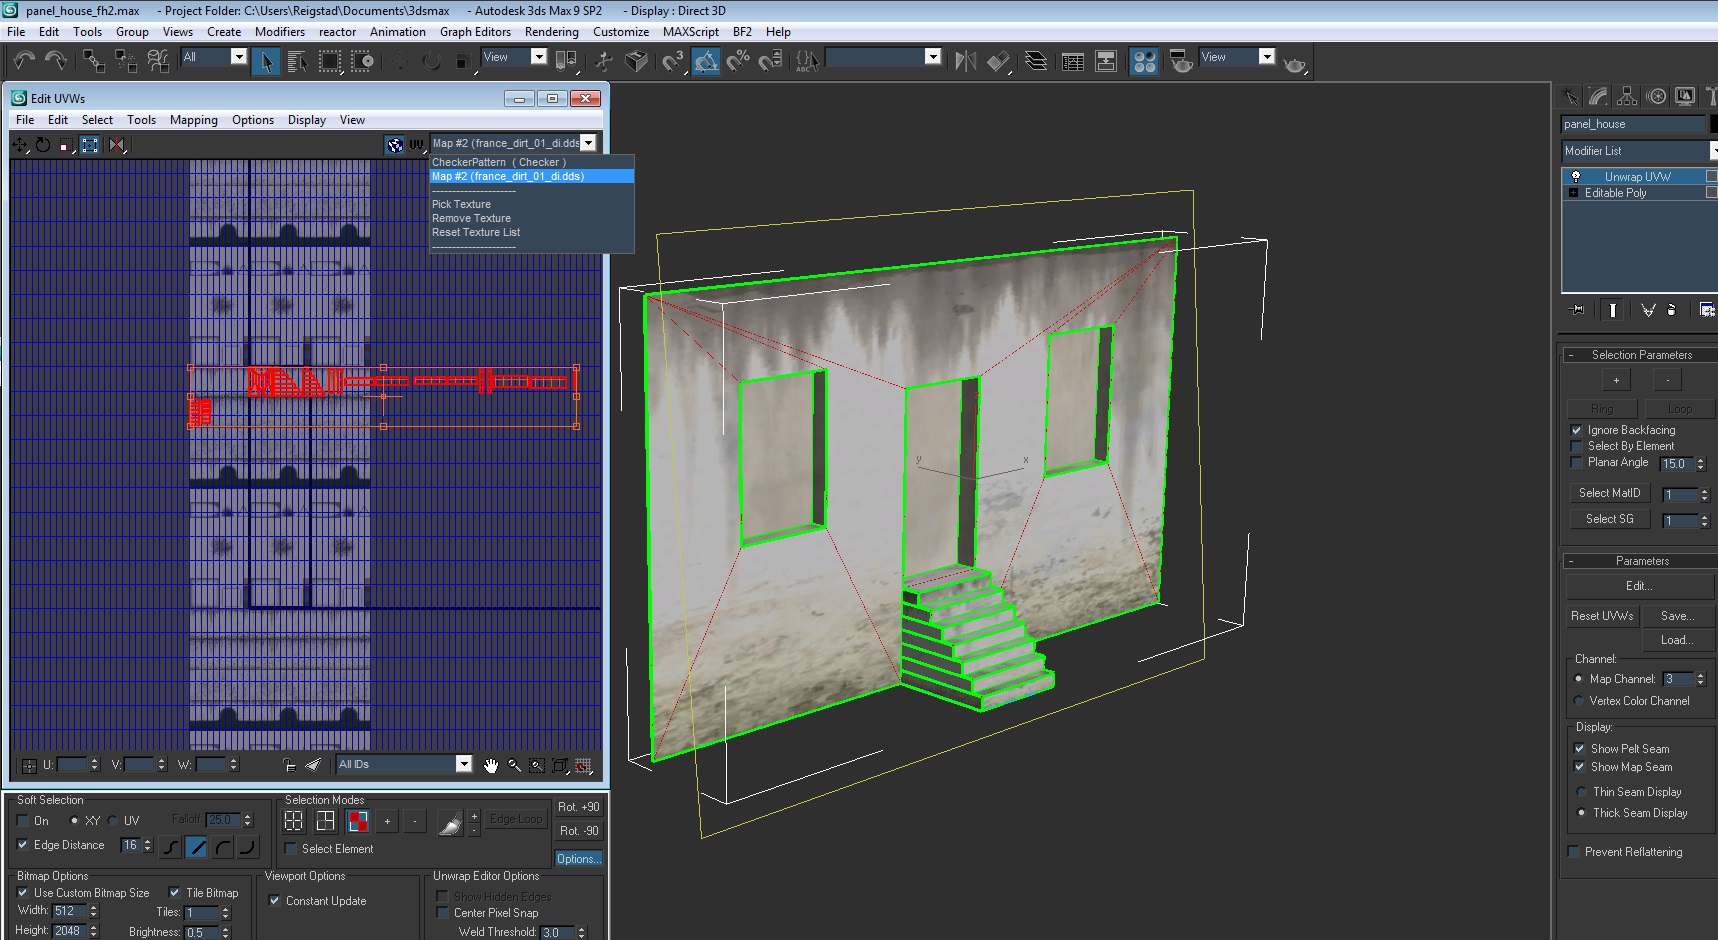
… and again, map them out properly:
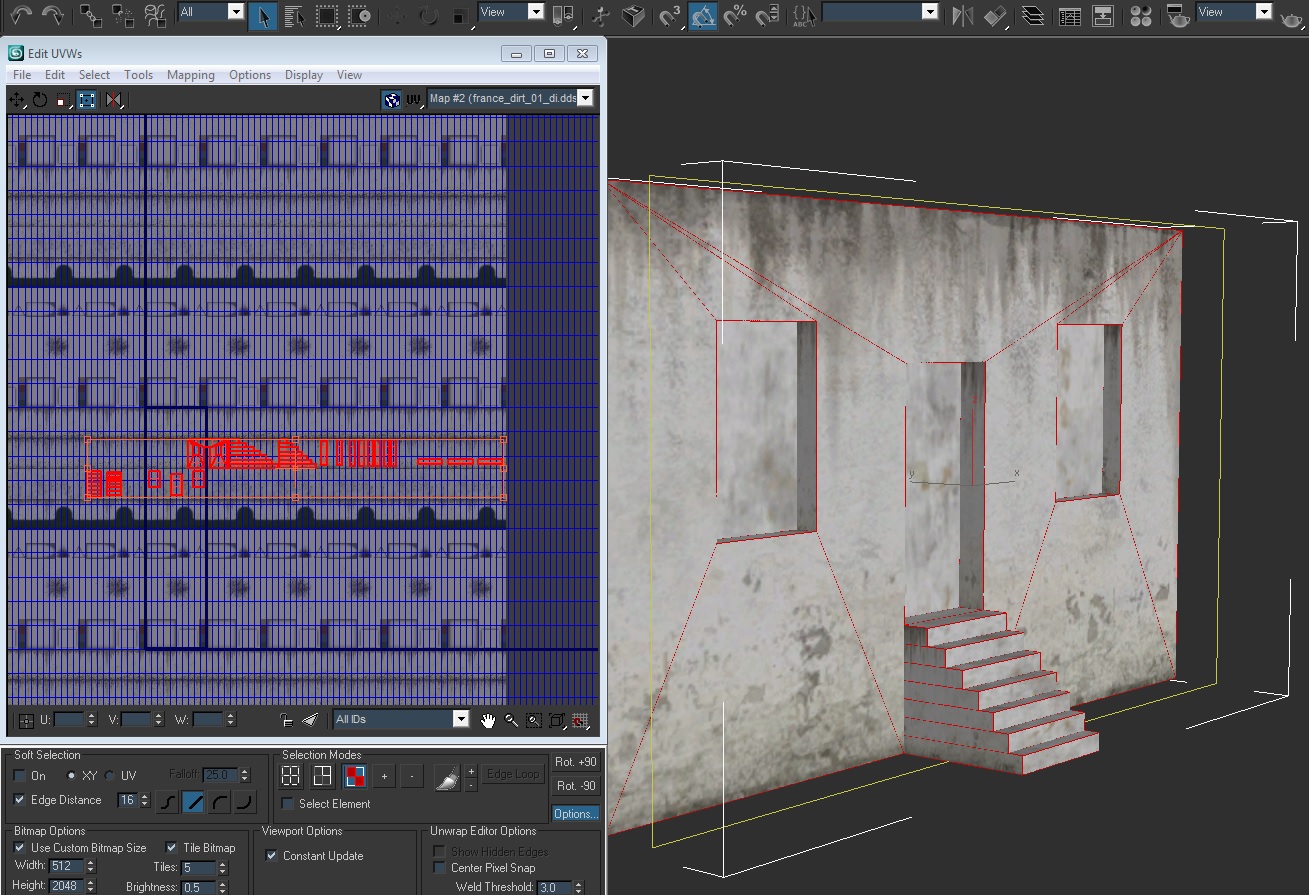
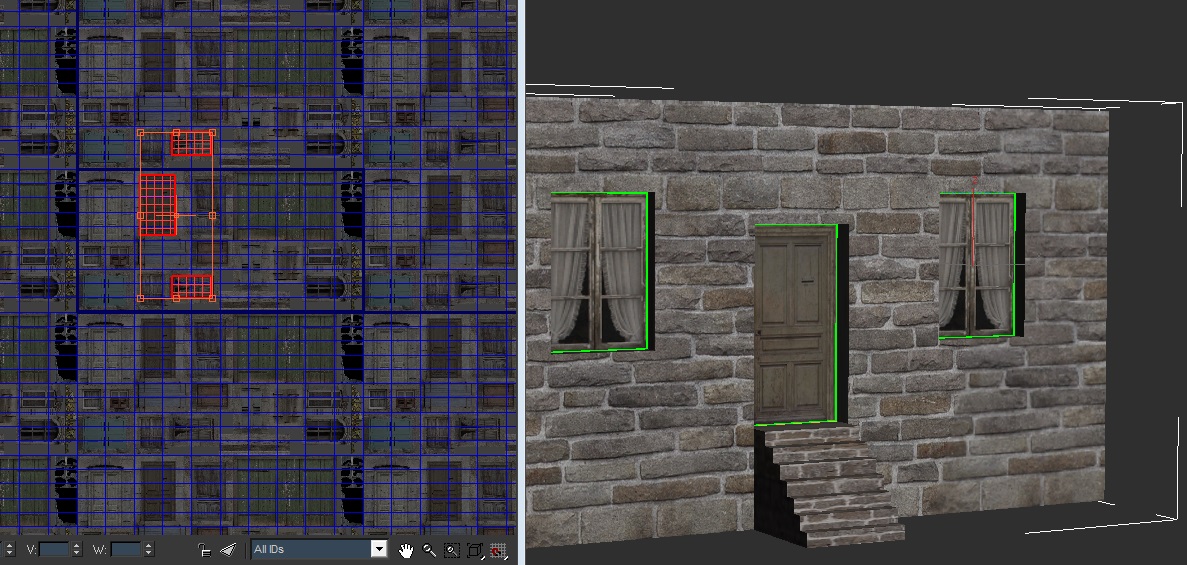
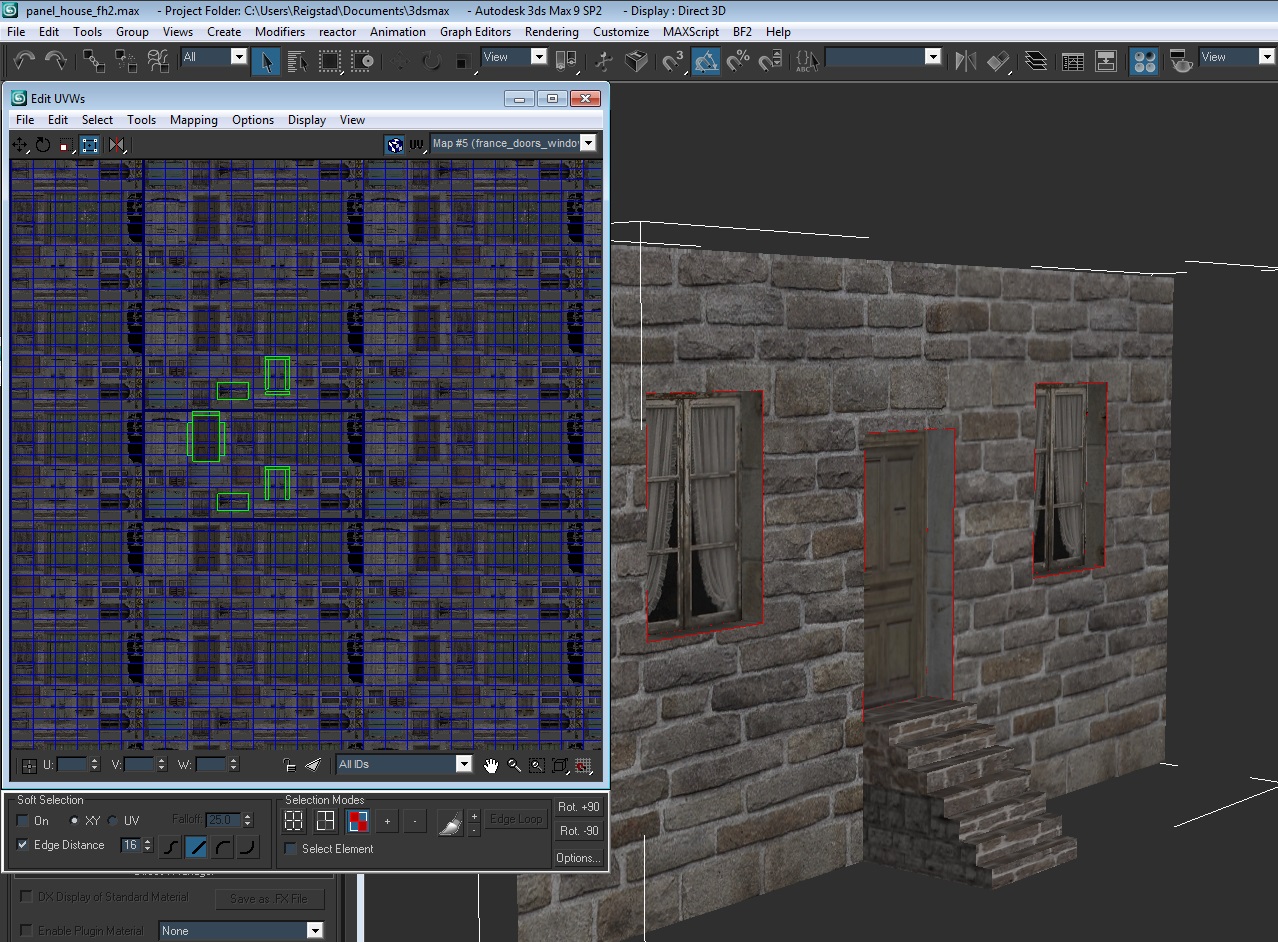
When we come to channel 2 (detail), we do this:
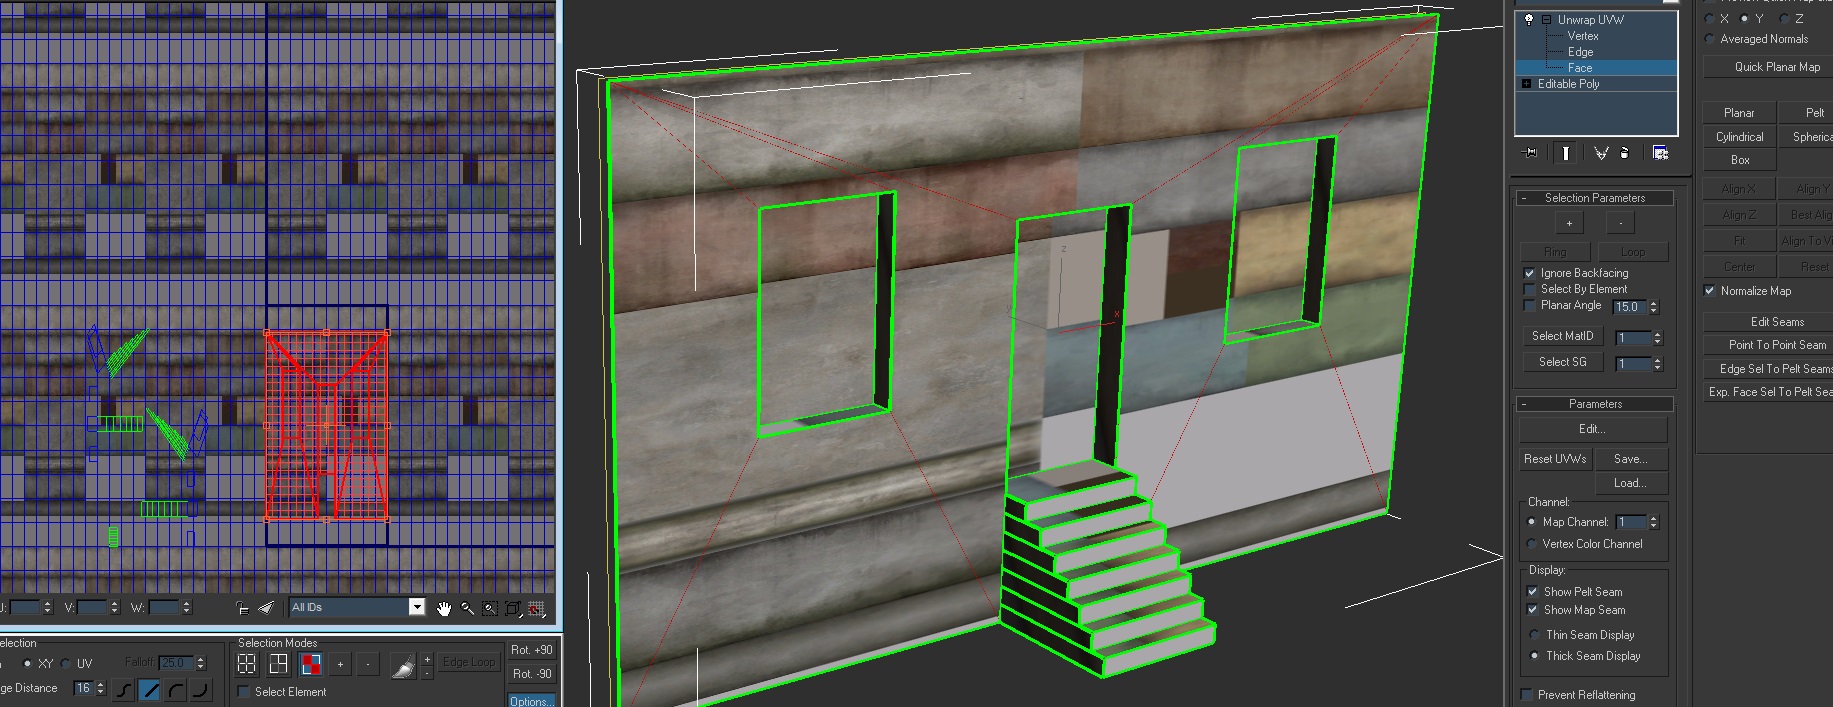
Collapse that, and start on the windows/doors:
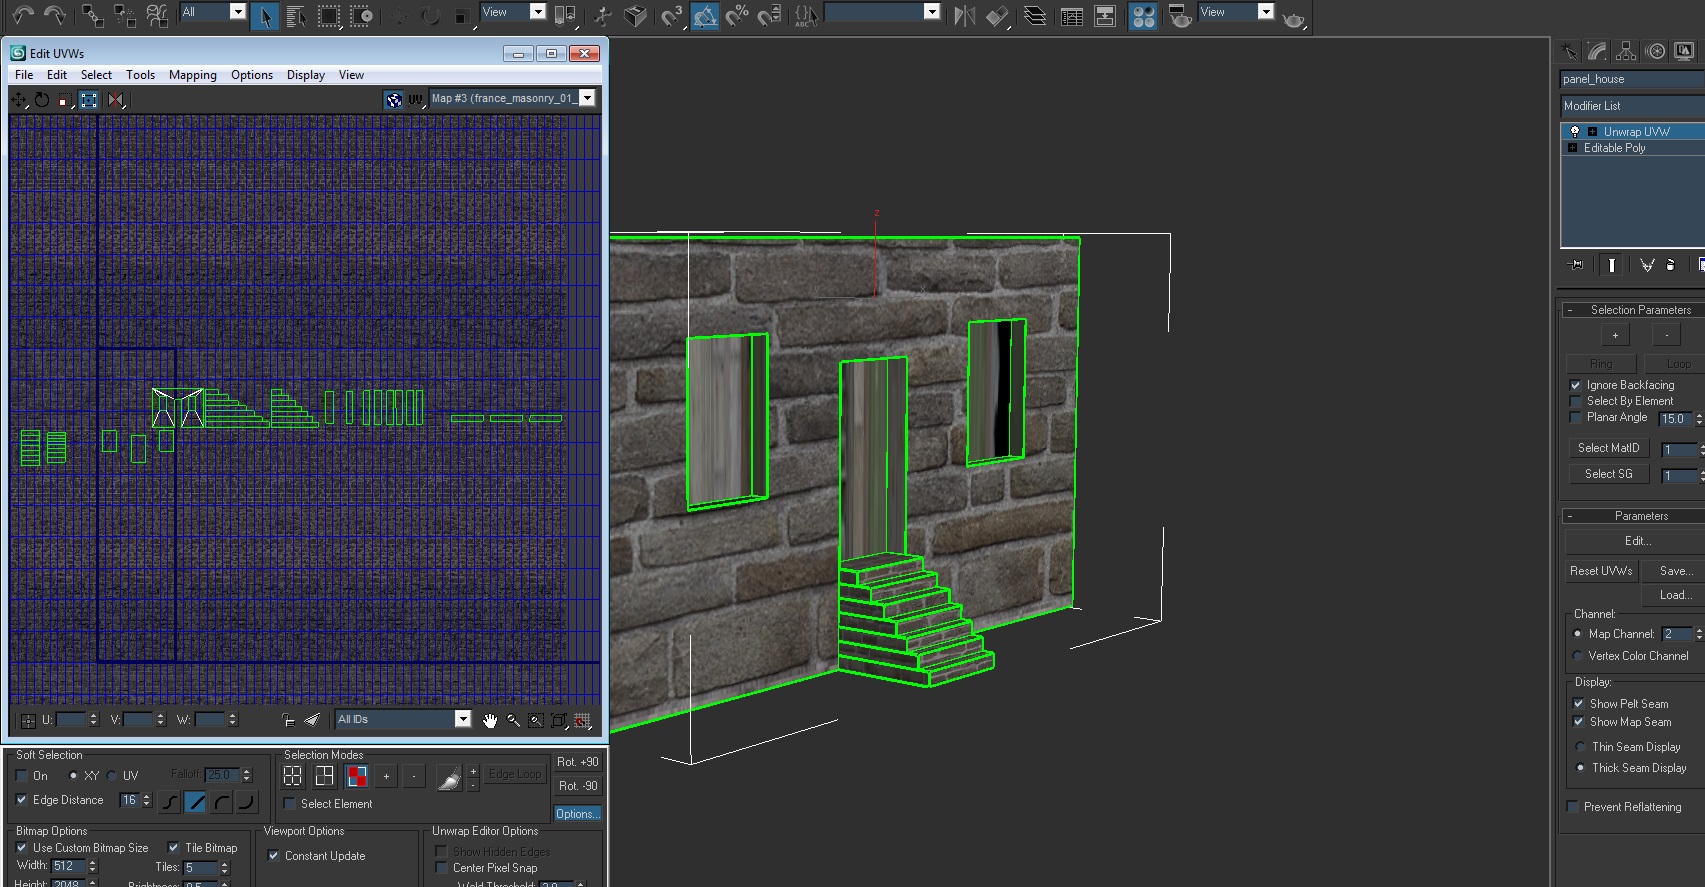
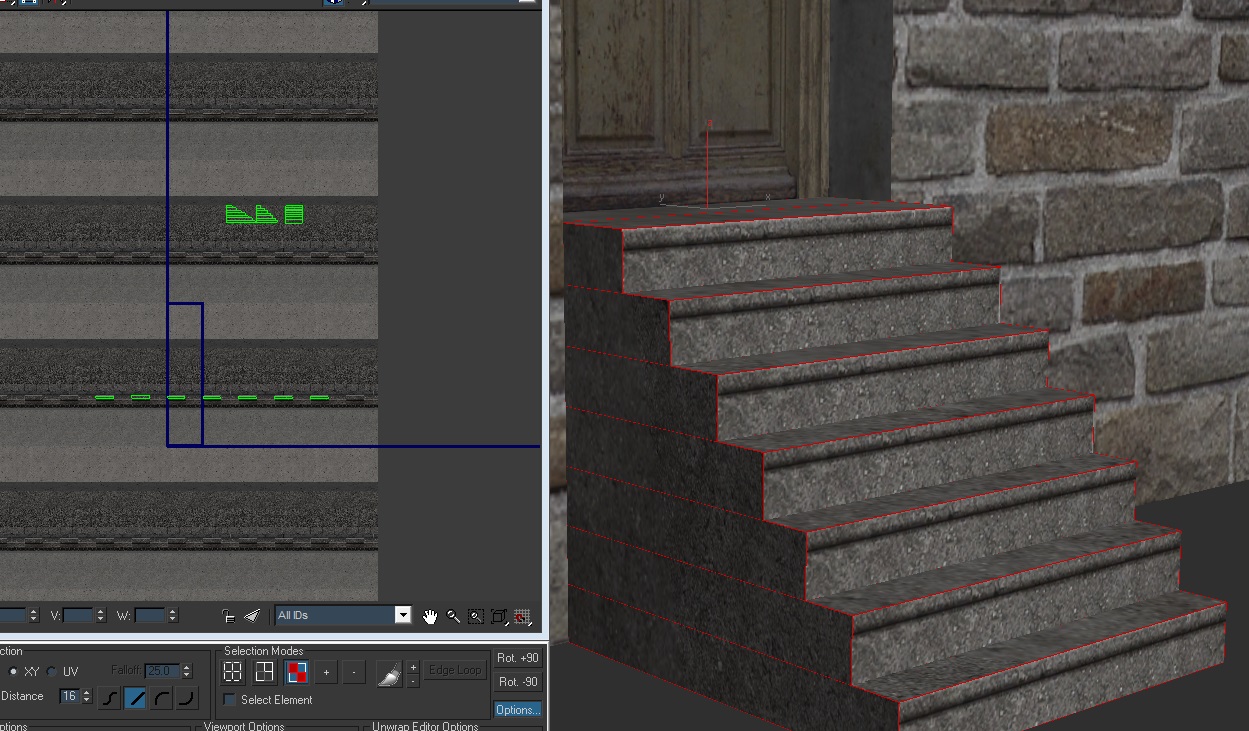
Collapse that modifier again, and start again by mapping out the stairs:
Lightmapping
This task is one of the most important in static meshes, it defines clean light being displaying onto your object or shadows being projected onto your surfaces.
The goal in lightmapping is nicely mapping out your polygons manually and trying to make it as clean as possible with no overlapped faces.
All of this is done in channel 5 of Unwrap UVW modifier. Lightmapping does take time, but it is a time worth spent because it will make the static overall better. Matter of fact, it will “make or break” your mesh.
Before you start, we have to be sure what kind of pixel map we going to use, a 32, 64, 128, 156, 256, 512, 1024px (notice the power of two) etc. A cottage house with no interior, it would look great in 256px. To do this, we have to make sure we have one or two more commas in 3ds Max 9, you can do this in the preferences\general\ tab.
Why do we need to do this? It is essential because our Unwrap UVW grid has to match up with our pixel size accordingly.
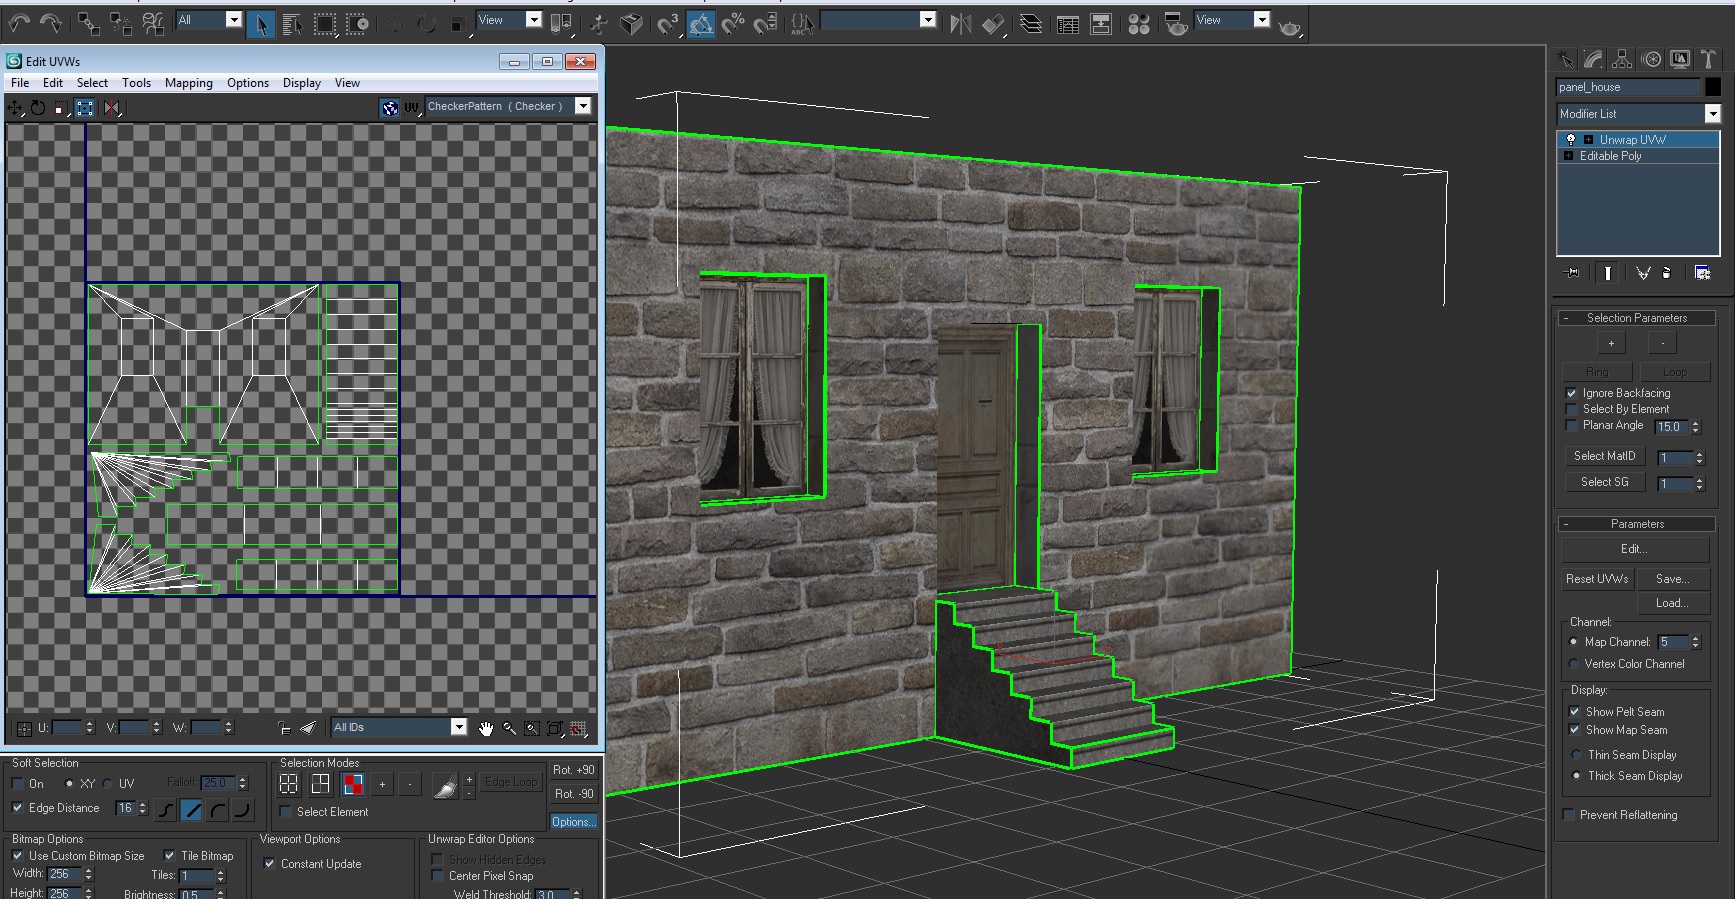
Also, as a general rule of thumb, we make sure our uv polygons have 1 pixel spacing on the perimeter of the box, and 3px spacing between the other uv chunks. As you see on our lightmap here:

Also, make sure our polygons do not have any overlap! You can check this by "select\select overlapped". If you notice these green seams, what are they? They are going to define where the light is going to be cut off and start from new - meaning that if you have a green seam moving across in the middle of a face, there is going to be a seam there my friend.
Indeed, it is a tough and time consuming process at first, but believe me, it will get much better once you keep practicing! When lightmapping is complete, check to see if there are no overlapped faces again, and collapse the modifier. Make sure to test these in BF2Editor (generate lightmaps etc.) to find any lightmap seams because the lod0 (most detailed) will be carried onto the other lods, hence making it only easier if you complete lod0 to its best.
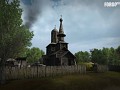
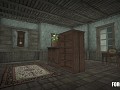
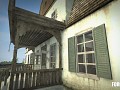
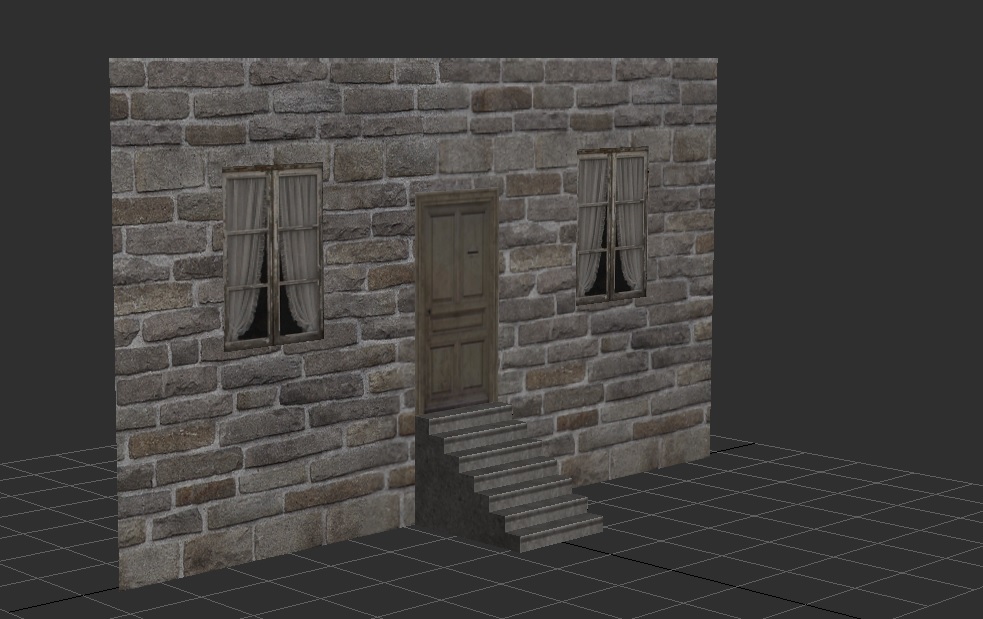
On our “panel_house”, its complete lightmap:
Collision meshes (cols)
Collision meshes are sub-objects designed for decals when you fire at it, its sound, and prevents you from moving through it. Let's examine them!
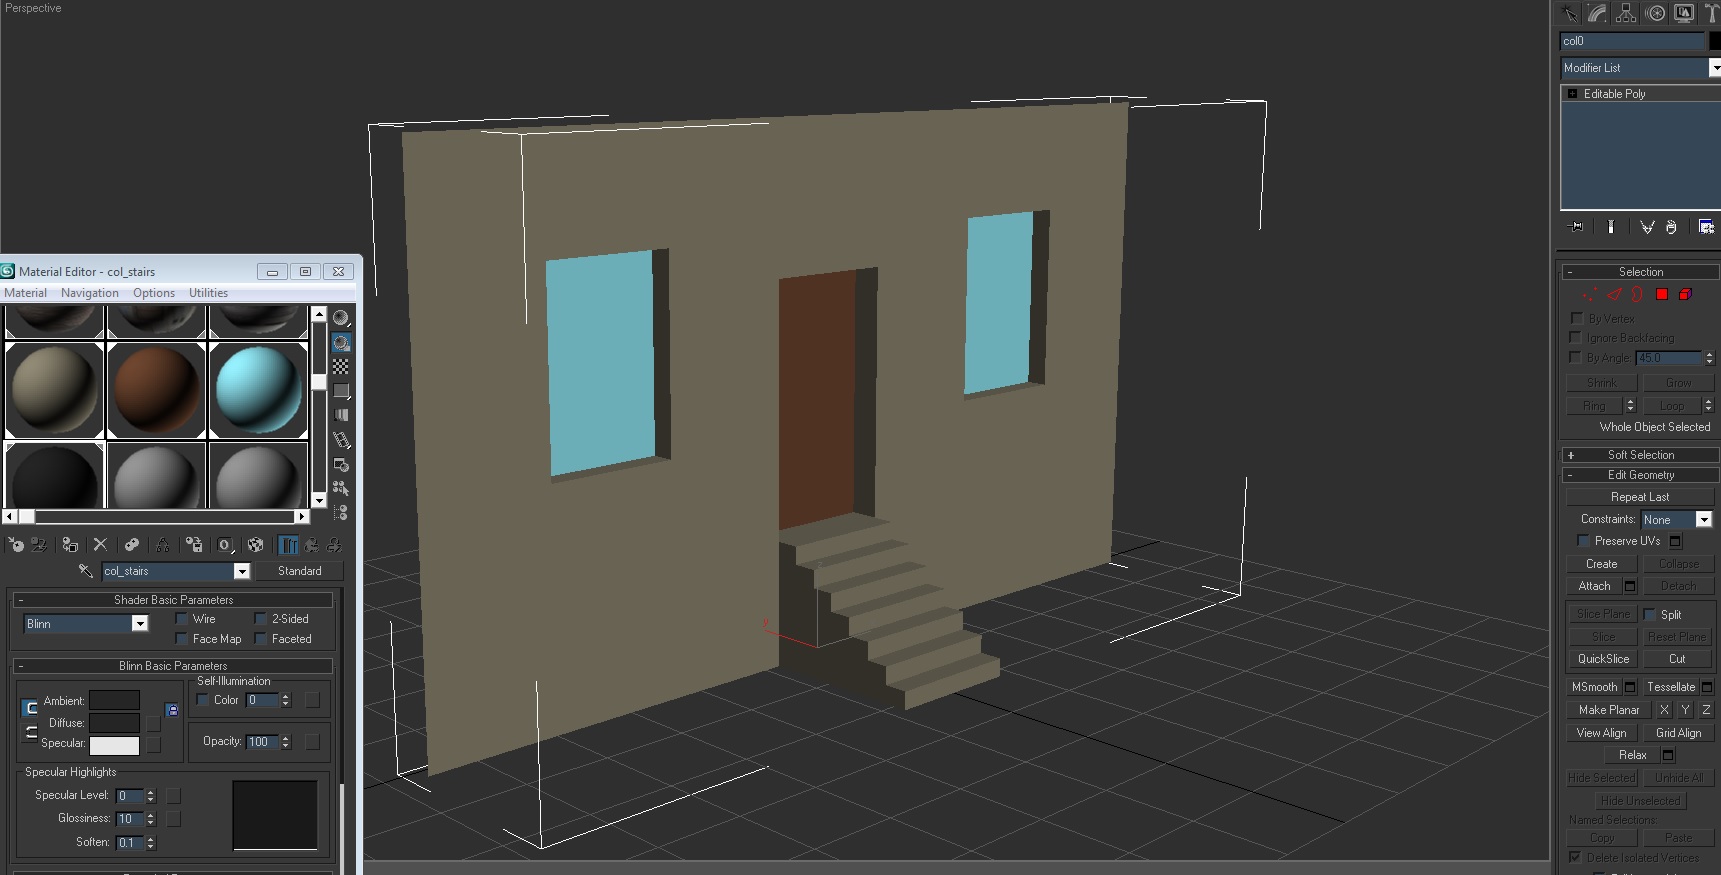
Col0 (projectiles/decals and sound)
The col0 is for decals/projectile, should be used as an exact copy of the lod0, except clean up the static in terms of unneeded edges/cuts and vertices added for textures.
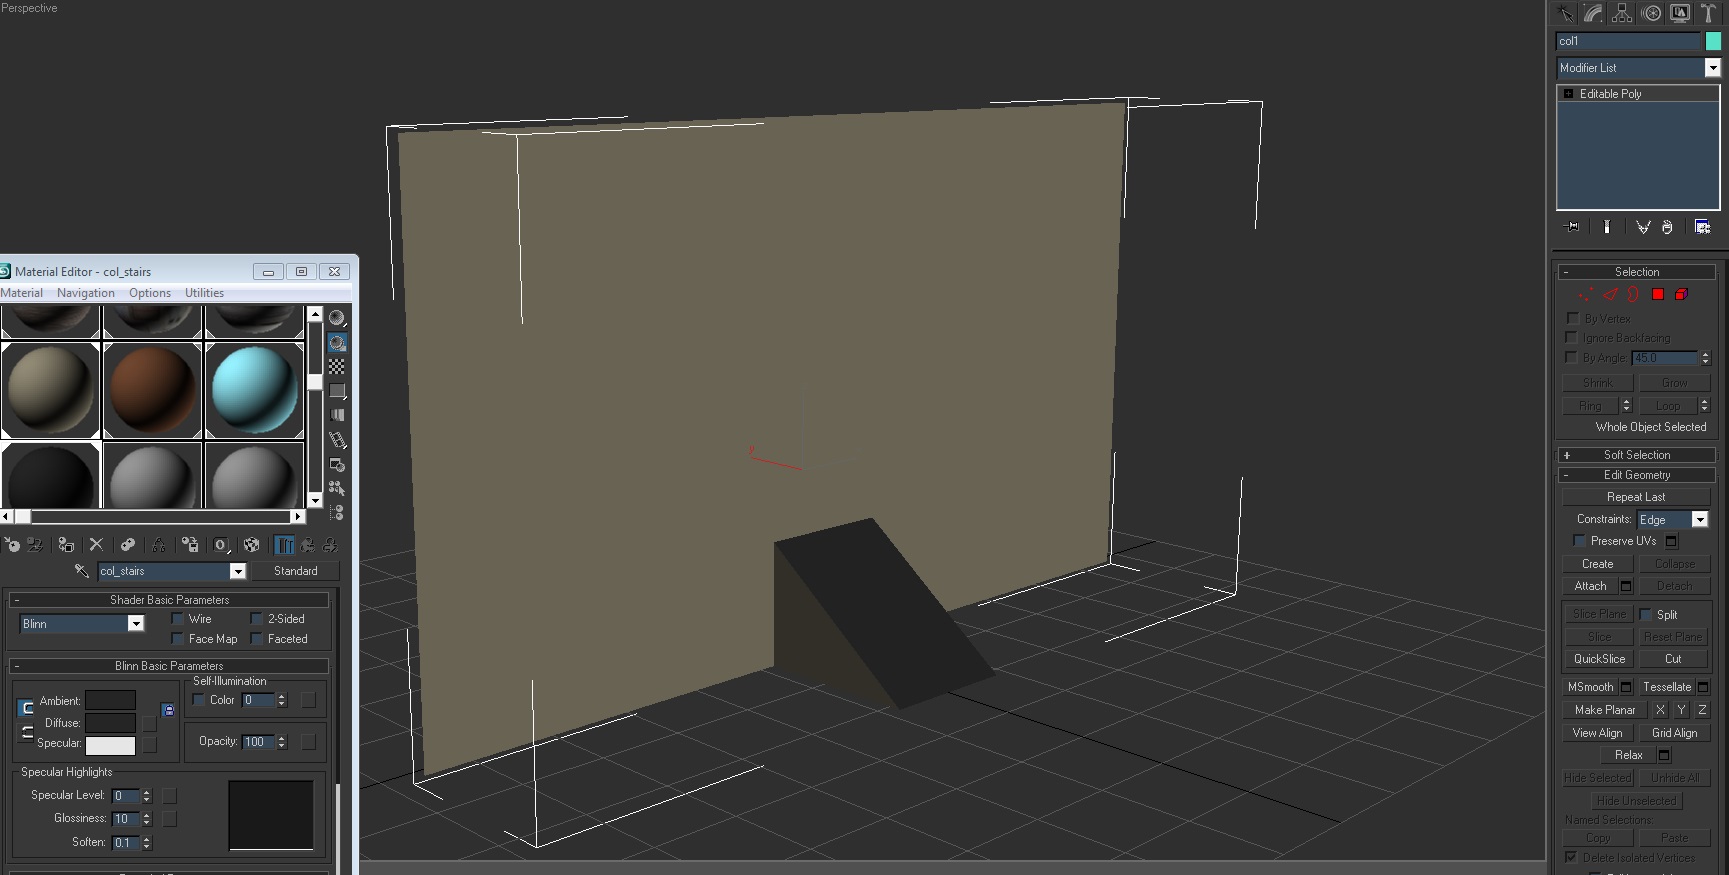
Col1 (vehicle)
Col1 is vehicle prevention. Like FH2-Dev Toddel said, “vehicles will never enter houses or planes would not care if they hit a detailed cylinder with many polys”. This mesh is the less detailed of the bunch, modeling with boxes are very useful, but make it in a way that it is clean and proper.
Col2 (soldier/players)
The col2 is what soldiers move on or prevent movement (i.e. from walking on floors, prevents moving through walls, moving up the stairs etc.). For steps or stairs, they require special “stairs_” material (there is a few, just select the one that fit’s the footstep sound accordingly – wood, metal etc. in BF2Editor, more on this later). This nice material adds a feature which allows you to climb higher slopes or such easier.
Also, things such as: if some windows are small - just close them to save polygons, if you have rubble stuff on your ground floor just remove these – keeping player movement nice and easy with no sticking, and some other stuff such as removing unneeded polys.
Col3 (ai/bot)
Col3 is the ai/bot mesh, it helps them navigate better. Some tips: it needs to be one piece or element, from extruded faces mainly. When you create it, keep in mind that bots do not climb ladders and never dance for joy on roofs of a house – delete unneeded polygons beyond them, do not totally delete the roof, just make it very simple.
Some procedures/tips on cols:
Always name your collision meshes with col0, col1, col2, col3 in Max 9 accordingly, because when you clone, 3ds Max 9 will often name it automatically col02 or something.
Your col0 has to be cloned from your lod0 (Ctrl+v and with “copy” instead of “instance”!), except it has to have a Standard material named “col_wood” or whatever is needed & logical (i.e. it would not make much sense to put a metal material on a wood fence). These can be later coded in BF2Editor.
Just drag the slot onto your object (plus "view in viewport selected); to keep in mind, you could be ending up with more than one material - metal, paper, brick etc. As said before, if you have any stairs or steps, make sure the top of the slope is fitted with a “stair” material on col2!
When working with these you often have to select your object you want to work with and “right click\hide unselected” to get a better view of your objects with less clutter.
Pressing “h” on your keyboard will view your hierarchy set up, you might have to “right click\unhide all” to view the hidden objects.
Our collision meshes (“panel house”):
Col0
Col1
Col2

Col3
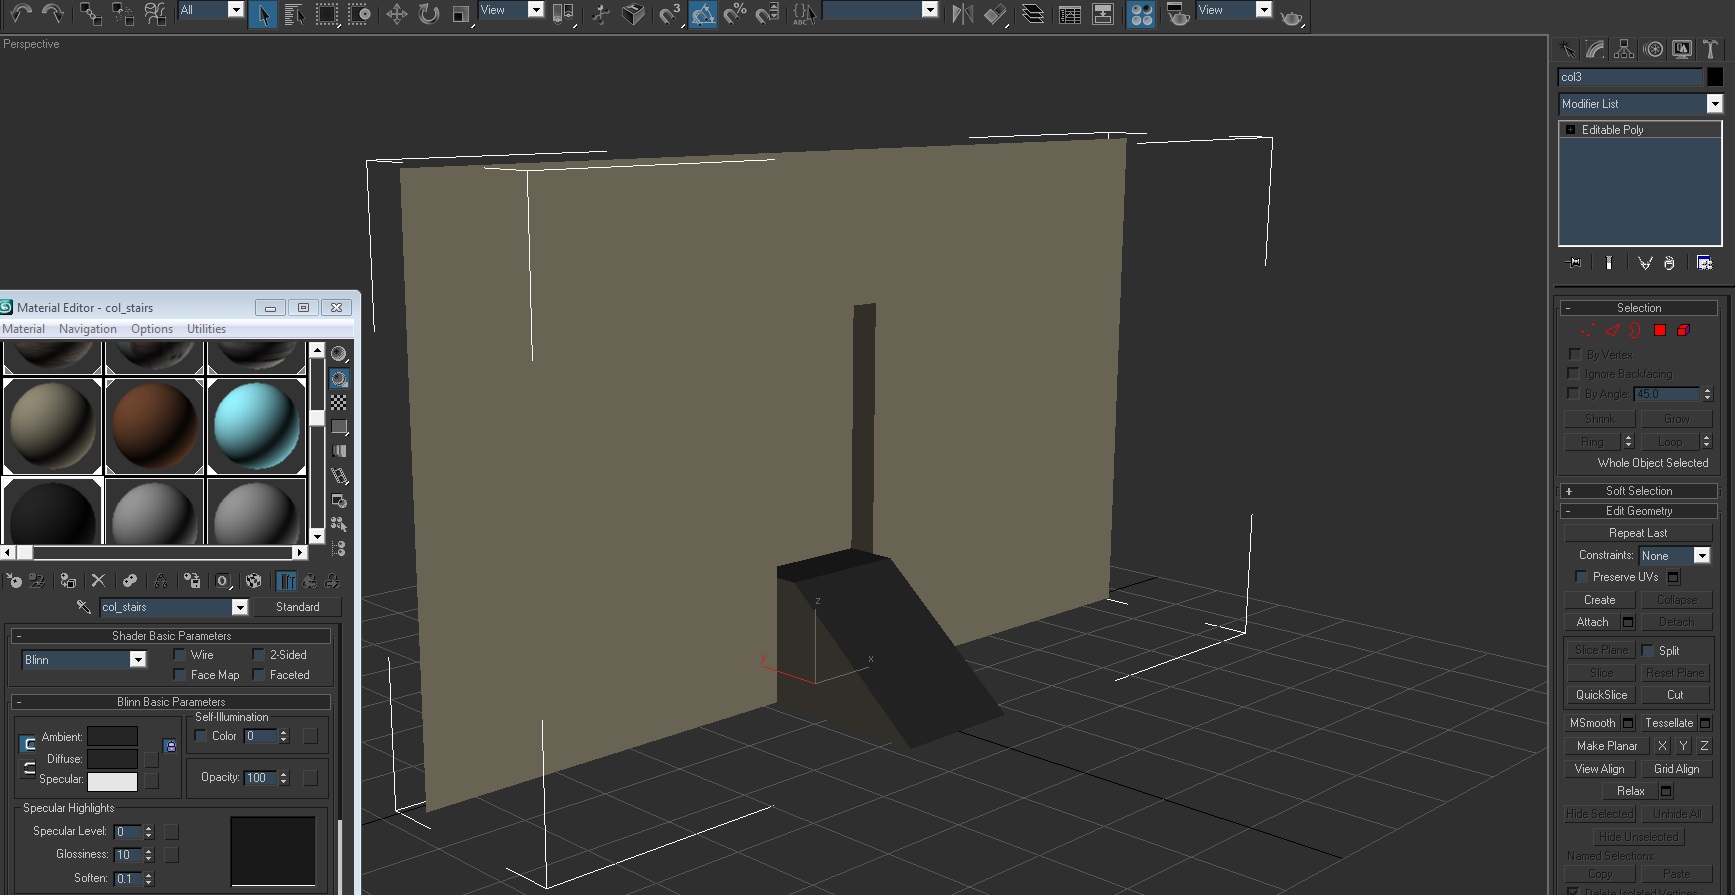
Also, please note that col3 should be closed!
Level of Distances (LODs)
Lods are what video games use to lessen the detail of your main object (lod0). To keep it short - as you move farther away from the object, it gets less detailed, and yet keeping performance on your PC nice. It would be performance heavy and a waist of polygons if you just had a lod0 on a complex mesh.
Like cols, lods are sub objects to the original mesh; we label them LOD1_objectname, LOD2_objectname etc. We usually do work with three lods, but sometimes even just one lod (lod0) is necessary – it only depends on what poly count you desire to lessen.
For some specifications on static meshes, FH2-Dev Toddel gave us some nice examples on lods:
Lod0 100% (% = number of your polygons)
Lod1 75%
Lod2 50%
Lod3 25%
Before you begin, make sure your lod0 is finished to its best – meaning regenerating lightmaps on it in BF2Editor, finding obnoxious errors to fix etc. Testing the lightmaps on lod0 is time consuming, but worth it, since you do not want to re- uv lightmap it again and again on all lods.
For making the lod1 just select your original mesh, clone it (ctrl+v and “copy” instead of “instance”, and rename it to “LOD1_objectname.” For this one, just weld some vertices that are rounded corners and delete small details.
Lod2 uses the same method as the previous lod (clone and copy instead of instance etc.); this one is even lesser detailed – more welding and deleting more noticeable details (inside chimneys, maybe even first floor ceilings), and simplifying roofs if you have them.
The lod3 is very low in poly count, if you have an enterable building, delete the inside and close it off cleanly. You can simplify the steps into angles like you have in your col2. If you have a log house or something, make those logs into boxes by deleting edges + verts.
The lod1 (notice how I moved the windows/door farther out and welded the vertices, to cut polys down).
Exporting
For the exporting, if it is your first time, we need to do some small pre-setup in 3ds Max 9. I said this before, but just make sure you have installed POE tools export plugin.
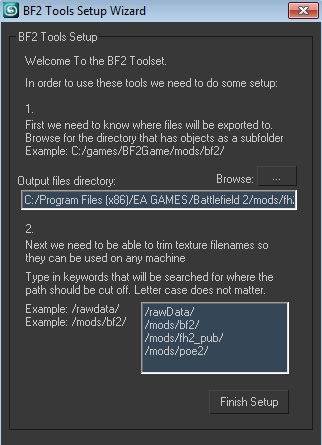
After installing it or if you did already, open up 3ds Max 9, go to BF2 --> Exporter --> Run Setup. When you get here, you have to enter an “output files directory” path – meaning that you would have to select your fh2 (or whatever mod you like) modding folder. Also, there is a text box containing some important lines for proper exporting.
The lines “/rawData/” and “/mods/bf2/” are very important, if you leave them out, who knows what would happen. Then, you would need to enter your folder name you mod out of. Some examples down below:
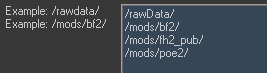
Your export should be good to go!
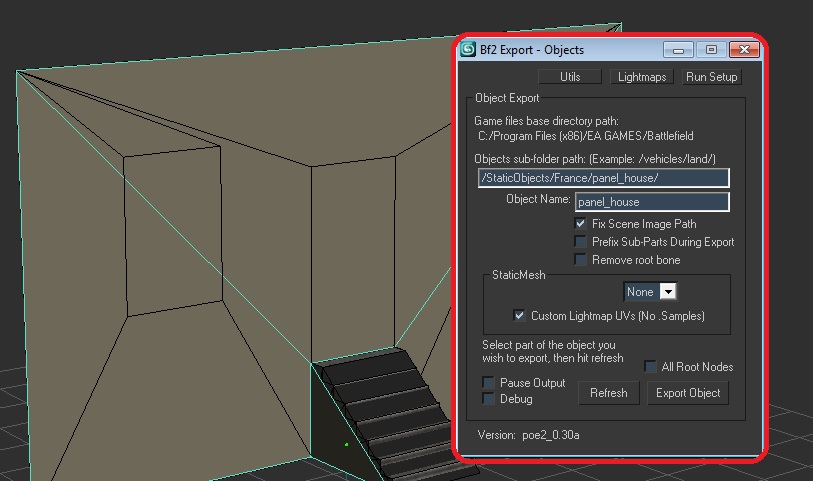
Now close that run setup window and you should have the Bf2 Export window back.
Your “Objects sub-folder path:” defines where your mesh will export to. Be careful with this, since you do not want objects randomly exporting and you have no clue where they go.
The next line “Object Name” will exactly as it says, your final name for it.
Also, there is a “StaticMesh” category right in the middle, telling you the lightmap properties of it. We usually select “none” (because we generate the sample/lightmaps in Bfmeshview), and if you completed your lightmap(s) in channel 5, tick “Custom Lightmap UVs”. Before we export our object, we need to do some additional steps to set it up:
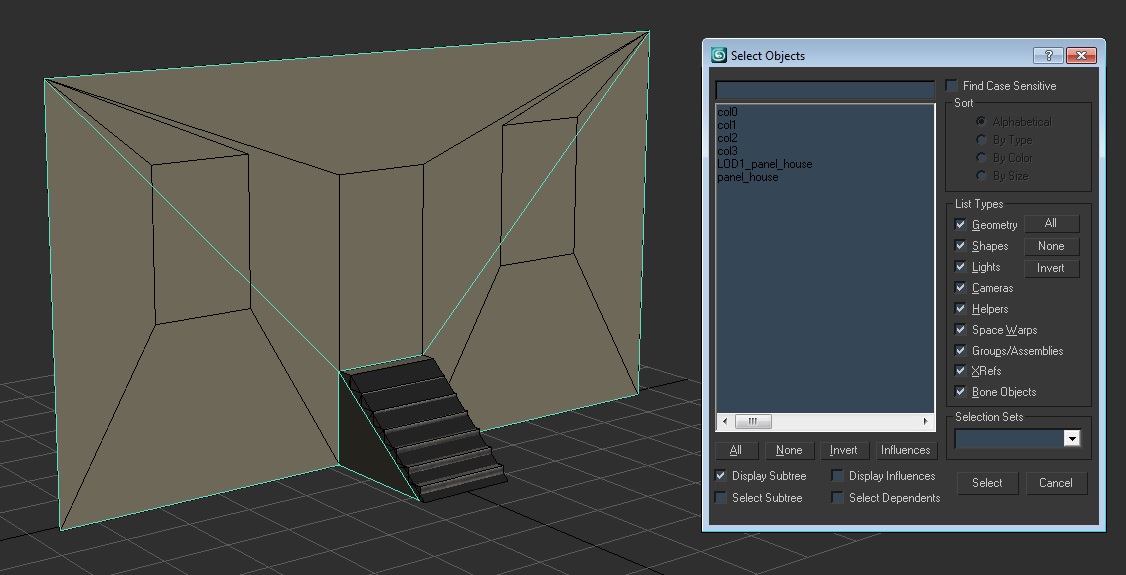
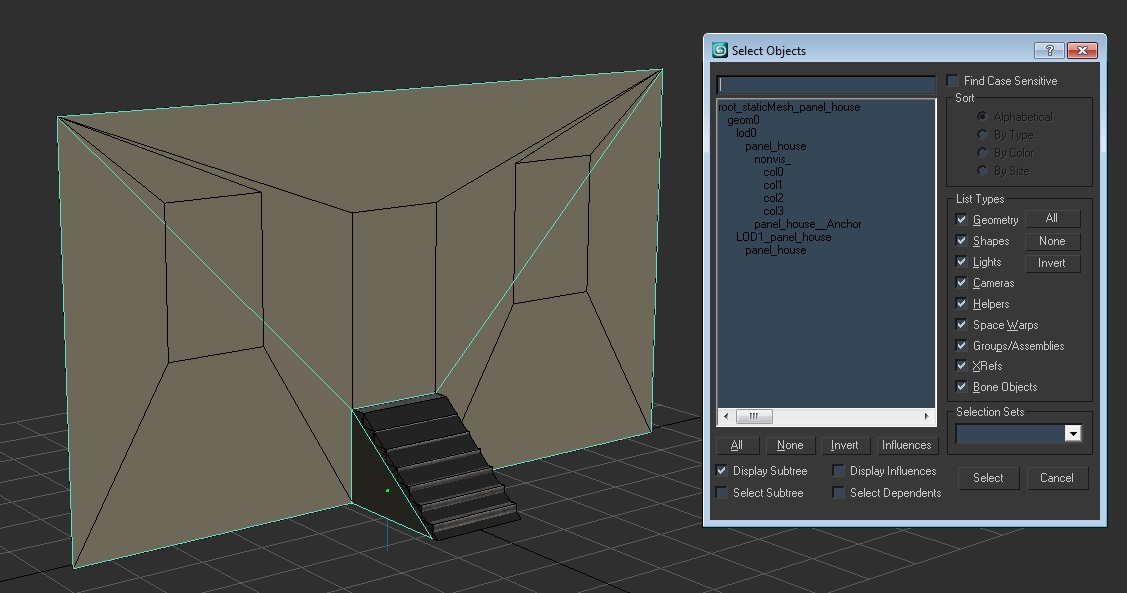
You need to review what is going on in the scene first and make sure you “unhide all” to see all of your object(s) in the scene by pressing “H”. Also, be sure again, your collision meshes are named something like “col0”, “col1” etc. and lods to LOD1_objectname etc. Like this:
Now this is where it gets fun, select all of the stuff in your scene, hit “BF2 --> Utilities --> StaticMesh”. Now your objects will be formatted to fit proper exporting. Also be sure that your object is fit with the proper dimensions or size, changing your units to meters or centimeters is what we work with or what BF2 Editor enjoys.
You should have something like this:
Last changes, rename lods to:
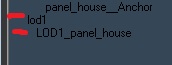
Now lastly go to your BF2 exporter panel and type in your desired output. If you have a custom lightmap, tick “custom lightmap UVs”, select “none”, and press “export object” in the drop selection like I said before:
When exported, your output folder should contain some files regarding of what you just made (i.e. .con, .staticmesh, .collisionmesh file etc.). You should have some files in here:

BfMeshview
Open up your .staticmesh file with BfMeshView, if it is your first time opening, you might have to configure your mod texture paths in it. To do this, hit “options/preferences”, click “add”, and select your same mod folder.
If this does not seem to work, restart it, and make sure the textures, samples, and .cons are check marked by clicking “options”.
Now select your exported .staticmesh again, select “tools\generate samples”, check to see if you will generate the correct lightmap resolution, and lastly generate it. To keep in mind, we usually half the resolution for each lod on down. These will be saved in the same folder. We lastly check everything that we did and begin opening up Bf2Editor!
Here is how it looks:
Coding
When we open up Bf2Editor, there should be a dialog of what mod you want to launch and pick your folder. This will take time loading all this, so be patient!
Assuming you loaded all the mod content and preparation stuff (might have to restart it again), go to “object editor”, find your mesh, and drag-drop it into the scene.
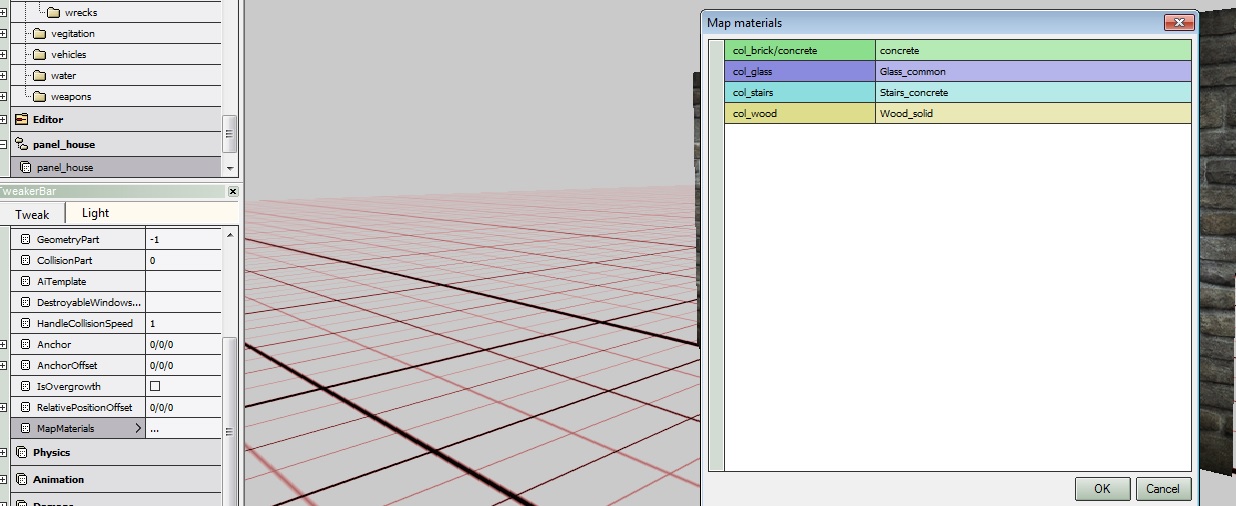
First off, let’s set up our materials. There should be a “tweaker bar” that defines what the object can or cannot do; right now select “MapMaterials” under Default tab and this is where our col0 (decal) comes into play. Right, setup the materials nicely, reload geometry, and save it.
Here is what I did on the “panel_house”:
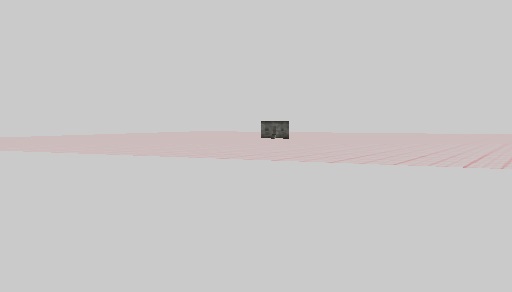
Next up comes our “CullRadiusScale”, this will determine when the object will stop showing or the max distance of showing. Keep in mind that you should let the static disappear at 650m - so trial and error is the thing here.
Before we start coding lods, check to see if they look nice and no issues with them. Okay, navigate to your geometry tab inside your object folder, and finally click on geom0. Next, we scroll down to the “Lod Distances” and place proper values:
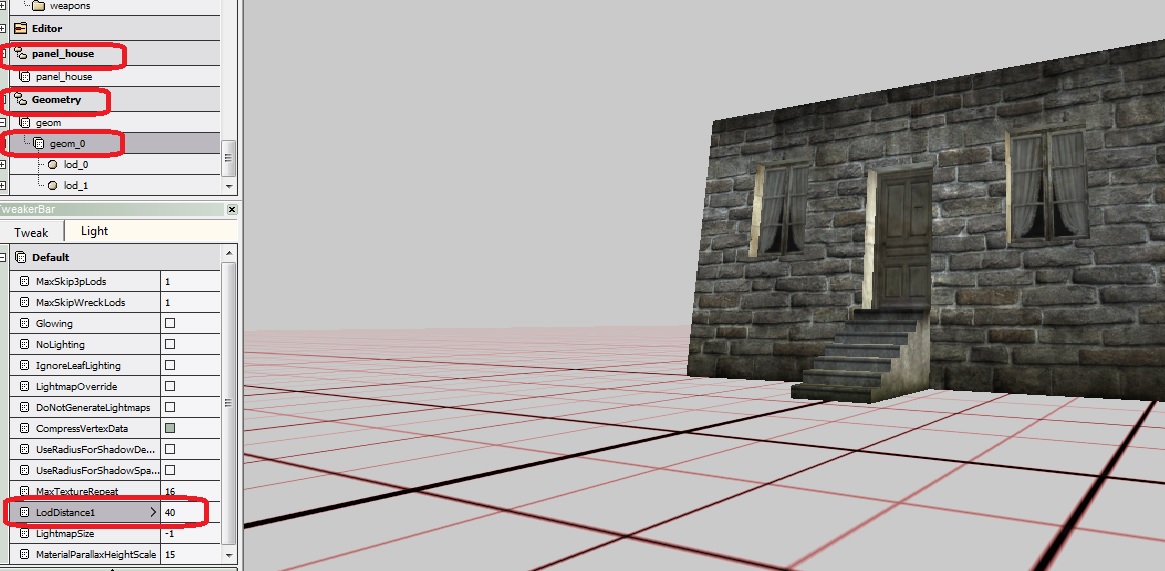
We can see the lod1 will appear here:
I would go further, but I need to wrap up. PR-Dev Rhino has an excellent tutorial I would recommend seeing.
Last things to do is checking the mesh in one of the maps, generate lightmaps on it, check lods, and the rest.
Close
Hopefully this improved your knowledge of static meshes, I really hope for the best who wants learn this! Like I said before, shoot me a pm or post here if you need any help!
Take care
Roughbeak

Groups

Indie Devs
1,715 members Hobbies & InterestsA group dedicated to indie and standalone game development.

WW2 Reference Group
147 members Hobbies & InterestsA page where you can find uniform and vehicle references of WW2. Please post pics of WW2 uniforms and vehicles. Post anything about WW2

Steam Greenlight
217 members Entertainment & PressA system that enlists the community's help in picking some of the new games to be released on Steam.

Mod DB
4,567 members OfficialIf it's information about Mod DB and ramblings about mods in general that you are after - then you have come to the right place. Welcome to the official...

3D Artists Group
1,262 members Arts & LiteratureAre you a 3D artist? Are you looking for some inspiration? Do you just want to collaborate or know who your fellow ModDB artists are? Doesn't matter what...

Indie DB
2,703 members OfficialIndie games are changing the world, one giant pixel at a time. With Indie DB we aim to support independent developers and their games, by providing them...
Battlefield Mod Developers
159 members Hobbies & InterestsGroup for anyone who models, textures, animates, codes, maps, etc., for the Battlefield series by EA/DICE.

CryENGINE Developers
418 members Fans & ClansWelcome to the "CryENGINE 3 Developers" group . The CryENGINE 3 Developers group is all about creating levels, mod, Total modifications, addon's, machinima...
Post a comment
Profile
X
Friends

Kark-Jocke
Online

7Game
Online
INtense!
Online
Anthony817
Online

Kimoxxie
Online

Ismo.gd
Online

FoxFort
Online

РredatoR
Online

General_Bradly
Online

illicitSoul
Online
Thanks for the Friend Request!
✯ I wish you a happy new year! Roughbeak ( Moddb.com ) ✯
Thanks for the friend request mate.
Thanks for the friend request !
Hi, no problem! :)
Hey man, I was wondering meybe you could do some badass renders for BF2 SOW mod ? ;)
Thank you for friend request!
Hey, no problem. :)
Hey friend, hello again! How are you? What are you doing nowadays?
Hey! I'm doing very well, especially loving the experience at FH2 dev team. :)
Yeah, it's good to be a part of a big development team such as Forgotten Hope. I hope you will make much better things in future. I'm waiting to see your buildings in Eastern Front maps, when I fight against Red Commies, or fighting to sweep Jerries from Mother Russia...