
In this tutorial. I will be teaching
you how to create 360 Degree Screenshots that the user can move
around.
Here are some examples of what we will be creating Planetphillip.com, Just select a Mod and Scroll down until you reach the panoramic Image, Just click on it to view.
You Can Create These Panoramic Images for Any Game, But for These Purposes I will Be Using Half Life 2 Episode 2
First of all, You are going to need to download a few tools that you need. Don't worry all of the programs we will be using are absolutely free.
- AutoStich - To create the flat 2D Picture - Photo-freeware.net
- Pano2QTVR - To create the 3D Image - Gardengnomesoftware.com
- Quicktime - To View the results - Apple.com
Step 1, Create 3 Folders on Your Desktop, Name the folders, "RAW Images", "Autostich" and "Output"
Step 2, Install everything you have downloaded. This applies for, Pano2QTVR and Quicktime. For Autostich, Extract The contents of the .RAR file to the Autostich folder you created on your Desktop

Step 3, Now you have to pick a point somewhere in your map to start taking the screenshot, For a good Panoramic image try to pick the following
- A Good, Wide Open Area to take your screenshots
- Free of any Large moving objects, Npc's or Flashing Lights
- An area that showcases as much of the map as Possible
Step 4, To create a perfect panoramic image it is important to clear everything off the screen [This includes things such as Crosshairs, Weapons, Health and Ammo Display E.T.C]
To do this in Half-Life 2 is very easy, After activating the console, Type in the following
- sv_cheats 1
- r_drawviewsmodels 0 - Stops showing the weapons
- cl_drawhud 0 - Stops showing the HUD
- noclip - Useful for getting into the middle of the map to take the screenshots
Step 5, After typing all this into the console and getting to where you want to be in your map, It is time to take your screenshots.
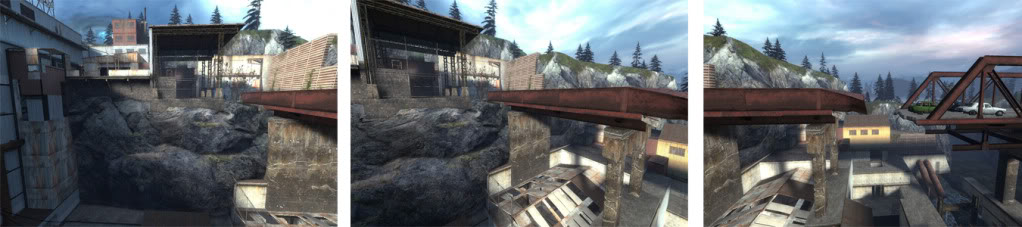
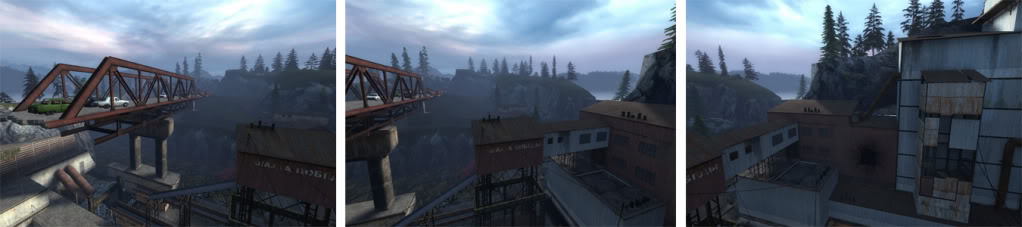
Step 6, The technique for taking in the screenshots is very simple indeed. It is a simple case of "take a screenshot, Move around about 40 degrees, Take another screenshot" and repeating this pattern until you reach your Original starting point as the Screenshots above Show.
You Must Not Move The Player AT ALL Throughout the entire process, as this will distort the Screenshots
Step 7, Then You must repeat this process while looking at the floor and again while looking at the sky, This ensures full, Even coverage of the whole map
Step 8, Once you have taken all the screenshots You can now exit the Game and copy all the Screenshots you've just taken in to the "RAW Pictures" folder we made earlier.
Step 9, Now open up Autostich and open all the screenshots in the "RAW Pictures" folder. To select them all, Click Once on the first screenshot then press SHIFT+END to select them all Then press "open" The process may take some time depending how may pictures there are, How big the file sizes are E.T.C

Step 10, Autostich has now built a 2D image [Placed in the "RAW Image" folder we created earlier] formed from all your screenshots. Sometimes the Image may be inverted, But you can correct this using Windows Photo Viewer Or a Similar Program.
Step 11, Go ahed and Open up Pano2QTVR, From the main menu select "Create a new Project" and save it to the "output" file we made, Once you have done this. The project tab will open. Click on the small "..." Button, just under the "convert to cubic" button and Open the panoramic image we created earlier with Autostich. All the settings should be fine so there is no need to play about with them unless you really want to.

Step 12, On the settings Tab you can adjust the output size and quality. I usually set the size to 800 x 300 and to the highest quality. You can play about with the other settings if you want. Leave a comment if you find out something interesting about the settings

Step 13, Now you are ready to Create the Final Product, Just press "Create" at the bottom of the Window. Then you will see a command screen building the Final Product

Congratulations!!! You have just successfully created a 360 Degree Panoramic Image, You can use this to show off entire areas of your map without having to upload multiple screenshots.
If you liked my tutorial. Leave a comment Below and Please Visit my Profile for more tutorials: Moddb.com


*Bookmarked* this will come in handy for my current project...
I wish I understood this.
couldn't you just take a couple screenshots and overlap them in photoshop?
this progrm make our life simpler and save a lot of time
Thanks Phillip, will get this tutorial updated when I get a chance
Tutorial Has been updated, Hope you like the changes
hi, I found some freeware windows tools to do the job.
Microsoft ICE for stitching
Hugin for stiching (and more options)
both of these can produce a Spherical or Equirectangular Panorama image in 360° x 180°
Stupid question, but do you use a special command to take the screen shot or just the "Print Screen" Button on the keyboard?
Nvm. Found the answer.