You may now be asking yourself, "I've downloaded the CryENGINE 3 SDK. Now how do I start making games with it?" Such a question has far-reaching implications and is awfully difficult to answer! So in my attempt to answer this question, let's create our own game together, in a short amount of time, using some of the functions and entities that the CryENGINE 3 SDK gives to us straight out of the box.
In this article by Sean Tracy and Paul Reindell, authors ofCryENGINE 3 Game Development: Beginner's Guide, we will be:
- Beginning with our first example using out of the box features of the engine
- Creating and sculpting terrain for a new level, from scratch
- Creating and using terrain texture layers
- Creating vegetation groups and applying them to your level
- Creating and setting a basic time of day to light our level
CryENGINE 3 Game Development: Beginner's Guide

(Discover how to use the CryENGINE 3 free SDK, the next-generation, real-time game development tool with this book and ebook.)
We saw that majority of the games created on the CryENGINE SDK have historically been first-person shooters containing a mix of sandbox and directed gameplay. If you have gone so far as to purchase a book on the use of the CryENGINE 3 SDK, then I am certain that you have had some kind of idea for a game, or even improvements to existing games, that you might want to make. It has been my experience professionally that should you have any of these ideas and want to share or sell them, the ideas that are presented in a playable format, even in early prototype form, are far more effective and convincing than any PowerPoint presentation or 100-page design document.
Reducing, reusing, recycling
Good practice when creating prototypes and smaller scale games, especially if you lack the expertise in creating certain assets and code, is to reduce, reuse, and recycle. To break down what I mean:
- Reduce the amount of new assets and new code you need to make
- Reuse existing assets and code in new and unique ways
- Recycle the sample assets and code provided, and then convert them for your own uses
Developing out of the boxAs mentioned earlier, the CryENGINE 3 SDK has a huge amount of out-of-the-box features for creating games.Let's begin by following a few simple steps to make our first game world.Before proceeding with this example, it's important to understand the features it is displaying; the level we will have created by the end of this article will not be a full, playable game, but rather a unique creation of yours, which will be constructed using the first major features we will need in our game. It will provide an environment in to which we can design gameplay.With the ultimate goal of this article being to create our own level with the core features immediately available to us, we must keep in mind that these examples are orientated to compliment a first-person shooter and not other genres. The first-person shooter genre is quite well defined as new games come out every year within this genre. So, it should be fairly easy for any developer to follow these examples.In my career, I have seen that you can indeed accomplish a good cross section of different games with the CryENGINE 3 SDK. However, the third- and first-person genres are significantly easier to create, immediately with the example content and features available right out of the box.For the designers:
This article is truly a must-have for designers working with the engine. Though, I would highly recommend that all users of sandbox know how to use these features, as they are the principal features typically used within most levels of the different types of games in the CryENGINE.
Time for action - creating a new level
Let's follow a few simple steps to create our own level:
- Start the Editor.exe application.
- Select File | New. This will present you with a New Level dialog box that allows you to do the adjustments of some principal properties of your masterpiece to come. The following screenshot shows the properties available in New Level:

- Name this New Level, as Book_Example_1. The name that you choose here will identify this level for loading later as well as creating a folder and .cry file of the same name.
- In the Terrain section of the dialog box, set Heightmap Resolution to 1024x1024 , and Meters Per Unitto 1.
- Click on OK and your New Level will begin to load. This should occur relatively fast, but will depend on your computer's specifications.
- You will know the level has been loaded when you see Ready in the status bar. You will also see an ocean stretching out infinitely and some terrain slightly underneath the water.
- Maneuver your camera so that you have a good, overall view of the map you will create, as seen in the following screenshot:
 (Move the mouse over the image to enlarge.)
What just happened?
Congratulations! You now have an empty level to mold and modify at your will.Before moving on, let's talk a little about the properties that we just set, as they are fundamental properties of the levels within CryENGINE. It is important to understand these, as depending on the type of game you are creating, you may need bigger or smaller maps, or you may not even need terrain at all.
Using the right Heightmap Resolution
When we created the New Level, we chose a Heightmap Resolution of 1024x1024. To explain this further, each pixel on the heightmap has a certain grey level. This pixel then gets applied to the terrain polygons, and depending on the level of grey, will move the polygon on the terrain to a certain height. This is called displacement. Heightmaps always have varying values from full white to full black, where full white is maximum displacement and full black is minimum or no displacement.The higher the resolution of the heightmap, the more the pixels that are available to represent different features on said heightmap. You can thus achieve more definition and a more accurate geometrical representation of your heightmap using higher resolutions. The settings can range from the smallest resolution of 128x128, all the way to the largest supported resolution of 8192x8192 . The following screenshot shows the difference between high resolution and low resolution heightmaps:
Scaling your level with Meters Per Unit
If the Heightmap Resolution parameter is examined in terms of pixel size, then this dialog box can be viewed also as the Meters Per Pixel parameter . This means that each pixel of the heightmap will be represented by so many meters.For example, if a heightmap's resolution has 4 Meters Per Unit, then each pixel on the generated heightmap will measure to be 4 meters in length and width on the level.Even though Meters Per Unit can be used to increase the size of your level, it will decrease the fidelity of the heightmap. You will notice that attempting to smoothen out the terrain may be difficult, since there will be a wider, minimum triangle size set by this value.Keep in mind that you can adjust the unit size even after the map has been created. This is done through the terrain editor, which we will discuss shortly.
Calculating the real-world size of the terrain
The expected size of the terrain can easily be calculated before making the map, because the equation is not so complicated. The real-world size of the terrain can be calculated as:(Heightmap Resolution) x Meters Per Unit = Final Terrain Dimensions.For example:
- (128x128) x 2m = 256x256m
- (512x512) x 8m = 4096x4096m
- (1024x1024) x 2m = 2048x2048m
Using or not using terrain
In most cases, levels in CryENGINE will use some amount of the terrain. The terrain itself is a highly optimized system that has levels of dynamic tessellation, which adjusts the density of polygons depending on the distance from the camera to the player. Dynamic tessellation is used to make the more defined areas of the terrain closer to the camera and the less defined ones further away, as the amount of terrain polygons on the screen will have a significant impact on the performance of the level.In some cases, however, the terrain can be expensive in terms of performance, and if the game is made in an environment like space or interior corridors and rooms, then it might make sense to disable the terrain. Disabling the terrain in these cases will save an immense amount of memory, and speed up level loading and runtime performance.In this particular example, we will use the terrain, but should you wish to disable it, simply go to the second tab in the RollupBar (usually called the environment tab) and set the ShowTerrainSurfaceparameter to false , as shown in the following screenshot:
Time for action - creating your own heightmap
You must have created a new map to follow this example.Having sufficiently beaten the terrain system to death through explanation, let's get on with what we are most interested in, which is creating our own heightmap to use for our game:
- As discussed in the previous example, you should now see a flat plane of terrain slightly submerged beneath the ocean.
- At the top of the Sandbox interface in the main toolbar, you will find a menu selection called Terrain; open this. The following screenshot shows the options available in the Terrain menu.
- As we want to adjust the terrain, we will select the Edit Terrain option. This will open the Terrain Editorwindow, which is shown in the following screenshot:
- You can zoom in and pan this window to further inspect areas within the map. Click-and-drag using the right mouse button to pan the view and use the mouse wheel to zoom in and zoom out.
- The Terrain Editor window has a multitude of options, which can be used to manipulate the heightmap of your level. Before we start painting anything, we should first set the maximum height of the map to something more manageable:
- Click on Modify.
- Click on Set Max Height.
- Set your Max Terrain Height to 256. Note that the terrain height is measured in meters.
- Having now set the Max Height parameter, we are ready to paint!
- On the right-hand side of the Terrain Editor , you will see a rollout menu named Terrain Brush. We will first use this to flatten a section of the level.
- Change the Brush Settings to Flatten, and set the following values:
- Outside Radius = 100
- Inside Radius = 100
- Hardness = 1
- Height = 20
- Now paint over the top half of the map. This will flatten the entire upper half of the terrain to 20 meters in height. You will end up with the following screenshot, where the dark portion represents the terrain, and since it is relatively low compared to our max height, it will appear black:
 (Move the mouse over the image to enlarge.)Note that, by default, the water is set to a height of 16 meters. Since we flattened our terrain to a height of 20 meters, we have a 4-meter difference from the terrain to the water in the center of the map. In the perspective viewport, this will look like a steep cliff going into the water.
 - At the location where the terrain meets the water, it would make sense to turn this into a beach, as it's the most natural way to combine terrain and water. To do this, we will smoothen the hard edge of the terrain along the water. As this is to become our beach area, let's now use the smooth tools to make it passable by the player:
Change the Type of brush to Smooth and set the following parameters:- Outside Radius = 50
- Hardness = 1
I find it significantly easier to gauge the effects of the smooth brush in the perspective viewport.
- Paint the southern edge of the terrain, which will become our beach. It might be difficult to view the effects of the smooth brush simply in the terrain editor, so I recommend using the perspective viewport to paint your beach.
- Now that we have what will be our beach, let's sculpt some background terrain. Select the Rise/Lowerbrush and set the following parameters:
- Outside Radius = 75
- Inside Radius = 50
- Hardness = 0.8
- Height = 1
- Before painting, set the Noise Settings for the brush; to do so, check Enable Noise to true. Also set:
- Scale = 5
- Frequency = 25
- Paint the outer edges of the terrain while keeping an eye on the perspective viewport at the actual height of the mountain type structure that this creates. You can see the results in the Terrain Editor and perspective view, as seen in the following screenshots:
 (Move the mouse over the image to enlarge.)
 (Move the mouse over the image to enlarge.)
 - It is a good time to use the shortcut to switch to smooth brush while painting the terrain.
- While in perspective view, switch to the smooth brush using the Shift shortcut.
A good technique is to use the Rise/Lower brush and only click a few times, and then use Shift to switch to the smooth brush and do this multiple times on the same area. This will give you some nice terrain variation, which will serve us nicely when we go to texture it.
- Save this map as Book_Example_1_no_color.cry.

 (Move the mouse over the image to enlarge.)
Using a second monitor:
This is a good time to take advantage of a second monitor should you have one, as you can leave the perspective view on your primary monitor and view the changes made in theTerrain Editor on your second monitor, in real time.
NOTE: You can sample the terrain height in the Terrain Editor or the view port using the shortcut Control when the flatten brush is selected.
Don't forget the player's perspective:
Remember to switch to game mode periodically to inspect your terrain from the players level. It is often the case that we get caught up in the appearance of a map by looking at it from our point of view while building it, rather than from the point of view of the player, which is paramount for our game to be enjoyable to anyone playing it.
What just happened?
In this particular example, we used one of the three different techniques to create height maps within the CryENGINE sandbox:
- The first technique, which we performed here, was manually painting the heightmap with a brush directly in the sandbox.
- The second technique, which we will explore later, is generating procedural terrain using the tools provided in sandbox.
- Finally, the third technique is to import a previously created heightmap from another program.
You now have a level with some terrain that looks somewhat like a beach, a flat land area, and some mountains. This is a great place to start for any outdoor map as it allows us to use some powerful out of the box engine features like the water and the terrain. Having the mountains surrounding the map also encourages the illusion of having more terrain behind it.
Have a go hero – using additional brush settings
With the settings we just explored, try to add some more terrain variation into the map to customize it further, as per your game's needs. Try using different settings for the brushes we explored previously. You could try adding some islands out in the water off the coast of your beach or some hills on the flat portion of the map.Use the Inside Radius and Outside Radius, which have a falloff of the brushes settings from the inner area having the strongest effect and the outer having the least.To create steeper hills or mountains, set the Inside Radius and Outside Radius to be relatively similar in size. To get a shallower and smoother hill set the Inside Radius and Outside Radius further apart.Finally, try using the Hardness, which acts like the pressure applied to a brush by a painter on canvas. A good way to explain this is that if the Hardness is set to 1, then within one click you will have the desired height. If set to 0.01, then it will take 100 clicks to achieve an identical result.You can save these variations into different .cry files should you wish to do so.
Generating procedural terrain
Use the Tools menu in the Terrain Editor and click on Generate Terrain ; you can modify many parameters when generating new terrain procedurally like this: (Move the mouse over the image to enlarge.)
Have a go hero – generating procedural terrain
Try adjusting some of the automatic generation parameters like:
- Feature Size: This value handles the general height manipulations within the seed and the size of each mound within the seed. Since the size of the feature depends greatly on rounded numbers, it is easy to end up with a perfectly rounded island. This is not realistic, so it is best to leave this value to around 7.
- Bumpiness / Noise (Fade): This is a noise filter for the level. The greater the value, the more the noise that will appear on the heightmap.
- Detail (Passes): This value controls how detailed the slopes will become. By default, this value is very high so that you can see the individual bumps on the slopes, and it gives a better impression of a rougher surface. Reducing this value will decrease the amount of detail/roughness in the slopes seen.
- Variation: This controls the seed number used in the overall generation of the terrain heightmap. There are a total of 33 seeds ranging from 0 to 32 from which to choose, as the starting base for a basic heightmap.
- Blurring (Blur Passes): This is a blur filter. Increasing this value yields progressively smoother slopes.
Importing a pre-made heightmap
You may already have a heightmap prepared, or you may even have exported one from the CryENGINE.To import/export your own grayscale heightmaps use File | Import/Export Heightmap.The resolution of the heightmap must match the resolution of the terrain.The supported formats are:
- 8-bit BMP
- 16-bit PGM
- 16-bit RAW
For maps requiring high detail close to the player, it makes sense to set the resolution as high as possible but keep the meters per unit of the terrain low. In this way, the terrain polygons will be small enough to represent accurate terrain displacement sufficiently at short distances.
Creating terrain textures
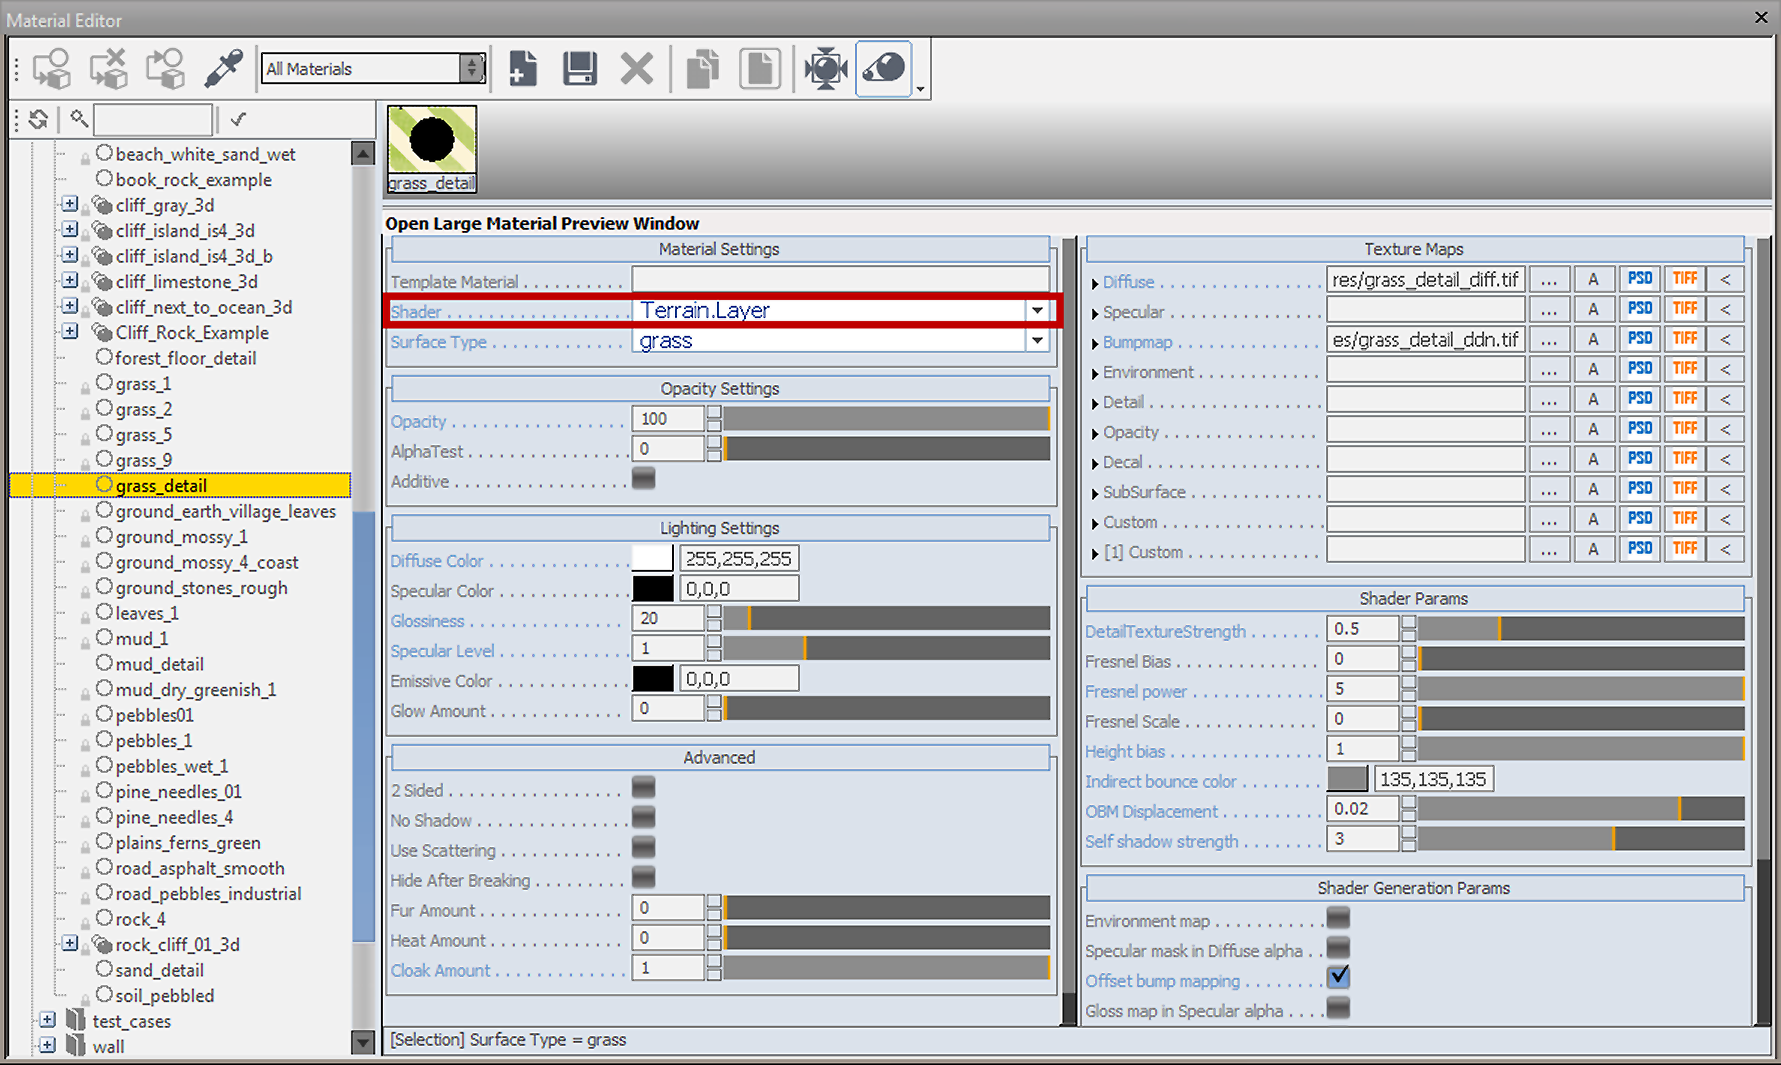
Up until now we've been using the default terrain texture, and since real life doesn't look like a checker or grid pattern, it is imperative that we paint some textures onto this terrain. We can do this with sandbox relatively easily, and it allows us to leverage the power of the advanced shading features of the CryENGINE3 quickly.Terrain textures are split up into multiple layers and are painted manually, directly in the viewport onto the terrain. Each Terrain layer consists of a Surface texture and a Detail material. The various components of the Terrian layer are shown in the figure below: The Surface texture will be the surface the player can see from a long range. It is also blended together, when viewed close up, with the Detail material. This is done to provide a higher quality of shading and realism around the player where needed. As seen in the preceding figure, it is made up of a Diffuse color and a Diffuse texture.The Detail material is what a player will see when they are close. It is similar to other materials in CryENGINE as it is comprised of a particular Shader , Surface type, and textures. The Surface type of the material defines how the layer reacts to physics and other systems such as sound and particles.
Time for action - creating some basic terrain texture layers
Applying a good set of terrain layers depends heavily on the environment in which you wish to create your map. In this particular example, we will use a somewhat straightforward setup of rocks, forest, grass, mud, sand, and underwater.
- Create a new map and generate some terrain, or open Book_Example_1_no_ color.cry because we need to have some terrain loaded for us to paint onto like a blank canvas.
- Open the Terrain Texture Layers window found in the main sandbox toolbar under Terrain | Texture.
- In this window we want to create some new layers because, as we can see, it has only a single layer at present.
- Create a new layer using the Add Layer command, as shown in the following screenshot:

- Rename the new layer grass.
- Next, change the Surface texture of this layer.
- Use the Change Layer Texture command shown in the following figure, and select the grass.tif texture. In this case, this texture is a small, 256-pixel, green image with some variations in it, which will work well tiled across our grasslands.
- Next, change the Detail Texture by using the Material hotlink path in the grass layer; click on the link, and the material file Materials/material_terrain_default. mat will open in the Material Editor.
By default, the terrain materials contained in the SDK are located in materials\ terrain. Terrain material can be identified as they must always use the Terrain. Layer Shader, as seen in the following screenshot:
 (Move the mouse over the image to enlarge.)
 - Navigate to the Book_Chapter_2_Assets\terrain_materials\ folder in the Material Editor, and select thegrass_detail material.
- Go back to the Terrain Texture Layers window and click on Assign Material; this will assign the selected detail material from the material editor to the selected terrain texture layer.
You have made your first texture layer. You could continue adding your own texture layers. - Before experimenting with painting, import the sample assets provided. Use the File | Import layerscommand and import the file Book_Chapter_2_Assets/ Example_Base_Terrain_Layers.lay, as seen the following screenshot:
 (Move the mouse over the image to enlarge.)Having loaded a base set of texture layers into our level, we can now get to the fun part of painting them!
 - As the layers are already set up with basic values, you can switch immediately to the layer painter under the Environment tab of the Rollupbar.
- Once in the layer painter dialog box, you can select the layers and paint them by clicking and dragging them in the viewport on the terrain. The selected layer will be painted using the Radius and Hardnesssettings within the layer painter.
- After experimenting with painting a layer onto your map, scroll down in the layer painter rollout to where you see the Tile Resolution along with the button Change.
- Click on Change and turn your brush into a terrain sector selection tool with which you can adjust the overall resolution of your terrain textures in certain sectors. It is recommended to maintain a1024X1024 resolution or more in gameplay areas and where you expect the player to be, and setting exterior sectors or non-playable areas to a lower resolution.
- In our case, we have a relatively small map, so setting this to the maximum of 2048X2048 will produce the best results. To disable the Tile Resolution tool, simply click on the Change icon a second time.
- In the layer painter, select the grass material and set the Min/Max angle setting to Min:0 and Max:40. This will paint grass on any terrain that has an angle less than 40 degrees.
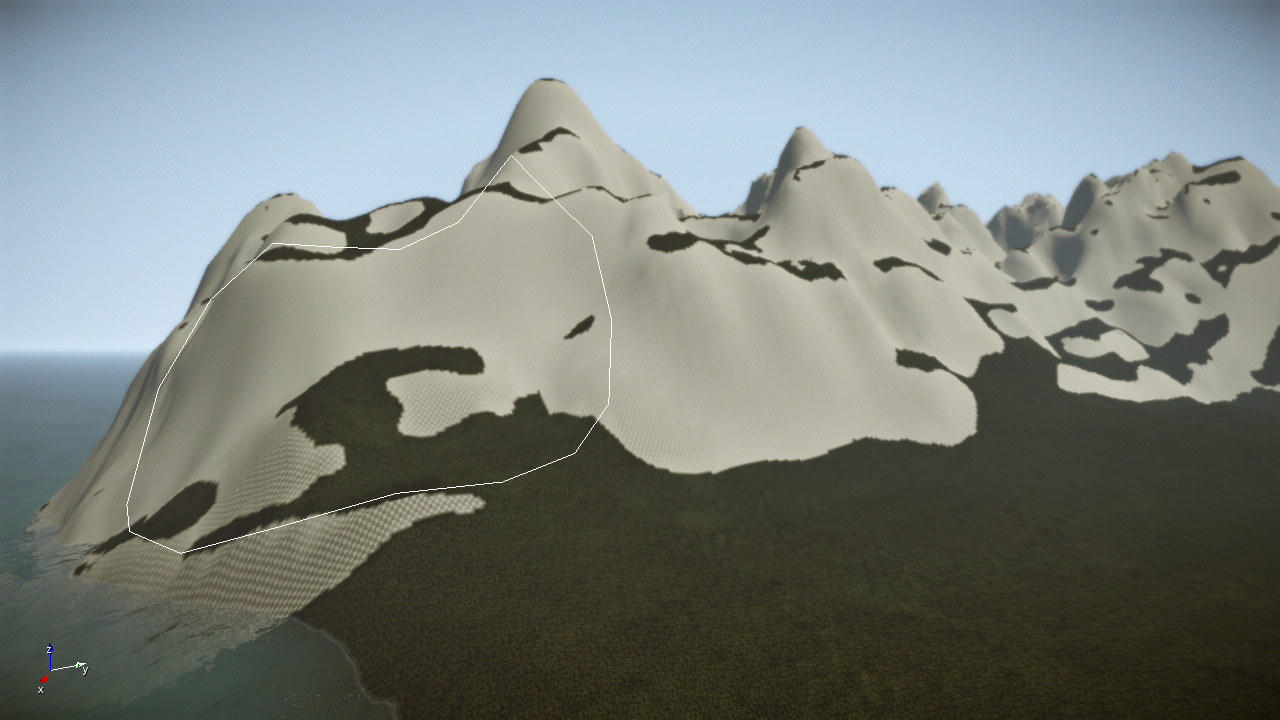
- Paint the grass layer onto the terrain as seen in the following screenshot:
- You can use this same technique for the rock layer. Set its Min/Max angle setting to Min 40 and Max 90, which will effectively fill up the rest of the terrain.
- Paint the rock layer onto the terrain as seen in the following screenshot:
- Finally, painting sand or a beach can be done quite quickly by clicking and dragging a fairly large brush manually, and it will allow you to blend the texture to your liking into the grass and rocks.
- Paint the beach section of the level as in the following screenshot:
- The other two layers can later be used when painting vegetation objects as they will compliment the objects nicely.
- Once you have finished painting, you must compress the texture and generate a surface texture for the engine.
- Do this by going to File | Generate Surface Texture.
- Select a resolution and click on OK.
- When you are happy with the terrain textures, save your level.
 (Move the mouse over the image to enlarge.)


Generating surface texture at a high quality
A higher resolution will result in better, overall quality. The optional high quality setting creates an additional way over the textures to bake in further detail while keeping the same memory footprint.
It should be noted that once the terraintexture.pak is generated, it will appear on all .cry files stored within that directory, should it contain the corresponding, terrain texture layers.
What just happened?
Congratulations! You are well on your way to becoming a terrain painting master. Now, our level is starting to take shape. It's so colorful now!Let's further explain some of the layers that this example uses:
- Grass: This layer attempts to match a natural color tone while using some variations of bright colors to break up the tiling.
- Rock: Using this for cliffs and other steep terrain will be ideal. It utilizes a 3D material to aid in an attempt to avoid obvious tiling.
- Forest: Use this layer for the vegetation layers, which we will import later, to blend them into the environment better. It is slightly brownish, to match the color of dead leaves.
- Mud: This layer has some specular and wet qualities, and uses small stones and a few different types of vegetation that blends best with the terrain.
- Sand: This layer uses some variations in bright textures to break up the tiling on the beach or in other sandy areas.
- Underwater: This layer uses a darker blue color to enhance the depth of the water when seen from above or below the surface. You can lighten this layer if you desire to achieve a coral reef-type effect.
This gives us a ton of possibilities for various types of terrain.
Adding altitude and slope
As we saw, these parameters can be set per layer, allowing you to paint that layer within the altitude measured in meters or the slope measured in degrees. This is especially useful for cliff-like layers (for example, 55 degrees to 90 degrees).
Adjusting the tile resolution
A tile's resolution affects how many terrain tiles there are in each terrain sector. The higher the resolution, the higher the amount of tiles used, which leads to better layer blending, as well as softer transitions in the high detail textures. It can be set from as low as 64x64 to as high as 2048x2048; this tiling resolution is an important factor when it comes to optimization, as well as high quality terrain. A good technique is to utilize only higher resolution tiles within the gameplay area of a level, and to use lower resolution tiles on the surrounding terrain for performance and memory considerations.
Creating vegetation
The vegetation system in CryENGINE is powerful, you can utilize a small amount of assets and use procedural placement to make their placement look quite natural.The interface for vegetation painter is similar to painting terrain textures. They are both based on a brush-like interface where you can click-and-drag directly on the terrain as if you were painting. Both the terrain painter and the vegetation painter support the same altitude and angle properties, and can be used together to achieve very realistic results.It is important to understand though, that quite differently than painting terrain textures, painting vegetation is a placement of geometry. This geometry is then instanced, a technique used to increase performance, since the objects that are being drawn are already in memory for the entire map.Placing geometry as vegetation allows us to use the vegetation system to its full potential, as applying the vegetation shader to these geometry objects allows for realistic physics such as touch bending simulation (where the player can physically bend branches) and also wind bending.
Time for action - creating some flora for your level
Without further ado, let's bring some life to the map we have been working on.
- Open Example_Level_2.cry or your own, already textured level.
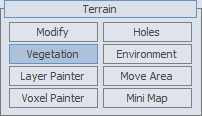
- From the RollupBar, open the Terrain tab and click on the Vegetation button as shown in the following screenshot:
 Before we can paint the vegetation, we first must add in some objects that we want to use. The first vegetation we will place will be some trees.
 - Click on the icon called Add Vegetation Category, as shown in the following screenshot:
- Name the new category Trees.
- Select the newly created Trees category.
- Click on the add vegetation object icon as shown in the following screenshot:

- Navigate to .../Objects/Natural/vegetation/rocky_ravines/ and select a_spruce_a.cgf, then click onOpen.
- All of the highlighted trees have now been placed in this category. You can now start painting with a few of the selected trees or select the entire category to paint.
- Paint the objects into the level, making sure to use a brush size larger than zero; you can quickly remove them by using the remove shortcut, which is the control key, when painting.
- You can remove the category you just created, or leave it and carry on importing the preset vegetation sets.
Having seen how we can create our own categories, let's see how we can import the preset vegetation sets. - Click the import vegetation icon seen in the following screenshot, and browse toBook_Chapter_2_Assets\vegetation_categories\forest_trees.veg and click on OK. Also, importforest_ground_mixed.veg.
 You will now have two categories one of trees and one of detail objects detail objects with some preset parameters with which to work, as seen in the following screenshot:
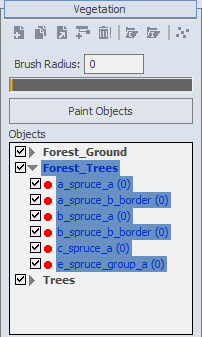 You can immediately start to paint these categories and experiment with the parameters at the bottom of the rollup bar while the vegetation tool is active.
 - First, let's set the brush radius to 50 percent and then select the category Forest_Trees.
- Next, click on the Paint Objects button seen here:
- A good technique to create good vegetation with a brush is to just click a few time rather than actually painting by clicking and dragging.
- Next, paint the second category forest_ground_mixed in the same places where you have placed trees. These two categories are meant to work well together.
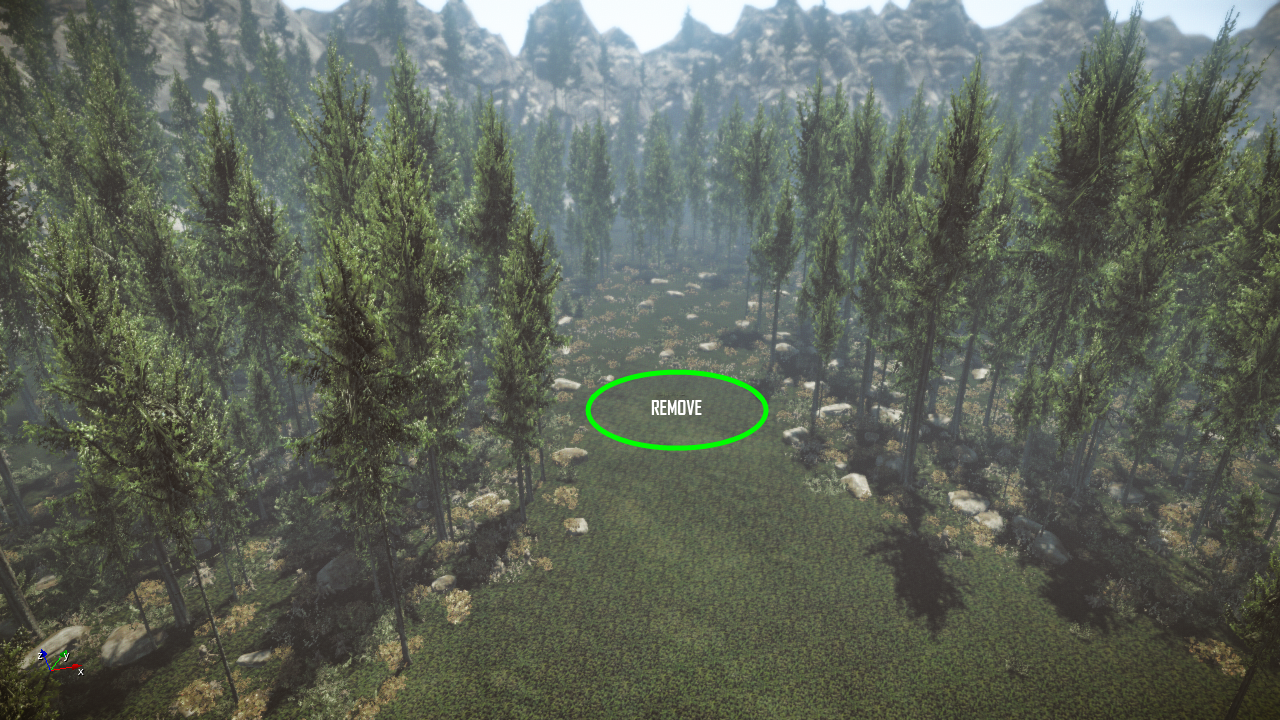
- After painting some fairly dense areas, use the remove tool at 1020 percent width to erase a path through the forest, as you can see in the following screenshot:
- Select individual objects by toggling the paint mode off and by holding the Space bar. This will display a small selection helper at the base of the object.
- Select an individual vegetation object.
- Hold Alt, and click-and-drag this vegetation object to adjust its scale.
- Hold Alt and Ctrl, then click-and-drag the vegetation object to rotate it.
- Finally, hold Shift, and click anywhere on the terrain to create the selected object.
- A good technique is to select certain instances of vegetation individually to adjust their placement, rather than trying to get the perfect, painting settings.

You can hold Control and click on multiple objects in a category at once.
Changing the vegetation properties after they've been placed
The properties of a vegetation object are only applied while painting, so if you want to change the properties after the vegetation has been placed, you will need to repaint it. Some properties such as random rotation use terrain color, and properties such as wind bending will update to the currently placed vegetation objects.
You will notice a number beside each object within the vegetation category, which is meant to be a quick reference to the number of instances, which a current object has, within the level.
Remember that you can quickly switch between painting and erasing by using the control key. We can also customize these landscapes using the individual selection mode available.
Note that in one of the vegetation groups, a stone is used. Not usually considered vegetation, it is a good example of demonstrating that you can use any sort of model as vegetation, but it should be noted that they will be typically restricted to terrain. Another good use of the vegetation system could be small, rubble pieces, twigs, and so on.
What just happened?
Congratulations! You have just become accustomed with one of the most powerful tools the CryENGINE has to offer for creating realistic forests and environments containing massive amounts of vegetation.
In this example, we used the vegetation painter and some of its parameters to create and sculpt the flora for our level.
Time for action - setting up time of day and its basic parameters
Now, the time has come to adjust the overall lighting of our level. The fastest and easiest way to achieve a huge variety of atmospheres and settings is by using the Time of day feature in CryENGINE.The sun in CryENGINE is approximated by a colored, directional light without distance attenuation. This is important to understand as its properties are similar to that of a regular light, and properties such as color and specular level can be adjusted. There is an important distinction, however, to the sun and other lights in CryENGINE, as the sun uses a technology called cascaded shadow maps.
- Open the Time Of Day dialog box from Terrain | Time Of Day.
 (Move the mouse over the image to enlarge.)Note that when you highlight any of the basic parameters in the time of day dialog, there are key frames set already represented by the small, yellow squares on the timeline in the preceding screenshot.This timeline is represented by a 24-hour slider at the top of the Time Of Day interface.Since the best way to learn to manipulate the Time Of Day editor is to create your own. So, let's reset all the values before starting.
 - To do this, click Reset Values in the Time of day tasks window, which will give you a blank Time Of Dayas shown in the following screenshot:
 (Move the mouse over the image to enlarge.)This will effectively remove all the key frames outside of the default values of 0000 and 2400.
 - Before we adjust the parameters to suit our needs, set Force Sky Update to true and ensure that the record button is highlighted.
Next, let's set the Current Time value in the level and camera so that we can see the sun clearly. - To do this, click-and-drag the arrow on the slider to late afternoon. If you have difficulty getting theCurrent Time value accurate, you can type in the time you desire.
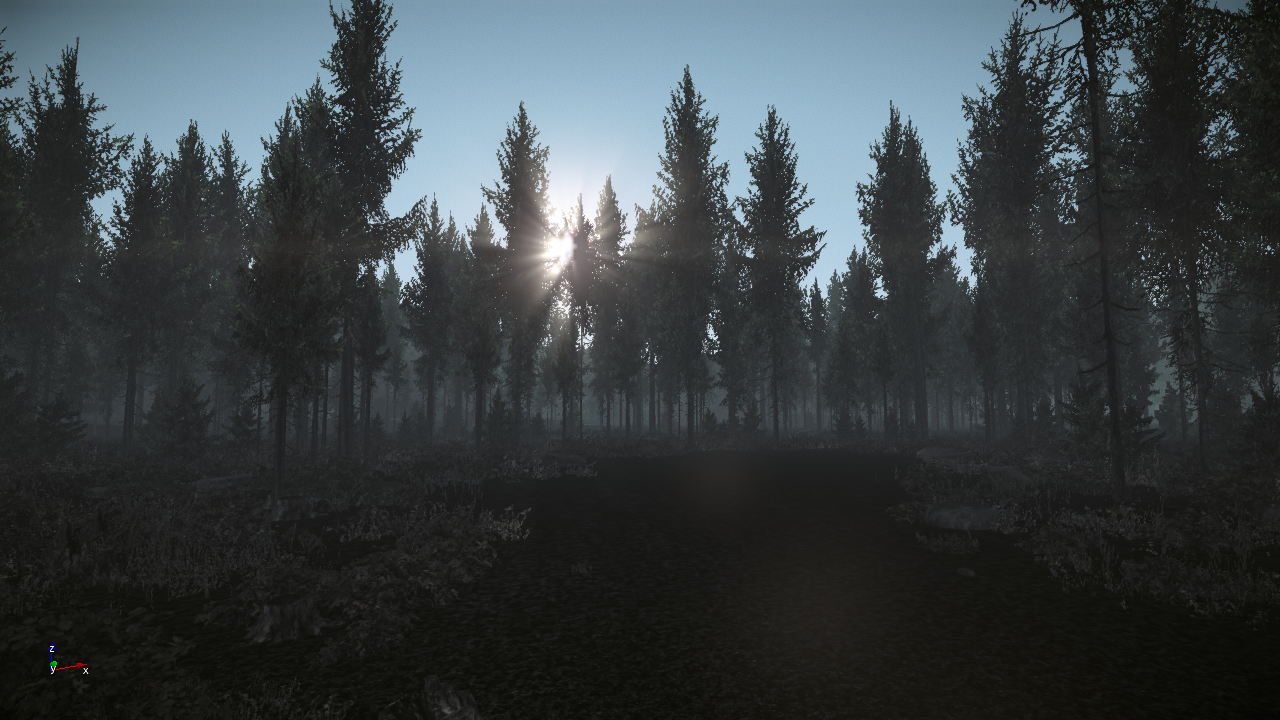
- Set the Current Time value to 0700. At 0700, the sun should be fairly low in the sky and the shadows on the vegetation in our level will be quite long. You can of course use whatever time you like, however, for this example we will use 0700.
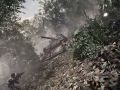
Having the sun intersect some geometry will allow the sunrays to be shown more clearly. The following screenshot shows us how the terrian will look:
 The first setting we will adjust, will be the Sun color.Monitor settings and calibration
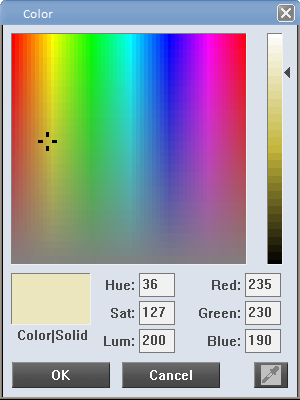
It is important to have good settings on your monitor for color before adjusting the time of day. For the absolute best balance of color, use an external monitor calibrator.The sun in CryENGINE3 has an advanced, dynamic light. Adjusting the Sun color , in simple terms, will adjust the diffuse color for this light. - To adjust the overall color, first click on the Color sampler box and then click-and-drag the black target to your preferred value. In our case, let's take a realistic approach to lighting this level and set the sun color to a warm, yellow tone of RGB 235,230,190. We choose a warm yellow as the sun scattering in the atmosphere has the effect of becoming slightly yellow.
 After clicking on OK, you will see that new key frames have now been created on the timeline. You can see the interpolation of the values from 0000 to 2400, which will be used in the case where you have an animated time of day. The next parameter we will adjust will be the multiplier for the Sun color we previously set.
 - Set the Sun color multiplier to a level of 8.
Next, we will set the Sky color.
Though the setting is called Sky color, it is more accurately the ambient lighting color for the entire level.
To observe the effects of changing this color, simply look anywhere, where there is no sun affection on objects from the sun lighting, otherwise known as indirect lighting.
Let's set the Color to the currently visible color of the sky. - To do this, click on the Color sampler box for the Sky Color parameter and click on the sample tool. The sample tool icon is shown in the following screenshot:
- Next, click somewhere on the sky in the perspective viewport that will sample its color.
- For this tutorial, set your Sky Color to RGB 150,200,210.
- The Sky Color multiplier works as the ambient, color multiplier. Since we are going for a more realistic-looking time of day, set this to 0.8.
Sky light parameters are solely used to compute the atmospheric appearance of a dynamic sky. They do not directly affect the rendering of objects in the world (for example, lighting colors and intensities). However, they are used by the engine to compute an approximate Fog color to automatically fog the entire scene in appropriate colors.
Next is the Fog subsection of the Time Of Day editor.
In our case, we only need to adjust the Global density value.
When using a dynamic sky, some haze is already calculated by the sky model. The fog specified by theFog color gets added to that haze. In many cases, the haze may be enough to get properly colored fog for a given period of time. - As we do not require a high amount of fog for a pleasant, realistic scene, let's set the global density to a value of 0.02.
The next setting we will adjust will be the Sky Light Parameters . - Adjust the Sun Intensity Multiplier to a value higher than normal, to give a volumetric look to the fog. For this, try to use a multiplier of 50. For the time being, we will not be setting any parameters for the Night Sky and Night Sky Multiplier, as we will discuss that later. The next setting is Sun rays visibility, in which we will adjust what our basic time of day will be.
- This value controls the visibility of the sunrays. Higher values will cause brighter rays to appear around the sun, and lower values are a bit less stylized but more akin to a realistic look. Set this to 2.0. Finally, to put a nice final touch on the lighting for this environment, we will enable some High Dynamic Range ( HDR ) lighting.
- Toggle the display of the advanced parameters in the time of day dialog.
- Locate, at the very top of the dialog, the HDR Dynamic Factor and set this to between 2 and 3. This will brighten the overall image and increase the variance in some of the color.
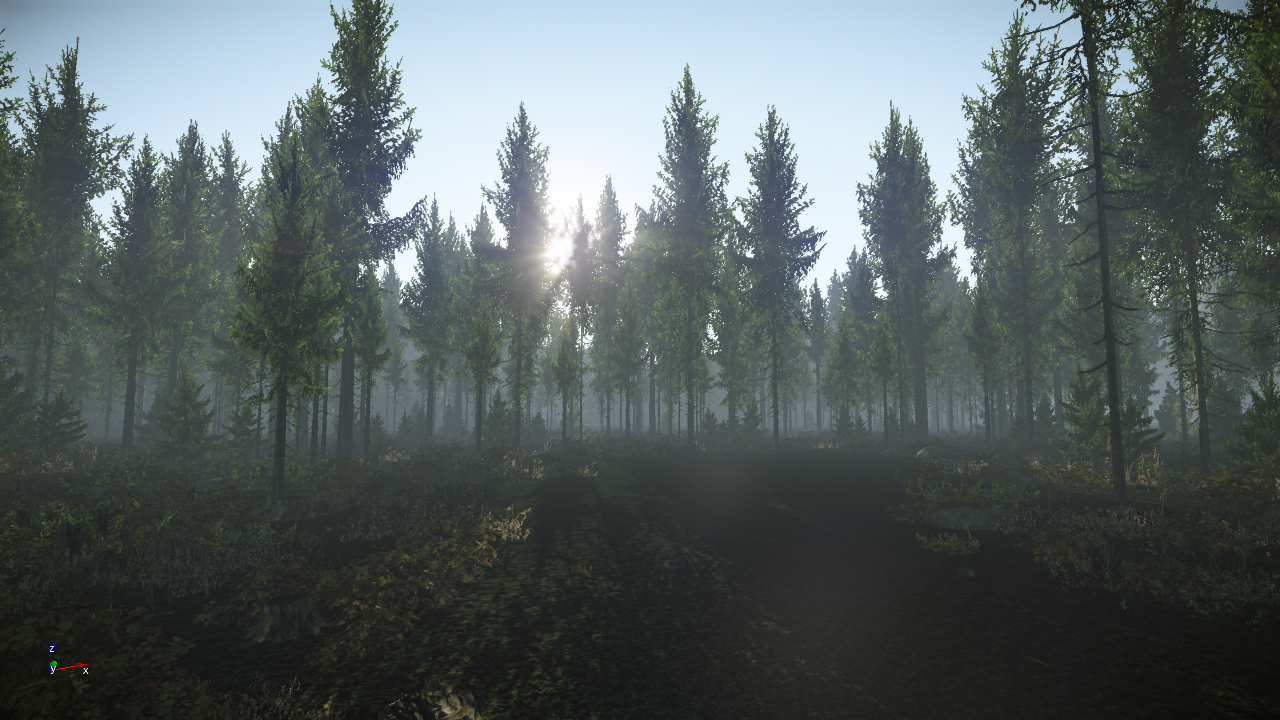
You should end up with something like the following screenshot.

What just happened?
Having now set some of the basic Time Of Day settings, we have added some important aspects to our level. Not so much in terms of gameplay, but rather in theme and atmosphere.
Our level now has some Fog , a good Sun color , some contrast on the ground between shadows and light, as well as a fairly intense sun with sunrays.
An important point to realize is that there is truly no single, correct or perfect setting for the time of day; this will depend greatly upon your taste and your overall needs for different environments. Be sure to experiment with the values, and try to create some dramatically different atmospheres. When using the Time Of Day feature, it is recommended to not have the sun perfectly at the highest position. The Time Of Day dialog box has a huge variety of settings for simulating realistic and surrealistic lighting effects. Having completed setting up the basic parameters will make it substantially easier to adjust the advanced effects that time of day allows you to adjust, to achieve photorealistic-looking, outdoor lighting.
Have a go hero – moving the sun
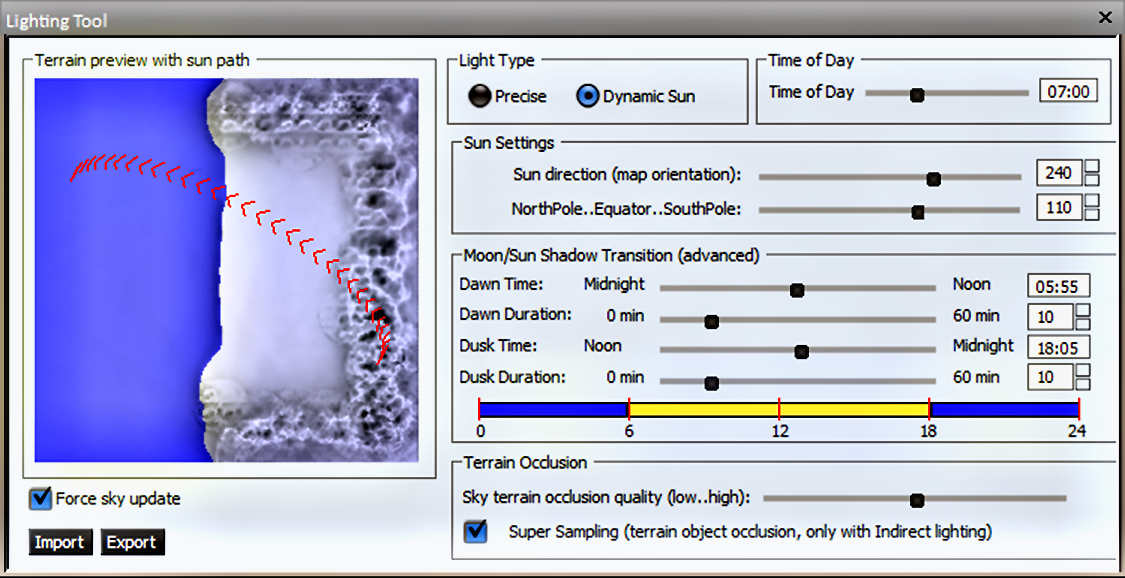
For truly precise lighting, you can supplement the time of day using the Lighting tool.
- Open the terrain Lighting tool by clicking on the Terrain section of the main toolbar and then on lighting. A Lighting Tool dialog box will be opened, as seen in the following screenshot:
 (Move the mouse over the image to enlarge.)
 - Under the Sun Settings section, there are two sliders. Adjust the first slider named Sun direction to the centermost point on the slider. This aligns the sun, so that it rises in the east and sets in the west.
- Next, adjust the second slider named NorthPole..Equator..SouthPole to its centermost position. This will change the tilt of the sun when set at the center; setting the Current Time to 1200 will cause the sun to be directly above you. Adding a tilt in either direction will infer that your level's location, in reality, is closer to either pole of the planet.
- Adjust the tilt slightly towards the North Pole as this particular environment looks to be in the northern hemisphere.
- Click on OK to save your modifications.
North is assumed to be on the Y positive axis (y+) in the CryENGINE.
Do not point the sun straight down on your level
It is good to have some rotation on the sun so that the shadows are not aligned with the world direction and thus objects that may be aligned. This is all done to make man-made buildings and other level objects look better because they are often world aligned and built straight up.
Adding Atmosphere
As with film and television, atmospheric effects play an essential role in a level's environmental design. As you saw in the previous examples, adding atmospheric effects using the time of day tool can change the look and feel of your level drastically. An old building can look perfectly harmless in the bright sunshine, but in the fog it can take on a sinister appearance, which hints at underlying drama yet to unfold!SummaryIn this article, we've found out that gameplay needs an environment in order to take place, and so the creation and design of a level's environment is a critical factor in developing top-quality games. The level's environment is just as important as character design and presents several unique challenges to designers.
Designing levels breaks down into two distinct parts. The first of which is the look and feel of the level's environment, which we've gone over in a good amount of detail in this article. The whole purpose to this article was to provide the space and ambience to host the various challenges of AI enemies, puzzles, and trials within our game. Having made an interesting environment, let's fill it with some gameplay, using entities and objects essential to making our first game example!
CryENGINE 3 Game Development: Beginner's Guide
Discover how to use the CryENGINE 3 free SDK, the next-generation, real-time game development tool with this book


Great read.
Could you please add it to CryENGINE 3 Developers group Moddb.com
Thanks in advance.
Some of the screenshots are missing?
this is amazing..... this is exaclty what i was looking for......THANK YOU!!!!