Hey again and welcome to the final installment in the VA tutorial that I'll be writing for now.
If you missed the first two tutorials you can find them here:
Voice Acting Tutorial #1 - Preparing to do some good!
Moddb.com
Voice Acting Tutorial #2 - Working with text and creating your voice file
Moddb.com
In this blog I'll be writing about the final aspect that you'll be likely to encounter as a Voice Actor in the hobbysection and the Freelancer department. The reason why I write 'in the hobbysection' is because this part is more likely than not in the hands of a professional sound engineer in the event of you getting a professional VA job, allowing you as the Voice Actor to concentrate more on your own stuff.
However, if you work Freelance across borders, and don't land a job so close you can attend a studio session, you might find yourself in a situation where you're encouraged or even required to edit your lines yourself, either because the sound engineer has more pressing things to take care of on his timeshcedule, and/or because the team is small and consists of a small group of people specialised in their own area of expertise.
Nevertheless, in the modding and VA Freelancer world, it pays off to know a bit of software editing, and since you'll be sitting on your computer afterwards picking out the parts you think sound the best anywho, why not wrap it up nicely and save the poor engineer the tedious and easy yet time-demanding work of cleaning up your files.
So, you've made all the preparations necessary, you've got a good microphone, you warmed up, you did all the paperwork and now you're itching to get down under the hood of the sounds you've made. What now?
First of all, make sure you have your copy of whatever audio editing software you wish to use open. If you're still unsure about which one to use, check out my first blog in this series about the preparatory phase. Personally I'll be using Goldwave to illustrate. More often than not I've found that some tuts take things for granted that might confuse completely new beginners, so if you think I'm going a bit basic on this one, bear with me.
In the more advanced programs such as QuBase there's a lot of faffing about in order to even get to edit the sound. You have to import files, set gates etc. Very useful if you're working with longer tracks and need to keep track of all the effects you're adding, but for a quick clean-up detail, its not effective unless you're a sound designer, and even then it might be faster to use one of the free programs.
In all the free programs is just a matter of 'Drag and Drop'ing the file into the programs screen, or if you want to go the technical direction, go to 'File' -> 'Open' like you'd do with any normal document in for example Microsoft Word.
Then its just a matter of finding the file you want to edit and clicking it.
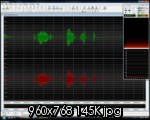
Your screen should now look something like this:
And in my case sound like this:
As you can hear there's quite a number of faults in this recording. One of them was kind of unexpected, which was the doubling (sounds almost like there's two sound files overlayed at two points). If this happened to my sound clip straight from the recorder, and it would not be going through filtering, I'd have to redo it, simply because I have no idea how to remove that kind of static. On the other hand, doing the line over again might even be faster than going technical on the one you have, which would be the case with this one.
Secondly the quality on the microphone is low. For this recording I used my headset microphone, which gives decent quality when I talk on programs like Skype or VT, but when I use it for recording, the quality drops significantly, even when using the buildt in recording feature in the software and not the standard windows recorder.
As you can hear, the clip has a too defined beginning and end, there's background static coming through the roof (well through the window and door, but you get the picture).
I also took care to mute down my S's and T's, otherwise the clip would've been unbearable to listen to.
So we have three things we have to do with the clip in order to make it at least passable for use. Let's see what we can do about that background static.
If you're using Goldwave, click and drag so that you mark the entire sound area. Take care to use the lower one. The biggest field is the detail view and might not, depending on the size of your file, cover the entire file. The slimmer one on the bottom is the overview field and shows the entire file in all its glory.
When you've marked the area it should turn blue or at least give some colour indication that its selected.
You are now ready to edit the selected area.
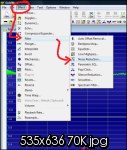
Go to 'Effects' -> 'Filter' -> Noise Reduction
Then its just a matter of trying and failing on what filter you want to apply. Personally I just go with the stock options provided in the roll-down menu near the bottom of the window and tweak as necessary if it doesn't fit my needs. For this operation I simply Used "Light Hiss and Hum removal", which is in my view the one that screws the least with your soundfile (Don't want metallic echo on it do we?). You can test the effect the filter has on the play button to the right of the roll-down menu, and even if you add it by mistake you can remove it again by going to *Edit* -> *Undo*
If you listen to the clip above, you'll hear that the blowing of the wind combined with the ingrained static of the microphone has disappeared. I used the filter twice to get all the static away, but still you can hear remnants of the birds in the background. Had this been a recording I was planning to use somewhere I would have had to scrap it because of those birds (or the TV or whatever it was, bottomline is its not supposed to be there). And would you look at that, we even removed the double effect! Some time adding filters can affect your soundfiles in surprising ways, so never be afraid to experiment.
Ok so now the soundclip doesn't sound as messy as it did before. Onwards to glory!
Next step is to smoothen the start and the end. In order to do this, mark the beginning of the file in the detail or the overview window up to the point where the the actual sounds begin. If you want to use the hotkey click the icon on the toolbar that looks like a small clock with an upward turned arrow. If you want to do it the old style; click 'Effects' -> 'Volume' -> 'Fade In...'
A new box will open and again you'll have a range of presets to choose from. There are two types of fade that I use the most and that is "Fade in, Linear" and "Fade in, Logarithmic". The difference between the two is that the Linear fade will fade in gradually while the logarithmic completely wipes the starting point of sound (or the end if you fade out, and makes an abrupt yet smooth fade just before the clip starts.
For now we'll use "Fade in, Logarithmic".
Then select the end of the sound clip and repeat the process, BUT with "Fade out..." Again you can hotkey by using the clock with the downward pointing arrow.
If you have a clip like mine, odds are you can trim off some dead time. When using the logarithmic fade it goes completely silent, its like a black hole for audio. Use it with care.
Now comes the detailwork. If you have bits and pieces within the soundfile that you want to get rid of, you can use the logarithmic fade for great effect inside the clip. Be aware though, that the silence the logarithmic fade creates is so complete that it will sound unatural beside a voice clip unless you've recorded in a room with no echo or background at all.
If you need to go closer to get the fading done properly, use the zoom hotkeys on the tab above the hotkeys for volume change (eg. the fading among other things). You can see it at one of clock of the far right volume clock.
Also remember that if you fade out, you must remember to fade back in, otherwise you might create a pop as the sound is abruptly returned from complete silence.
In this reference clip you'll hear how unnatural such a sudden silence sounds:
But still the opening and end now sounds very much cleaner, and would more readily fit into a game or vid. The background static that I meantioned is still there as you can notice, and makes the sudden silences all the more clearer. This is one of the reasons I'd have to scrap this recording in favour of a new recording.
So, unless you're unsure what kind of setting your boss wants it in, you can try adding a weak reverb in order to mask the silence, but for that I'd advise getting a set of plugins or using a different program as the stock presets for adding room-feel to sounds in Goldwave also imprints a metallic tinge, like if you were talking from inside a metal barrel. Unless your character is SUPPOSED to be inside a metal barrel, this won't help us in reaching our goal.
Finally there is only one thing to do. Increase the volume. This is something you have to just adjust to by trial and error as it depends very much on the quality and intensity of your recording. But a rule of thumb is that as long as the waveform in your image doesn't expand beyond its track (E.g. the top and bottom goes all the way up past the screen and likewise for the lower part in the opposite direction) you're pretty safe.
In my example you could probably increase the general volume of the entire clip doubly so. To change the volume of your clip, click either the clock with no extra symbols on the toolbar, or go to "Effects" -> "Volume" -> "Change Volume".
And voila, your clip is now cleaned up and ready for use unless you feel like playing around with the filters.
This whole process I've showed you in this three part blog is pretty much what I go through before each recording session. I hope this has been of help to anyone aspiring to get down and dirty with Voice Acting and that it has given some insight into the process of making a single voice clip without the extra fluff that can accompany a sound bite.
And without further ado, this concludes the VA Basic Tutorial series.


This is some good stuff. Appreciate the info on the programs 8D.
So i have been editing my sound clips properly that's good to know :P i greatly liked and appreciated the information from these tutorials.
One of the things i don't qualify for is being in a secluded place so i may never get any practice as a hobbyist VA unless i can get to a place where the need to stay quiet won't over throw the need to actually act out a convincing line. so it may be some time but I'll certainly hold onto these tutorial for reference for when i do have the space i need to work on VA.