The mod you are trying to view has ceased development and consequently been archived. If you are a member of this mod, can demonstrate that it is being actively developed and will be able to keep this profile up to date with the latest news, images, videos and downloads, please contact us with all details and we will consider its re-activation.

An Open Window is an experimental MOD for Half-Life 2, Episode 2. In this project I will attempt to bring the concept of different realities to life in a realistic scenario. Instead of being another Shooter, AnOpWi centers around the role of the player and his/her experience, emotion and memories. By interacting with the world the player will define his own reality within the story. For this project I chose an open development cycle, which means I will update very frequently and share every step I take in the process of creating this game. Next to the regular media updates, I will also share my thoughts on the different areas of game design in the form of articles. In every article I will also ask for your opinion with the Question of the Day. This MOD also functions as a knowledge base for new and experienced designers.

Report RSS Creating quick Normal Maps for Half-Life 2 Materials

This tutorial will show you how to create Normal Maps (Bump Maps) for your Half-Life 2 materials within seconds.

Posted by on - Intermediate Textures

While regular textures are just flat, Normal Maps will create a sense of depth in your texture. The Normal Map is basically an overlay that contains lighting information. These normal maps can be created in matter of seconds using the following steps.

Step 1.
Save your texture as a BMP, PNG or TGA file.

Step 2.
Open VTFEdit, go to File -> Import and load your texture. Then use the following settings.
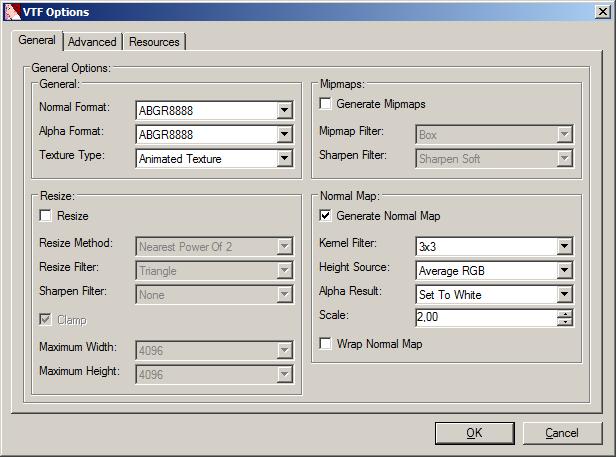
Hit "Ok" and VTFEdit will automaticly create a Normal Map.

Step 3:
Save the file with "_normal" added to the filename ( "brick1a_normal.vtf" )

Step 4:
To make this Normal Map work in-game, you need to put the file in the /materials folder where your textures are stored. Then add the following line to texture's VMT file:

"$bumpmap" "foldername/brick1a_normal"

This should point the engine towards the right Normal Map file. Make sure you use the right folder name where the file is stored.

DISCLAIMER!
This way you can get results quick, but the quality of the Normal Maps created may vary. If you want better results, use one of the programs listed here.

Post comment Comments
DarkPivot
DarkPivot - - 699 comments

Ah, thanks for the link to the VDC page. I was looking for a free CrazyBump alternative yesterday actually. :D

Reply Good karma Bad karma+1 vote
Phsd_OuT
Phsd_OuT - - 1 comments

gud tutorial :)

Reply Good karma Bad karma+1 vote
Post a comment

Your comment will be anonymous unless you join the community. Or sign in with your social account: