Reality Factory is a program that - in conjunction with other tools - allows you to create 1st and 3rd person perspective games without programming! Reality Factory is built on top of the powerful Genesis3D Open Source engine and supports all major 3D graphics cards.
Reality Factory provides most of the tools you need to make a game. You will still need a program to create actors (characters and props in your game) and software to make textures with, but what you won't need is a C/C++ compiler and a couple of coders to build your engine for you. By using objects called "entities" which you place in your world, you can set up a game - with audio effects, multiple soundtracks, and special effects.
Reality Factory is intended to be a "rapid game prototyping tool" - it is able to make playable, interesting games across a wide range of genres but it's not optimized for any ONE kind of game. While you can certainly make a good game with Reality Factory, and even give it away and/or sell it to others, you won't see the kind of blazing optimized speed that you would in other single-purpose engines (like Quake 3 or Unreal Tournament).


Articles
Before we start on this tutorial, I want to point out that you want to have Reality Factory installed to C:/RealityFactory. When you install Reality Factory, the installer will suggest C:/Program Files/RealityFactory, so make sure to change it to just the C drive! If you didn't do that, the level editor RFEditPro can give a whole lot of error messages because of missing files. This is sort of a bug in the installer.
Alright, now that that's out of the way, open up RFEditPro (you can find it in the 'tools' map).
When you start up, anyone with prior experience in constructing levels for Half-Life or Quake will have a familiar sight. The simularities don't stop there: Reality Factory's underlying engine, Genesis 3D, is based on the same BSP algorithm that Half-Life, Quake, and other earlier FPS games also use.
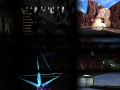
The editor is split up into four views: the camera view, the front, side, and top. The right windows, and the bottom left window will be used to create and edit our objects and building blocks, while the camera view will be used to view our level in 3D while we are constructing it.
Start a new map (file >> new). Notice how our map has a blue box in the side views. You can use the mousewheel at any time to zoom in or out. Try zooming out to a comfortable level, and press the enter key on your keyboard. You have now created your first brush! You should hear a little sound when you pressed enter, indicating that you created something new in your map. Like in Half-Life or the early Quake games, the levels are made out of blocks that you put together. If you look in the camera view, you should see a bunch of weird looking smileys from the stock texture that's been put on the cube. If you hold the right mousebutton inside the camera window, you can move around to view the level, and you can use the mousewheel to fly around! This is crucial for navigating around your level later on.
If you look at the top of the editor, just underneath the 'change' tab, there's a button with a blue box and a mousepointer in it. This is the brush and entity creating tool. As long as you have this button selected, you can create brushes with the enter key on your keyboard. Next to that button with the blue box, is a button with a green box and a mousepointer. Select that, and click on your brush to modify it. If you look to the right of that same row of buttons, there's a button with four arrows on it. Select this button if you want to move your brush around. With this selected, click and hold down the mousebutton in one of the side views to drag your brush to another position. The rotate button next to that does just that: with this button selected, drag your brush in any direction in one of the side views to rotate it around.
Now, as you've noticed, we only created a hollow cube so far. If you want to create complex geomitry, you're going to need to create independant blocks that connect to eachother.
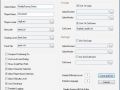
To do this, simply select the button with the blue box again. Notice the information at the right side of the screen, where it says 'box template'. Click the button down there that says 'customize template'. All the above functions that were greyed out, are now available. Click and select the dot that says 'solid'. This will make your brush solid with no 'insides'. In the tool bar at the top, there is a tool called 'scale brush' (you can read it if you hover over it with your mouse). With this, you can resize your brushes (don't forget to select them first with the green box tool!). If you create a few brushes, you should be able to put them together to make a four-sided room. Just make sure all the brushes are sealing off the level! If there are any 'leaks', the game will have trouble compiling. Fortunately, the editor's snap-to-grid function helps you with locking your brushes into the right place. By default, the grid is set at 8 texel, but if you want to move your brushes around with more precision, just go to project >> level options and select any number below the default at 'grid snap'.
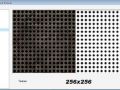
If you like to give your brush a different texture, simply select your brush using the green box button, go to the 'textures' tab on the left side, and double click on the texture you want to assign it to your brush!
Once you experimented a little with the brushes and created a simple room (you can even use a simple hollow cube for the sake of testing), its time to put in your player start so we can test it.
To do this, simply click on the 'templates' tab (if its not highlighted yet) on the left side of the screen. If you look down, you can see the 'entities' tab. If you click in it, you can look through the list of entities that are available to the engine. NOTE: if you installed Reality Factory in the wrong way, you will NOT be able to see the whole list, but only a really short list! Go through the list, and select 'PlayerSetup'. This will determine the setup for our player character. As you can see in the editing windows, the entity will appear as a small blue box with a cross in it. You can place it just like brush, by hitting enter. Now, make another entity, but this time, create 'PlayerStart'. This will determine the location of our player character. Ofcourse, make sure you move it into a suitable location! That means, not into the ground, or through the ceiling, since this entity will be your starting spot.
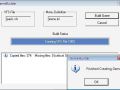
Once you did that, you can save the level, and click the 'Build bsp file' button from the tools (its next to the little refresh button) to begin playtesting your level. Just leave the compile settings as they are for now. Just make sure 'preview in Reality Factory' is selected, and click 'ok' to begin previewing.
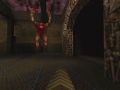
Now you should see the menu screen for Reality Factory, and click through that, you should be able to see your level and walk around in your creation!
For now, I hope this little tutorial provided you with enough information to get you started with experimenting in RFEditPro. From this point on, you can basically find out alot of things simply by experimenting with them. For example, you can hover your mouse over buttons to find out what they do. Reality Factory also comes with a help-file that is packed with information about all the different entities the engine comes with. If you still get completely stuck somehow, you can always go to Reality Factory's official forums to find out more and delve deeper into the material.
Happy editing! :)
Post a comment
Mod SDK & Community
Built a game for Reality Factory and want to support mods? Try mod.io, a cross-platform mod SDK created by ModDB which makes it easy to get a mod community up and running in-game. Currently seeking games to integrate and promote

X
Tags
Embed Buttons
Link to Reality Factory by selecting a button and using the embed code provided more...


You may also like
Quake Engine
GPL

WOLF RPG Editor
GPL

ZDoom
Public Domain

id Tech 6
Proprietary
Xash3D Engine
GPL
Unreal Engine 5
Commercial
Coming from Genesis3D, I am sorely disappointed in Reality Factory, the fact that I cannot apply different textures to each face of a prefab is baffling. HUGE oversight on the dev team.
Even looking at their documentation and tutorials on the main site, the mention alternate ways to make rooms, but leave it at "but its less efficient" without any pointers at all.
Trust me, making a hollow box and re-texturing the inside faces is MANY ORDERS OF MAGNITUDE easier than making each wall yourself and making sure they dont have any gaps or overlaying edges.
I guess I just have to have a separate rig running a 32bit os so I can continue using Genesis3D, cause this port is a train wreck.
If you would like to learn more on how to use Reality Factory, you can download the manual on their main site:
Realityfactory.info
Well appearantly its hard to use this engine... if other people say it is then who am i to say theyre wrong? but my internet's ability to download is screwed up at the moment so i cant exactly test it out...
Its not hard to use at all. There are very good tutorials you can find on Reality Factory's website to get you started, plus it comes stuffed with tools.
The thing is that the engine behind it (Genesis 3D) uses BSP format (simular to the first Quake games, and Half-Life 1), which is considered dated. RF is a great way to get started with your own game, especially if you have any previous experience with modding / mapping for Quake or Half-Life.
its not hard.... just backward and arkrward
plz add some new's about this thank's =)
its hard to use this engine :( please developers of this make it easyer
i tried using reality factory, and its the most difficult thing i have ever used. it made me consider just learning to code.(which so far the easiest code i could find to learn is light c) it has its advantages, and disadvantages. with this you are restrained to a fps, which what i wanted to create was an action. basically what i mean is you have to be a person. you cant be the controller of other units.
is this cool? ... Im sadened by the other comment, he's sad.
awwwww....