Here, you will learn about how to use the .fgd file found in sdk. If you have used hammer, you will be in touch with a file type like this. Or if you are brand new to sdk(s), I will explain what is a FGD file.
FGD file
FGD files contain entities to use in a map. Entities are special placements that are really needed to make a map. Example entity is “light”, which is really needed in a map.
Half-life FGD contains a lot of entities to use. Entities that place the monsters, scientists, doors, lights, water, animations, speaking sentences, triggers, teleporters and many many others.
Back to trinity…
Let’s say you are a mapper who can use Valve Hammer Editor very well and known about its accessories. In the FGD file of Trinity, contains 10 more entities to use. They are…
Env_elight
Env_spotlight
Env_decal
Env_fog
Env_particle_system
Envpos_sky
Envpos_world
Info_light_origin
Item_generic
Func_mirror
They expand the features of trinity. By using them in maps, you can see how trinity is working really. In this tutorial, those entities will be explained one by one.
ENV_ELIGHT
Env_elight is the entity that gives per-vertex lighting to models around it. The lighting is given from the point where this entity is placed. This entity gives lighting only to models. So, even in a dark room with no lights, this entity will light up the models, producing a ghostly effect.
The parameters go like this…
Class info
Name - its name, just simple. You can give it a name to use it in triggers.
Radius – the light’s radius. The more number, the wider distance it lights up the models.
Render color – the color of the light. 255 is maximum. The line goes from “red” to “green” to “blue”. For example, 255 0 0 will be pure red, 0 255 0 will be pure green and 0 0 255 will be pure blue. 255 255 255 is pure white.
Flags
Start on – if ticked, the elight will start once the map is loaded. If not ticked, it must be activated by the trigger.
In this picture, an “env_elight” entity is placed on the top with the “monster_scientist” is placed on the floor, with no “light” entity. The result goes like this.

To use it wisely, placed this entity just below the light source (ex: lamp cone) and below this entity, place the “light” entity.
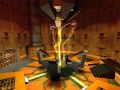
ENV_SPOTLIGHT
Env_spotlight is an entity that produces a flashlight “light” at a position which this entity points. This lights up both models and world as the flashlight. The texture of the light can be changed alternatively, but only possible in original version v3.08f. The custom edition still contain the parameters for the texture but no bug fix for its problem.
The parameters go like this…
Class info
Name - its name, just simple. You can give it a name to use it in triggers.
Pitch Yaw Roll – adjusting pitch can rotate the entity up to front to down to back. Adjusting yaw can rotate the entity left to front to right to back. Adjusting roll can rotate the entity up to right to down to left.
Radius – unlike “env_elight”, this adjusts how far the spotlight goes to its direction and how far the shadows go. 256 is maximum. At least 100 is advised to have the spotlight working correctly.
Render color – the color of the light. 255 is maximum. The line goes from “red” to “green” to “blue”. For example, 255 0 0 will be pure red, 0 255 0 will be pure green and 0 0 255 will be pure blue. 255 255 255 is pure white.
Cone size – the size of the spotlight, just simple. 80 is advised to work correctly.
Texture index – the texture of the spotlight. The source file it reads is texture_flags in the gfx/textures folder. The parameter must be set up like this. “Flashlight example none”. “example” is the name of the texture file in the “texures” directory. The texture must be in tga format. Size is not limited. The texture index must be set to 1 if going to use the external texture. 1 means use texture from the first flashlight line found in texture_flags and so on.
Disable shadowmaps – No means cast shadows from the spotlight, better quality. Yes means no shadows casted from the spotlight, better performance.
Flags
Start on – if ticked, the spotlight will start once the map is loaded. If not ticked, it must be activated by the trigger.
The texture of the entity is addictive. So, if the texture has squared black borders, you can use this entity as a projector.

The big round thing is spotlight.
ENV_DECAL
Env_decal is an entity that places a decal on the world that is pasted on. This also works on brush entities (ex: func_door). This entity is quite simple. The parameters go like this…
Class info
Name - its name, just simple. You can give it a name to use it in triggers.
Decal texture – the name of the decal texture. The decal texture must be placed in gfx/textures/decals folder.
Flags
Wait for trigger – if ticked, the decal will not start until it is activated by the trigger.

The blood under the barney is “env_decal”.
ENV_FOG
Env_fog produces fog. However, it is not like the fog is produced from the entity position. Once the env_fog is placed, the fog will be applied to the whole map. The parameters go like this…
Class info
Name - its name, just simple. You can give it a name to use it in triggers.
Start distance – the distance between the player and the fog. 100 is advised to work properly.
End distance – the distance where the fog ends. A little complicated one.
Fog color – the color of the fog. 255 is maximum. The line goes from “red” to “green” to “blue”. For example, 255 0 0 will be pure red, 0 255 0 will be pure green and 0 0 255 will be pure blue. 255 255 255 is pure white.
Don’t fog sky – when set “no”, the fog will hide the sky. When set “yes”, the fog will only appear on models and world objects and the skybox can be seen clearly till to the horizon.
Flags
Start on – if ticked, the fog will start once the map is loaded. If not ticked, it must be activated by the trigger.

The sky is fog.
ENV_PARTICLE_SYSTEM
Env_particle_system places particles. A very useful entity for superior effects. The particles will appear on the place where “env_particle_system” is placed. The parameters go like this…
Class info
Name - its name, just simple. You can give it a name to use it in triggers.
Pitch Yaw Roll – adjusting pitch can rotate the entity up to front to down to back. Adjusting yaw can rotate the entity left to front to right to back. Adjusting roll can rotate the entity up to right to down to left.
Definition file – the particle file which loads the particle. The file must be in script/particles folder.
Script type – the type of particle script (or) particle. The type is based on the script. Ex: engine_dirt_flecks.txt is cluster type and flames.txt is system type.
Flags
Start on – if ticked, the particle will start once the map is loaded. If not ticked, it must be activated by the trigger.
Remove on fire – if ticked, the particle will disappear when it receives damage.

The fire on the firewood is a particle.
ITEM_GENERIC
Item_generic is an entity that places a model in a map. The most often use of this entity is placing prop. However, the models are not clipped, so you need to place the clipping brush to make it solid. Item_generic cannot be killed and won’t bleed, unlike monster_generic and monster_furniture. So, it becomes a good use for prop. The parameters go like this…
Class info
Name - its name, just simple. You can give it a name to use it in triggers. Also, putting the name can animate the model. If there is no name, the model won’t animate. I mean won’t animate, NOT won’t appear.
Pitch Yaw Roll – adjusting pitch can rotate the entity up to front to down to back. Adjusting yaw can rotate the entity left to front to right to back. Adjusting roll can rotate the entity up to right to down to left.
Render FX – still need to learn
Render Mode – render modes, still need to learn
FX Amount – only need to adjust if render mode is not chosen “normal”
FX color – the color of model, independent from the original color.
Model – the model, you need to chose it from models folder.
Body – the submodels, 0 means first one, 1 means second one and so on.
Skin – the skin changing, 0 means first skin, 1 means second skin and so on.
Scale – the scale of model, nothing in the space means original scale. 1 means 2x the model, 2 means 4x and so on.
Sequence – the animation you that you want the model to animate once the map starts. The animation won’t work if the model has no name.
Light origin – the name of the info_light_origin that you want. The light (or/and) elight entities listed in info_light_origin will only light this model up.

The light pole, car and grass are “item_generic” entities.
PS: The models are from Afraid of Monsters: Director's Cut, so the model credits go to team psyskallar.
FUNC_MIRROR
Func_mirror is an entity that places a mirror. A mirror reflects everything in front of it, like in real world. However, there is some limits in mirror. To have the mirror working, first, place the brush you want to be the mirror in the map. Then, paint all the textures with “null”, except the texture that you want to be the mirror (ex, the front one). The “null” texture can be found in zhlt.wad or other generic texture wads. The parameters go like this…
Class info
Name - its name, just simple. You can give it a name to use it in triggers.
Global Entity Name – not very sure that the name is used in writing error logs if this entity cause error.
Render FX – still need to learn
Render Mode – render modes, still need to learn
FX Amount – only need to adjust if render mode is not chosen “normal”
FX color – the color of model, independent from the original color.
ZHLT Lightflags – special functions concerning with lighting, still need to learn
Light Origin Target – the name of “info_light_origin” entity you want to use. The light (or/and) elight entities listed in info_light_origin will only light this mirror up.

Note: In the picture, you can see the reflection of the player and the world objects. However, when you try the entity, you may not see the player. If you want to see the player reflection, type "te_mirror_players" in the console.
For the entities, “info_light_origin”, “envpos_sky” and “envpos_world”, I am still learning. I apologize if I stressed you.
Thank you very much for reading this tutorial. I wish you have a good and easy time modding with trinity render.
PS: The last picture of func_mirror contains a number "58" on a upper left corner. That is actually nothing concern with trinity or goldsrc. Its just "Fraps", a program I use to know frame rate per second and capture videos and screenshots.
Best regards,
RedFog
let's say that i copy the lines from you fgd then paste them (let's say for example : the cry of fear fgd )
would they work as they work properlly on cry of fear ??
ps:i can't see the picstures on this page :/
well, you can't combine entities like that unless the renderer have its properties in the other, or vice versa.
In your case, you can't do so because trinity's codes are not included in cry of fear renderer.
i not understand the "Texture Index"... than i write the directory of a new texture??