I also show how to create a simple QC file and how to use Milkshape to convert the Source smd-file format that we get from Blender SMD Tools, into a Goldsource compatible smd.
However this tutorial wasn't created for ModDB and I wont do the extra work on formatting it completely again (especially not with something like a MCE editor and limited HTML).
For those of you who want to see an eye-friendly version of this tutorial, please visit my site:
And now I want to show you how to export and compile a *.mdl modelfile for GoldSRC from Blender, using the following tools:
- Blender (version 2.66)
- Blender SMD Tools (version 1.6.5)
- Milkshape
- GUIStudioMDL by wunderboy
Content
- Checking for the correct version of the Blender SMD Tools
- A short summary on basic compile-conditions
- To export or not to export bones using Blender SMD Tools
Before we start:
This should tell you which Blender version the SMD Tools support.
You can as well just try to install them in Blender an see if you can activate them. If not, they have most likely not the correct version.
- a mesh with correctly aligned normals (faces might be visible in Blender but ingame they disappear due to inside out face normals)
- a proper UV map for the mesh (all faces should have proper UV coordinates)
- a material assigned to the faces in your modelling software (in Blender it will have to be named like the respective bmp file, e.g. body.bmp - Blender textures do not need any special naming though)
- at least one static animation sequence
In case your model will just feature one static animation (where the model does not move at all) you can just export the so called "reference"-smd of the model without any armature or bones attached to it (why is that possible?).
If you want your model to feature one or more animation sequences, you will need to fulfill the following conditions, too:
- an armature (Blenders skeleton system) and minimum 1 bone
- an action (animation) which is produced by keyframes (not just physics or constraints) in the timeline (for a proper preview choose a suitable framerate, e.g. "30", in the render settings of your scene - this however will not affect the speed of an animation in-game, which is specified in the QC-file instead)
A blank idle.smd may look like this:
nodes
0 "origin" -1
end
skeleton
time 0
0 0.000000 0.000000 0.000000 0.000000 0.000000 0.000000
end
Using this empty idle.smd will only work for models that have no bones (or maximum ONE bone - bone "0") attached to them in Blender, since the Blender SMD Tools are not made for exporting (fully) GoldSRC-compatible SMD files. This causes that all polys will be attached to bone "0".
What this means for models with more than 1 bone I will explain later.
1. Getting the files
As an example I will use a model that already has some animations and one controller, a little toycar version of the Black Mesa SUV.
I am sure you have already seen it on top of this article.
1.1. Example-files Download
These include the blend-file, the materials (PSD, truecolor and indexed), the QC-file (along with all so far exported SMD-files) and the final mdl-file “toycar_final.mdl”.
2. Exporting SMDs from Blender
You can of course choose your own way of arranging project files into subfolders. In any case: DO IT AT ALL (!), because it will become essentiall when there are a lot more different files and filetypes for complex models like those of NPC characters.
2.1. Open toycar.blend in Blender
Navigate to the blend directory and open the file toycar.blend in Blender (in case blend-files are not associated with your Blender yet, you should do that manually now).
2.2. Inspect the scene
When you have opened the file, this is what you will see (might differ when you told Blender to not load window configuration of blendfiles):

At the moment the only interesting objects for you are the skeleton "Armature" and the model "toycar", which is already connected to the skeleton in 2 ways: an Armature-Deform-Modifier and by physically being parented to it. This was done by first selecting the toycar, then the Armature and then pressing CTRL+P and choosing -.
How this is done in detail I will cover in a separate tutorial.
If you havent already done that, press the small button left of the armature in your scene navigator to see the underlying objects.
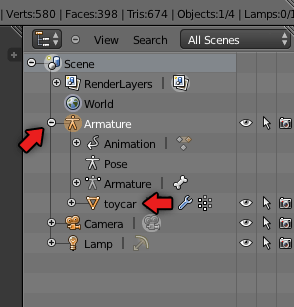
If you select the armature you can also see that there is already an animation sequence associated with the armature. As you will see later, there are even more sequences.
You can already play the current animation by moving along the timeline with the right mouse button pressed.
If you want to see how the toycar mesh is parented to the armature, you can navigate to the Object-Modifier tab in the middle of the Properties-panel:
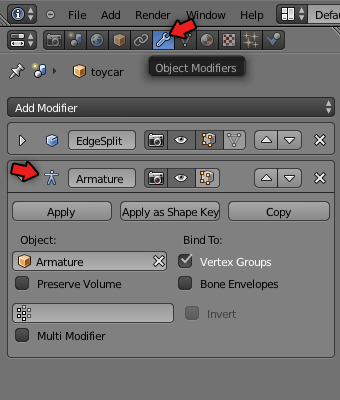
This is because it is still bonded to the armature physically by being parented to it.
You could dissolve this relationship by selecting the toycar and then pressing ALT+P .
![]()
![]()
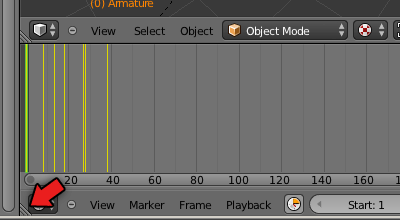
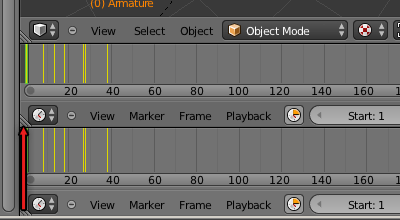
For this navigate to the bottom left corner of your timeline until your mouse cursor changes into a little cross.
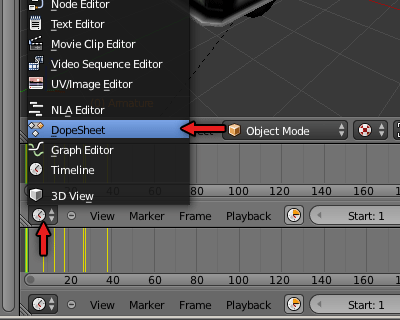

2.3. The SMD Tools
So far so good, but now you probably want to learn something about the relevant stuff.
With every new version the SMD Tools have changed a bit, both in their features and interface, so if you are using another version than 1.6.5. you will probably have to translate the following steps to your version.
Once again:
The Blender SMD Tools are made for exporting Blender files into the Source SMD file format. However the Source and the GoldSRC smd format are pretty close to each other, so it is still possible to export smds for simple models (e.g. without animation or only 1 bone) without any further steps (as I explained above).
Differences between Source and GoldSRC reference SMD-files
Here are some lines of the reference-SMD file of our toycar in Source format (as it will be exported by the Blender SMD Tools):
0 1.000000 -1.362009 1.847306 0.163518 -0.346416 0.923704 0.231964 0.684915 1 1 1.000000
0 1.239749 -1.346065 1.771808 0.856990 -0.159764 0.489914 0.230389 0.651338 1 1 1.000000
0 1.031438 -0.038912 2.795163 0.690054 -0.216895 0.690451 0.450439 0.675454 1 1 1.000000
These are the same lines, just that they are now compatible to GoldSRC:
1 1.000000 -1.362009 1.847306 0.163518 -0.346416 0.923704 0.231964 0.684915
1 1.239749 -1.346065 1.771808 0.856990 -0.159764 0.489914 0.230389 0.651338
1 1.031438 -0.038912 2.795163 0.690054 -0.216895 0.690451 0.450439 0.675454
The most important difference (which makes a Source SMD file useless for us in the first place) is, that all triangles are assigned to bone zero (the first number of each line), instead to the correct bone number.
Instead you will find the bone and weight information for the Source format at the end of the line, where it is usually ignored by common GoldSRC model compiler.
How we will overcome this issue, I will tell you in one of the next steps.
2.4. Setting up the SMD Tools
... and scroll down to the bottom. Here you will find the settings of the SMD Tools.
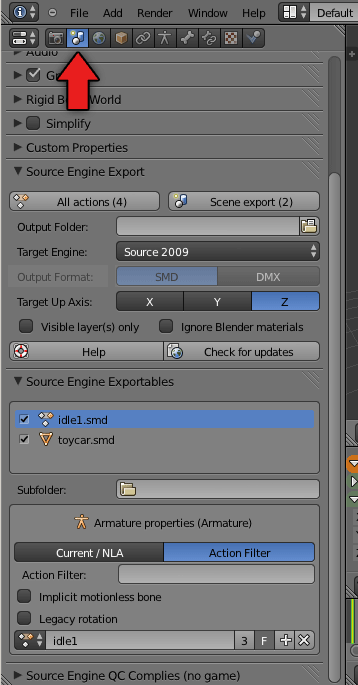
The SMD Tools will let you export seperated objects (e.g. "toycar.smd") as well as the whole scene (which means that all available meshes and actions will be exported unless you say otherwise) by pressing one of the first two main export buttons.
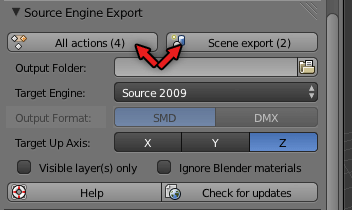
The export button will then say something like "All actions (4)".
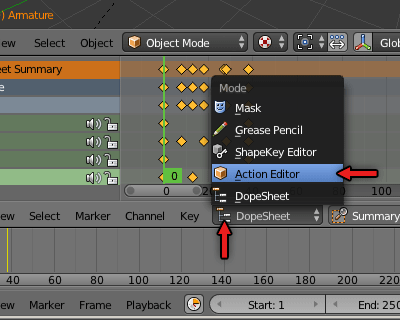
In our case, choose , to export all actions that are associated with the armature.
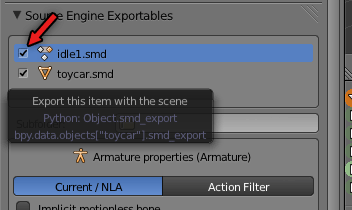
To define wether objects are exported by the -button or not, just check or uncheck those objects at the section. Usually you will just want to export your final model meshes and its animation.
e) Define an output folder
This is what we probably should have done in the first step (remember to slap me for that). If you dont specify an output folder, the SMD files will be exported to the root of your current working directory, since Blender uses relative paths a lot (what I like a lot by the way).
We want our "smd"-folder to be the output folder in this case.
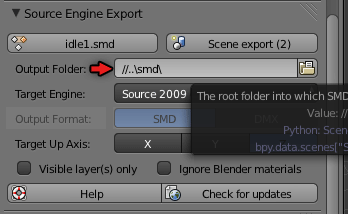
//..\smd\
This is a relative path to the SMD folder as recognized by many other windows programs (as I suppose). It says "from the current root folder (//) move one directory back (..\) and then enter the smd-folder (smd\)" (I just put two and two together here, dont take me too serious).
By the way, by default, animations will be exported to a seperate folder called "anims". As I realized it before, there is no way around this (but its not so bad either).
2.5. Exporting the Scene
- specify an ("//..\smd\")
- at "Source Engine Exportables":
- choose the while having selected in the objects list
- check and in the file export list
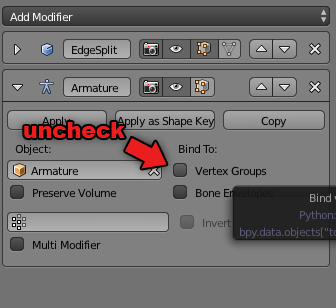
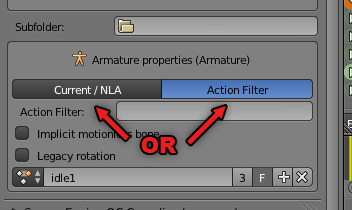
- in case its checked, uncheck the option at the "Armature Properties"
..\smd\toycar.smd
..\smd\anims\idle1.smd
..\smd\anims\walk.smd
..\smd\anims\run.smd
..\smd\anims\static.smd
Most of these files can already be used to compile your final model with, but, as I explained earlier, there is one exception.
Because of the Source format we will now have to convert the reference-smd (toycar.smd) into a GoldSRC compatible smd format.
3. Converting Source SMD files using Milkshape
As there is no other (practical) method I know about, I will now tell you how to convert your Source SMD file into a GoldSRC compatible version by using Milkshape 3D.
Basically its as simple as just importing your reference-smd into an empty MS scene and then exporting it again under the same name (maybe into another folder, e.g. "..\smd\fixed\").
But just to be sure, once again:
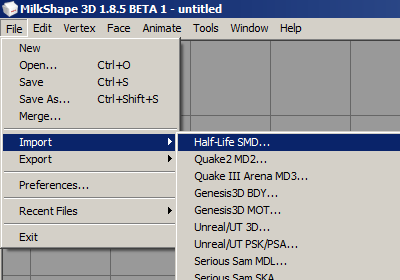
a) Open Milkshape
b) Open a new file
In the menu choose - to reset the scene.
c) Import the toycar.smd
In the menu choose -- while leaving all settings checked (Triangles, Skeleton and Rename Bones, even though I consider the last one is not doing any difference).

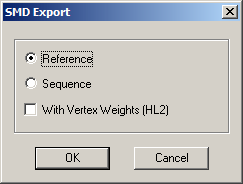
d) Export the scene
Now just export the scene again -- using the settings (but no Vertex Weights)
You can now move on to creating a QC-file.
4. Creating a QC file
QC files define the properties of the compiled model and put together everything, that has been created so far – your model (the reference smd files), its animation (the animation smd files) and its materials.
Additionally you can specify things like bone-controller (e.g. for controllabe heads and mouths), body-groups, texture-groups, advanced settings for animation sequences and attachments (e.g. for sprites like muzzleflashes or the gargantua eye glow). You can also specify Hitboxes, the position of the entities eyes and even more stuff I dont remember right now (I am not a brainman, you know).
For now, we will be satisfied with setting up a simple QC file, where we define some paths, the animation sequences and one controller.
For more detailed informations about setting up QC files, please google for any Half-Life SDK (2.3 seems to be the latest). It will contain a doc-file similar to "Modelling for Half-Life.doc".
Basically I can tell you, that the qc file contains information in the form of commands that begin with a $-sign. Dont get scared and associate this with coding though!
a) Creating a QC-file
In the root project folder create a textfile and rename it to something like "built.qc".
b) Specifying compile-paths using $cd and $cdtexture
$cdtexture mat_index
Paths can be absolute or relative. Relative paths are relative to the position of the qc file.
Absolute paths should look like this:
//or (in case folder names contain spaces):
$modelname "D:/Modelling Projects/blender_smd_tutorial/toycar.mdl"
Relative paths can look like this:
$cd smd
Note: If you dont have any subfolders, you can as well completely leave out $cd and $cdtexture.
Note: $cd will be the base for all further paths where smd files are involved (e.g. those of $body and $sequence).
c) Specifying your final modelname using $modelname
d) Specifying the scale of your model using $scale
Usually, if the models scale is already matching the final ingame size, you can skip this command.
e) Specifying the main body-mesh using $body
Here you just place the path and name of the reference-smd that contains the models mesh.
Note: Any declaration of files (except $modelname) happens without adding the file-extension! Thats why "toycar" is not "toycar.smd" and sequence-paths are specified like "anims/walk" and not "anims/walk.smd".
f) Specifying sequences using $sequence
$sequence idle1 "anims/idle1" fps 30 LOOP ACT_IDLE 1
$sequence driveslow "anims/walk" fps 30 LX loop ACT_WALK 1
$sequence drivefast "anims/run" fps 30 LX loop ACT_RUN 1
I would also recommend that you take a closer look at existing qc-files (which can be generated out of any compiled models by decompiling them, e.g. using the MDL decompiler by Jed, OR you just look at those that are shipped with the Half-Life SDKs).
Just to explain this one a bit closer:
- driveslow – This is the name of the sequence that is visible in the final mdl-file. This name can also be used by various entities in hammer, like the scripted_sequence.
- "anims/walk" – This is the name and the path of the animation-smd for this sequence.
- fps 30 – This is of course the framerate for this sequence (here it finally gets specified – remember that specifying FPS in Blender hasnt any effect on the exported animation).
- LX - This short value defines, that the transformations of the model during these sequence are affecting the characters actual location and rotation in-game, which is important for a lot of animation-sequences where the character covers a distance (e.g. a simple walkcycle).
- loop – This indicates, that the animation is an endless cycle (e.g. like an idle-animation).
- ACT_WALK 1 – When you use this on a sequence, the characters AI will be able to use this sequence for its usual in-game behaviour, like walking, turning around, getting hit and attack. The last number specifies the possibility for playing the sequence.
Simplified a $sequence command can as well look like this:
g) Specifying bone-controller using $controller
- 0 is the controller ID (0 - 3 are possible)
- logo is the name of the correspondent bone, which will then get controlled
- YR says that this controller controls the rotation of the Y-axis of this bone (X, Y, Z)
- -90 90 – these are the minimum and maximum limits of rotation
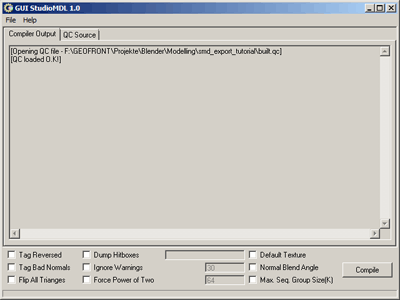
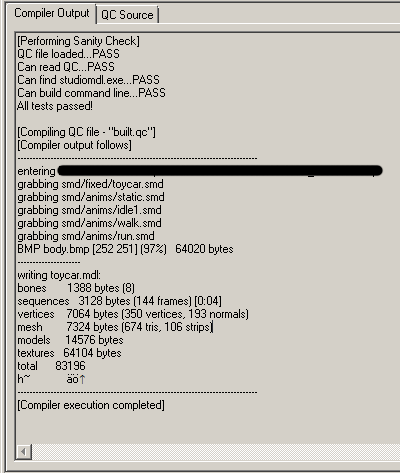
5. Compiling the model using GUI StudioMDL
When you have set up your qc-file so far, you can finally give it a shot and compile the model. If there is still anything wrong at this point, GUI StudioMDL will hopefully tell you what, so you can fix it.
But for this to happen (or not to happen, depends) you will first have to install GUI StudioMDL. When done, just navigate to your project folder, where you created the qc-file, and run it (that is, if qc files are associated with GUI yet. If not – try it manually).
6. The final model
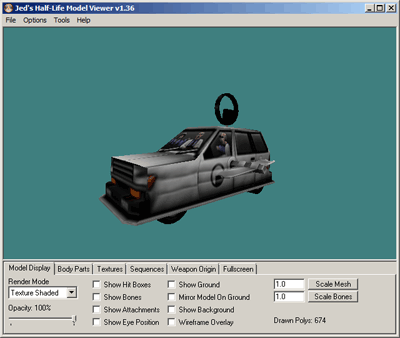
You can try using it in-game.
I went a bit further and replaced my barney.mdl with this and it worked just fine. The game even uses the logo-controller for Barneys head-movements.
7. What else?
I hope I was able to show you the principle of the process and even give you a bit background information.
Information about QC-files
If you need more informations about QC-file setup, look for the Half-Life SDK on the internet, it will be there, anywhere.
For example here.
Blender Tutorials
If you want to learn more about Blender, look for Blender tutorials on the internet, its not that hard. Video tutorials are good for people who learn stuff better by seeing it (like me).
The site Blendercookie features a lot of free video tutorials and there are a lot of good Blogs like blenderguru.com and blendernerd.com.
Is there any alternative to Milkshape?
I am afraid this is a question where I dont know a good answer for. I thought of building a script that does the same as Milkshape, but I am not a coder of course. Unfortunately the author of the Blender SMD Tools doesn't seem to find it necessary to built in this little feature (maybe hes just not aware of it?!).
If somebody knows a good alternative or way to do this, please leave me a message and my special thanks goes to you!


Brilliant tutorial, well explained too, thank you!
Glad you liked it, thanks too :)
video please
New milkshape link: Milkshape3d.com
Indeed a fantastic tutorial. I've got a question. At the moment I'm basically just an animator creating tons of new npc animations for various npcs in Hl1.
How ever after a certain amount of decompiles the UVs will lose their coordinates and I'm getting weird texture errors such as this one:
I.imgur.com
Any idea how to fix that? Some model artists told me that's easy to fix and would be a matter of few seconds. Unfortunately they didn't say how. So I can't imagine they actually unwrapped the whole thing again. Do you know how I can fix the textures to fit the UV again? Again I'm not really a model artist myself so if it gets to complex I might need to ask for help on the subject.
The big issue I have with this is that Milkshape is $35. Any cost renders it no longer universally accessible.
EDIT: And you've already addressed this. Stupid me.
Can we please have a new version of this tutorial