Hey all. This is my first time writing a tutorial, so please bare with me. I hope to make it as clear and easy to follow as possible, so it's a bit image-heavy (I'm looking around for a good free desktop recorder). I'm also constantly changing the formatting around until I find a presentation that works. If you have any suggestions or feedback, feel free to leave a comment here or contact me privately.
Introduction:
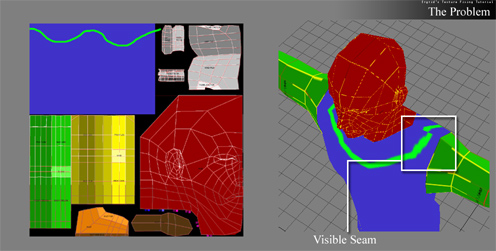
If you've tried your hand at texturing before, chances are you've run into some pretty common problems – visible seams and texture warping. These can be made worse by poor UV maps which sometimes the texture artist may have little-to-no control over. This tutorial is designed to eliminate all that guesswork involved in going back in forth between your 2d and 3d programs to fix these problems, instead letting you paint directly over the errors on the 'wrapped' version of the texture.
It may seem a bit long at first glance due to all the images, but once you know and understand whats going on, this is a fairly quick process (perhaps two minutes, painting aside). It takes inspiration from both this concept and a technique I've been taught by Carl Callewaert when fixing matte paintings for Camera Projections, and a little bit of my know-how to combine the two.
(Note: this tutorial assumes the user has basic XSI knowledge and shortcuts)
Unfortunately I don't currently have a real-world example of a seam at the moment, so I'm just going to use XSI's Primitive Man as it is basic and saves me the time of unwrapping and texturing it. Sorry if the bright colors are hard on the eyes - I'll be updating the images in the future using more of a finalized character/texture. Since this example character is extremely basic, I had to make a quick edit to it first in order to create a problematic seam:
------------------------------------------------
Step 1:
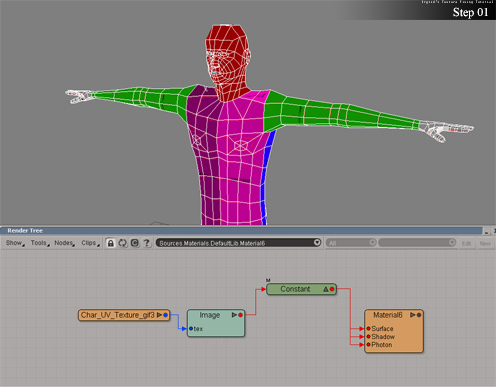
The first step is to make sure your using constant materials. This will get rid of lighting information such as specular and shadows, allowing us to focus primarily on the color map itself.
Step 2:
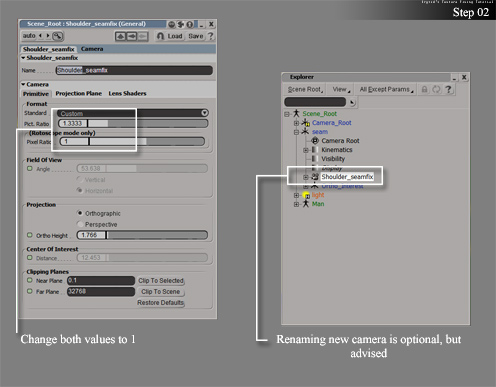
Next, create a new camera, and change its properties so that the Pixel Ratio and Picture Ratio are both set to 1 (I'd also highly recommend giving the camera a name).
Step 3:
Now we'll want to isolate the problem. Switch the viewport to your new camera, and position it so that you have a great view of the problem you want to fix. This will be the view you'll be painting over in a bit, so make it a good one (straight on if possible). Once you are happy with the view, it is critical that the camera not be moved, so please keyframe the camera along with its root and interest. Accidents happen, so having the positions keyframed will usually save you some trouble.
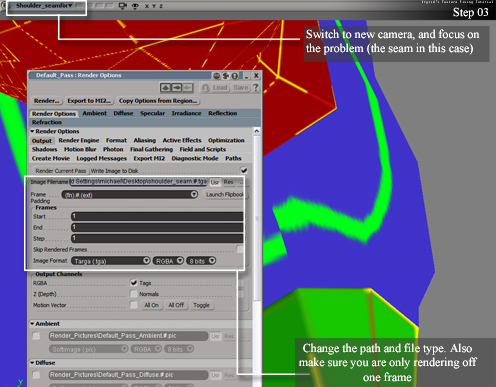
As I said, we'll be painting over this view, so we'll need to capture it as a 2d image first. Open the Render Options, and change the path output to a folder of your choice, and in a format you can edit (I used a .tga). Also make sure to change it so that it only renders 1 frame.
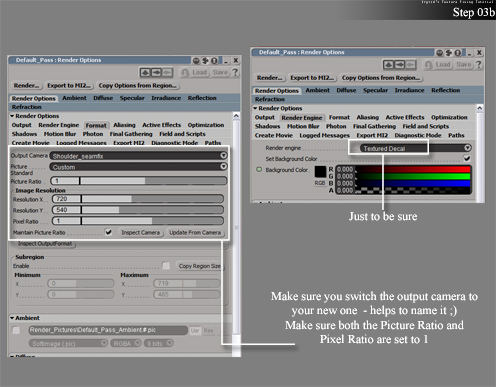
On the format tab, make sure to set the output camera to the camera you created in Step 2. Again, set both the Pixel and Picture Ratio to 1. I also switched the render engine over to Texture Decal just to be safe and speed things along.
Step 4:
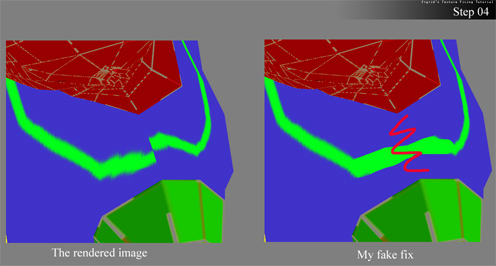
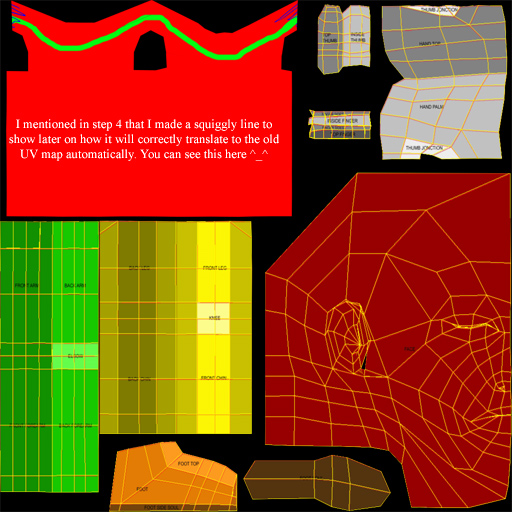
You now have a screen shot of the problem you can open with a 2D program such as Photoshop, and easily paint over your problem, be it a seam or a warp. In the example you can see the original image to the left, and the change I made to it on the right (these two images are in photoshop). I'm just using a basic example, so I quickly fixed the visible seam, and then made a squiggly line over it to give you a good example of how good it works later on.
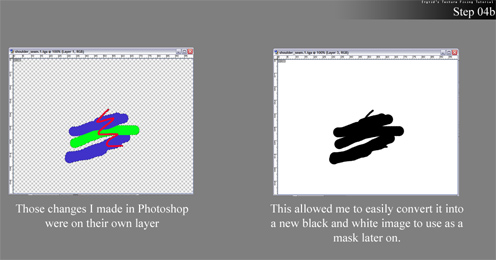
I painted my desired corrections on a new layer in photoshop, so that I would be able to quickly generate a black and white mask which will be needed later on. So now I have 3 images: the original texture, the render that I just painted over and fixed, and the black and white mask.
Step 5:
First of all, change the viewport back to the original camera – we don't want to touch the one you created in step 2 as it has to remain in the same position it was when you rendered off the image in step 3 (this is why I recommended keyframing the positions of it)
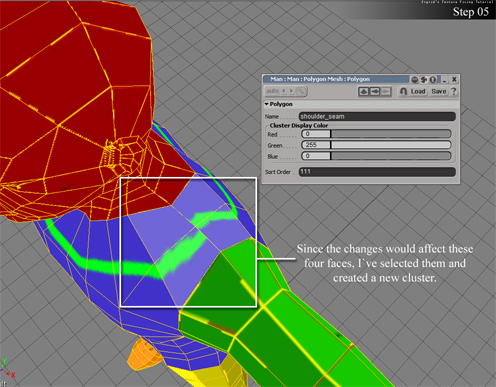
We only want to fix a certain area, so we have to isolate it with a new material. Here I've selected the 4 faces that would be affected by my 'quick fix', and created a cluster.
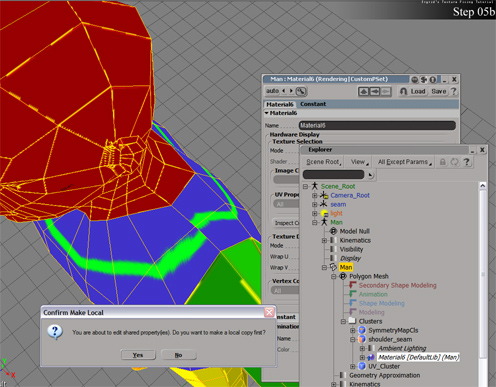
The cluster still has the same material as the model however, so we need to give it a copy. Open the Scene Explorer, and find the cluster you created, then double click on its material. A window will pop up asking you if you wish to create a local copy, click yes.
Step 6:
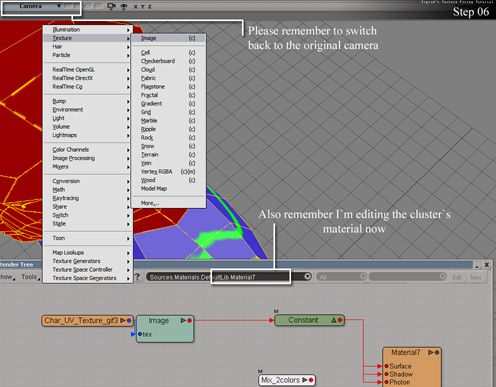
Select the cluster again in the explorer, and open up its render tree. Bring in a mix_2colors node, and plug that into the surface port of the main material node. The existing texture should be plugged into the 'color1' port of the mix_2colors. Bring in a new texture, and plug it into the weight of the mix_2colors node (I hope this isn't confusing – there is an example image in a bit of what the render tree looks like).
Step 7:

Select the texture you just added, and change it so that it is using your black and white mask for an image clip. For the Texture Projection, select 'Camera Projection' and assign it to the camera you created in Step 2 (naming it really helps) .
Bring in another texture node, and plug it into the 'Base Color' port of the mix_2colors node. Set it to the image you touched up in your 2d program (step 4), and again give it the Camera Projection with the camera you created in Step 2.
Step 8:
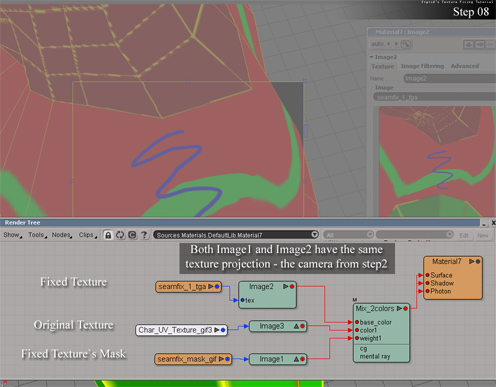
Here's the final render tree for the cluster to give you a clearer example of how everything should be connected.
I should point out my computer crashed at this point and I hadn't saved, so I had to quickly redo the steps. As you can see I painted the torso red this time instead of blue.
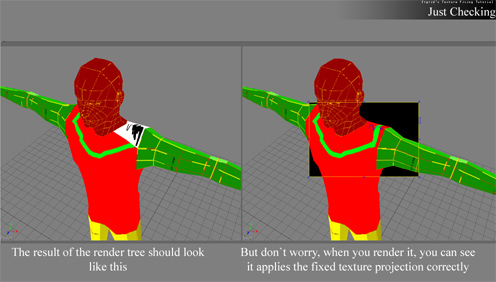
Just a quick check to make sure it looks correct.
Step 9:
My original plan was to use XSI's Rendermap tool, which would regenerate the new surface appearance into a new image with the original UV set. However I was getting an error with the Rendermap, and instead used the lifesaving Ultimapper. Ultimapper requires a 'high res' model, so I just duplicated the man mesh.
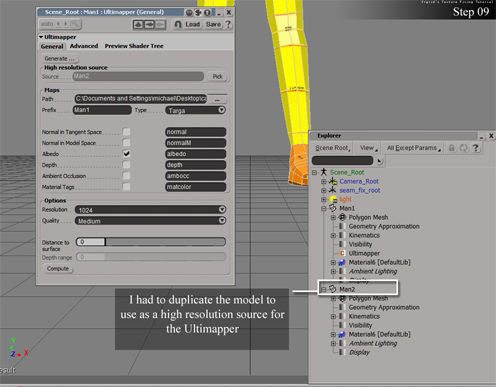
Set the path so that it will create the new texture where you can find it. Again I rendered it off as a targa, and only with the Albedo information. I chose to keep the 1024x1024 resolution, and just went with medium quality because I'm just doing a quick demo. Afterwards, just hit 'Generate' at the top and let it do its thing.
Step 10:
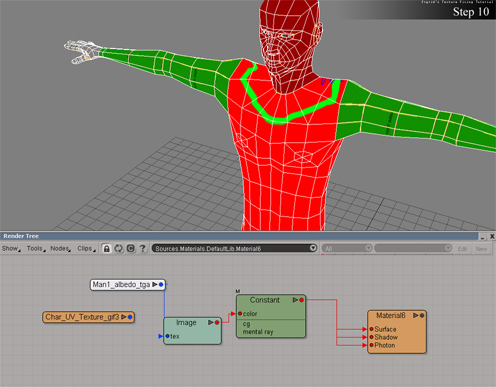
Now that we have a new and improved texture with the original UV map, the last step is to delete the cluster we created, and update the original texture to the new image.
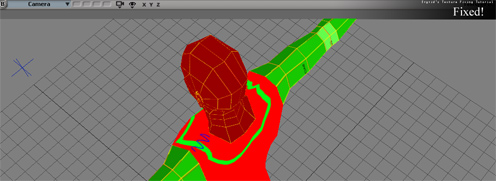
Success!
And here's the final texture map it generated back to the original coordinates:

Wow, that's a lot of steps. An easier method would be to use DeepPaint3D. It has a wonderful projection painting mode that addresses painting over seams.
Also, there's another program called BodyPaint 3D , which I hear is quite good.
Won't seem to let me reply to comments, so I'll make a new one. It's quite a few steps as I'm trying to make it as clear as possible due to my lack of a screen recorder - the process itself is actually pretty simple once you've done it, and takes less than 2 minutes to set up after you understand the concept and know what you are doing.
As for 'easier' methods, not everyone is in a position where they can pay $160+ to add additional software to their pipline, and some probably wouldn't want to get caught using warez (probably not the case with the modding community, but this tutorial was originally written for Softimage's Official Community Forums). I'm just teaching XSI users how take advantage out of the program so that there is no need to pay additional money and introduce new software.
I'd love to see this in Video Tutorial format. For future reference, you can grab a copy of CamStudio (http://camstudio.org/) for free and use that to capture what you're doing on the screen with voice.
very well written. good job!
Cool :D, clever way of solving a problem if you ask me. I would have never thought of it :D.
Are their any games / groups / engines this should be linked too, to help people find this tutorial?
Wraiyth: Awesome, thanks for the link! This looks like it could do the trick, so I'll give it a shot.
INtense!: I'm not sure - I had given the group area a search to see if there were any that relate to XSI, but couldn't find any. I suppose the 'Texology' as well as the 'Texture Artist Guild' could be a fitting home for it, though I'm not a member of these groups (I'm a bit unclear at how this all works, but if that isn't a problem then I wouldn't mind linking them)
Interesting idea. I should once check out if this can be applied to Blender3D. I think so though since they have a "Texture Bake" feature which might even cut out some steps. Thanks for sharing.
Works well with Blender3D too without requiring camera juggling. Is there at all any interest in an adaptation of this tutorial for Blender3D usage?