I'll work on Darkscape, with an up to date CoC SDK ( Moddb.com , Moddb.com ).
Please check our downloads section as it's very likely there is another CoC SDK update by the time you are reading this.
Anyway, all the following lines applies if you work with the CoP vanilla SDK, too.
Oh, and don't forget to often save your work, with incremental saves and in another folder than the “levels” one. So you'll be able to revert changes if you made a mistake or the LE starting to have a weird behavior. And you won't overwrite the original files.
Alright. That said, here we go.
Open the Level Editor (by the “!LevelEditor.cmd”) and load the map you want to edit.
* I'll name the Level Editor by “LE” after this.
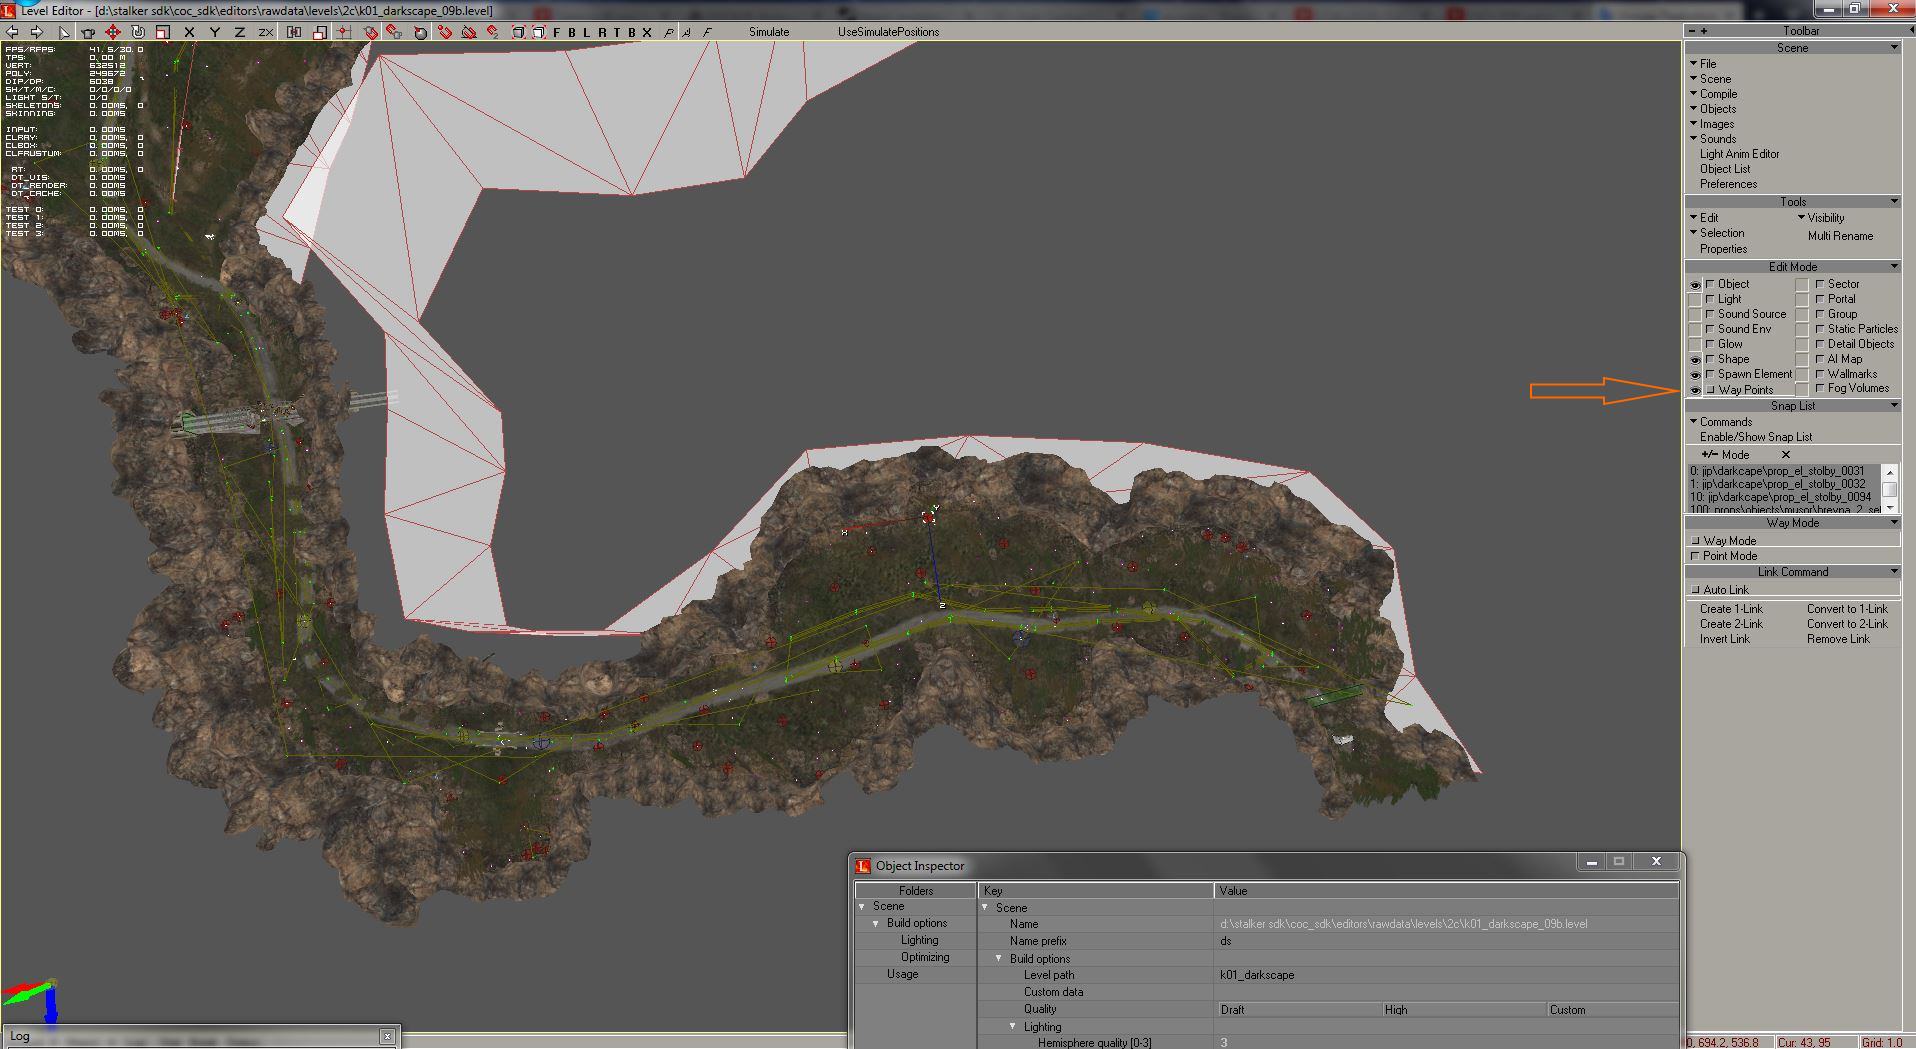
1 – Select your spot :
Depending the spawn you want to create, choose your spot wisely. For artifacts and anomalies, we don't want the npcs to simply cross them. Especially with CoP engine.
On the other hand, if you want to create npcs spawn, interactions with others spots is a mandatory information too.
So, before adding new things, just give a look at the Way Points and choose the place.
2 – Adding the anomaly_spot :
The “anomaly_spot” is a “space_restrictor” in the Spawn Element section which will create references for all what follows.
It determines the spot itself, its type and what the player will see in the PDA.
But this space_restrictor needs to be attached to a shape, so let's create this shape first.
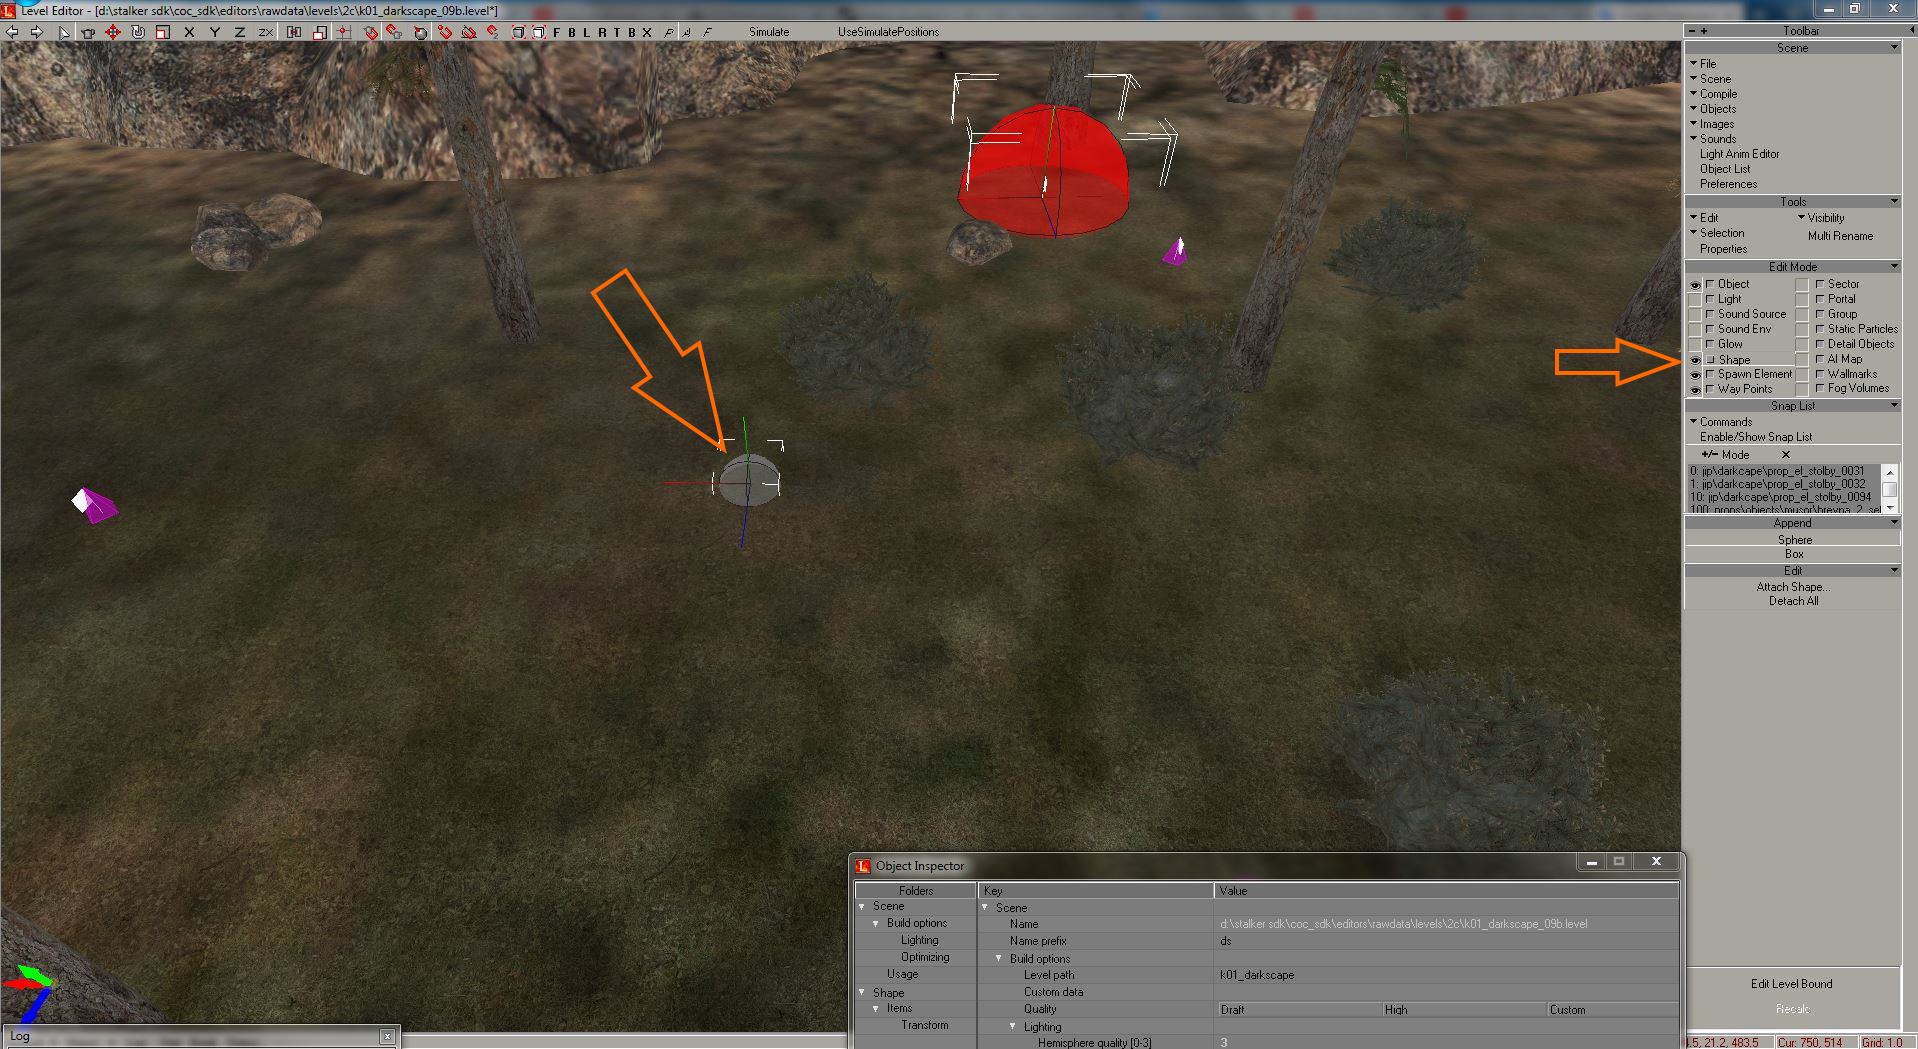
Now in Spawn Element mode, make a space_restrictor near that shape.
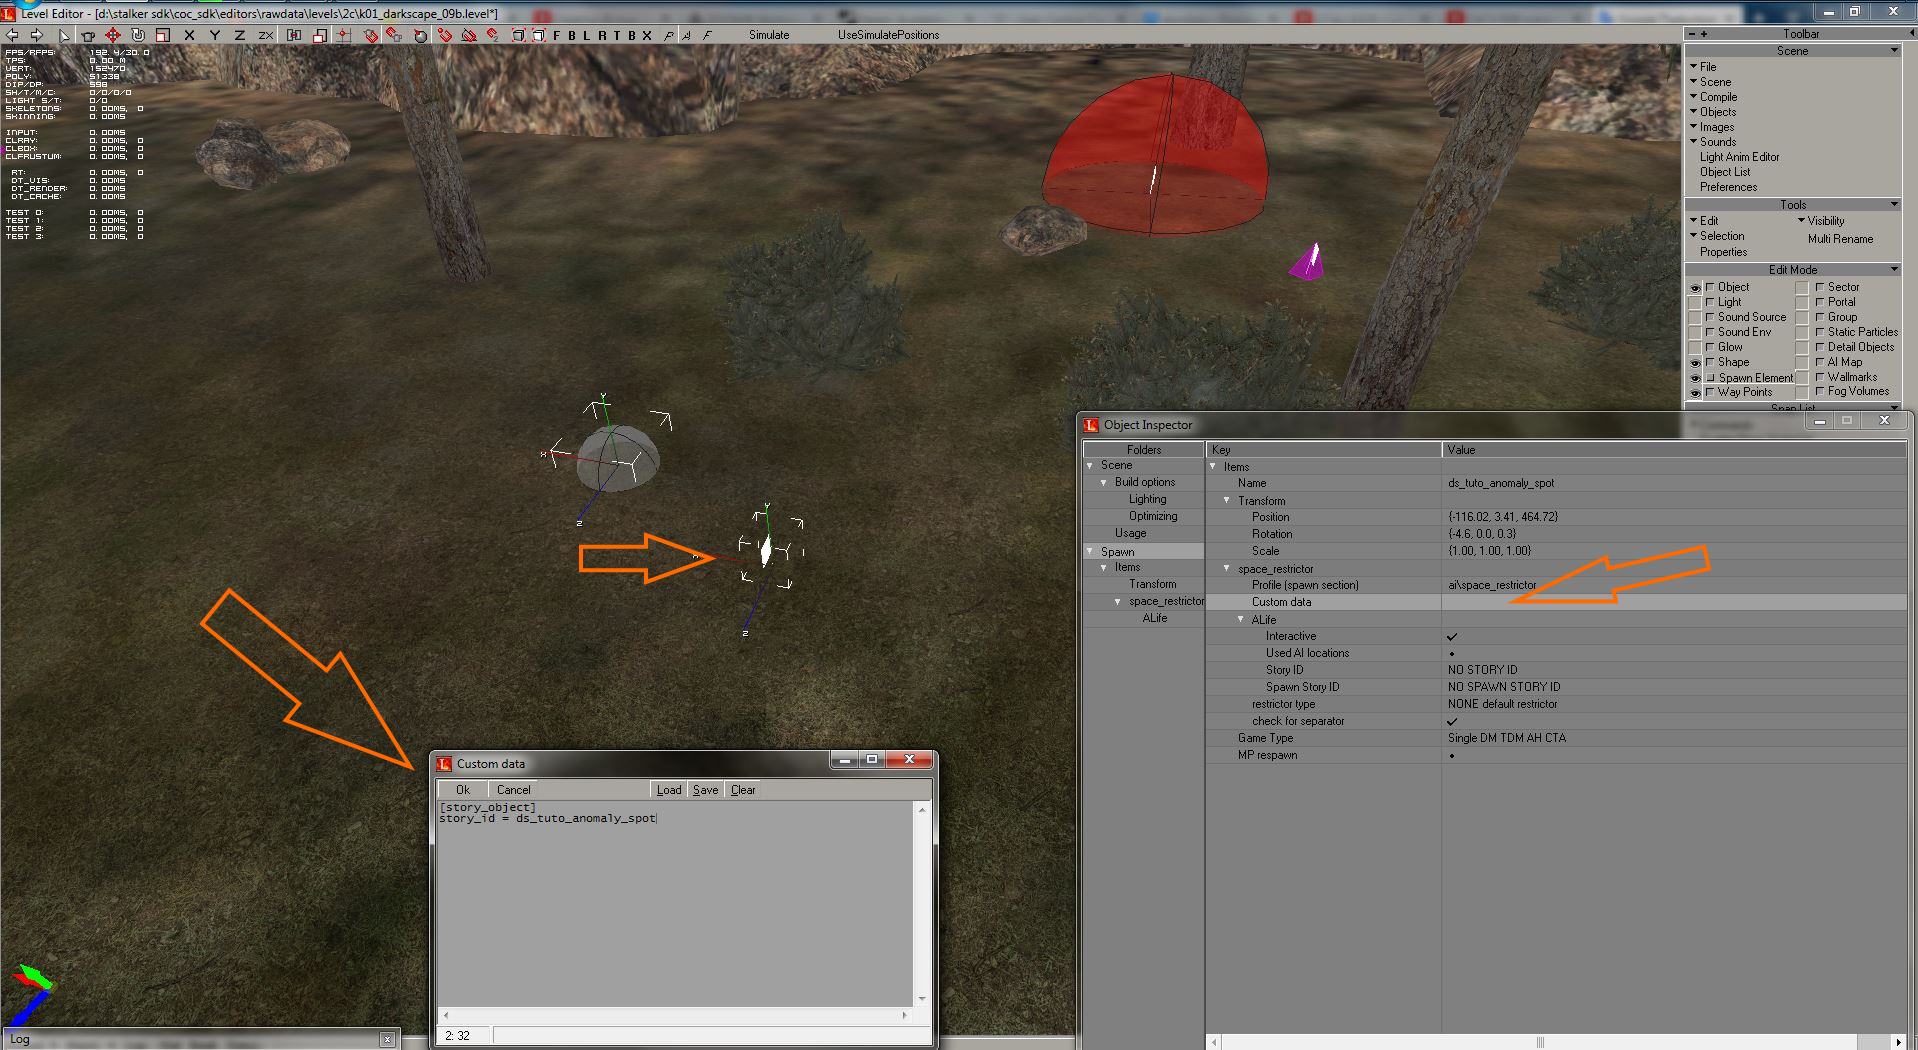
It needs to have a relevant name (we'll copy/paste this name often, later) and some properties in the custom data.
For anomaly spot, it must be
[story_object]
story_id = the name of the spot
For the correct window to edit the custom data properties to show up, you have to click Custom data field for 3, 4 times.
Now, attach it to the shape we created before.
Select "Attach Object" and click on the shape.
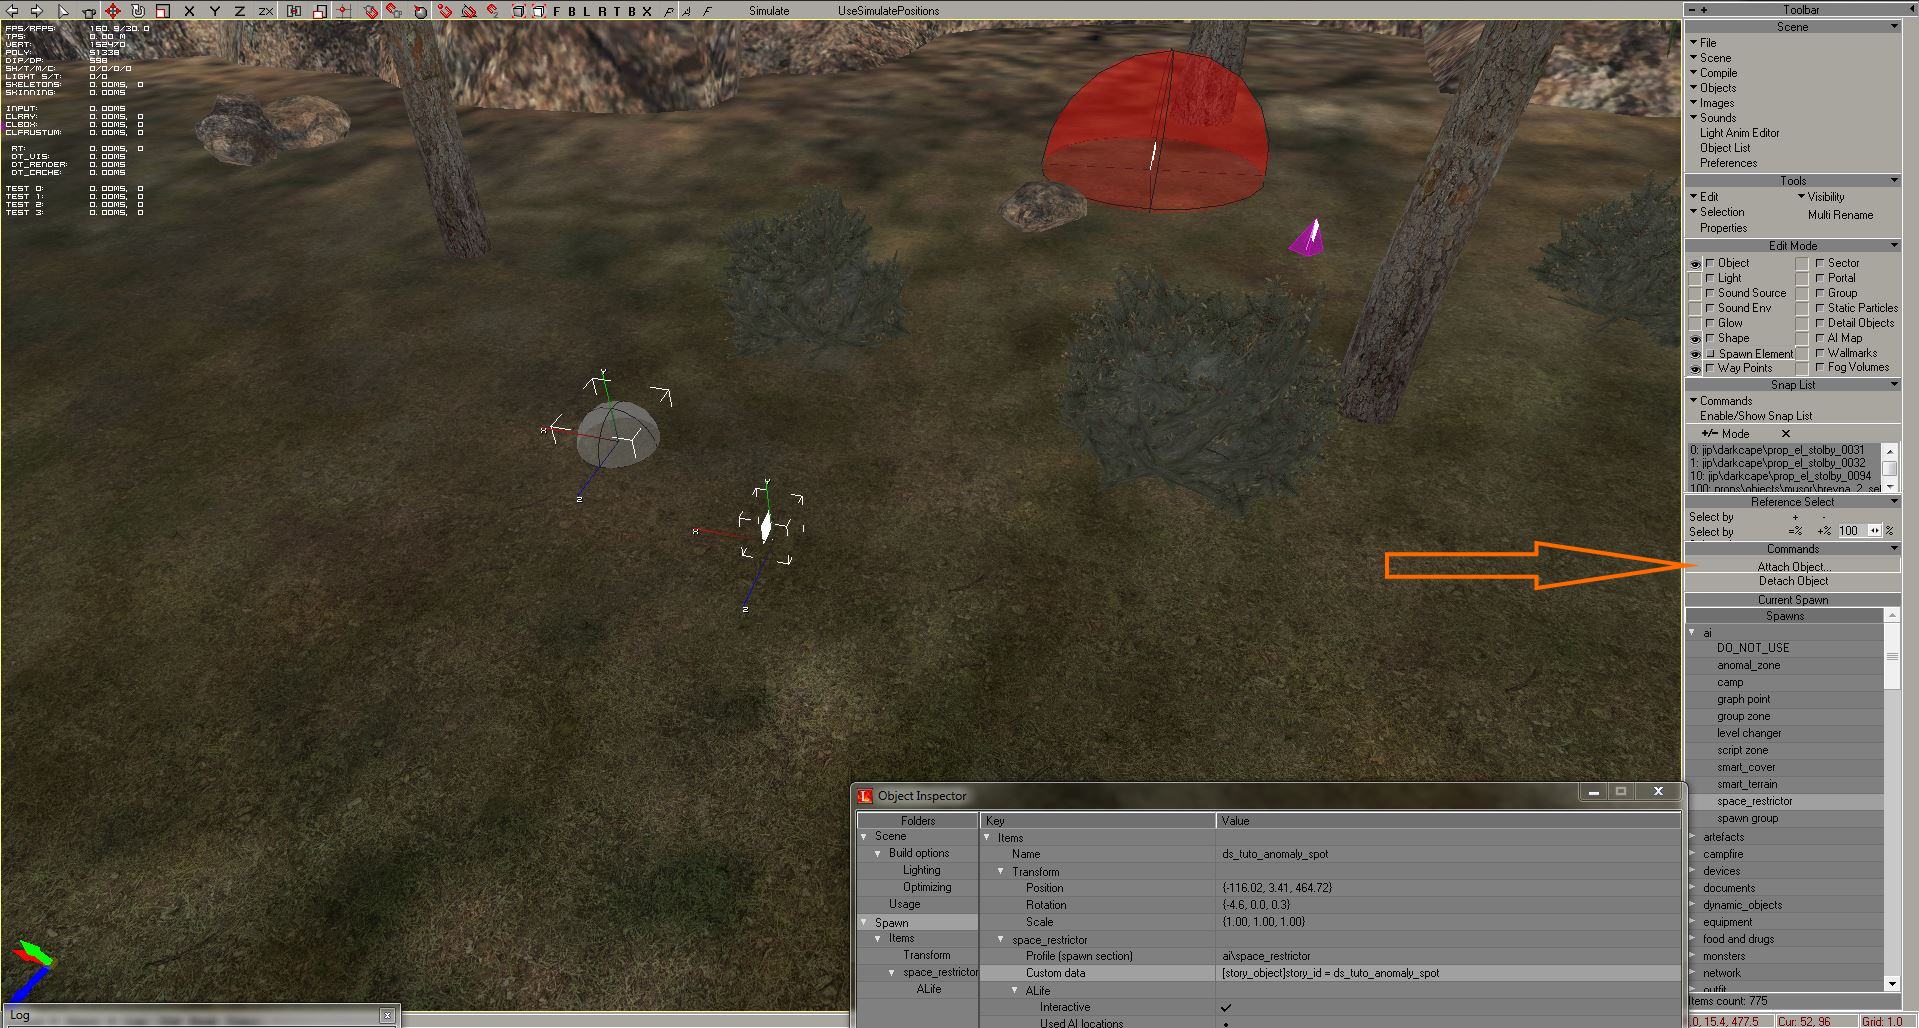
As you can see, the shape has become the space_restrictor, it's now a spawn element.

3 – Adding anomalies :
The simple part.
Scroll down Spawn Element's Spawns menu, expend the “zones” section.
Select the mine type(s) you want and simply add them.
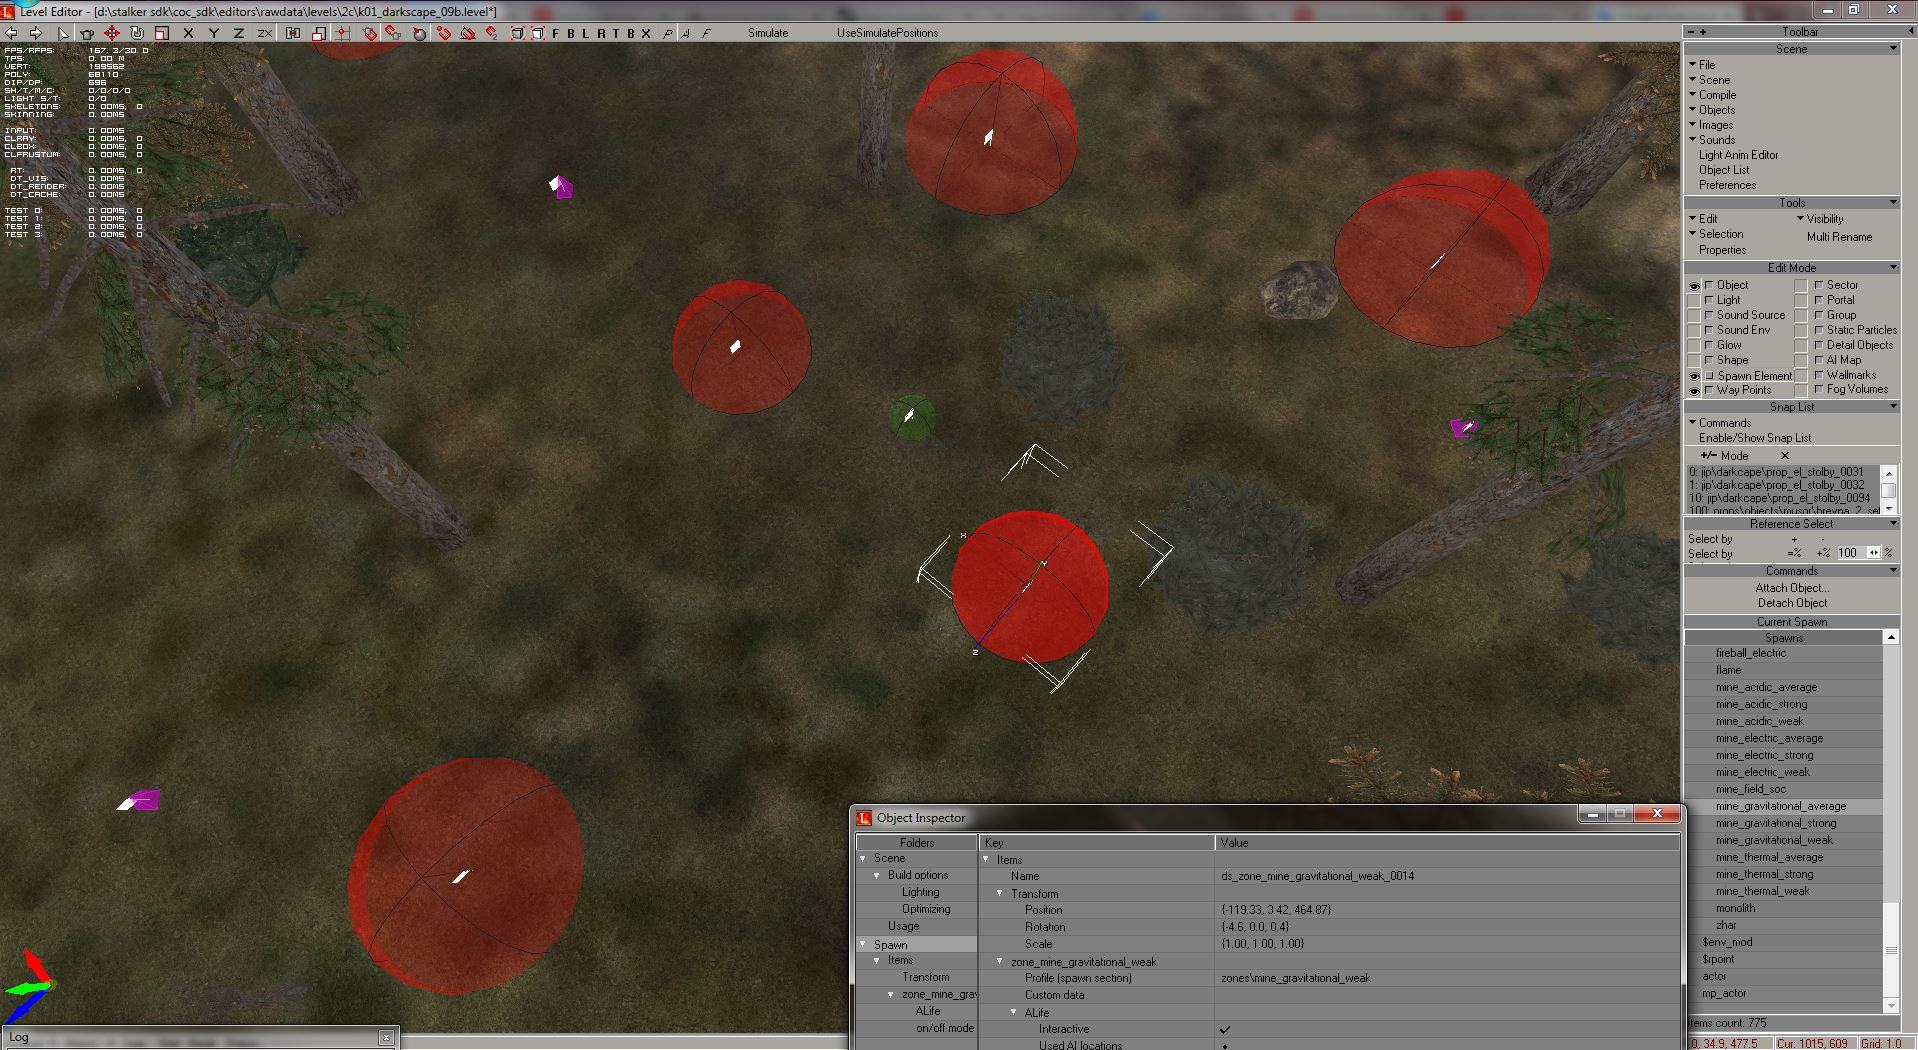
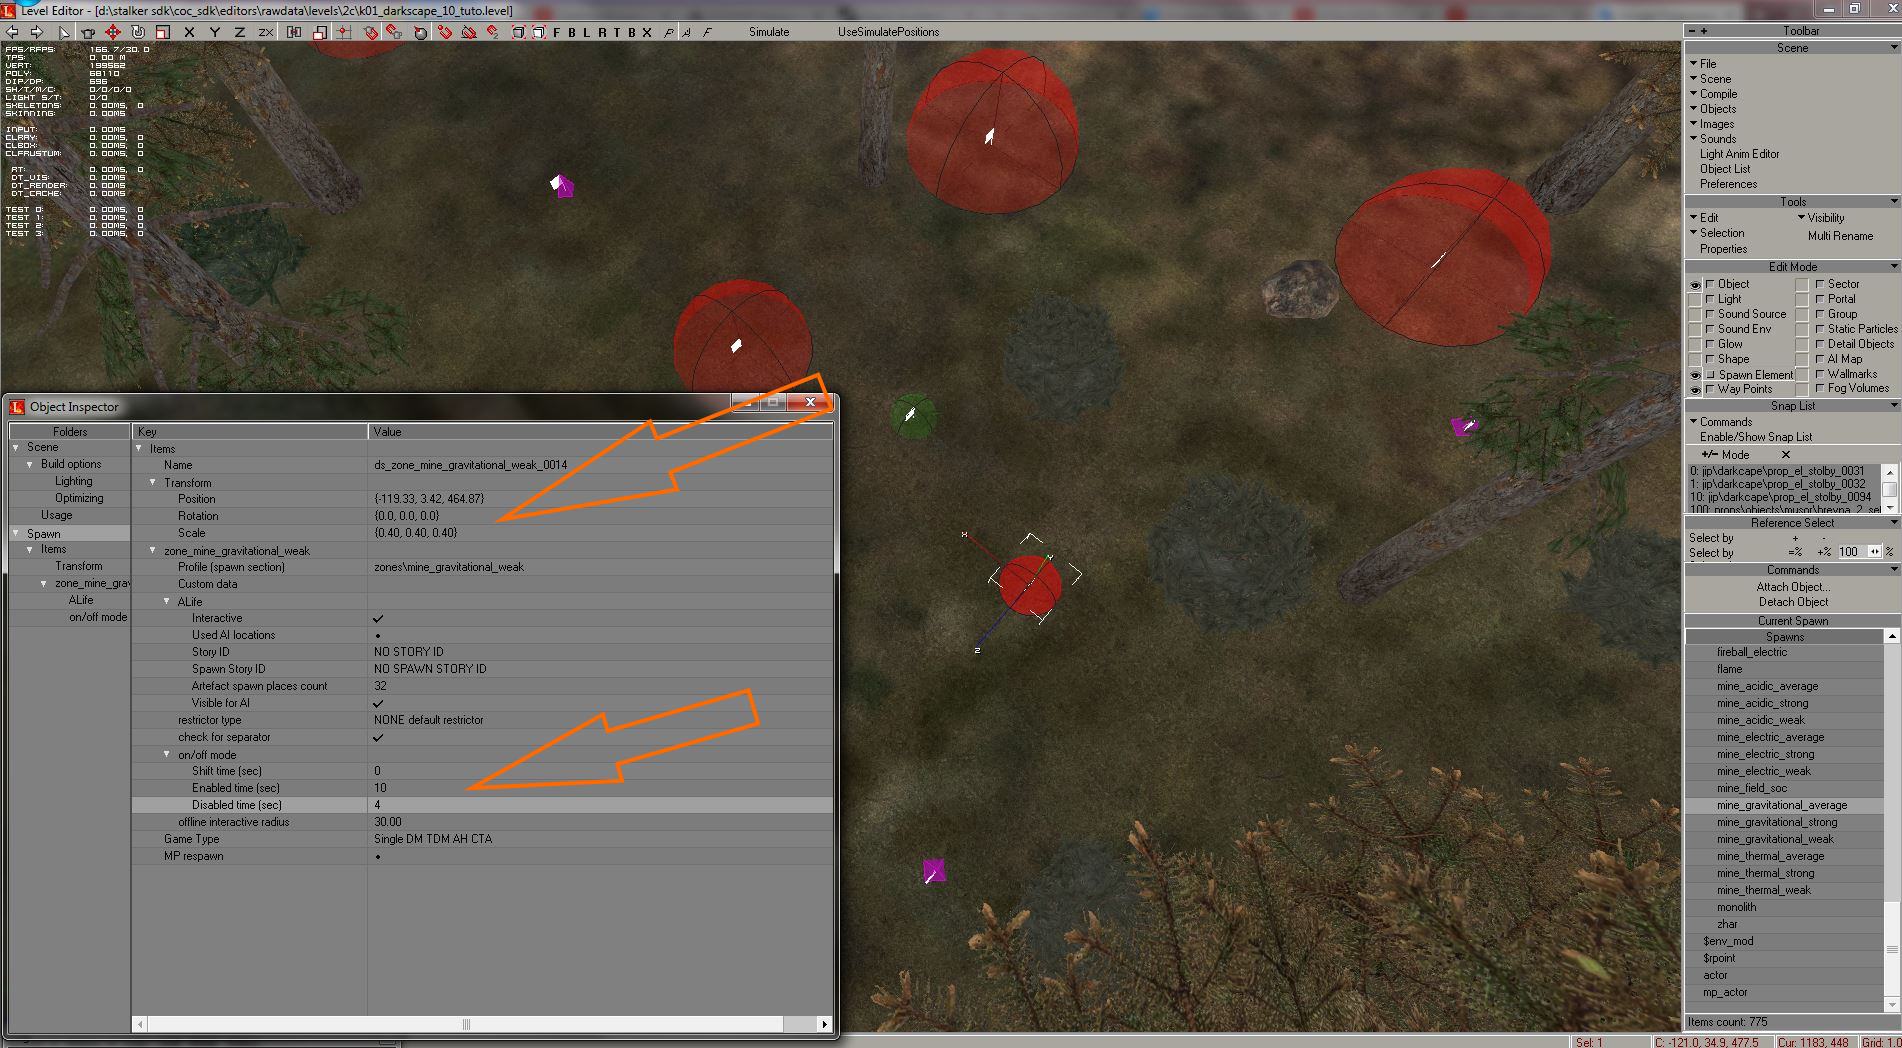
You can change their position (x,y,z), size, but even their time of activity in the “on/off mode” section of their properties. With "shift time" setting, you can make sequential or random anomaly fields.
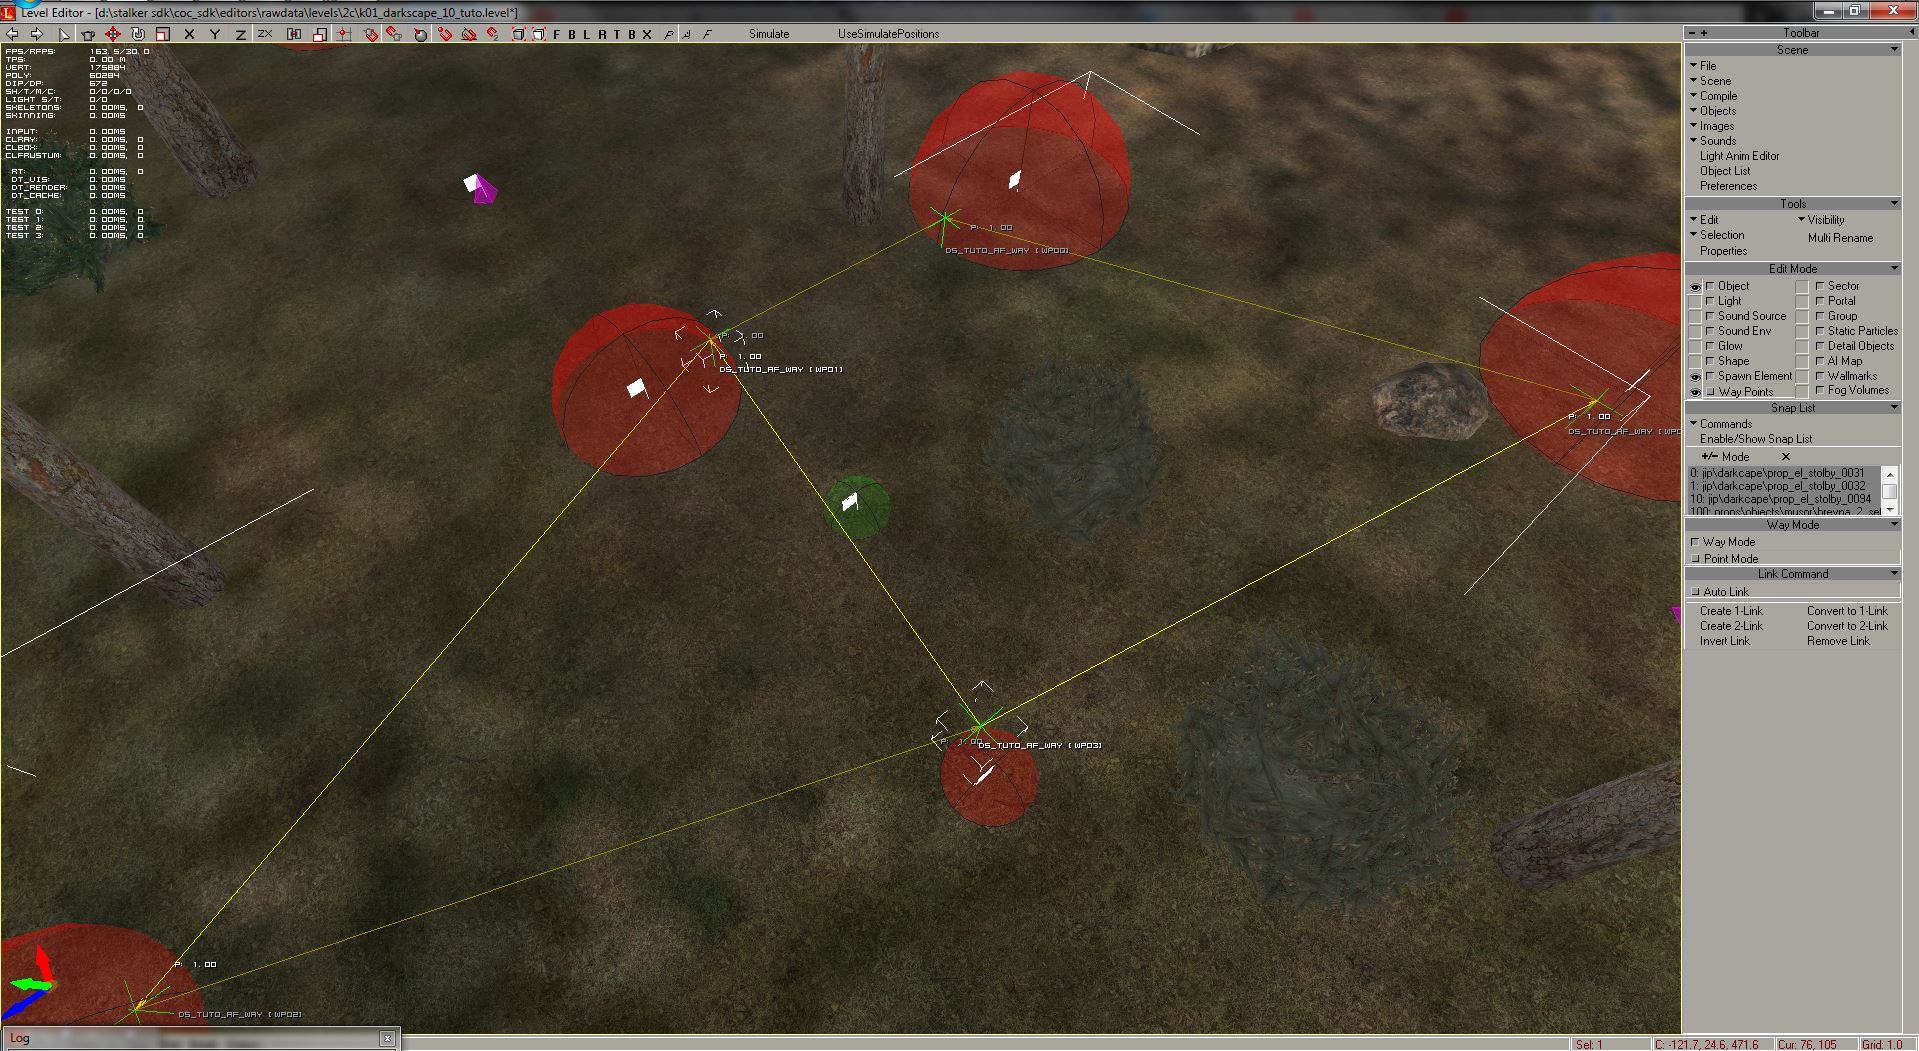
4 – Adding way points :
To move as intended around the anomalies, the artifacts must have at least one way. We'll see later that arties configs can use more than one. But let's make it simple for now.
Go in Way Points mode, then Way Mode.
Create a node, edit its properties to name it with the same base name than the anomaly_spot. Usually with a “..._af_way” to easily recognize it.
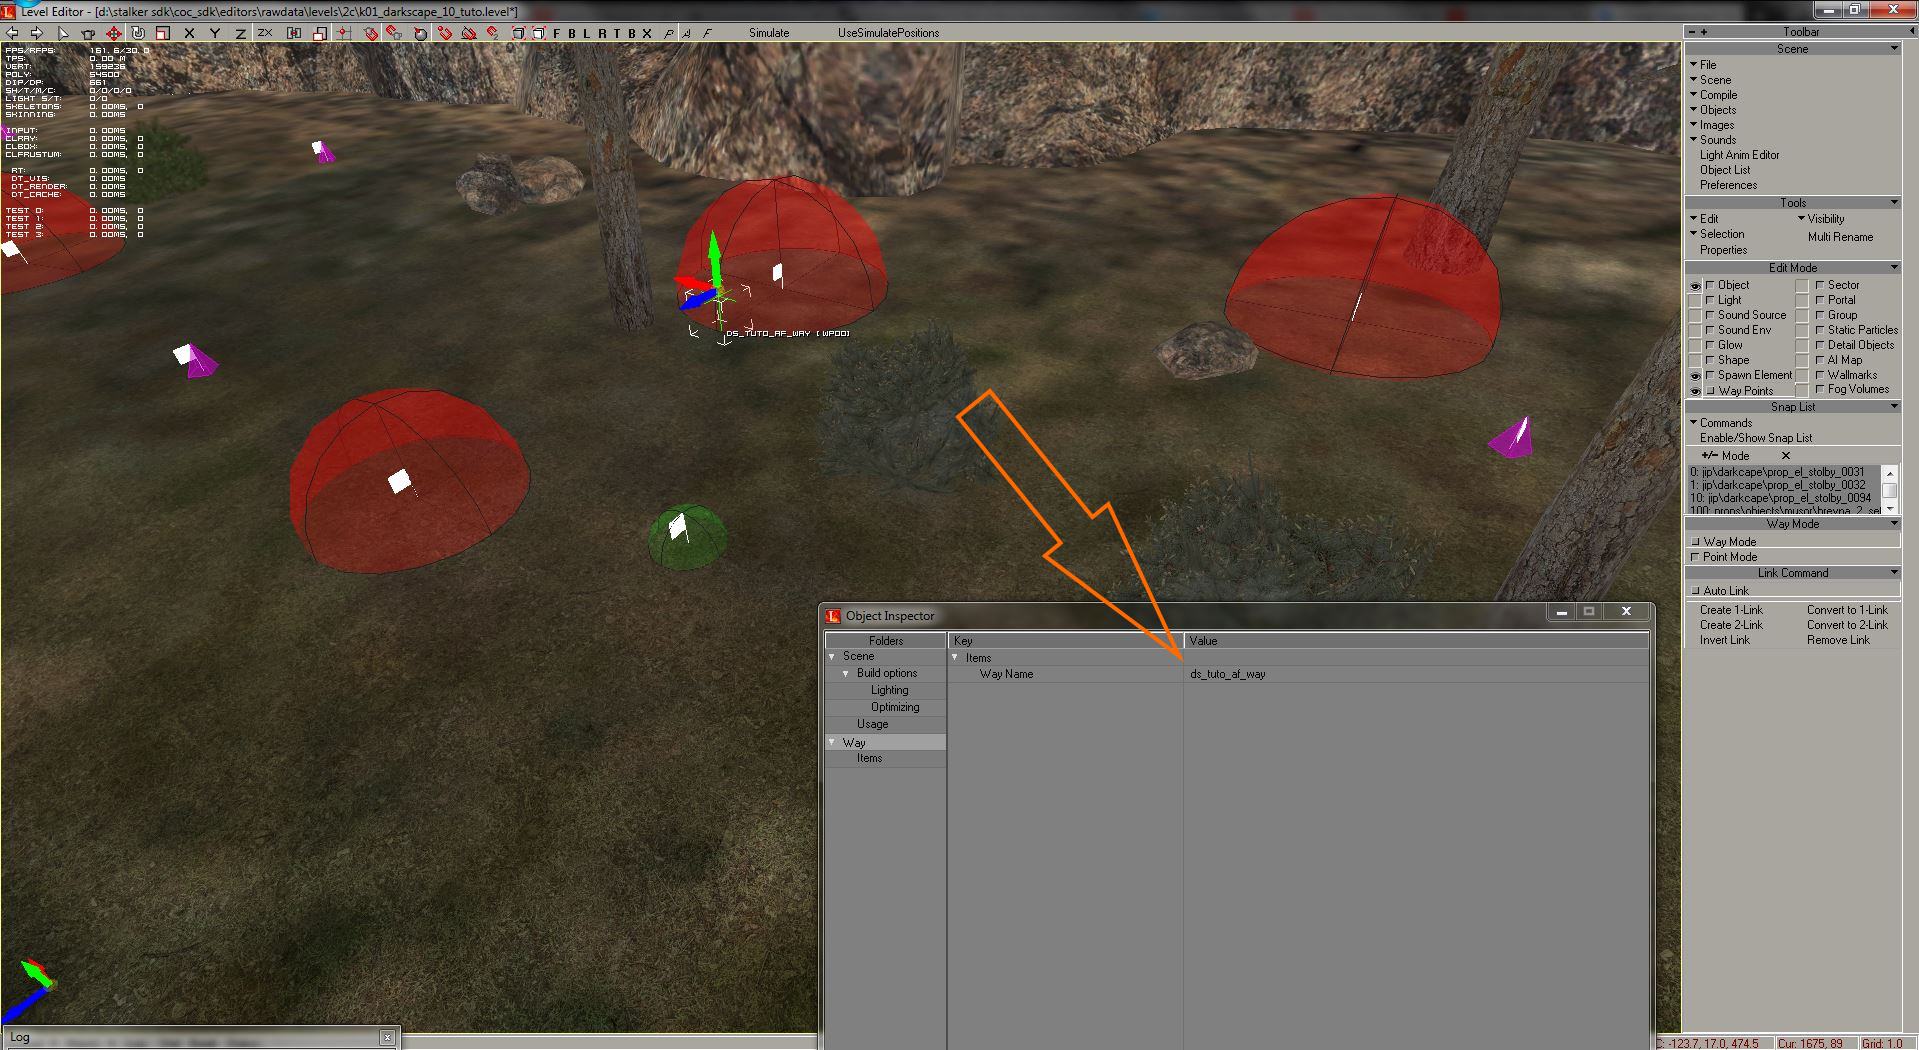
Then, with the node selected, go in Point mode.
When you add new way points, those are linked one after another as a part of the af_way.
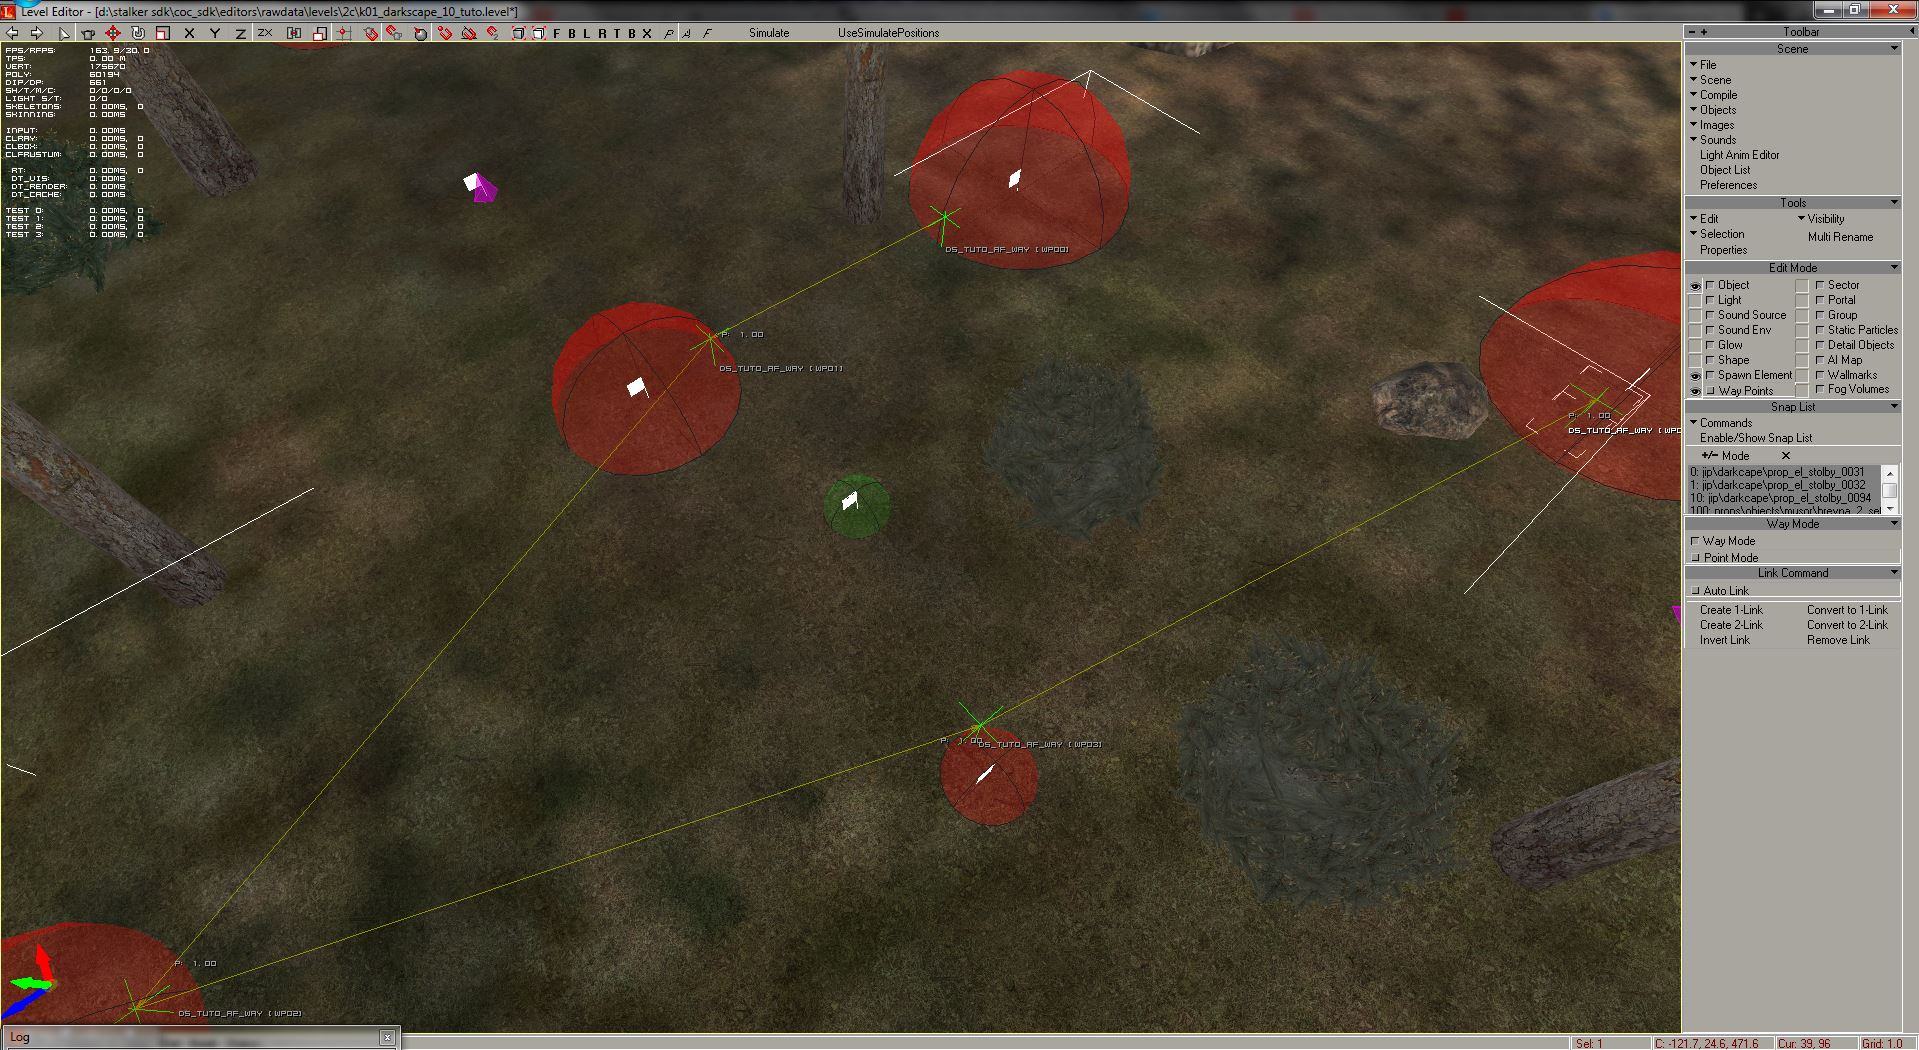
If you want to add links between nodes, just select both nodes you want to connect and click Create 1-Link.
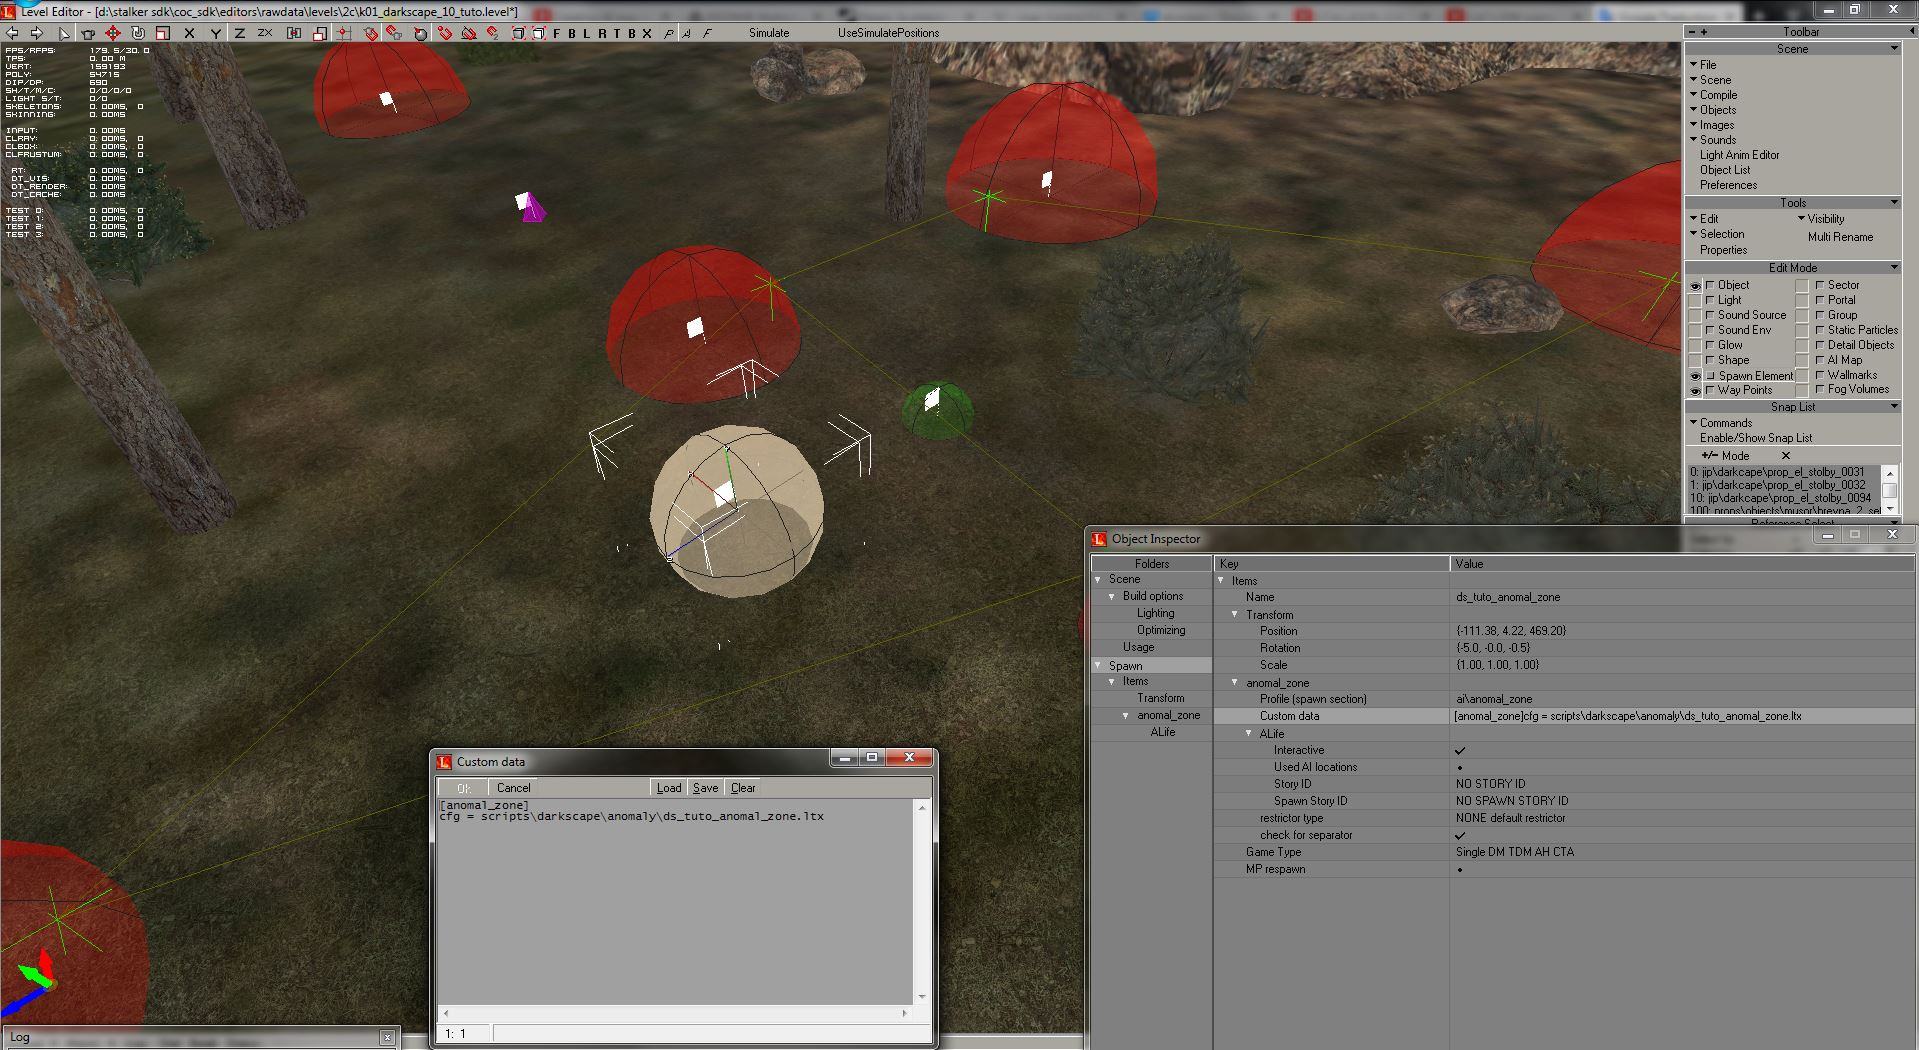
5 – Adding the anomal_zone :
Anomal_zone is where your artifact(s) will be spawned by the engine.
I would recommend to make it slightly above the ground to avoid the risk of your artifact be spawned under the terrain.
It's not even necessary to make the anomal_zone inside the anomalies because as soon as the artifact is spawned it will be put on the af_way.
It's also in the anomal_zone's Custom data you'll point at a .ltx file, giving it's properties.
The game will search for this file when creating spawn at start and the map going on line.
Name it in a convenient way, according to the anomaly_spot name.
The Custom data field must contain something like this :
[anomal_zone]
cfg = scripts\darkscape\anomaly\ds_tuto_anomal_zone.ltx
6 – Creating the .ltx for the anomal_zone :
So, our anomal_zone now needs a proper .ltx to generate things.
In the SDK folder, go to gamedata\configs\scripts\edited_map_name\anomaly.
Create here a new .ltx file with the same name as in your anomal_zone Custom data.
You can use an existing .ltx to modify it to your needs but don't forget to save it with its new name and in the correct folder.
As I created a gravitational field for the tutorial, let's go for such kind of artifacts.
The .ltx will make the anomal_zone spawns a Gravi at first, and then (with the blowouts) a list of related arties.
Its content should look like this :
[anomal_zone]
field_name = ds_tuto_anomaly_spot
layers_count = 1
respawn_tries = 1
max_artefacts = 2
applying_force_xz = 200
;applying_force_y = 20
start_artefact = af_gravi
artefacts = af_medusa, af_cristall_flower, af_night_star, af_vyvert, af_gravi, af_gold_fish
coeff = 3, 3, 2, 2, 1, 1
artefact_ways = ds_tuto_af_way
7 – For anomaly fields with artifacts, show them in the PDA :
Go in gamedata\scripts\ and open pda.script.
Add the anomaly_spot to the pda by adding such kind of line in the local primary_objects_tbl section (around line 213) :
{target="ds_tuto_anomaly_spot", hint="st_ds_tuto_anomaly_spot_name"},
Then, give it a name by adding a new string in the st_land_names.xml (in configs\text\eng) :
string id="st_ds_tuto_anomaly_spot_name"
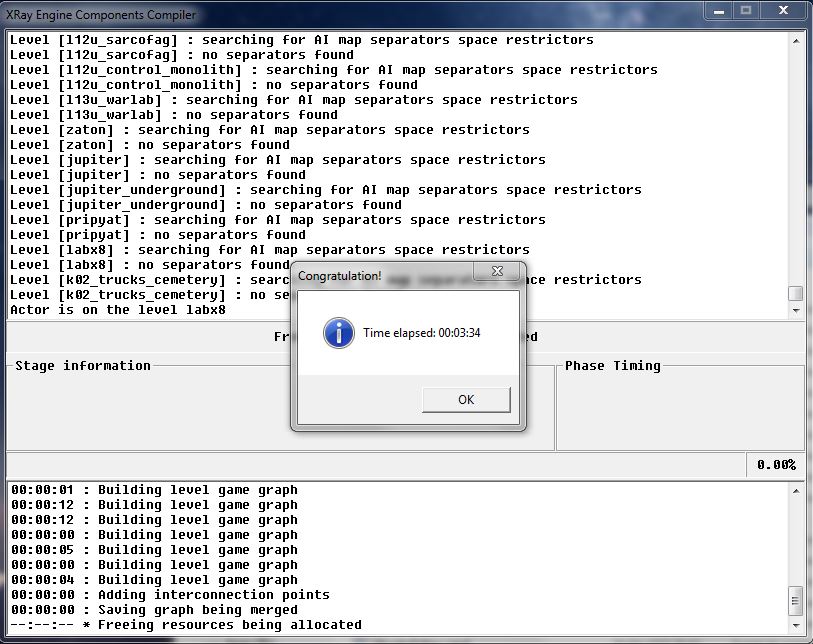
8 – Generating spawn in the LE and then compile it :
Yes, we've almost finished.
Get back in the LE, go to Scene >> Compile, and click Make Game (and only this).
When done, go in the LE's folder and launch the command named “3_xrAI_allspawn.bat”.
Let the compiler work to its end. You should be congratulated when it's done.
9 – Using this in your game :
Go in the LE's gamedata\spawns folder.
Copy the spawn file generated to your gaming/testing CoC folder. Backup original all.spawn and replace it by the new one (you have to rename it to "all.spawn").
Don't forget to also copy the anomal_zone.ltx file at the correct path into your gaming/testing CoC.
Launch a new game and enjoy.

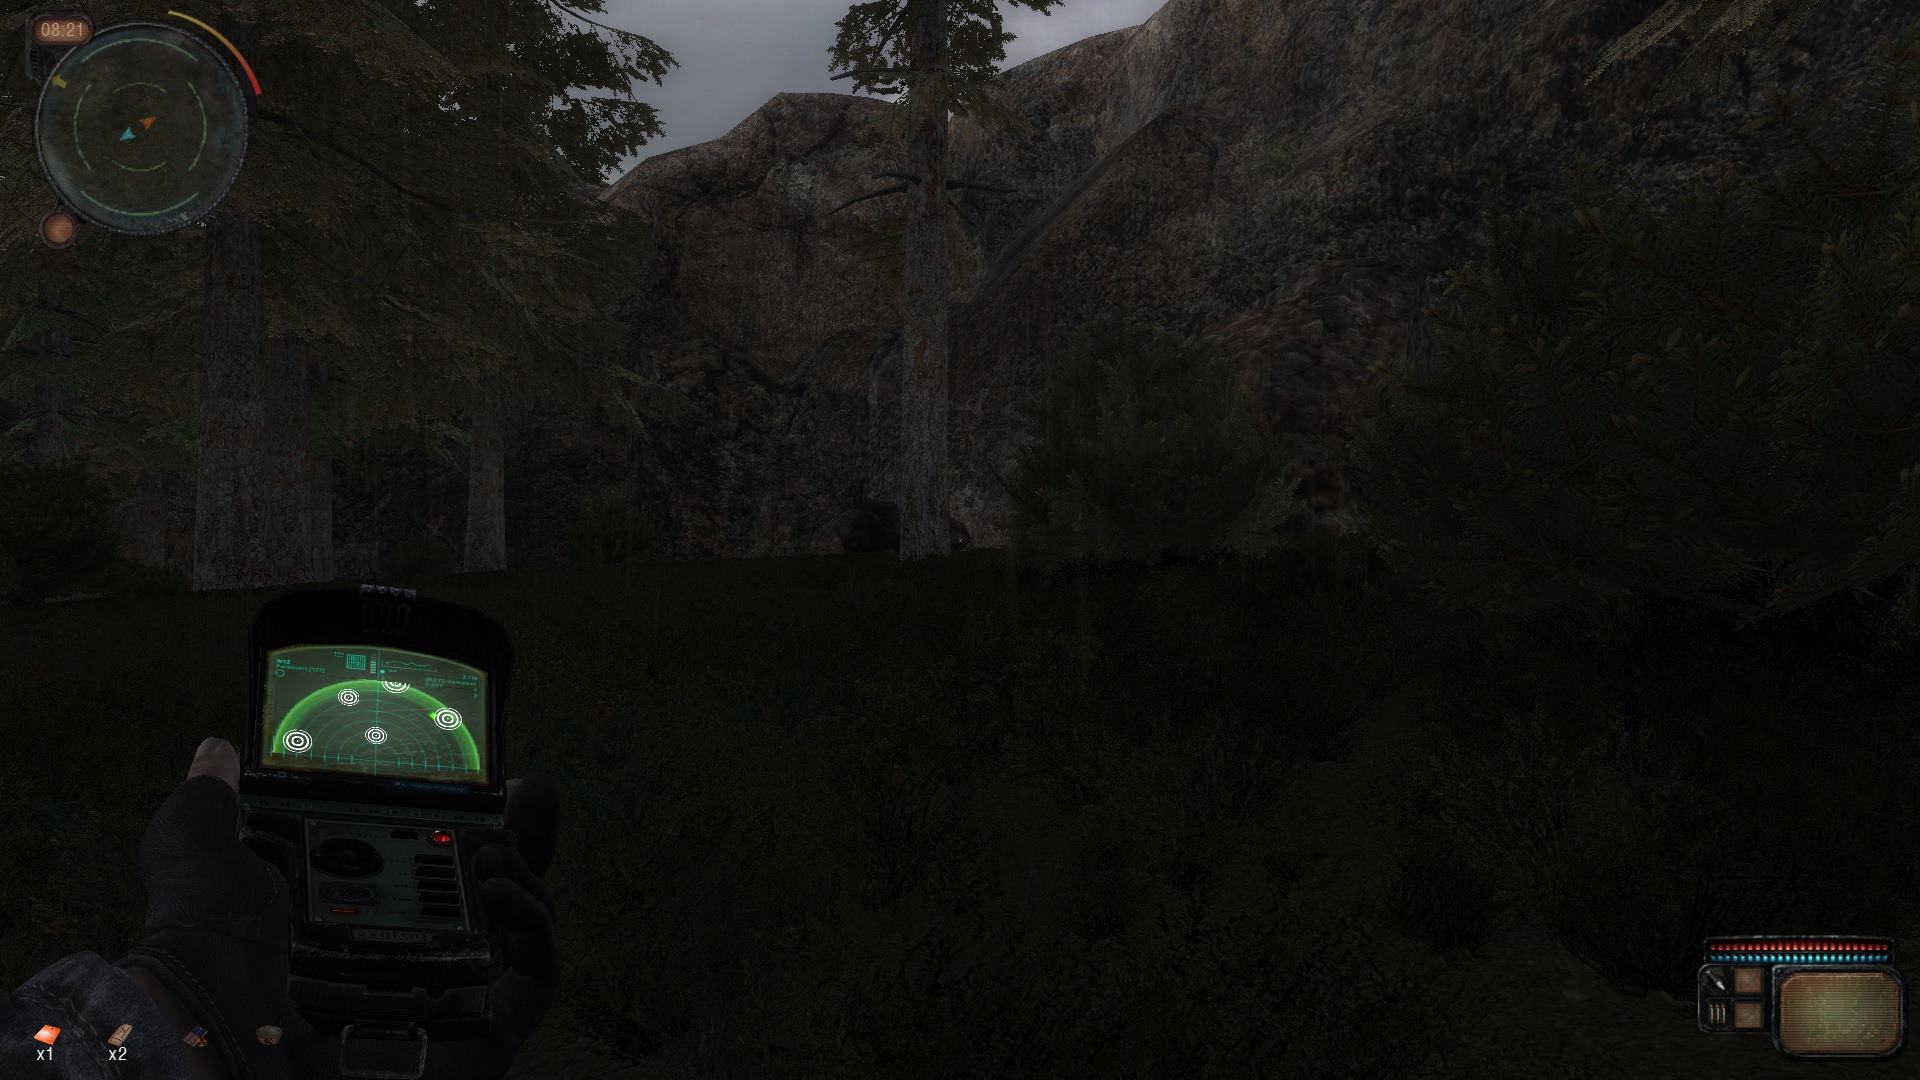
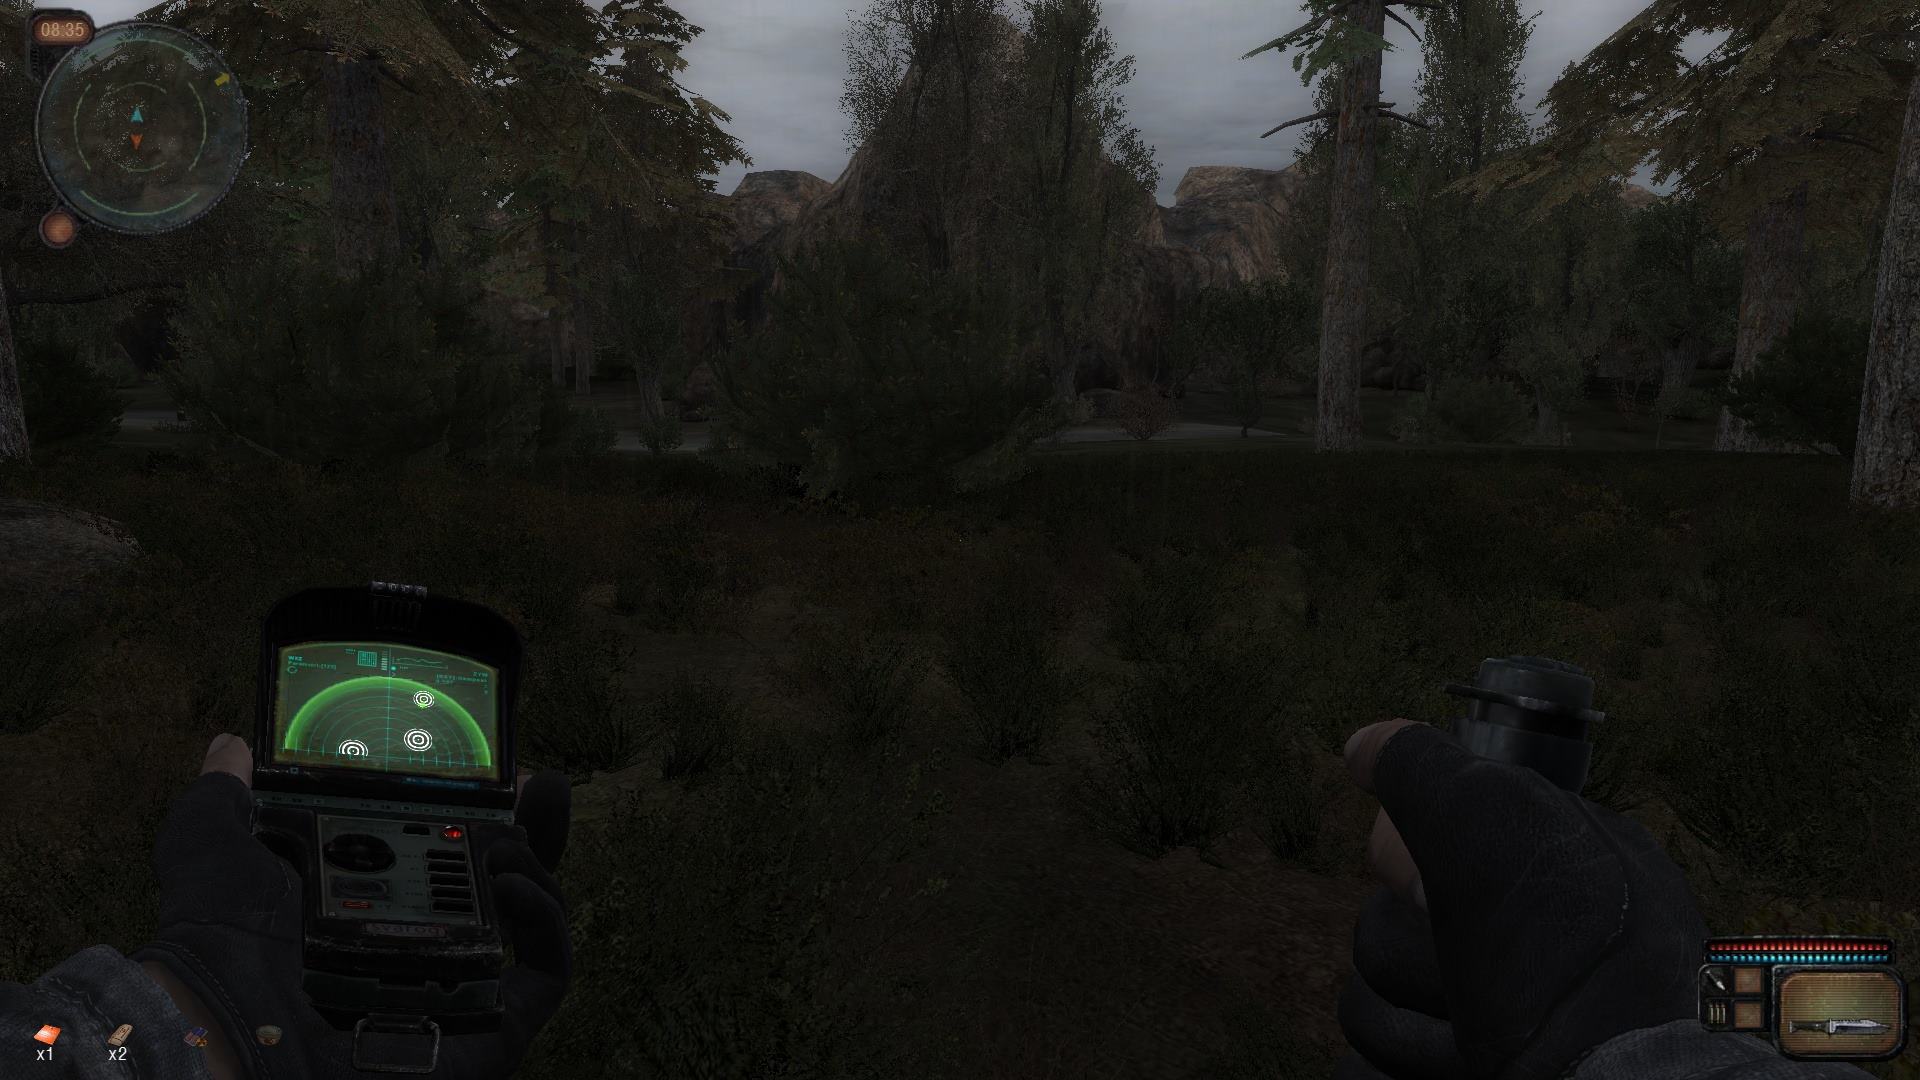
As you can see in the above pictures, we now have a fully working anomaly spot.
It generates artifacts and show the anomaly field on the PDA map.
You can also notice below, the anomaly with on/off setting is enabled and disabled according to its timer.

10 – Additional informations :
About anomal_zone.ltx, our example .ltx consist in a very simple configuration settings.
The field_name.
I keep it even if it looks to be unused. The in-game name is took from the space_restrictor, pda.script and st_land_names.xml.
But clean things are always better to find, especially talking about STALKER modding.
One single layer.
According to my tests, it's better to keep this line, even without specifying any anomaly.
Without it, the engine's game tends to ignore the applying_force parameters, making arties to not move at all or even to disappear in anomalies (you can go off line from the anomaly and come back, the artifact will be back though).
respawn_tries and max_artefacts looks to be self-explaining.
It's the tries to spawn artifact(s) after a blowout (according to the stats in bind_anomaly_zone.script) and the maximum number of artifacts contained by the field. But don't expect to find much in usual anomalies, as NPCs also hunt for the wonders of the Zone in Call of Chernobyl. :D
applying_force settings.
The force applied to the arties for them to move around.
Electric, chemical or thermal fields have the energy to make the artifacts move on their own.
At the opposite gravitational anomalies will attract and keep the arties.
In other words, pay a specific attention to these settings if you have gravitational anomalies near/in your field.
start_artefact is also self-explaining.
You can even specify an artifact which isn't in the artefacts list. It will be spawned at first and then, the anomaly will produce arties from the artefacts list.
artefacts.
The list of arties which be spawned by the field.
coeff,
Usualy with 3 probabilities for the weakest artifact, 2 for the middle one and 1 for the rarest one.
It must have as much values as you have artifacts in the artefacts line, even if you give a 1 probability for all.
artefact_ways.
The path the artifact follow.
But you can make more advanced configurations. Specify layers, mines cores, multiple artefact_ways and various settings in the config file.
Just give a look to jup_b206_anomal_zone.ltx, for instance.
You can notice it have different anomalies in the different layers.
It makes the field to have 2 layers and 3 artifacts ways. With 2 spawn tries and 3 arties max, there is a chance for the anomaly field to give 2 or 3 arties at a time, at different places of the field.
You now know all I know (^_^) about that part of S.T.A.L.K.E.R. level editing.
If you need a good tutorial about AI map part and related stuff, check this one : Moddb.com
Thanks goes to Borovos, Bangalore and Alundaio for sharing their knowledge.
Great tutorial, 2C :)
Thank you @2C.LiryC for the priceless Tutorial , well done comrade !
Wow,thank's a lot for such lesson!Awesome!Thank to you to share an awesome tutorial!So great!
I was looking for exactly this. Kudos to you.
Thank you for this! Very clear and concise. Much appreciated.
Workin SDK Lost Alpha 2.6 ?