
with New Textures and/or Model File Names.
- This tutorial will teach you how to easily update a (.smd) model with new material names, and/or model export locations.
It will also help and work for Mappers who've never compiled a model before, and are looking to do so without frustration.
-
-
- Looking to change Original Texture File Names that are UV mapped to a Model, without the need to load the Model into a 3D Program.
- Looking to change Original Texture File Names of a model, even if you don't have a 3D Program that can set or adjust UV maps.
- Looking to use a custom model within your level, that has already been previously compiled to be a prop-replacement model.
- Modelers
- Compilers
- Mappers
This tutorial can assist ..
Q?
- Why is this tutorial necessary or even needed?
A!
- After a model has been compiled for the VALVE Source™ engine, it becomes practically "locked" in terms of where the model can reside & what the model can be named, in order to even load into the engine. Material names and original folder directories also must remain intact in order for a model to work.
This means you CANNOT rename a model, material file, or move a model/material file from its intended folder location, without errors occuring.
This can lead to some issues for mappers particularly, when trying to use custom models and content within a map.
For instance, Let's say a mapper finds a prop/model they'd like to use in their map; but it's already compiled to replace original game content, such as the rocket for Team Fortress 2. Normally if they just installed the custom model's 'materials' and 'models' folders and brought the prop into Hammer World Editor, they could use the model however they like, but it will also still be replacing the default rocket model because it was originally compiled with the model name and sometimes material names to do so.
But if he/she wants to use that model in a map as just a static prop, etc, WITHOUT wanting the custom prop to still replace default content, then it's impossible to do so without physically recompiling the model.
Let us begin!
STEP ONE - DOWNLOAD
-
-
-
This program will decompile an already compiled Source .mdl file, into a workable set of files that can be recompiled to your likings. It creates all reference models including LOD's, dumps all animations, and will create the .qc file.
- Author's Home Page
- CF's MDL DeCompiler v. 0.5
It will decompile model .mdl files into a workable set of files that we can recompile.
-
"Notepad++ is a free (as in "free speech" and also as in "free beer") source code editor and Notepad replacement that supports several languages. Running in the MS Windows environment, its use is governed by GPL Licence."
- Download Page
- Quick Executable Installer Download of NotePad++ version 5.2
It will allow us to open the model .smd file into a text editor, to easily adjust file names.
- CannonFodder's Model Decompiler
- NotePad++
-
For this tutorial, you will need (2) programs.
STEP TWO - INSTALL
- To install CannonFodder's Model (.mdl) Decompiler..
-
- ...\Steam\steamapps\YOUR_STEAM_ID\sourcesdk\bin\ep1\bin\
Unzip the downloaded file and move the file within named "mdldecompiler.exe" into the following SDK Bin folder,
Because this program uses the HL2 .dll files, the file "mdldecompiler.exe" MUST be in the proper directory to work.
Next, try launching the program and see if it opens correctly. If so, close the program for now. If the program doesn't launch correctly, it it's either not in the right folder, or if you are missing MFC71.DLL check the linkbelow.
If needed, more info can be found at the Program's Home Page.
-
- To install NotePad++..
- Simply launch the self-installer and choose a directory location. It should install automatically.
After it is done installing, it's recommended that you Restart your computer at this point just to be safe. It will then be a lot easier for us to use the NotePad++ file editing features.
STEP THREE - DECOMPILE
-
-
Normally you can use any model you like, but for the sake of this tutorial I recommend downloading the submission below to help you follow along with the steps.
First we need something to decompile.
After you've downloaded the replacement model, unzip it somewhere you can relocate it (Preferably your desktop). Open the unzipped folder and inside create a new folder named decom for decompile. We will be decompiling the model into this folder, so we can make adjustments then recompile.
NOTENormally at this point, we would be able to decompile our model files by just launching the Decompiler, and choosing the correct locations. But since we are currently working on a TF2 model, we will have to make (1) mini adjustment to the model file using NotePad++. Otherwise, the Decompiler will not open the file.
Remember, this is only necessary when decompiling HL2:EP2 / TF2 models.
So, lets go to our downloaded "Koopa Shell Stickies" unzipped folder, and open up the tf \models \weapons \w_models\ folder where we will find our Sticky Bomb replacement models.
Right-Click the file "w_stickybomb.mdl" and we should see "Edit with NotePad++" on your drop-down. Click "Edit with NotePad++.
( If you don't have the option on your drop-down, you may not have restarted your computer. If you installed correctly but still don't have the drop-down option, Simply go to Start, All Programs, NotePad++, then click NotePad++. You can then open the file from within the program itself using the File, Open command from the top-menu. )
Once the .smd file is opened in NotePad++, you should see the first five characters as,
IDST0
We need to change this to
IDST,
So replace the 0 with a comma , and we're good to go. Click File, Save. And we're ready to decompile.
-
- Click the ... to the Right of "Choose Model File" field, and go to the "w_stickybomb.mdl" file in your unzipped Koopa Stickies tf \models \weapons \w_models \ folder.
Then Click the ... to the Right of "Choose Output Directory" field, and go to the choose the "decom" folder that you created in the unzipped Koopa Stickies directory.
Make sure all the Check-Boxes below are NOT checked, then click the "Extract" button.
Now that we've fixed the .mdl file for decompiling, Launch CannonFodder's Model Decompiler.
If everything works, you should get a "Loaded Model.." alert-window, then a "Completed Dumping Model!" alert-window.
We should now have a set of extracted files within the "decom" folder.
STEP FOUR - ADJUST MATERIAL & MODEL NAMES + LOCATIONS
- Once we have our model decompiled, we're ready to make quick adjustments then recompile.
In the following steps, we will be able to choose and rename our wanted final material & model file names + directory locations of choice.
NOTEWhen a .SMD file is created from a 3D Modeling Program, the exported file will contain Material File Name(s) for each UV Mapped surface of every Poly within the model.
We will use NotePad++ to easily change this material name without having to use a 3D Modeling Program.
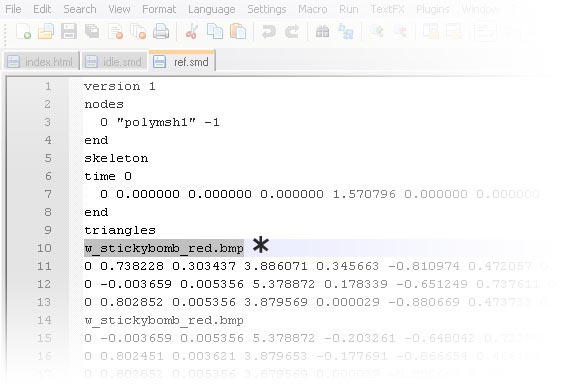
- Right-Click & 'Edit in NotePad++' the file "ref.smd" from within the "decom" folder that contains our newly decompiled files.
-
-
- This is the texture name that is telling the model which Material File Name it will be looking for, after it's been compiled. Later we will specify our own directory that we want the material to be "found" or "located" in.
- Each line should now be replaced with the new texture name. If you see the new filenames, click File, Save.
-
- ref.smd
- lod1_ref.smd
- lod2_ref.smd
*Level of Detail models are used in-game to help minimize poly counts. The LOD model changes depending on how far the player is away from the model. This info is included here because many models usually contain LOD models as well.
So for this tutorial, we should have adjusted the following .smd files, in order for our new compile to properly work.
When finished adjusting texture filenames, Save, then close NotePad++.
-
- When compiling, the .QC file literally tells the compile tool "studiomdl.exe" information such as: Model .smd names and locations, Material Folder Names, Physics Information, LOD Model names, etc. You can read more about .QC files here.
From inside the "decom" folder, you should have a file named "mdldecompiler.qc". Open this up in Notepad by Right-Clicking the file and Choose, 'Open With' from the drop-down. Then choose Notepad. You can also edit this file in NotePad++ if you like, but usually I prefer Windows Notepad for .qc file editing.
Inside the file you will see all the settings that were originally used to compile the model. We will only be adjusting the highlighted ones below.
Here, you should see the material name "w_stickybomb_red.bmp" starting from about the 10th line, and every other fourth line or so. Select the whole first line that has this material name by clicking and dragging over the filename, then continue below.
Next, for this tutorial we will be renaming EVERY "w_stickybomb_red.bmp" to "koopa_shell.tga" by clicking Search, Replace, from the Top-Menu. Or press ( Control + H ) for the hot key.

If highlighting the filename w_stickybomb_red.bmp before clicking Replace, we should see that "phrase" in our current "Find What" text-box field.If not, simply write it in.
Find What = w_stickybomb_red.bmp
Underneath that in the "Replace With" text-box, we can choose a new texture name that we'd like to recompile our model to. For this tutorial it will be "koopa_shell.tga".
Replace with = koopa_shell.tga
When filled in, click "Replace All"
Next, since we are recompiling a model that has Level of Detail (LOD) models* included, we will need to open up each LOD .smd model in NotePad++ and do the same to each. Replace each texture filename for each .smd model. Note that animation .smd files do not contain texture filenames, so you don't have to worry about editing them. Also the Physics .smd file doesn't need to be adjusted.
We now have our material filenames fixed, so our final step before compiling is to quickly adjust our .QC text file.
- $modelname "weapons\w_models\w_stickybomb.mdl"
-
- This line asks, "Where should I place the compiled model, and what will it be named?"
Since all models will automatically be placed starting from the "Models" folder, we do not need to specify it. So in this case, the model would compile to "\models\weapons\w_models\" and would be named "w_stickybomb.mdl"Since we do not want the model to replace any default content, we need to change at least the model name. But it's important to keep models organized so we always want to change the folder path as well.
So, change this line to..
- This will tell the compiler to name the model "koopa_shell.mdl" and export into the "\models\my_props\nintendo\" directory. It will also make any folders that do not exist, so you don't need to worry about creating them prior.
$modelname "my_props\nintendo\koopa_shell.mdl"
-
- $cd "C:\Documents and Settings\Administrator\Desktop\Koopa Shell Stickies\decom"
$modelname "weapons\w_models\w_stickybomb.mdl"
$model "studio" "ref.smd"
$lod 18
{
replacemodel "ref" "lod1_ref"
}
$lod 35
{
replacemodel "ref" "lod2_ref"
}
$cdmaterials "\models\weapons\w_stickybomb\"
$texturegroup skinfamilies
{
{ "w_stickybomb_red.vmt" }
{ "w_stickybomb_blue.vmt" }
}
$hboxset "default"
$hbox 0 "polymsh1" -5.984 -5.971 -5.984 5.984 5.971 5.984
// Model uses material "w_stickybomb_red.vmt"
// Model uses material "w_stickybomb_blue.vmt"
$surfaceprop "default"
$sequence idle "idle" loop fps 10.00
$collisionmodel "phymodel.smd" {$mass 5.0
$inertia 1.00
$damping 0.00
$rotdamping 0.00
} -
"mdldecompiler.qc"
- $cdmaterials "\models\weapons\w_stickybomb\"
-
- This line asks, "Where will the Material files be located, for the compiled model to find / use them?"
Since models can sometimes use multiple texture files, it is only necessary to provide the Directory in which the Material files will be found; Not the name of the material files used.It's also important to know that during the compile, this command will not create any folders or files, it will only compile the model with information on where to find it's materials.
So, change this line to..
- This will tell the compiler that the Materials will be found in the "\materials\models\my_props_nintendo\" directory. Notice that we do not place a "materials" path because the compile tool will automatically expect the materials to be found starting within that root folder.
$cdmaterials "\models\my_props\nintendo\"
-
- { "w_stickybomb_red.vmt" }
{ "w_stickybomb_blue.vmt" }-
- This command will not always be found in decompiled .qc files. It is only used when a model needs to be compiled with multiple "skins". As in, different team color versions, etc. You don't have to recompile a model with multiple textures if you don't want to. But since models often have multiple skins, we will compile with this command to learn and practice compiling multiple textures.
Note- These file names must be exact to what our new Material file names will be.
So, change this line to..
- This will compile the model with two skins. And that the Material file names will be those we specified. Also remember, these files need to be placed in the folder location we specfied in the $cdmaterials command.
{ "koopa_shell.vmt" }
{ "koopa_shell_blue.vmt" } -
- // Model uses material "w_stickybomb_red.vmt"
// Model uses material "w_stickybomb_blue.vmt"-
- These commands are not needed, but can be useful for making notes in your .QC files. the double // brackets cancel out the line when compiling.
If you like, change the lines to
- You can also make notes for other commands in the .QC file by using the double brackets before a line.
// Model uses material "koopa_shell.vmt"
// Model uses material "koopa_shell_blue.vmt" -
- Once finished, click File, then Save. We should now be ready to compile with our new material & model file names + directory locations.
STEP FIVE - COMPILE
-
- Now that Source SDK is installed, we can compile. First Launch the Source SDK and make sure the bottom drop-down menus are set to our Correct Engine and Game. In this case, we are compiling for the Orange Box engine, and Team Fortress 2.
This is important because the compile tool will automatically compile to our selected "Source SDK" engine and game.
- To compile, simply "drag n' drop" the .QC file from one window, onto the "studiomdl.exe" file. The compile tool will then process that .QC file and export it to the specified location from within the .QC file.
If you are following this tutorial without ever using the Source SDK tools, you will need to first install it before we can compile. To Install the Source SDK, Launch Steam, Login, Click the "Tools" tab, then double-click "Source SDK". This will install the tools needed to map, and compile. It also has a Model Viewer that we can use to view our finished model.
Open a new Windows Explorer (Keyboard Shortcut = Windows Start Button + E") and go to your Steam directory, usually in C:\Program Files\Steam. Then we need to go to "\steamapps\YOUR_STEAM_ID\sourcesdk\bin\ep1\bin\" folder. Inside this folder you should see a file named "studiomdl.exe".
STEP SIX - FINISH UP
-
- "...\Steam\steamapps\YOUR_STEAM_ID\team fortress 2\tf\materials\models\my_props\nintendo\"
-
w_stickybomb_blue.vtf
w_stickybomb_blue.vmt
w_stickybomb_normal.vtf
w_stickybomb_red.vtf
w_stickybomb_red.vmt-
koopa_shell_blue.vtf
koopa_shell_blue.vmt
koopa_shell_normal.vtf
koopa_shell.vtf
koopa_shell.vmt- A .vtf file stands for "Valve Texture Format", and a .vmt file stands for "Valve Material Type". They both work hand in hand because one is simply a texture/image, and the other is a text file that tells the game engine how to render the texture and other information. A .vtf file will not function without a corresponding .vmt file.
-
- "$baseTexture" "models\my_props\nintendo\koopa_shell"
"$bumpmap" "models\my_props\nintendo\koopa_shell_normal"- "$baseTexture" "models\my_props\nintendo\koopa_shell_blue"
"$bumpmap" "models\my_props\nintendo\koopa_shell_normal"
So for the "koopa_shell.vmt" file, we must update the commands to,
And for the "koopa_shell_blue.vmt" file, we must update the commands to,
- "VertexLitGeneric"
{
"$baseTexture" "models\weapons\w_stickybomb\w_stickybomb_red"
"$bumpmap" "models\weapons\w_stickybomb\w_stickybomb_normal"
"$nodecal" "1"
"$phong" "1"
"$phongexponent" "5"
"$phongboost" ".25"
"$lightwarptexture" "models\lightwarps\weapon_lightwarp"
"$phongfresnelranges" "[0.25 0.5 1]"
} -
The last thing you will need to do is manually rename and place the original downloaded Material (.vtf) files and corresponding .vmt files to the location we chose for our new model. In this case, the files need to be placed into the following directory..
Then, the following files,
Should be renamed to..
Last, we need to open each .vmt file and adjust the following highlighted lines,
"koopa_shell.vmt"
The $basetexture command must be updated to match the correct folder location of the texture file, and also must have the corresponding name of its matching .vtf file. Though you do not need to use a .vtf extension.The $bumbmap command must also be updated to match the correct folder location of the texture file, and also must have the corresponding name of its matching "normal" .vtf file. More information on Bump Maps can be found here.
Finally after all the above steps have been completed, you should now have a new model file that you can import into Hammer that won't replace a default prop model or texture.
To check out your new compile, Launch Source SDK, then the Model Viewer. Go to File, Load Model, and go to Models, My Props, Nintendo, then you should see a "koopa_shell.mdl" file. Open it, and hopefully you will see the working textures!
That is the end of this tutorial. I will be updating this as time goes by, with more cross-linking and perhaps more detailed information on certain steps. If there is anything you see that I can or should work on, please let me know.
-


If there are any problems with this tutorial, as in broken links, etc. Please feel free to contact me and I will gladly make updates.
I don't know about broken links, but the presentation is all over the place. Lists aren't useful here: go with headings instead.
Very nice thanks for that.