Tutorial 3
Game: Doom1,Doom2.
Level: Basic.
Objectives: To investigate the mechanism of weapons action.
Resources required: Visual C++ , source code for Doom (doomsday v 1.9.0 beta 6.9).
Introduction: In this tutorial I will try to explain in simple steps how the weapons animation, in combination with the Action functions is used to operate the guns and weapons in Doom. I have chosen to do this for the chain gun because the number of frames used here are fewer and the re-fire mechanism lends itself well to explaining how an automatic weapon works in the game. Keep in mind that what I describe here applies to all the weapons used in the game including the fist and the chainsaw. They all use the same sequence of events and functions (but they have their own firing functions).For this we need first to examine the definition file called “Objects.ded”. I know I am getting ahead of myself here, I did mention that we will do some modding with the definitions files at a future date, but today we need to jump right into it to help explain what follows. The data in these files are loaded by Doom at start up.
Procedure:
1. Navigate in your source folder to:
.....\deng-1.9.0-beta6.9\doomsday\plugins\jdoom\defs\Objects.ded
2. Open this file up with notepad or any text editor of your choice and go straight to somewhere near line 3890. The series of states for the chain gun is shown there. The states are not numbered but they are placed in a strict order of sequence. The ones we are interested in are those for “WeaponReady” and for “Attack state”.
3.Let’s examine the first state for the chaingun:
State
{
ID = "CHAIN";
Sprite = "CHGG";
Frame = 0;
Tics = 1;
Action = "A_WeaponReady";
Next state = "CHAIN";
}
The first line is the state id; the second is the sprite id; the third indicates the first frame to be displayed,which is the weapon ready frame 0 , (see fig. 1 below);the next line shows how long in tics this particular frame is displayed on the screen,in this case it is 1 tic .The following line shows what action is to be taken during this state.The last line is the next state to jump to,in this case we are looping back to the top, i.e. back to "CHAIN".
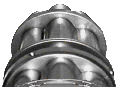
Figure 1: Animation Frame 0 for “CHAIN” state displayed continuously for 1 tic each loop.
Now we have a loop that continuously displays the weapon ready sprite “frame 0” for 1 tic and at the same time checks the action function “A_WeaponReady” for various events. The only way to break out of this continuous closed loop is for something to happen inside this “action” function. So let’s take a close look inside this function:
void C_DECL A_WeaponReady(player_t *player, pspdef_t * psp)
{
If (player->brain.attack)
{
P_FireWeapon(player);
}
}
For clarity reasons, I have omitted from the above all the code that we do not need for this tutorial. You can see what this line “if (player->brain.attack)” does. It checks if the player (brain*?!) is pressing the attack button or not. If he is, then the P_FireWeapon(player) function will be executed, if not the loop will continue in the ready state displaying the "CHAIN" sprite. Let’s assume that the player has pressed the fire button. We need now to examine the P_FireWeapon function (be aware, this one is common to all) to find out how this event is handled:
void P_FireWeapon(player_t *player)
{
If (!P_CheckAmmo(player))
return;
player->plr->pSprites[0].state = DDPSP_FIRE;
P_MobjChangeState(player->plr->mo, PCLASS_INFO(player->class)->attackState);
newstate = weaponInfo[player->readyWeapon][player->class].mode[0].states [WSN_ATTACK];
P _SetPsprite(player, ps_weapon, newstate);
}
The first thing this function does is to check if the player has sufficient ammo; if he is out, it will change the weapon to the next available one and return control back to the weapon ready state to display the new weapon sprite..etc. if on the other hand, there is enough ammo, the next block of code will be executed. It will identify (check lines 4 & 5 specially) what weapon is being used and set this weapon, the chain gun, into the attack state; in this case it is“CHAIN1” ; and by transferring control to this state, we break out of the loop.
Here it is:
State
{
ID = "CHAIN1";
Sprite = "CHGG";
Frame= 0;
Tics = 4;
Action = "A_FireCGun";
Next state = "CHAIN2";
}
Frame 0 here is the first firing frame,see fig.2 below.It is actually the same image as in fig1.
The image is displayed in this case for 4 tics and the Action executed is "A_FireCGun" or fire the chain gun. The next state to go to is "CHAIN2".

Figure 2: Animation Frame 0 for “CHAIN1” state displayed for 4 tics during attack.
Before going on to the next state, let’s have a close look at the function A_FireCGun that actually fires the chain gun (and only the chain gun):
void C_DECL A_FireCGun(player_t *player, pspdef_t * psp)
{
S_StartSoundEx(SFX_PISTOL, player->plr->mo);
P_SetPsprite(player, ps_flash,weaponInfo[player->readyWeapon] [playermode[0].states[WSN_FLASH] + psp->state -&STATES[S_CHAIN1]);
P_GunShot(player->plr->mo, !player->refire);
}
Again, I have only shown the lines relevant to this tut. The most important statement to note is the “P_SetPsprite” as this one sets off the animation state for the bright flash light effect of the shot and displays the flash sprite shown in fig 3 below. This is superimposed on the one in fig 2 above and both appear to the viewer as one single sprite. I will not go into the details of flash states sequence here or this tutorial will get too lengthy. This function also calls “p_GunShot“ to fire the shot and plays the pistol shot sound “SFX_PISTOL” once.
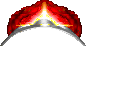
Figure 3: Gun flash Frame 0 for “CHAIN1” state as called by the P_SetPsprite function.
You can see clearly now that the next state is similar to the previous one except that it displays the next animation frame shown in figure 4 below.

Figure 4: Animation Frame 1 for “CHAIN2” state displayed for 4 tics during attack.
Next one:
State
{
ID = "CHAIN2";
Sprite = "CHGG";
Frame = 1;
Tics = 4;
Action = "A_FireCGun";
Next state = "CHAIN3";
}
Same thing happens above with the Action function but this time the “A_FireCGun “ plays the second gun flash sprite shown in figure 5 below. This is superimposed on the one in fig 4 above.
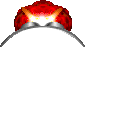
Figure 5: Gun flash Frame 1 for “CHAIN2” state as called by the P_SetPsprite function.
On to the next state"CHAIN3":
State
{
ID = "CHAIN3";
Sprite = "CHGG";
Frame = 1;
Tics = 0;
Action = "A_ReFire";
Next state = "CHAIN";
}
Notice that the tic value in the above state is 0, this simply means that this frame is blanked out or disabled during the execution of refire. Look carefully at the action function pointer this time, it says “A_ReFire”. There is a decision to be made here. Either the gun continues to fire or moves on to the next state that is "CHAIN" and jumps all the way back to the weapon ready state. In order for us to understand how this decision is made, needless to say we must look inside this function, here is the definition:
void C_DECL A_ReFire(player_t *player, pspdef_t * psp)
{
If (player->brain.attack && player->health)
{
player->refire++;
P_FireWeapon(player);
}
else
{
player->refire = 0;
P_CheckAmmo(player);
}
}
Again, for clarity reasons, I have removed a little bit of code in order not to confuse the reader. The first line checks that the player is still alive (still has health left!) and he is still holding down the firing button (player->brain.attack). If it checks true then the refire index is incremented (actually becomes non-zero) and the FireWeapon function is called again, therefore cycling through the same sequence of events over and over, giving you the rapid fire action .This will only stop if the player releases the fire button (mouse or keyboard) or runs out of ammo (or worse, gets shot dead).Once that happens, the “else” in the function is selected, the re-fire index is re-set to zero and the check ammo function is executed which results in return. The gun then stops firing and returns control all the way back to the first state: "CHAIN”; ready for the next action to be taken by the player. Extra info for you if you did not know: 1 tic equals 1/35 second or 35 tics are equal to one second.
Conclusions:
1. Weapons animation is done through a chain of consecutive states displaying sprite frames.
2. These sequent frames of video are displayed for a very short time, measured in tics.
3. These states also incorporate pointers to Action functions that call various events.
4. These Action functions can make decisions that may loop or jump between the states.
5. Action functions fire weapons, play sounds and flashes of light among other things.
6. Frames may be disabled by setting the tic value to 0, so a state is used for Actions only.
Note *: The original Doom code used player->cmd.attack and not player->brain.attack.
Now that we understand (hopefully!) how the mechanism of weapons animation and Action functions works, we can go ahead and make our mods and code changes to all the weapons in Doom (and not just the chain gun) by either editing the files in jDoom.pk3 or recompiling jDoom.dll or a combination of both. See you next time.
Happy modding!
Adam.