
[page=main]
This is kind of a long tutorial, and the first that I have attempted to write for the public, so forgive me if it's hard to follow.
Creating blend textures for your displacement surfaces in half life 2 is as simple as creating a basic texture for the game, there's just a little bit more code you need to put into your vmt. Here is the process for creating your .vtf files for your final blend.
Before I go further, it's important to note that if you want to get any of your custom textures into the game, you need to create a texture folder to hold all your custom files in. The way I learned was you need to have one in two different places:
C:\Program Files\Steam\steamapps\username\sourcesdk_content\hl2\materialsrc (I'll refer to this location as location 1)
C:\Program Files\Steam\steamapps\username\half-life 2\hl2\materials (I'll refer to this location as location 2)
You can name this folder anything you want, maps is fine, that's what I did. Within these "maps" folders you can/should create sub-folders organizing your textures into types i.e. brick, concrete, wallpaper etc... just make sure you do this in both locations, and this is just preference, but I'm recommending you make a folder called blend (I'm going to assume that you do this) to hold your blend .vmt files and your tooltexture.vtf files (but more on the tooltexture later)
vtex.exe
For blend textures you technically only need two different .vtf files, but if you want to display your blend in the texture browser much like valve does (where it shows both textures used) you will need a third .vtf file, the tooltexture.
First of all you need to have one of two "programs" on your computer, it's much easier if you have a shortcut on the desktop so you can drag files onto it. The first one is vtfEdit and the other is vtex.exe. vtfEdit is much faster in creating your textures, but I've yet to figure out how to make blend textures with it, so for the sake of this tutorial, I'll assume that you're using vtex.exe.
In order to get vtex.exe onto your desktop, go into your program files and find it, more than likely the same place I did:
C:\Program Files\Steam\steamapps\username\sourcesdk\bin
Once there, right-click on the vtex.exe and paste a shortcut onto your desktop.
Creating the .vtf Files
Just a note before I proceed, a .vtf file is the image part of a texture. Also, note that when you make a blend, have it make sense, having brick and carpet blend into each other would look pretty silly.
Open photoshop, create your texture files (you will need two of them for a blend), and save them as targa files in location 1 in the appropriate sub-folder, which will more than likely be nature. Make sure you save the targa file the same name you want your texture to be i.e. nature_grass_001 Once you have those targa files saved, in windows explorer, navigate your way to where you have those targa files saved in location 1. Click and drag your first texture onto the vtex.exe shortcut on your desktop, a dos prompt looking window will pop up and say bunch of jargon and eventually tell you to hit any key. Basically as far as I know this is just converting your targa file into a .vtf file, I could be mistaken, I know how to do the process not exactly what it does step by step. After you hit any key, when you check the same folder in location 2 you should see a .vtf file that has the same name as the targa file from location 1. Do the same process for your second texture
Creating the Tool Texture .vtf File
This is your third .vtf file for the blend texture, this one isn't that important, but it's the file that you can use to display your texture in the texture browser and have it show the two textures that make up your blend. This file is very easy to make, simply open your two targa files (or jpg if you've got some) in Photoshop, and make sure that they're in the same Photoshop file but on seperate layers. Select the top layer and add a layer mask:
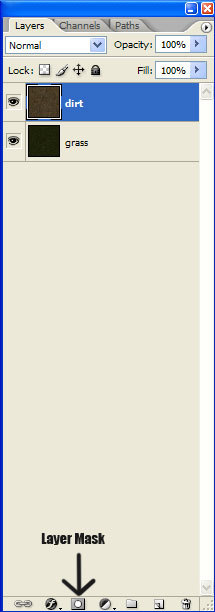
and paint a gradient going from white to black from the top left to just shy of the bottom right, the result should look something like this:
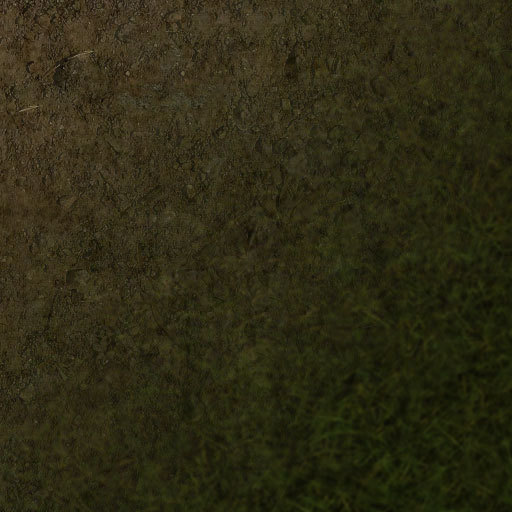
Save this file in a folder within your location 1 blend folder. This is just a personal preference, but when I save this particular file, I save it as "blend_dirtgrass_001_tooltexture.tga" where dirtgrass comes from the two material types in the blend texture, from left to right. If you look at the above image you'll notice dirt is on the left, grass is on the right, thus "dirtgrass". Drag this targa file to vtex.exe to create the appropriate .vtf file.
There you go, you have the three .vtf files that you need for your texture, no on to creating the .vmt.
Creating the .vmt File
When I create a .vmt file (which is the code that tells the engine how the texture reacts to bullets, and you walking on it), I create it in Notepad, it just seems easier to me. Like I said, the code in a blend texture is a little different than it is for a regular texture. For a regular texture you would want to put the following:
"lightmappedgeneric"
{
"$basetexture" "maps/nature/nature_grass_001"
"$surfaceprop" "grass"
}
Those are the important parts of a .vmt file, the "$basetexture" points to the .vtf that you want to use. Make sure that you set the "path" to the correct folder, you only have to start at that very first folder you created which has all the sub-folders (maps in my case). What I put above is just an example of what I've got on my own computer. The "$surfaceprop" is how you want that texture to react. You can find a whole list here of what kind of surfaces you can use. Note that it is important to have things in quotation marks for this to actually work. Anyway, on to the important part, the code for the blend .vmt file.
Create a new file in Notepad and immediately save it (i.e. blend_dirtgrass_001.vmt) in your blend folder in location 2. I recommend that you save it with the first word blend, just seems easier. Anway, here’s the code:
"worldvertextransition"
{
"$basetexture" "maps/nature/nature_dirt_001"
"$basetexture2" "maps/nature/nature_grass_001"
"$surfaceprop" "dirt"
"$surfaceprop2" grass"
"%tooltexture" "maps/blend/blend_dirtgrass_001"
}
The "$basetexture" is going to be the image file that is first applied to your displacement surface, and the "$basetexture2" is the texture that you will be painting onto the surface. The "$surfaceprop" and "$surfaceprop2" determine how each of those textures react to bullets/walking on it and it is important to have these correspond in the same order you put in your "$basetextures".
This blend will still work without the "%tooltexture" part, but in your texture browser in hammer, instead of a cool thumbnail that shows both textures in the blend it will default to "$basetexture".
Normal Mapping
Well this is the only thing that I know how to do that I didn’t include in this tutorial, so here it is. I’m sure that many if not most of you have gotten the Photoshop filter that NVidia released, and if not, go here to get it. This will basically turn what you paint into Photoshop into a normal map (which you can also use with your 3d work if you’re into that). Our texture artist normally just turns the whole texture into a normal map and it does an incredible job and helps make our textures look more amazing. So after you have generated your normal map, save the normal map with the same name as the texture file but add _normal at the end; so your file would be: nature_dirt_001_normal.tga. Again, put this in location 1, and drag the file onto vtex.exe. From my understanding, it is crucial that you have _normal on the end of your file name or it may not work properly. After you have created the .vtf file for the normal data, it’s just a matter of putting the necessary code into the .vmt:
“lightmappedgeneric”
{
“$basetexture” “maps/nature/nature_dirt_001”
“$bumpmap” “maps/nature/nature_dirt_001_normal”
“$surfaceprop” “dirt”
}
The only difference here is the “$bumpmap” and despite you may or may not think it should be “$normalmap”, we’ve tried that before and it didn’t work well if at all. As for applying this to a blend texture, I personally have not attempted it before but I imagine it would work, you would just have to put “$bumpmap” and “$bumpmap2” in and make sure you point to the correct files.
Conclusion
Well there you go, you should now be able to get your textures into Hammer complete with normal map and all. I hope that this has been helpful to at least some of you, any feedback on how I did for my first tutorial would be appreciated.
- Moose


Hey King of Moose-
This is a good looking tut. I appreciate the images. I'm at work now, but when I get home to the second leveling job, I'm looking forward to putting this into practice.
keep posting!
Currently I'm in the process of re-writing this tutorial. After having read over it again, I've realized that it is kind of confusing so I'm doing my best to clean it up. I'm also going not only into the process of creating blend textures, but also how to import decals and regular "no-blend" textures.
awesome tutorial! :D
the only trouble was at the third vtf file.
I didnt have photoshop so i had some problems, but otherwise it was fine :)