Tutorial written by Terry DeLaney. Mirrored here for archival purposes.
"See-Thru" Custom Shaders
I don't know about you, but I've always loved transparent textures in a game. Even DooM had them. For some reason, iD dropped them during Quake and Quake 2, but now they're back in Quake III: Arena. In this tutorial, we'll show you how to create your own custom shader that you can see thru, such as a grate, fence or other such device having holes or openings in it.
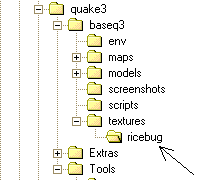
For this tutorial, we've already supplied a map which you can grab here. This zip file also contains the texture we'll use for our tutorial and the shader script, in case you screw up. Save the texture to a directory called \baseq3\textures\ricebug, like we did in our previous tutorial.
The Alpha Channel
It's not that difficult to show grates, fences, 2D trees, and other such devices in the game. The script files are not that tough, if you use the old cut-and-paste method. The hardest part is knowing how to use the paint software to get an alpha channel into your texture. Since there are several paint programs and different versions of the same among mappers, I won't go into the details of how to make an alpha channel.
The Shader Script
To get the texture to work as a "see-thru" shader, you need to employ a shader script. The easiest way is to copy an existing shader script and change it accordingly. Here is the shader script from the base_trim/proto_fence shader:
textures/base_trim/proto_fence
{
   surfaceparm trans
   cull none
   nopicmip

   {
      map textures/base_trim/proto_fence.tga
      tcMod scale 3 3
      blendFunc GL_ONE GL_ZERO
      alphaFunc GE128
      depthWrite
      rgbGen identity
   }
   {
      map $lightmap
      rgbGen identity
      blendFunc GL_DST_COLOR GL_ZERO
      depthFunc equal
}
}
Copy this particular shader file by dragging your mouse over the text and pressing CTRL-C. Open EditPad or any good text editor and press CTRL-V to paste it. The blue text is what needs to be changed.
Since the shader file is named ricebug, we want to change the script as follows:
textures/ricebug/grate
{
   surfaceparm trans
   cull none
   nopicmip

   {
      map textures/ricebug/grate.tga
      tcMod scale 2 2
      blendFunc GL_ONE GL_ZERO
      alphaFunc GE128
      depthWrite
      rgbGen identity
   }
   {
      map $lightmap
      rgbGen identity
      blendFunc GL_DST_COLOR GL_ZERO
      depthFunc equal
}
}
If you didn't follow our previous tutorial, you'll also have to update your shaderlist.txt file to include the ricebug directory.
The tcMod scale determines the scale at which your texture will be displayed in the game. The larger the numbers, the lower the resolution. Since 3 3 is too small for my taste, I decided to reduce it to 2 2. (Note that this is a number, followed by a space, followed by the second number.)
Applying the Shader
If you haven't already done so, copy the included map into the \baseq3\maps directory and load it into Q3Radiant. Navigate the camera so that you're looking at one of the fireplaces, as shown here:
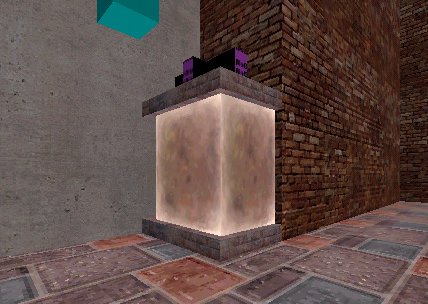
Fireplace enclosed with two simple meshes. A temporary texture has been applied to make them visible for this screenshot.
Notice how I've used simple meshes instead of brushes. This keeps the player from walking through the grates and into the fire. A brush could have been used with the common/full_clip shader applied to 5 sides of each brush, but the mesh method is simpler.
Bring down the textures menu and click on ricebug. Your grate shader should appear in the texture preview window.
Apply the grate shader to the patches by selected the patches and clicking on the texture. Do the same to the other fireplace in the opposite corner. Compile your map and you should have some cozy fireplaces contained behind proper grates.
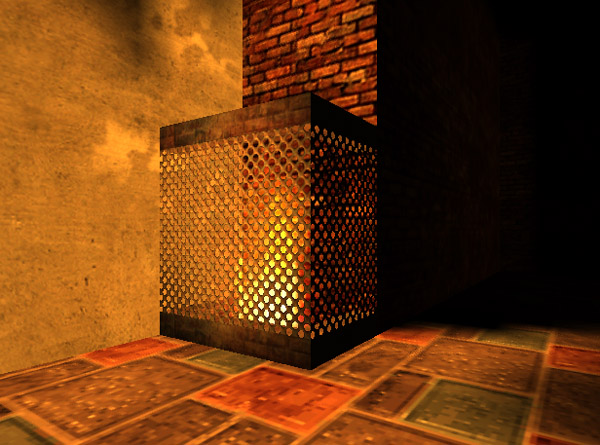


It's looks cool^^