Tutorial written by Terry DeLaney. Mirrored here for archival purposes.
Falling & Blowing Leaves
In this tutorial, we'll learn how to create realistic falling leaves, blowing leaves, and swirling leaves. Although the mechanics of putting the basics together are pretty straightforward, the believability factor is what takes time. While the Quake 3 engine can employ a number of wonderful mathematical scripts, they are, unfortunately, cyclic. In other words, they are repetitive. In nature, chaos, or randomness is what makes the world around us. Because these effects are purely distractive in nature (the player stops to admire your falling leaves and gets railed as a result), they must be used sparingly and briefly.
For this tutorial, we've already supplied a map which you can grab here. The textures for these tutorials are also included, as are the scripts. However, I would encourage you to practice making your own.
Falling Leaves
1. Open up your fave paint program and create a new, empty canvas/layer, 256 x 256 pixels.
2. On this layer, get real close and draw/paint three leaves. They don't have to be too detailed. I merely slopped some autumn colors together and used a dark brown to add a stem or some detail.
3. Make sure everything is flattened or merged to a single layer, and use the magic wand to select the blank area surrounding your leaves. Notice in the screenshot below, I have set my wand tolerance to zero, with anti-aliasing turned on. This will ensure that the alpha channel will get right up to the edge of our leaves. If you're making snow, you may want to increase your tolerance a few pixels to give your snowflakes a translucent edge.
 The background is set for conversion to alpha channel.
4. Although it's not necessary, fill the white area with black so the white shader border shows up in Q3Radiant's texture preview window, create your alpha channel, and save the file as leaf.tga.
NOTE: Since there are several paint programs and different versions of the same, it would be beyond the scope of this tutorial to explain how to create an alpha channel. I can tell you from personal experience that it takes a lot of reading and trial-and-error, and maybe a sniveling email to someone begging for help.
5. Save the leaf.tga file into your /baseq3/textures/ricebug directory
6. Update the shaderlist.txt file to include the entry ricebug, so the game can find your leaf shader.
Making the Shader Script
For those of you already proficient with shader parameters, you've already guessed what needs to be done. For falling leaves, you need (A) the leaves to fall to the ground; and, (B) some semblance of turning, drifting, etc. For the first part, all you need is the following line inserted into your script:
tcmod scroll 0 .25
Since we don't want the leaves to travel in a horizontal direction, the first number is zero. The second number gives us a nice, slow downward scroll effect to the ground.
The trickier part of getting a drifting motion, involves this parameter:
deformVertexes wave 30 sin 0 10 0 .2
I'm not going to get into what each of the numbers mean. The last four (0/10/0/.2) are what you want to adjust to obtain different degrees of motion.
The final script should look like this:
textures/ricebug/fall_leaf_1
{
qer_editorimage textures/ricebug/leaf.tga
surfaceparm nonsolid
surfaceparm trans
cull none
deformVertexes wave 30 sin 0 10 0 .2
nopicmip

{
map textures/ricebug/leaf.tga
tcMod scale 2 2
blendFunc GL_ONE GL_ZERO
alphaFunc GE128
depthWrite
rgbGen identity
tcmod scroll 0 .25

}
{
map $lightmap
rgbGen identity
blendFunc GL_DST_COLOR GL_ZERO
depthFunc equal
}
}
Note that the very first line determines the name of the shader. This is the name you'll see in the editor. It is given a different name from the actual .TGA file.
This is extremely important if you plan on using the same texture file for different shader effects.
If you don't adhere to this naming convention, you run the risk of causing texture robbing problems within Q3Radiant if you create other shaders that use the same texture as the one you just made.
Adding the Leaves to the Map
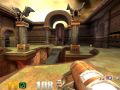
1. Open up the supplied map file. It should be an open yard with a tree situated in the middle.
2. Create a cylinder mesh around the tree and make it around 96 units tall.
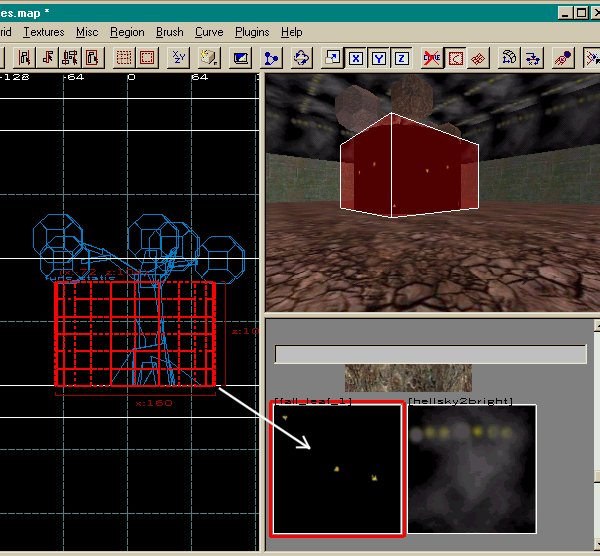
3. With the mesh selected, click on the fall_leaf_1 shader to apply. Do not deselect the mesh yet.
4. Call up the Surface Inspector and click on the Natural button. You may have to mess with the Fit button, also. What you're trying to do is get the leaves to be sparse. Too many leaves will be unrealistic.
5. Deselect the mesh and compile and run your map. You should have a nice falling leaf effect.

Aahh...autumn is in the air. Tree prefab courtesy of Michael Welter
NOTE: Structures such as trees can dramatically increase compile times. To avoid the wait, turn such objects into func_statics. The VIS engine will then "ignore" the tree. Keep in mind however, that any of the func_ entities will not cast shadows.
Blowing in the Wind
To achieve this effect involves another mesh and a modified shader script of the one we just used. Here is the shader script:
textures/ricebug/leaves1
{
qer_editorimage textures/ricebug/leaves.tga
surfaceparm nonsolid
surfaceparm trans
cull none
nopicmip

{
map textures/ricebug/leaves.tga
tcMod scale 2 2
blendFunc GL_ONE GL_ZERO
alphaFunc LT128
depthWrite
rgbGen identity
tcMod scroll 1 -.5
tcMod turb .2 .2 .1 .05

}
{
map $lightmap
rgbGen identity
blendFunc GL_DST_COLOR GL_ZERO
depthFunc equal
}
}
Save this script in the same file as your other leaf shader.
Note the red text beginning with tcMOD. These are the instructions that will tell our leaves to move left and downward, with a slight turbulence added. The alphaFunc LT128 deserves special note also. If your shaders are not transparent, try changing this to either LT128 or GE128. One is for white alpha channels, the other is for black ones. You can view the alpha channel's color in most paint programs.
1. Using the same map, create a simple patch mesh that stretches from one end of the yard to the other. Put it 8 units above the ground and 128 units wide. Use the 3 x 3 default patch division. You may have to rotate the mesh to get it parallel to the ground. If you flip it so where you can only see the wire mesh and not the texture, go to the Curve menu and select Matrix/Invert.
2. Apply the leaves1 shader to the mesh if you didn't have it already selected.
3. Now twist the mesh so that one end remains 8 units from the ground, while the other end twists up and toward the sky at the other end of the yard, like so:
 Mesh twisted up towards the sky. Sky removed for clarity.
4. To achieve the twist, go to Vertex mode and Shift-Click on the left handles (they'll turn blue).
5. Switch to the YZ Side view (looking at the narrow end of the mesh) and press the Rotate button to rotate the vertexes 90-degrees. Avoid touching the sky with your mesh, since this may cause a bad point to polygon form error.
6. Enter into Bend mode and bend the mesh as shown in the screenshot above. Don't worry about being exact. Remember, in Nature, everything is chaos; there are no straight lines.
Compile your map and you should have some blowing leaves blowing across the yard and up into the sky. If you accidentally placed your mesh into the wall's shadow, it will be hard to see the leaves.
Monster Mesh
The above example serves to explain how to get the blowing leaf effect. Your map must determine the right shape and size of the mesh serving as the vehicle. A twisted mesh combined with a cylindrical patch--each having its own leaf texture--will provide a realistic "blowing in the wind" effect, especially when placed in a small alleyway or alcove.
To avoid a constant wall of blowing leaves, consider sprinkling a few leaves near one side of a large texture as depicted here. The blank area will provide a respite. To avoid the cyclic repetition, apply the shader to adjacent meshes with slightly different scroll speeds. Again, experimentation is the key.
Tornado Effect
-
Create a cone mesh or flared cylinder and create another shader, this time, using the tcMod rotate command. A speed of 999 will give you a fast spin.
-
To achieve the tornado's base effect, add a normal cylinder mesh to the base of the cone as shown to the left.
-
Be sure to throw in a dash of deformVertexes wave and tcMod bulge to get a realistic motion.
-
Convert the mesh into a func_train and have it sweep through a yard. The demonwind1.wav sound should complement it nicely.
 Tornado surrounded by four rings of cylinder meshes with leaves shader applied. (Blur effect from PhotoShop)
Final Note
The ideas presented here are certainly not authoritative, but merely presented to stimulate you toward your own inspiration. For example, the falling leaves effect could easily be modified to simulate a snowfall or blizzard. With some creative mesh work, snow drifts could add to the effect.
The tornado could certainly do better in more competent hands, and I would gladly accept someone else's effort and incorporate it into this tutorial (credit given, of course).
Special thanks to EutecTic for his technical feedback and help with those $%&#*$ alpha channels. Couldn't have done it without him.


i want more tutorials^^