Tutorial written by Ricebug. Mirrored here for archival purposes. Note his example file/textures have been lost to time, however all of the images for this tutorial were preserved.
Acft Maint, Pt 3: Texture Tricks
Based on Q3Radiant Build 201
Part 3 in a Series, by Ricebug
In our first tutorial, we made a cargo aircraft, texturing everything with the standard Q3A textures and shaders. If you're into designing castles or science-fiction levels, these textures do very well. But if you want to re-create the streets of Chicago or your living room, these textures will suck badly. Such is the case with our aircraft. The intent of this tute, therefore, is to show how to design your own textures and how to painlessly replace existing ones. We'll be going deeper into the Surface Inspector, and using Q3Radiant's Find & Replace feature for painless texture replacement.
1. Using Lightwave 3D™ to Create Textures
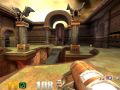
The first thing we want to fix is this intake. Most readers of the first tutorial probably thought, Ugh! Putting an old, rusty fan blade from Q3A's sfx shaders does not make a convincing aircraft engine. (Unless you've stuck an old Chrysler "Hemi" in there!)
The problem is, how to find a suitable texture? You have two options: paint one, if you've got the skills, or model the fan blades with a program like Lightwave.
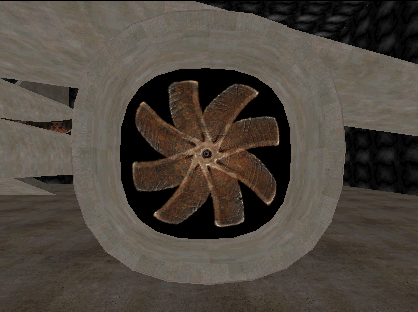
Fig. 1, Not very realistic, is it?
1. You can use any 3D program for this exercise---it doesn't have to be Lightwave. 3D Studio disciples can take the same concepts and follow along just as easily.
2. Launch Lightwave Modeler, and in the face view, create a disc, extrude it, and punch a hole in it, using Boolean Subtract. Dimensions don't matter, since we're creating something for a 2-D screenshot which will be re-sized to Q3A dimensions.
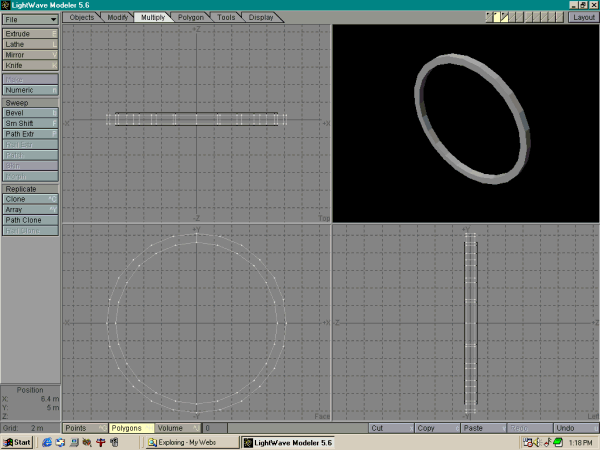
Fig. 2, Creating the outer ring in Lightwave's Modeler
3. Next, draw a polygon, extrude it, and rotate it slightly, as shown here:
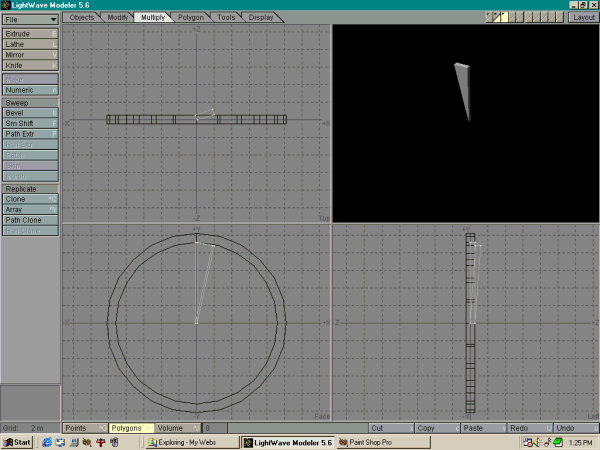
Fig. 3, A single fan blade is positioned, extruded, and rotated.
4. Call up the Array tool and do a radial clone of 35 copies, with the settings shown here.

5. The lower screenshot shows the result of the clone. The reason for doing 35, is that the first blade that you created will bring the total up to 36. You can clone as many or as few as you want.
 Fig. 4, The result of the Radial Array cloning operation.
6. Finish up your turbofan assembly by adding a center hub. Save the object. Here's a preview of the completed engine turbofan.

7. Now launch Lightwave's Layout module and load your turbofan object into it. Zoom the camera so that it fills up the screen and make sure that the camera is pointed dead center on the fan. If it is not, the fan will spin off-center.
8. Re-position the light so that it also is dead center targeting the fan. Normally, you'd want the light off-center in order to cast shadows. However, since this will become a bitmap, rotated by the shader command tcMod rotate, any raytraced shadows would also rotate with the bitmap, making it appear unrealistic.
9. Although not necessary, apply the appropriate surface textures to the fan.
10. Render out a single frame at high resolution, saving it as a .tga or .jpg file. Here's a shot of my turbofan, with some fractal noise applied to the blades to give them a worn and dirty look.
11. Bring the rendered frame into a paint program and crop and re-size it to a 256 x 256 24-bit image. Since we won't be doing any transparency on this image, don't worry about saving it as a 32-bit Targa file.

12. If you've been following this series, you should have a hangar.shader script already in your shaderlist. Add the following lines to create your spinning turbofan effect:
textures/hangar/enginefan
{
surfaceparm nomarks
qer_editorimage textures/hangar/turbofan.tga

{
clampmap textures/hangar/turbofan.tga
tcMod rotate 256
}
}
13. After removing the cap (you'll have to ungroup and drag the cowling pieces out of the way), apply the turbofan shader to a 16-sided brush and shove it far enough down into the engine so that the edges don't poke through the sides of the engine mesh.
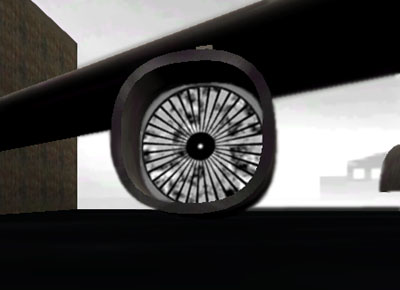
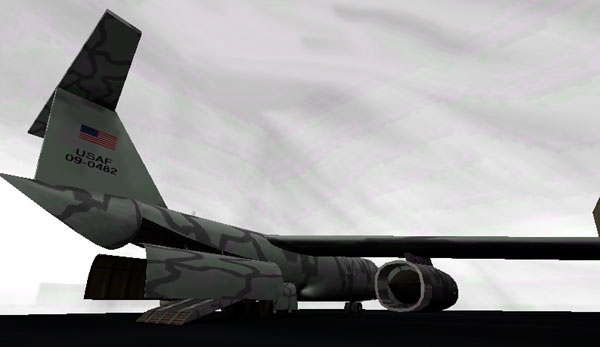
The custom texture gives our engine intake a much more realistic appearance.
Why apply the texture to a 16-sided brush? Applying it to a mesh cap results in a squashing effect. Unlike id's sfx/fan shader, which has a fair amount of empty space surrounding the actual fan, I wanted the texture to fill the brush. Be sure to add the nodraw shader to the whole brush before applying the custom texture to the face.
2. Adding Some Spotlights
Although not related to textures, let's go ahead and fix the lights situated near the two main landing gears. Simply add a light entity and target it to an info_null or target_position. Leave the light values at its default settings. Clone these two entities and place another one at the other gear. When you compile your map, light should be focused forward instead of just splashing the surrounding brushes with a pool of light.

Spotlight aimed forward cast a more realistic light on the fuselage.
In reality, these lights would never be turned on inside of a hangar. They're used for taxi purposes.
3. Replacing Textures Using Q3Radiant's "Find / Replace..."
Almost all of the aircraft's exterior has the base_wall/patch10 texture applied to it. For the sake of this tutorial (and in keeping with military tradition), let's replace it with a camouflage paint job.
1. Create a seamless texture using Wally. I don't know of a paint program that does this, although Corel Photo-Paint allows one to "program" seamless textures, by picking colors and applying stock algorithms. Since not too many can afford Photo-Paint, and Wally is free, let's go with the latter.
2. I created a 256 x 256 plain gray pattern and added a few noise passes. Always add noise to your textures, as Q3's rendering engine does not display solid colors very well. This is especially true of lighter shades.
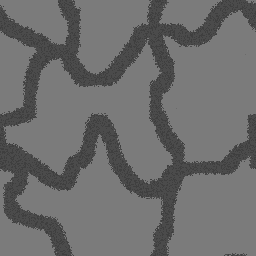
3. Name the file camo, saving it as either a .jpg or .tga file into your textures/hangar directory. Refresh the texture list in Q3Radiant. Your new texture must appear in the texture preview window.
4. Go to the Textures pull-down menu and select Find / Replace...
5. This dialogue will pop up. Click in the FIND field and then click on the patch10 texture in Radiant's texture preview window.
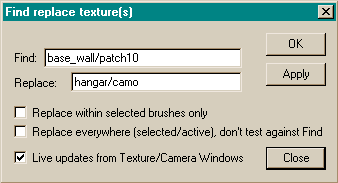
6. Click in the Replace field and then click on the camo texture.
7. Hit Apply and you should see the aircraft instantly camouflaged.
ALWAYS save your work before invoking the Find / Replace command, as you cannot undo it.
5. Unfortunately, you will have to go to each of the meshes and fool around with the Surface Inspector's (SI) Fit and Natural buttons to make the pattern appear uniform. (I used Fit on the large meshes and scaled the textures with the SI's scale spinners.)
When using the scaling spinners in the Surface Inspector, simply click in one of the fields and then use the UP and DOWN cursor keys on your keyboard to adjust the texture's size. It may also make things go faster if you change the 0.05000 to 0.5.
If I had constructed this aircraft "for real," it would have been better to FILE/LOAD the aircraft into the empty editor, and while it was still selected, applied the texture, and used the SI's Fit command.
4. Last Words
We could go on tweaking our aircraft. It still needs a door, but you don't need me to tell you how to build one. The wings are showing inside the fuselage...ditto. In our next tute, we'll build a hangar for this beast. See you then!