ALL ABOUT “History of Centuries” 2024
We are the official representative of "THOA". We are the new development team for "The History Of Ages". Motto: "Don't lie, don't steal, don't be lazy"
The History of Middle-Earth - HOME is a project that is a platform for other projects, such as TOOD, ENNORATH, EDAIN, AOTR, patch 2.02 and THOA as well as others, at the moment, the advantages of our build are obvious optimization and good graphics.
A continuous journey through the world of Middle-earth reveals new lands, wild creatures, exceptional magic and many other mysterious and enchanting aspects of the game to players. Indeed, the more beautiful, realistic and exciting the game, the more interesting it becomes, which is exactly what The History of Ages (THOA) mod for the game LOTR The Battle for Middle-earth 2 - The Rise of the Witch-King says.


Articles
TITLE
THOA MAP EDITING RULES
I. PREPARING FOR MAP EDITING
1. SOFTWARE PROGRAMS
2. Game profile and location of custom maps
II. MAP EDITING THOA MOD
1. The correct path to the edited maps is C:\Maps or D:\Maps
2. Check the libraries folder. Check if you have it in the root with the mod
3. Extract the file ___THOA_Volumetric Lighting.big to disk C or D with the command Extral All
4. Light Customization - Global Light Option
5. Lighting or PostEffect
6. Faction List - Edit Player List - Add Ai, Edit Faction List
7. Adding scripts and camera to the map using Libriers
8. Working with textures (Vertical and Horizontal) smoothing and transitions
9. Selecting the Rivers and Oceans - Water System settings
10. SkyBox - skyboxes, examples
11. There is a map.ini file in the maps
12. Cloud - cloud shadows and other area illumination effects.
13. How to add your own maps to the mod
first of all
MAP EDITING PREPARATIONS
In this article we will deal with all the nuances of working on maps in the THOA mod, as the knowledge of map editing in this project will be exhaustive and you can apply your knowledge in other projects on a smaller scale, where there are no additional scripts or work with shadows from clouds, lighting and post-processing.
All examples below are original material and all provided material is in the public domain, including all tools so using them you do not infect your computer with any virus and are provided on a free basis created by enthusiasts, some of the programs are pirated software.
SOFTWARE PROGRAMS
When We installing the repack or you separately downloaded programs such as FinalBig 4.0 and any graphics editor to work with the format .DDS and .TGA we will fit PaintNet or Photoshop with plug-ins Nvidia - Texture Tools Exporter
Example of opening ini.big it contains game code and all characteristics


Unpacking maps with Final Big
NOTE: the path to mod and game folders should not contain Cyrillic letters in the address, as well as various signs ™, ©, ®, etc. Unpack .Big files only in the direct path D:\* "D:\Maps"; "D:\ART"; "D:\Data", etc.


Do not select the map or other elements except TGA; DDS; W3D; INI; INC otherwise the program will froze completely, it is recommended to unpack all the necessary big files at once.
For description of maps we need SSTEditor - opening files of Russian text .CSF and English text .STR interface of the program I think is clear to many people.
A little bit about command buttons and translation in the SSTEditor program .
The name of the line: CONTROLBAR:ToggleAmbushFormation - this refers to the button code in CommandButton.ini or CommandButton.inc - the inc format can be edited in Notepad mode or unzip all files and edit in Notepad++ program
CommandButton *The name of the button that must match in CommandSet.ini or CommandSet.inc section of a unit or squad or building or other object, each of them has a Commandset.
Command - type of button, for more details see the Coding section there are examples and help in editing code.
Options - command button options, in this case responsible for rack switching - TOGGLE_IMAGE_ON_FORMATION and has a common command execution when identical squads with the same command set -OK_FOR_MULTI_SELECT are selected.
ButtonImage - display the icon of the team, in this case there are two of them when switching the rack.
ButtonBorderType - type of use - command, system, build or nothing ACTION, SYSTEM, BUILD, UPGRADE, NONE.
TextLabel - the name of the button, usually the lack of translation is displayed MISSING:CONTROLBAR:ToggleAmbushFormation - in game this means no translation.In this case we have 2 rack names CONTROLBAR:ToggleAmbushFormation - Ambush (&M)
CONTROLBAR:ToggleLineFormation - Line (&M)
&* - any letter after the & sign means that this button will activate this ability, hire a unit, select building construction or other commands to be executed when you press this button, you can edit the set of commands to be executed.
DescriptLabel - description of the command, ability or build, description of conditions and other actions.
InPalantir - visible or not visible in the palantir (in the interface near the portrait in the command set of the unit or object)
DoubleClick - double-click is allowed (title, description, icon change with this function)
UnitSpecificSound - sound effect
GondorSoldierVoiceBlockFormationOn GondorSoldierVoiceLineFormation (1 and 2 build sound)
CommandButton Command_ToggleFormationGondorDunedainFighter
Command = HORDE_TOGGLE_FORMATION
Opti OK FOR_MULTI_SELECT
Butt ucformation skirmish
Butt />TextLabel = CONTROLBAR:ToggleAmbushFormation CONTROLBAR:ToggleLineFormation
DescriptLabel = CONTROLBAR:ToolTipToggleGGondorDunedainFighterLineToBlockFormation CONTROLBAR:ToolTipToggleGGondorDunedainFighterBlockToLineFormation
InPalantir = Yes
DoubleClick = Yes
UnitSpecificSound = GondorSoldierVoiceBlockFormationOn GondorSoldierVoiceLineFormation
End


SST Editor
NOTE: Maps.str works, but Maps.csf will not work, so edit the main translation file for Russian, which usually lies at "*\lang\russianpatch201.big\" or "*\lang\englishpatch201.big\", where * is the path in any known mod, except AOTR and THOA, there is a difference in the location of language files.
Edit map name and description MAP:*Map name as in Maps and map description is added MAP:*/Desc at the end and description and features of the map are written.
Translation of the game


Example: "C:\Games\History Of Middle-Earth\Electronic Arts\The Rise of the Witch-king\lang\russianpatch201.big" and the English version "C:\Games\History Of Middle-Earth\Electronic Arts\The Rise of the Witch-king\lang\englishpatch201.big" all these files have different paths to save inside the big files russianpatch201 and englishpatch201, example below. Even if you move the big file to the root of the game, the correct path to the .CSF and .STR files inside the .Big files is still shown below.
It is better to unpack translations in the same way as maps, not by selecting the translation file itself, but by unpacking all the files of the .big archive.


Example with Russian text
GAME PROFILE AND LOCATION OF USER MAPS
At the bottom you can see the path to the game profile and games, all your game profile data is stored there, you just need to know that the path to them is through \AppData\ - this folder may be hidden in your view and search settings.
 If you can't find the AppData folder, access it from hidden.
BFME1, BFME2, ROTWK and THOA game profile folder location
C:\Users\Администратор\AppData\Roaming\My Battle for Middle-earth(tm) Files
C:\Users\Администратор\AppData\Roaming\My Battle for Middle-earth(tm) II Files
C:\Users\Администратор\AppData\Roaming\My The Lord of the Rings, The Rise of the Witch-king Files
C:\Users\Администратор\AppData\Roaming\My The History Of Ages™ Mod Files
The following folders and files exist in the game profile

A typical game profile, in this case of the THOA mod.
MAPS - folder where you should put your game maps, which you want to play yourself or with a friend.

Folder with the map and created after the first launch MapCache.ini - a file with information about all maps located in MAPS
Map design example, files in the map folder _PIC and _ART
_art - is a thumbnail of the map \ reflected vertically
_pic is a preview or art of the map
Create a map screenshot (top view Ctrl+F)


REPLAYS - folder with game replays, you can add there replays for shooting or training, you can also share replays with friends.

The last video is always the last battle, the file is overwritten, you can always copy it and rename it if you need a replay of the last battle.
SAVE - a folder with saves, including saved created heroes, you can share them by passing saves and created heroes to your friends.

All save data on created heroes, the saves themselves, and medal information.
OPTIONS.ini - the most necessary and important file, without it you will not run the game.
To manually customize your game resolution, you need Options.ini Resolution = 1920 1080
Resolution = 1920 pixels wide by 1080 pixels high.

A file of all options in the game, graphics settings and game launch options.
secondly
THOA MOD MAP EDITING
We proceed to a detailed block of editing maps with their own hands, there are basic rules that every self-respecting cartographer or moderator should remember and know. Now we will tell about all of them in detail.
№1. The correct path to editable maps is C:Maps or D:Maps

Example of finding a folder with maps for editing.
№2. Check the libraries folder check if you have it in the root with the mod.
C:\Games\History Of Middle-Earth™\Electronic Arts\The History Of Ages™\libraries\lib_thoa_camera

libraries - folder with settings for cameras and ground horizon recoil, has a number of ready-made settings and scripts for importing into maps.
№3. Extract the file ___THOA_Volumetric Lighting.big to disk C or D using the Extral All command.

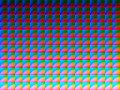
___THOA_Volumetric Lighting.big - the PostEffect kit contains a huge number of LUTs. It stands for Look Up Table - color conversion table.
LUT means "Look Up Table" - it is a set or better to say a matrix, which contains information about the correspondence of one color to another, and which can be used in various programs.
Here's a simple example:
Red = dark red
Blue = blue-green
Green = gray
Thus, if you apply LUT, the colors in your file will be recolored. Of course, in reality there are many more colors, and the algorithm of their replacement is more complicated, but you get the idea.

An unzipped example LUT that you can use in the mod when editing maps.
№4. Lighting Setup - Global Light Option.
Global Light Option - this is the setting of lighting on the left column under the square values there is a good better to reduce highlighting more contrast and reducing excessive brightness, there is also the setting of three points of lighting camera with light 1- light 2- backlight camera and 3- backlight camera if 2 or 3 are considered by the indicators are brighter, it is 2 or 3 will give glare on the water and other objects.

Interface of working with lighting in the game.
№5. Illumination or PostEffect.


Edit Post Effects - selection of post effect with LUT files.
Edit Post Effects - select from the given lighting textures those that you need and customize the strength and contrast at the expense of a simple level of their use where 1.0 is fully 100% strength of the effect of this filter.
№6. Faction List - Edit Player List - add Ai, edit faction list.
Open the map editor, check the list of factions and add our list, factions that are not in our mod remove Edit Player List click on Add Skrimish will add factions.


A way of adding factions to the map.
IMPORTANT!!! When adding bots to the map be careful. Depending on what mod check with a set of factions, you can remove factions and add them with the same button Add Skrimish and will add bots exactly that mod, through whose editor you came.
№7. Adding scripts and camera to the map using Libriers.
There you select PlyrCivilian select the button Libriers and again select the already familiar to us script library, so you import our scripts on the camera and distancing it in the game.
C:\Games\History Of Middle-Earth™\Electronic Arts\The History Of Ages™\libraries\lib_thoa_camera\lib_thoa_camera.map

Select PlyrCivilian → library Maps → lib_thoa_camera.map
№8. Working with textures (Vertical and Horizontal) smoothing and transitions


1 - Auto Edge Out - Expands the boundaries of the selected texture, the texture is expanded in a bloat pattern.
2 - Auto Edge In - Shrinks the boundaries of the selected texture, making it smaller smoothing is done in the image of pulling it in.
3 - Blend Single Edge - Method, it is already separate fixes textures where smoothing has not occurred, you can manually apply it. The appeared triangle should be clamped and pulled to the side of the texture, the boundary of which should be corrected.
4 - Texture Sizing - this is the texture of the vertical slope, it is recommended to start smoothing textures, steep cliffs and relief mark one texture, which will be used for the vertical slope in the future, works only for one texture. So texture smoothing should be done beforehand.
Map Cliff - makes a texture vertical by increasing the number of times it is repeated in that area by one square.
Remove Cliff - undoes the texture for the vertical plane. Cancel all Map Cliff actions with this texture.
The rest of the Texture Sizing section settings are at your discretion, try, experiment.
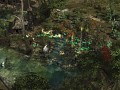
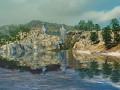
№9. Selecting the Rivers and Oceans - Water System settings
Changing the water model is applied through unchecking and re-enabling the checkbox in the Ocean Sea water settings in the line Enable FX Shaders and what bottom or how will go distortion of lighting on the bottom you already change Enable Depth Colors also by unchecking and checking the box where you are asked to specify what texture to use.

An example of working with water.
At the link is a list of texture types and formats of sea and river water.
The distance of passability (wading) should be 2 units below sea level. At the link there are 2 archives download and unpack into the same folder where and unpacked LUT. Kachate from there textures and models, they are original so that will work with any map.
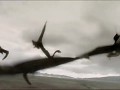
№10. SkyBox - skyboxes, examples.
All skies can be viewed in \Games\History Of Middle-Earth™\Electronic Arts\The Lord of the Rings - The Battle for Middle-earth II\ Terrain_HD _SkyBox.big there are all skies in JPG format and select them in the Sky Box objects section.
 You select add object, search for SkyBoxes and select the appropriate one.
№11. There is a map.ini file in the maps
Weather - this is already what concerns weather effects here is an example with a table of gradient, choose the color you want, the second indicator is the boundary of the start of the fog and the boundary of the end of the fog, I suggest always put from - minus, and the boundary to raise to when you become comfortable.

Code example in Map.ini
I put the size of at least 9600 and fog start from -600 that the sky was visible at least partially and the fog worked as antialiasing:
HardwareFogColor = R:102 G:106 B:120
HardwareFogEnable = Yes
HardwareFogStart = -600
HardwareFogEnd = 9600
WaterTransparency - section with reflection from the Ocean water surface where you set the reflection distance from the water height level. If the water has an upper (height/depth) boundary of 40 units, you set the same amount:
Reflecti />Reflecti />AdditiveBlending = Yes
ReflectionOn and AdditiveBlending - they are responsible for the reflection on the water.
№12. Cloud - cloud shadows and other area illumination effects.
We will talk about the effects that are in the original and add atmosphere to the game, first of all, you need to remember about the number of characters in the name of textures, and secondly, you need to make sure that the edited map has a format in Map Settings should choose Compression → No Compression instead of RefPack. You will also need the program Notepad++ to open the map with this program to edit codes, scripts, you can of course and the usual notepad.

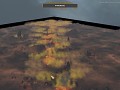
Here you can see the main menu of map information, which includes camera height, minimum and maximum camera zoom in and out values, and more.
Here you find in the open text format of the map through the program Notepad or Notepad++ and find TSCloudMed.tga change it to any of the textures presented below, or your own textures, because the main criterion is to match the number of characters (there are 10). There is also another texture responsible for the depth of glow, you can use it at your discretion. It will only affect the lighting of some parts of the map, which you specify, for the shadows of clouds on the ground is responsible for TSCloudMed.tga.
10 characters:
tscloudmed
tscloudsun
tscloudwis
cm5a_cloud
cm5b_cloud
cm8a_cloud
cm8b_cloud
cm8c_cloud
cm10_cloud
cm11_cloud
cm12_cloud
cm13_cloud
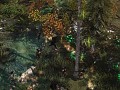
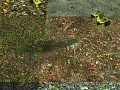
In the game, clouds are a form of ambient light. Clouds color everything on the map: objects, terrain, and units. For example, on a map such as the Blue Mountains, the cloud texture is replaced by an ambient light map. This texture is colored black and white, with white areas of the map illuminated and black areas of the map darkened.
TSNoiseUrb.tga - texture of noise or additional lighting, used in maps to highlight areas and highlights, darkens areas on the map.
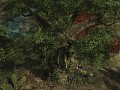
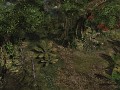
Macrotexture colors only the terrain. For example, on the "Dol Guldur" map, the ground shading is done by a stretched macrotexture. Another example is the unused macrotexture " Minhiriath", the map has three sections: Old Forest, Dark Misty Swamp and Green Mounds, each section has a different color designed to blend into the map. Also such an example can be and work on the map " Mountain of Doom ", where the lighting is darker in places and lighting smoothly moving and clouds give a more contrasting view on the terrain itself and there are many such original maps.


An image of the ambient lighting for Dol Guldur.
Add the following code to the map.ini file
Weather
CloudTextureSize = X:1000 Y:1000
CloudOffsetPerSec Y:-0
End
CloudTextureSize is "the size in world units that encompasses one repeat of the cloud texture", this should be the size of your map or otherwise aligned with where you want to place and repeat the ambient light texture.
CloudOffsetPerSecond is "texture offset in units of how fast the cloud texture moves per second", if you want your ambient light texture to not move, set it to 0.
Link to English tutorial.
Forums.revora.net
№13. How to add your own maps to the mod?
After placing the map or maps in the Maps folder, you launch the game!
See the paths to where you need to put the maps in the article in the paragraph:
Game profile and location of user maps
In our case we choose the path of our mod:
C:\Users\Administrator\AppData\Roaming\My The History Of Ages™ Mod Files\Maps
Launching The History Of Ages™ mod
After entering the game menu, we exit the game and go to the address above to find the "MapCache" file:
C:\Users\Administrator\AppData\Roaming\My The History Of Ages™ Mod Files\Maps\MapCache.ini - open the file with the program "notepad++".
MapCache.ini - this file contains all information about maps and is always updated in the profile when there are maps attached to the Maps folder.
Then go to the folder with all our maps on the drive C:\Maps\MapCache.ini or D:\Maps\MapCache.ini - open the file with the program "notepad++" and edit it.
MapCache.ini - must always contain a complete list of maps required for the game, it does not matter how many maps in the big file, it is important what is specified in MapCache!
Maps.big maps stored in the BFME2 folder can be loaded due to MapCache.ini, but they are not edited and AI (bots) will not work for new factions.
sOfficial = yes - official map, will be displayed as official map in the list.


1. Found the MapCache.ini of the map to be added
After all procedures with C:\Users\Administrator\AppData\Roaming\My The History Of Ages™ Mod Files\Maps - delete from there the maps that we have already added to the mod, they will not be needed in the profile.
Also, when you start the map.
!IMPORTANT! Make sure that there are no other scripts with cameras on the map if there are, go here and remove not imported by us... deleting there sections and saving after the actions.
That's usually how you would write the script there as CAMERA is with our imported arrow icon...that's what you've just added.

Import scripts with cameras and distances - libraries.
Files

Torrent OLD RePack HOME v1.8
Full Version 8 commentsThe project is alive, all parties have reached an agreement. I can post lost materials with a light heart.
THOA Update v. 2.0 Date 03.03.2024
Patch 5 commentsA UPDATE IS OUT TODAY - 667 Maps multiplayer - Over several hundred trees - Over several hundred new rocks, stones, ravines, canyons - Over hundreds of...
208 Lut\Volume textures
TextureTo make use of a LUT, use the following properties to assign the LUT texture to the Post Process Volume you want to use it with and adjust its intensity...
106 buffs and debuffs
Model Pack106 buffs and debuffs are available to you for every color and taste. Please list us as co-authors, respect our work, we are ready to cooperate!
Skyboxes for your project
Model PackWe present to you 360 skyboxes for any of your maps, for every taste, color and even, no matter how funny it sounds, even spatial orientation; there are...
Textures terrain
TextureYou are presented with over 600 ground textures, you can familiarize yourself with the contents in more detail. Please include us among the authors. Thank...
Post a comment
Profile
X
Tags
Embed Buttons
Link to The History of Ages 2024 by selecting a button and using the embed code provided more...


You may also like


i added the files to my game but it crashes due to an ini block, dont know what to do
what did you install?
what blocks are you copying and why?
Glad to see you here again!)
Good luck to you, brother