
So I finally manage to have so time and show how to make them both work.The Notes of this Tutorial and what will show to you
- THE MOST IMPORTANT NOTE : - This tutorial is only for the trees & palm trees ( meaning the other folder at the moment I can't make them work because of some crashes, I need time for them )
- Will make you to learn how to install something manually, and of how much the game is default the better will run, and lose the nasty crashes after 5/10/20 minutes of playing.
- will be showed in 'step by step' mod for every single person, to be understood much better.
- without using gta.dat from DATA/MAPS
- without using weapon.dat from DATA/MAPS - to lose the sword & axe ( for those that don't want them )
- without using the vegepart.ide from DATA/MAPS/GENERIC
- without using real folder & subfolders like :
- For the beginning you need TWO GTA SAN ANDREAS; BOTH DEFAULT, NO MODS, NOTHING :
- One if for SRT3 installed into the default one.
- Second for Project Oblivion installed into the default one.
- Is best that to arhive the first San Andreas to make a one for Project Oblivion
- So we install this gta_tree_pine.txd on one of the San Andreas.
- Now we install the hole Project Oblivion 2007 HQ on the other San Andreas.
- Model NAME (.dff) -> vbg_fir_copse.dff
- Texture Name (.txd) -> gta_tree_pine.txd
- Model Name (.dff) -> pov1bg_fir_copse.dff
- Texture Name (.txd) -> pine.txd
- One for SRT3; gta_tree_pine.txd
- Other for Project Oblivion; pine.txdWe put them both near and see how they are looking. If you see Project Oblivion pine.txd already has the files from the default game; the names & alphas in it.
- tree19Mi & tree19Mia
- sm_pinetreebit & sm_pinetreebita
- kb_ivy2_256 & kb_ivy2_256a
- po1vbg_fir_copse.dff into vbg_fir_copse.dff
- pine.txd into gta_tree_pine.txdAnd Install them on gta3.img using the IMG TOOL.
- Model Name : - lod_vbg_fir_co.dff
- Texture Model : - lod_veg.txd We gona use now Project Oblivion Med Editor to view and find out the
- Model Name : - lod_1vbg_fir_co.dff
- Texture Name : - pine.txd
- lod_1vbg_fir_co.dff into lod_vbg_fir_co.dff
- pine.txd ( indeed we need another pine.txd and we extract him from real.img again ) and remane it into lod_veg.txd
Will make them both work :
- real.img
- real.ide
- real.ipl
- real2.ipl
- real3.iplThe MOST IMPORTANT piece of this tutorial is the real folder and his subfolders because is the one that is making the game to crash so bad, because the two tools like SALA & STREAM is making the game to crash because real FOLDER is a crash-bugged folder. = THE START =
First I will take just one tree .dff and .txd data from SRT3 cuz doesn't need to install the hole mod because buildings & objects texture doesn't have any to do with trees files. STEP1. - INSTALLING THE MODS
So let's start with gta_tree_pine.txd from SRT3. I've chosen this tree because this is the hardest one to be installed, having .dff, .txd and lod.dff & lod.txd plus .col
IMPORTANT; again I choose this tree the most because it has lod.dff & lod.txd where any other tree doesn't have, to make a complete tutorial of a tree from San Andreas.
Seems that gta_tree_pine.txd doesn't have a .dff in SRT3, so where this is ok to happend, meaning that SRT3 doesn't change the way of .dff trees dummy.
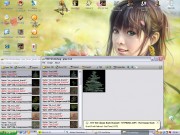
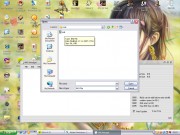
Now because we installed the two mods, we need two MED Editors. We open two Med Editors, and one of them we leave him in the taskbar for the moment.
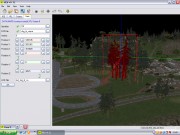
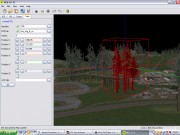
So we take the MED Editor of SRT3. Now we go to Item and choose CountryE.IPL and load it and you will get something like this picture below. Click on the tree till will be turn red.
STEP2. - THE NAME OF THE FILES
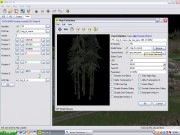
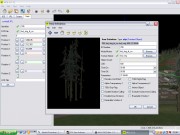
Now we go the IDE icon above and click on it and will appear a window with the :
Now we found out the names of .dff & .txd files from this tree.
STEP3. - PROJECT OBLIVION FILE NAMES
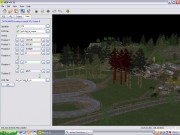
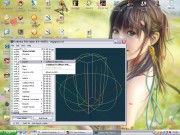
So now we use the second Med Editor and we do the same thing like STEP1 and you will get the same result just like in this picture below.
STEP4. - THE DIFFERENCE BETWEEN THEM
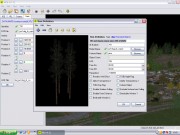
So after we saw the picture from the STEP3 we continue doing the same thing like STEP2, but this is where the things are starting to be different, where you gona see in the picture below the Model & Texture Name of Project Oblivion tree are different from the default game/SRT3.
Project Oblivion files .dff; .txd; lod.dff; lod.txd & .col are having a 'po' prefix at the beginning of each file; - po ( meaning of Project Oblivion shorted ). This is the difference between them. That's why you need Two Med Editor & Two TxdWhorshop to not get confused and of course you can work only in this way.
So the now the
After this don't close the MED Editor, you will need them.
STEP5. - EXTRACTING THE FILES
So now we go use an IMG Tool, and go to real.img from DATA/MAPS/REAL where we gona extract the povbg_fire_copse.dff and pine.txd
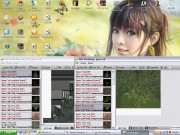
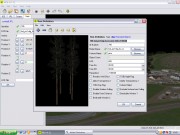
Now we gona open two TxdWorshop :
We can see that Project Oblivion doesn't have SRT3 tree textures where this is obvious, where why should we let the default textures from Project Oblivion to be in the game where SRT3 can do update the textures and somehow you have to be force to do that, because you already using SRT3.
STEP6. & STEP 7 - INSTALLING SOME TEXTURE FROM SRT3 OVER PROJECT OBLIVION
Now we gona extract texture & alphas from SRT3 gta_tree_pine.txd like :
How I've said, because they Project Oblivion will keep some texture default where SRT3 is doing the rest of the job, completing them. The other textures doesn't need to be replaced because Project Oblivion indeed has something much better then SRT3.
Now we gona use the second TxdWorkshop and open pine.txd and replace the tree files mentioned above with their alphas and then save pine.txd
We can see from the second picture that pine.txd still has the textures from Project Oblivion.

STEP8. - CHANGING THE NAMES AND INSTALL THEM
Now this is one of those important things to do if you want to make them both work. So we have the .dff & .txd names from Project Oblivion & SRT3 we gona do like this :
Now we have to extract po1vbg_fir_copse.dff too. So now we have the po1vbg_fir_copse.dff & the modded pine.txd file ( with the SRT3 textures ) from Project Oblivion.
Now we rename :
STEP9. & STEP 10 - THE LOD.DFF & LOD.TXD
How I mentioned above, this is the single tree structure that has lod.dff & lod.txd.
This is for the Long Distance, because SRT3 will overwrite Project Oblivion and when you gona be far from the tree object you will see the SRT3 texture and when we gona approach the object it will turn in Project Oblivion texture. So we need to fix this.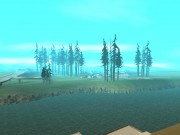
Indeed there are 6 lods that can be found at the bottom of vegepart.IDE from DATA/MAPS/GENERIC; they begin with LOD_****.
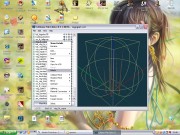
We gona use SRT3 Med Editor again and we go to VIEW - Long Distance (LOD) and click it to change in LOD MOD. Now we go the the tree and click it and we gona see the :

Now we rename the lod.dff & lod.txd
Now we gona install them too into gta3.img using the IMG TOOL.
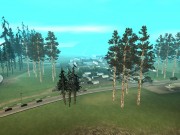
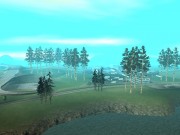
We can go now and test into the game to see the Long Distance how is working, like in this picture below.
STEP11. - THE COLLISION
-
Now we go for the Collision, where the trees from Project Oblivion are very different, most of them are tree or four per bouquet where on default game they are five or even 6 per bouquet on same areas. Some of Project Oblivion tree are even one tree per bouquet where on default they are four or five per bouquet.
- po1vbg_fir_copse.colwhere is the same name like po1vbg_fir_copse.dff.
- Now we gona go to the file and right-click and go the Export -> Collision Scripts (V2). After this we gona extrac the vegepart.col from gta3.img default one/SRT3 and open it with the second COL Editor.
Again we go to real.img and extract the vegepart.col where there are all the trees and palm trees collision from the game.
We gona need two COL Editors to do the job.
Open a COL Editor and choose the vegepart.col and we gona search and find
The .col names from vegepart.col from Project Oblivion has the same file names like those from .dff files.
IMPORTANT: Some of the trees that has collision, doesn't have the proper collision for the proper tree. If you can see around Project Oblivion 2007HQ is not a 100% finished mod. So possible that
some trees like those from Catalina House in the Country Hills to go through them. So this doesn't have any to do with the tutorial
We search for vbg_fir_copse.col and we gona find it we gona right-click it and delete it; yes we gona delete/erase it. After this we gona rename po1vbg_fir_copse.col from Project Oblivion into vbg_fir_copse.col for course to replace the vbg_fir_copse.col from SRT3 that has been deleted.
Now we gona go to EDIT and choose Add... and added the new vbg_fir_copse.col and we gona save it.
Now we gona use this new vegepart.col ( not the one from Project Oblivion ) and install it on the gta3.img SRT3.

So now we have installed the
- vbg_fir_copse.dff ( model )
- gta_tree_pine.txd ( texture )
- lod_vbg_fir_co.dff ( long distance model )
- lod_veg.txd ( long distance texture )
- vegepart.col with vbg_fir_copse.col inside him ( for collision ) STEP12. - GRASS TEXTURES
To Install the grass you gona need from Project Olblivion
- models/grass -> everything in the grass folder
- object.dat from DATA
- plants.dat from DATA
- surfinfo.dat from DATA
- procobj.dat from DATA has to remain from the default game, because there, are the malina, cvetoc, fern, plants & flowers that makes connection with real.img where I still have problems to make this flowers & plants to work, because is still crashing. So I'm sorry about the flowers if they will disappear but at least you remain with the grass.
STEP12. - GRASS TEXTURES
To Install the grass you gona need from Project Olblivion
- models/grass -> everything in the grass folder
- object.dat from DATA
- plants.dat from DATA
- surfinfo.dat from DATA
- procobj.dat from DATA has to remain from the default game, because there, are the malina, cvetoc, fern, plants & flowers that makes connection with real.img where I still have problems to make this flowers & plants to work, because is still crashing. So I'm sorry about the flowers if they will disappear but at least you remain with the grass.
[/LIST]
This are the basic steps in how to install a tree or palmtree only touching gta3.img and nothing else. For a beginner of this will take about 45 minutes by looking at the tutorial and installing in the same time. For the other trees & palmtrees possible to take some time, about half of day.
Again, at the moment only tutorial I can make, because the other features given by Project Oblivion to make SRT3 work without real.img and the other things is making my game to crash and I need to find out, but I don't have time. Good Luck.
IMPORTANT: This is only for those that didn't do the tutorial SRT3+Project Oblivion. This problem is caused by malina, cvetoc, fern, from real.img
 The error is in the Mission "Saint Mark's Bistro". You fall down because there is no floor and the guy that you have to kill is falling too :tired:. If you jump to catch the "target" that you have to kill, you gona be teleported in the plane again and go to LV airport and mission passed but I still very annoying to see only the sky, so I have fix it.
The game will not be affected by this modification. I use some alpha & beta objects where the game aren't using them anymore.


 Just go to DATA/MAPS/REAL and open real.IDE and erase everything and change it with this.
3892, cvetoc1, cvetoc1, 50, 0
3893, cvetoc2, cvetoc2, 50, 0
3894, cvetoc5, cvetoc5, 299, 0
13606, cvetoc3, cvetoc3, 299, 0
3896, cvetoc4, cvetoc4, 299, 0
13599, cvetoc11a, cvetoc4, 299, 0
3898, cvetoc11, cvetoc4, 299, 0
3899, fern, fern, 299, 0
13606, malina, malina, 299, 0
3901, grib1, grib1, 299, 0
3892, clubnica, clubnica, 299, 0
3910, cvetoc13, cvetoc13, 299, 0
3904, cvetoc8a, cvetoc8, 299, 0
3905, cvetoc10, cvetoc10, 299, 0
3891, cvetoc12, cvetoc12, 299, 0
3912, fern2, fern2, 299, 0
end
path
end
2dfx
end
anim
end
txdp
end
Good luck and hope that it will work
This comment is currently awaiting admin approval, join now to view.
This comment is currently awaiting admin approval, join now to view.