A few tips to get you started in RGB:
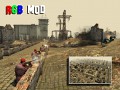
==Berlin Defence==
Don't charge about all over the map - let them come towards you! The enemy armour can only cross the canal at three bridge points if you wait near the middle bridge then you only have to traverse half the map to hit tanks at the dam or the culvert(pipes under the roadway).The enemy changes route at each crossroad so don't chase armour unless it has definately committed to one path or route. Save your Stukas for the later waves (the enemy tanks get faster with each wave of attacks) there will be times when you cannot get across the map quick enough - use the dive bomber here to save the mission. Don't open with the 88 too soon! take advantage of your nightsight - the Ai vision is handicapped at night - let them approach close before you let rip with that awesome cannon. Use direct control to fire and aim for the weak spot on the turret ring (the gap where the turret joins the main body) or let a tank pass you by then aim into the rear engine bay deck where the exhausts are. Turret slot an ISU-3 early on then repair it - you can get one crew member inside to defend the culvert on his own if you swag enough ammo from wrecks for the main gun. De-tracked enemy tanks count as hits but they will still fire on you if you get too close - either anti tank grenade the turret or let the wreck block the dam or culvert to hinder enemy access. Finally, remember the RCR is based on random generation and you still need a little luck to win - there will be times when the mission is unwinnable due to the way tanks have spawned at opposite sides of the map - don't keep bashing at it - reload an early game save and start again from a better position.
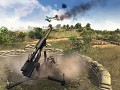
==Berlin Attack==
This mission can trip you up early on if you pick the wrong ruins to attack - use your troops wisely and don't let them stay still for too long or those damned mortars will zero in on you. The mortar fire is based on the static enemies vision sector - the mobile patrols don't set it off on the first side of the canal. If you are willing to sacrifice a few troops early on try wiping out one (or both) of the mortar crews with a banzai grenade charge - the harrassing fire is then reduced or eliminated for the rest of your ruin clearances...Don't let the sapper tank block a demined route over the canal - drive it clear so your reinforcements can get through...
==Wake the Dead==
This level provoked most comments - mainly wanting spoilers - you can win the mission without solving the angel's rhyme and without lifting the curse...however if you want to see the 'good ending' and free cam reward you have to do a bit of work. I find it easier to lift the curse then carry the ammo in peace than to keep battling away while trying to tote those heavy shells! The easy mode does half the work for you (there's an extra crate hidden near the gong). If you get pi**ed off or bored carrying artillery shells put the timer charge in the crate that is inside the church - oops). A rhyme is carved into the statue of the Angel - it reads: "Begin with a tool for the Worker ~ Two SMGs for the Wing ~ Three pistols for the Cavalier ~ Eight rifles for the King ~ End with twelve helmets of strife for the Bringer of Life"...here's how to lift the curse...
Pick up the crowbar (do not ring the gong with it!) go to the Worker's statue grave (hammer over the shoulder) - an eyeball will appear when you hover cursor over the base of the statue - transfer the crowbar to the grave. Next fight the skeletons - loot 2 SMGs and go to the Griffin statue (one with wings) - same again, eyeball transfer the SMGs into the Griffin grave. Next loot 3 pistols and go to the Cavalier's statue grave (a floppy hat on), eyeball transfer the pistols over to the grave. Next loot 8 rifles (you may have to make a few trips) and eyeball transfer them into the King's statue grave (a crown on). Finally loot 12 enemy helmets (not officer caps) and transfer them into the grave with the woman carrying the water urn [original PS1 Resident Evil - was not the statue in the small art gallery called the Bringer of Life?]. If you have followed the steps in order - there should be a cut scene and the curse is lifted - hurray!
= Team missi The key here is to provoke the two Ai sides into a meeting of arms then slide quietly off to get your task done while they pop away at each other - then mop up what's left - the shot gun has limited range but most times one shot will do! If it's signed - it's mined - keep a good look out for the random minefields. If you are planning a hit and run flag swag use a magnum shooter - they are the fastest and don't load him up with too much looted .50 cal ammo or he won't be able to lift the flag to run away with it! Set him to no-fire if you plan to run thru a bullet storm or he will drop the flag to return fire... In the red team mission the mobile patrols are unlimited reinforced so try and skirt round them until you have got their flag back to your base. The team missions are re-playable as the RCR moves the flags, supply trailer and mines with each restart - there's also a couple of weather options for you. Each 2 part mission will restart at the beginning of part 1 so make sure you save early and keep that file after the first stage is completed. If you can't spare a soldier to guard your flag in the later missions - use barbed wire and AP mines instead and leave room in the wire for your own men to return with enemy flags.
Nice...ad it ingame as #tips!
I don't like the way the ingame tips pop-up over the loading screen...rather have this format
Where is the gong?! Im gettin REALLY ****** at this damn mission n just wanna pass it. please help! this hasnt really helped me at all!!!
The gong is a length of rail - hanging outside the bell tower to the right of the tower door - with the crowbar equipped your cursor changes to a ring symbol (same as railway switch points) when hovered over the piece of vertical rail...
OHH!!! Lol i was searching in the editor for it i literally looked everywhere! Funny part is i zoomed in right on it n said"Hmm....Piece of rail on a string....naw its probably aways there!" hahaha. Thanks so much! i wanted to try the Team missions!
Hmm...dern lol thought the gong stopped em permenantly...well i spose ill keep alookin fer this grave you mentioned. Thanks again!
I have been looking for the grave mentioned in the tips for quite some time, but I cannot seem to find it. I assumed it was the one next to the worker statue, but there was no interact button when I had the crowbar equipped. I tried every single other uncovered grave in the graveyard, but none of them had an interaction either, besides an obelisk which had an engraving. Help please?
You cannot interact with the graves if you have struck the gong already. You need to interact with the angel statue inside the church to access the task and an eyeball will appear over the worker's statue once you have the crowbar in your inventory. Transfer your crowbar across and the task begins.