This tutorial will show you how to take a custom mesh and animation from 3DS Max and export them into the UT3 engine. You will be shown how to set up your content so they work as ‘background characters’ (people walking down the street etc). This tutorial also looks at how you can control these animations so they are triggered at certain times (when a switch is pressed for example). This is not a tutorial for custom player characters.
Before you start, make sure you have the ActorX plugin for 3ds Max. It can be found here: Udn.epicgames.com Make sure you select the one that matches your version of the software. The plugin must be placed in the plugins folder of your 3DSMax directory: example: C:\Program Files\Autodesk\3ds Max 9\plugins
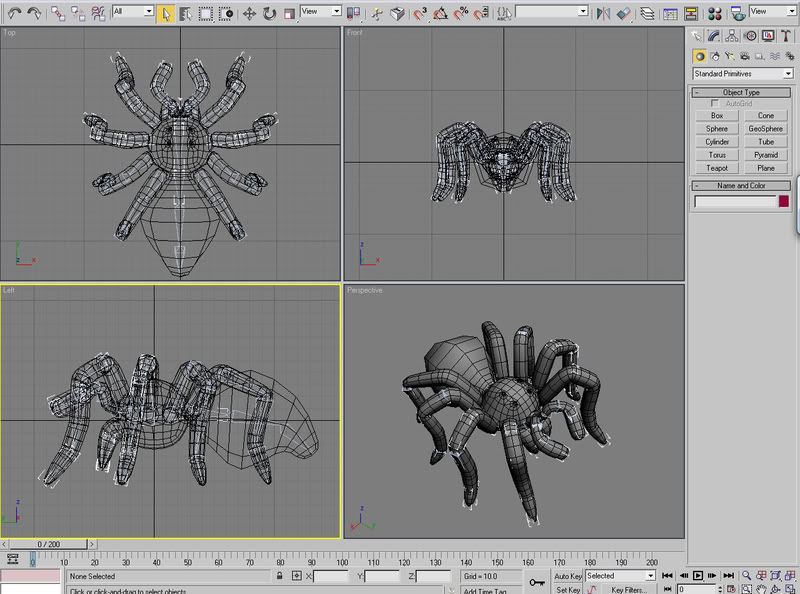
So here’s my mesh that I want to get into game. It has its own custom rig and has been animated so that it ‘hisses’ as if it’s going to attack something. To get this into the game, we need to use ActorX.
Load ActorX in Max – refer to the image below to see what needs to go where:


Output folder – where you want the file to be saved.
Mesh file name – what the mesh should be called.
Before you click ‘Save Mesh/Refpose’, scroll down and make sure these tick boxes are selected in the ‘ActorX-Setup’ properties. Then save out the mesh. IMPORTANT – Make sure only the mesh is selected before you save!
Next, we save out the animation.
Animation file name - what the file should be called
Animation sequence name – what ever the mesh is doing
Animation range – how ever many frames the sequence lasts for.
Next click on ‘Digest Animation’ and click OK on the windows that pop up. Open the animation manager, if successful, the animation sequence name should appear in the animations column.

Select the animation and click the right arrow underneath ‘move’ to transfer it into the output package column.
Click Save As – save your file to where ever you want.
We are now done with Max!
Open UT3
Open the generic browser (![]() ) and go to file – import – and select your mesh file (PSK) from its saved location. Name your package and group and the name of the PSK should already be there.
) and go to file – import – and select your mesh file (PSK) from its saved location. Name your package and group and the name of the PSK should already be there.
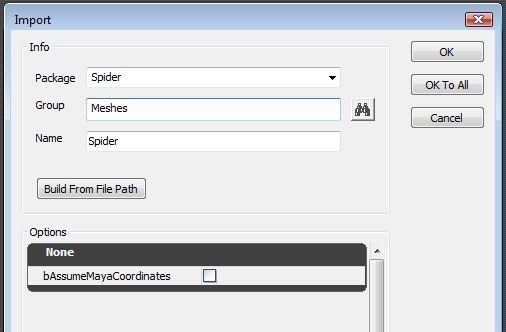
Locate your package in the generic browser and double click on your mesh (importing materials will not be shown in this tutorial).

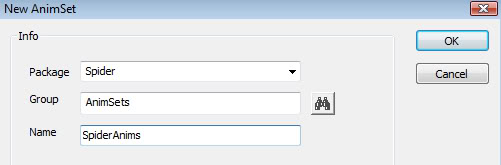
In the new window that opens, go to, file – import new anim set – make sure you rename the required fields.
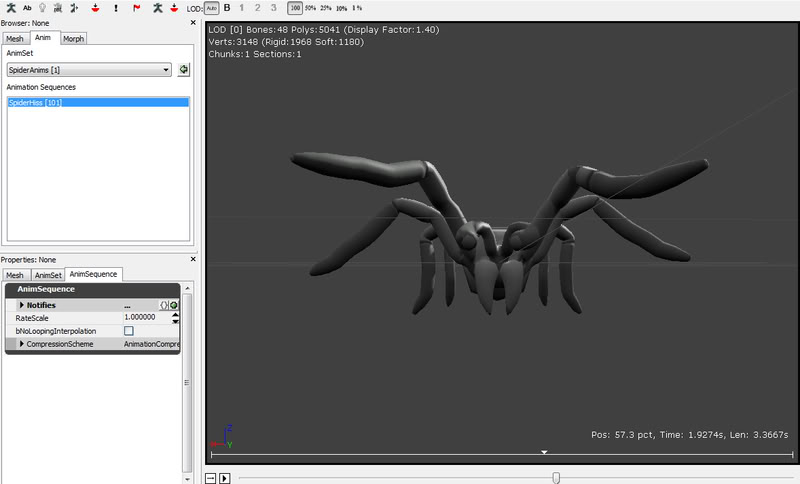
Next click on the Anim tab on the top left of the window and select your anim set from the drop down menu (the box below should now be blank). Go to file – import PSA - and select yours from its saved location (your animation sequence should now appear in the sequences box).
You now have it ready to use in game. Don’t forget to save your package!
Open your map/level and select your mesh in the generic browser. Right click somewhere in your map and go to add actor – add SkeletalMesh: Skeletal Mesh ‘YourMesh’ -. It’s probably going to come in black so right click on it and go into its properties. Drop down these bars – SkeletalMeshActor – LightEnvironment – LightEnvironmentComponent (tick the ‘bEnabled’ box). Also drop down the ‘DynamicLightEnvironmentComponent’ and change the ‘ShadowFilterQuality’ to ‘SFQ-high’. Your mesh should now be lit.

Kismet – Controlling the Animation
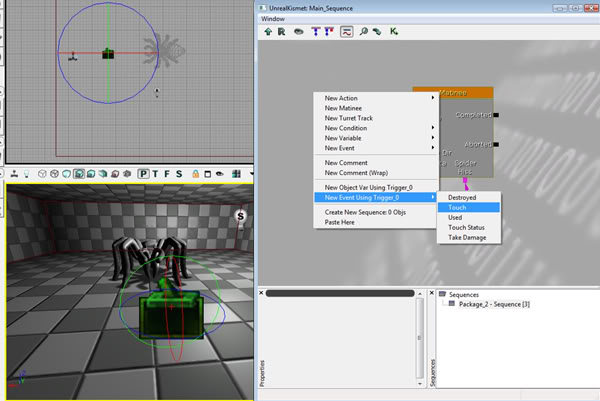
Select your mesh and open Kimset (![]() ).
).
Right click in the new window and select ‘New Matinee’ – Double click the Matinee box – Right click in the grey box to the left and select ‘Add New Skeletal Mesh Group’ (Name it appropriately).

Click on the name of your group – Underneath the timeline, click the plus sign next to ‘GroupAnimSets’ and add your own anim set by clicking on the small arrow button (make sure it’s selected in the generic browser first).

Next click on the anim track and hit enter – your animation should now be shown – click OK and you should now have a blue bar in your timeline. You can add more tracks to the group such as sounds and other property tracks. I’ve added a hissing sound.


If you click the play button, you should now be able to see the animation playing in the bottom left viewport.
To actually control when the anim is played, we are going to use a trigger. Right click on the floor, add actor – add trigger. Open Kismet with the trigger selected. Right click in the Kismet window and select ‘NewEvent UsingTrigger_0’ – touch (or whatever you want the anim to be triggered by). Link the touch trigger box the Matinees ‘Play’ box. If you test your level, your animation should now only play when the trigger is activated.

And that's it! This is my first tutorial so please be gentle with any feedback :P If you have any help/tips that I could add/change about this tutorial please feel free to leave a comment. Thanks for reading this tutorial!
I have simply posted this tutorial to share my knowledge of the Unreal Editor and so that the modding community have a resource in this certain area. There may be a million different ways of carrying out the task but this is the way I do it, and it works!
This was great, thanks!
Thank you :)
Thanks for the tutorial, it was very helpful to me in making my first custom animation in UT3. I do have a question though. I want the animation to continue more than one time. After I move through the trigger zone, the animation does its thing, I then back off and go back in to the trigger again and nothing. I think there is more I need to do. Can you help me?
Thanks,
Joe
Joesphat:
Go to kismet and change the "max trigger count" to 0. This will allow you to trigger the event an unlimited amount of times.
I liked the tutorial but I think using the spider is a bad example of what you can do with this technique. I'd personally use it for set pieces that jump out at you jack in the box style. For instance with a talking moose head attached to a wall who screams at you as you walk past him.
I know you did mention it at the start, but I initially missed the intro when reading (my own damn fault obviously) but if you had used a different set piece it might help burn the concept into the reader a little more that this is not how to do any sort of character on screen, but set pieces that require a skeletal mesh component.
Obviously I'm nitpicking though, its a great tutorial.