Solid Tutorial 2.0
(For Sandbox 3 for CryENGINE 3 SDK and Crysis 2 SDK)
Some may remember my Solid Tool tutorial from Crymod Wiki (Mirror )
With a new editor comes the updated solid tool.
Im starting to write a new version of my previous solid tutorial. Starting with some of the new features of the solid tool. I will and update the tutorial in the coming weeks.
Chapter 2.1 Texturing Solid before creating them
The first new thing that you will notice if you open up the solid tool in Sandbox3 is the "Mtl" button. This will allow you to select a texture for your solid before you actually create the solid. (saving allot of time in creating material files)
")
")
In this instance I selected the following texture located in:
Objects/library/architecture/building/ameri-bankbuilding/ameri-bankbuilding (nr 29 Wall)
")
And press assign to material
Now when you can create a solid, the texture will be created with it.
")
Chapter 2.2 Merging solids
Another new feature is that you can "merge" two or more solids together.
Create 2 solids:
")
Move both solids in each other.
Then select both Solid (select 1 then hold Ctrl and select the other one):
")
And then press the "merge" button.
")
Now both solids will be become 1 solid. The downside of this is that the texture will be reset to blank so you will have to apply the texture again.
Chapter 2.3 Deleting Faces
The by far best improvement for the solid tutorial is the option to delete "faces"
With this tool you can delete a face of a solid that is either inside another solid (or inside the terrain and so on) or not visible for the player.
In my example I created a big wall across the map, where the player can't get behind. So you have no need for the "face" at the back of the wall that nobody sees and the computer still calculates.
")
Now press the UVMAP button:
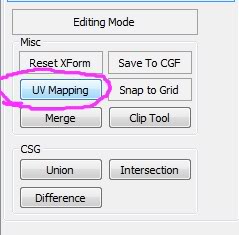
Select a "face" on the solid and it will become red, indicating that you selected that face.
")
Make sure you have the right "face" to delete and then select the face/delete button as indicated in the image below:
")
Once you build a complex building from solids deleting faces will save tons of frame per second (fps).
Chapter 2.4.1 Difference
With the "difference tool" you can cut solids with a touch of a button (you can also do this with the clipping tool but that takes more time and experencie.
In this instance I created 2 solids and moved them into eachother:
")
Now press the "difference" button and you will see it will cut a hole in the biggest of the 2 solids:
")
Here is another example for the "difference tool"
I created a box and a "sphere" with 50 sides and moved both into eachoter
")
First select the biggest object then hold Ctrl and select the "sphere"
After that press " difference"
")
If you move the solid down, you have an archway (well sort of)
")
With a little effort you can hollow out a solid by copying the solid and scaling it down to 0.9. Reset Xform on the scaled down solid. Select the larger solid and then select the smaller solid (select with Ctrl plus left mouse button.
In the example below I hollowed out a cylinder and cut out a door opening:

Chapter 2.4.2 Creating Archways
To create an Archway you need 3 solids.
First Create a Cylinder with at least 40 sides and turn it 90 degrees horizontal
")
")
And then create a Box with the same width and place it directly under the cylinder.
Tip: You can allign solids by setting them on the same Y axis in this case I used Y250.
")
Now create an solid box where you want your archway cut out. Make sure you get the size right before you start cutting the other solids out. (scaling a cut out solid can sometimes be difficult so get the size right before you cut). The solid where you want to cut your archway out must be floating a little above the lower box (see image below)
")
Now Select the big Box and then select the box underneath the Cylinder. (select solid then hold Ctrl+ left click on the other solid)
Now press the "Difference" button on the right
")
After that select the big box again and select the cylinder next (select solid then hold Ctrl+ left click on the cylinder)
")
Once you press "difference" tool again you will have a complete archway solid.
")


So is this a level editor? Internal model editor? I'm a bit lost here, frankly.
Level editor with all the others in one.
Sandbox 3 is the level editor for the CryEngine 3. It has tons of features, one of which is a simple geometry creation and modification tool, which Duruk is writing tutorials for. If you want to do more complex models, you are better off using an external 3D program like 3Ds Max.
One use for the solids tool is if you need to make something that fits the terrain, like a bridge over a river. You rough out the item in the Sandbox editor to fit, then export that model to .obj file. Then load it into 3ds Max and do all the detail work, levels of detail, breakability, vertex colors, etc that the solids tool is just not set up for.
Ah. I'm surprised how much Sandbox 3 sounds like Hammer. Yet, more model friendly. Interesting...
Nice Tut Duruk :) Thanks :D
Your welcome Hannibaldinski. I expect to expand the tutorial in the coming weeks.
Nice, Maybe some river tuts? I can't get the hang on those
great tut Duruk!!!
am glad they did add this new tool to this new engine, it makes it possible to work more like you are working with brushes.
as you probably know am i personally very glad to read this, lol.
great tut and will keep following this,
leon
Thanks Leon. Although the solid tool is not ideal for things like Danielle said: vertex colors, breakable objects and so on, it is however a good way for mappers familiar with Hammer, radiant, Unrealed and so on who love bsp mapping.
And with the export tools you can add detail in max.
I've never had the chance to look at the CryEngine content tools closely, I always thought that the idea of brush-based geometry had been abandoned, so you would have to create modular models for all sorts of walls, ceilings, etc.
Speaking of a best practise approach, what would you say is the best use for these solids apart from using them as a reference mesh?
I'd imagine that they're useful to create the elemental walls for levels that have a strong mix between indoor and outdoor scenarios. You could test and tweak the level flow and solid sizes before even getting your hand at Max. I always imagine it to be more intuitive to create freely scalable solids rather than building your entire level around tileable models for walls, etc.
What kind of use would you recommend? What are the limitations?
excellent tutorial. you can make some nice scenes just with that standalone tool. thanks for bringing this up.
How do you texture just a face of a solid?
Also, can I group a solid and ungroup the solids?
Yes you can texture a single face of an tutorial I explained that in tutorial 1: Moddb.com chapter 1.14
Yes you can group and ungroup solids.