
Tutorial originally created by Dave Foster and posted at Morrowind-oblivion.com. Mirrored here for archival purposes
Tutorial 1
The first tutorial will begin with the construction of another house on the banks of Lake Moonlight, in Moonrest. I'll keep this as simple as I can, whilst guiding you through the basics of the Morrowind Construction Set.
- Step 1
Open up the CS and arrange it to suit your needs.
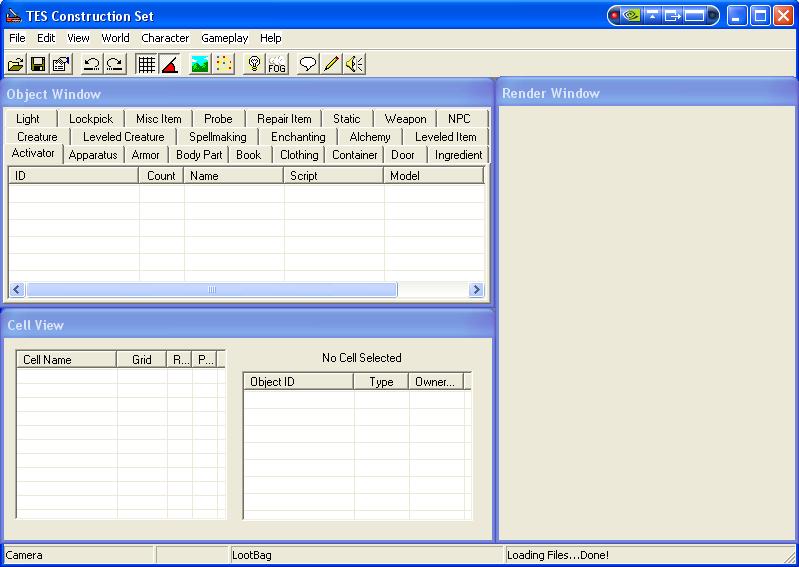
As you can see, you have the main window with the main menu at the top, the Object window on the left with the Cell View window below it, and the Render window on the right. There is nothing in these windows just yet; we'll load the mod shortly, but first let's go into the File|Preferences menu and set the autosave option to save every ten minutes, then close the preferences screen.
This is to ensure that if the CS crashes, the most you will lose is 10 minutes.
- Step 2
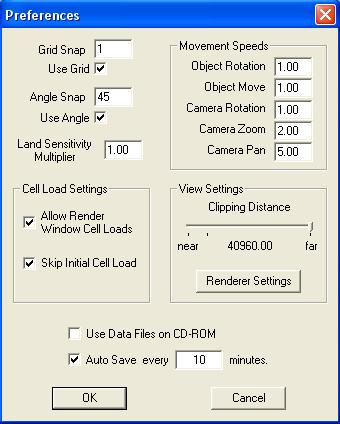
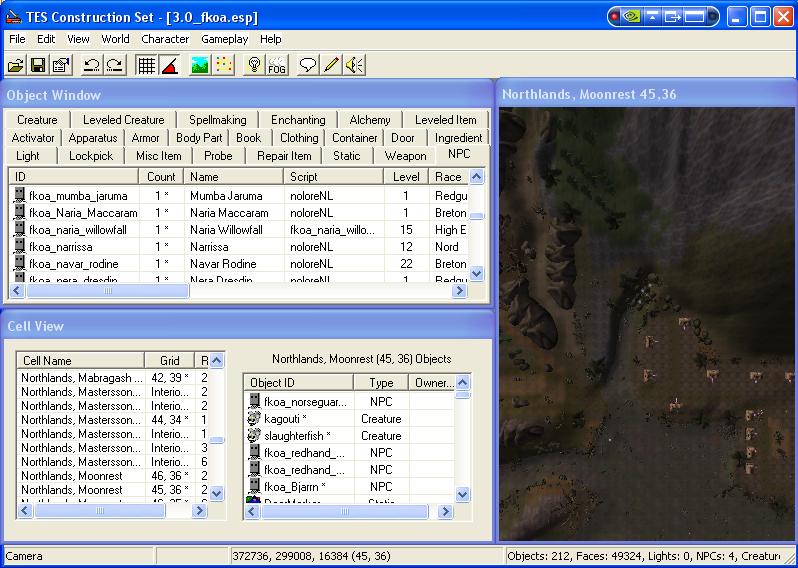
We should now load the mod. See the image below for how to do this. We click on the Open Folder icon on the main toolbar to open up the loading screen. All your mods ( in the Datafiles folder ) should now be visible in the left pane. Double-click in the box next to the fkoa.esp mod; a cross will indicate that it has been selected. The Parent Masters block on the right will show that the fkoa mod has it's parents as Morrowind.esm and Tribunal.esm. You don't need to click on these in the left pane since, as masters to the fkoa mod, they will automatically be loaded. Now, ensure that you click the Set As Active button to make the fkoa the active mod. This means that all modifications that you make from now on will be saved into the fkoa.esp file. It might be a good idea to make a backup of the original file before starting, just in case anything goes wrong, and you have to restart from the beginning.
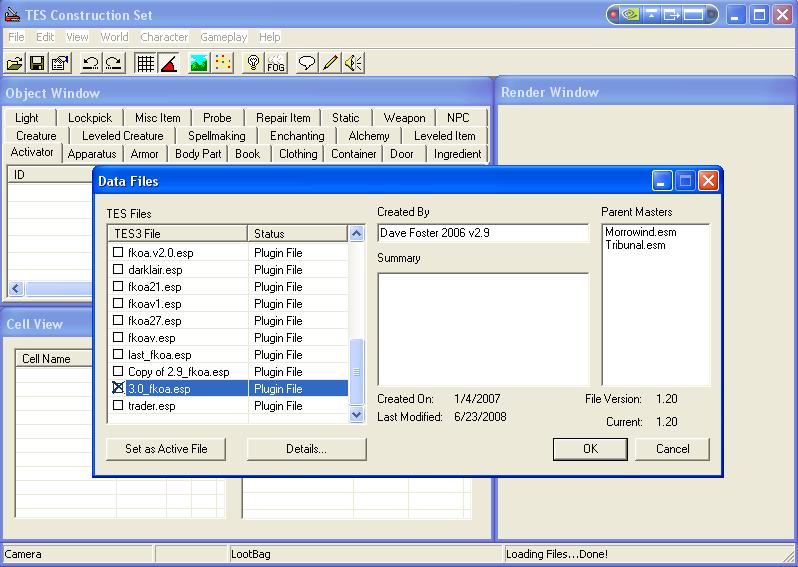
Click on the OK button to start loading the mod into the CS. Once it has finished, you will see something like the screen below, with the Object and Cell View windows populated, and the Render window blank. In the right side of the status bar you will see the message 'Loading Files...Done!'. This confirms that the mod and it's parents have been fully loaded into the CS, and that you are ready to begin modding.
- Step 3
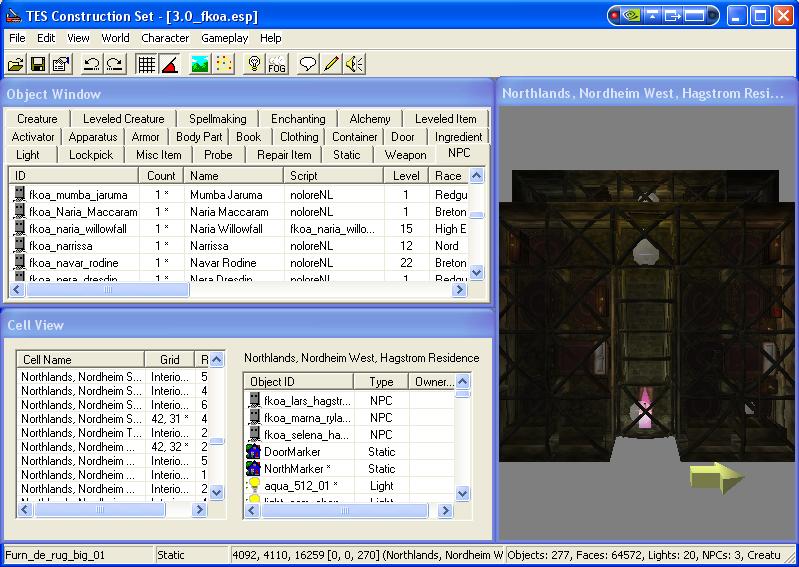
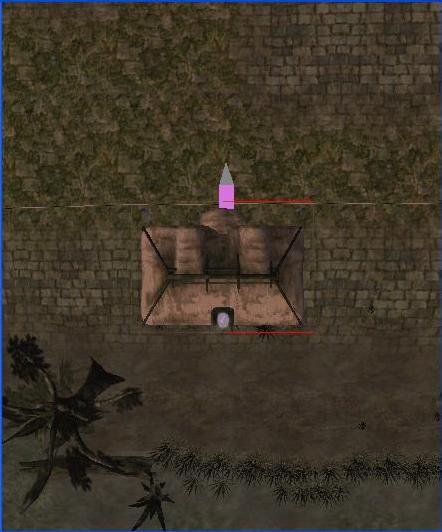
We're going to put our new house in the town of Moonrest, the second city of the Northlands. This cell is identified by the value 'Northlands, Moonrest' along with two other cells of the same name. We need to get this cell into the render window before we can modify anything in it, so, scroll down the list in the Cell View window until you find the string value. Now, single click on one of these values and check the coordinates in the top of the right hand pane. We are looking for a value of 45,36. When you find the right one, double-click to get it into the render window. It will be a distant view, from above, and now is a good opportunity to investigate some of the keyboard shortcuts for zooming-in, setting borders etc. Here's the initial view.
The cell that we are interested in is in the centre of the window. To see the cell borders, ensure the render window is the current window then press the B key. It has four houses in it already, and the cell is identified at the top of the window. Pressing the B key a second time will remove the borders - try it. Select the borders again. We are not going to put our house in this cell, but in the cell below - cell 45,35 - just to the right of the single house which backs onto Lake Moonlight. We need to get in a lot closer to do this so, click once on the house, and use the T key to zoom into a top-down view of the house. Image below.
Before we move on, it might be a good idea to explain the co-ordinate system in the CS. The first number, 45, refers to the 'easting' direction. All increasing values increase the easting value. Decreasing the value moves you to the west. Similarly with the second value, 35. This is the northing value which increases as you move to the north, and decreases as you move towards the south.
- Step 4
So, we are now over the top of the only house in cell 45, 35. What if we want to take a view of the house from ground-level? Well, that's the C key - try it. Did you remember to ensure that the window was selected first? I usually forget, then wonder why my view is not changing - the bane of my life! Right, they're the keyboard shortcuts for now.
Make sure the house is still selected, and lets now take a spin around this house. With your left hand, hold down the shift key, then whilst holding it down, move the mouse forward and back to change your forward/backward view. Move the mouse left or right to spin around the house. The mouse must remain within the confines of the CS window, otherwise the motion stops. Push the mousewheel forward to zoom-in, and backward to zoom-out. Now, take your finger off the shift key, hold the mouse pointer on the house and press the right mouse button to grab the house. Keeping the left button pressed, move the house around by moving the mouse. If you move the house far enough, you will see that the chimney and the doorstep have been left behind - thats beacause the house is made-up of a set of objects. The windows are separate as well. When creating a house you need to place all the components of it manually, and in the correct positions. Finally, to raise and lower the house, hold down the left mouse button whilst pressing the Z key, and move the mouse forward and backwards.
OK, at this point you may have messed-up the house a bit, so make sure you don't save the mod. If the autosave has already saved it and the house has moved, then it's best if you re-load the prior save.
Just a couple more keyboard shortcuts before we move on. The CTRL-C, CTRL_V and CTRL-X keys all work as they do in Microsoft Word or Notepad. They allow you to Copy, Paste and Cut in the render window - very handy for selecting all the objects that make up the house, copying them, then repasting them next door!
- Step 5
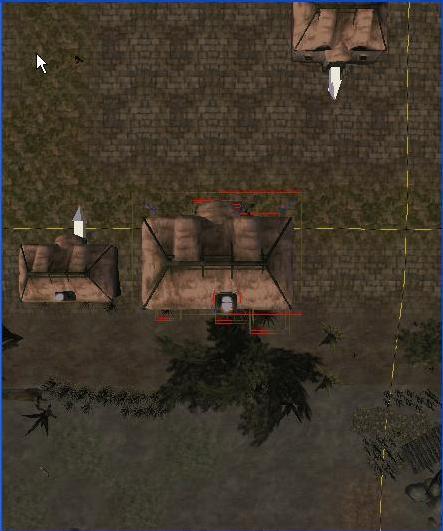
So, we should still be looking down on the house from above. If we're not, then press the T key again. The reason for taking this view is to do with cutting and pasting. We want to select all the objects that make up the house, and nothing else. I cannot stress this more strongly; if our view of the objects we intend cutting and pasting is such that other, more distant objects might be in the field of view, then we risk capturing those objects at the same time. And sometimes, you might not realise that you've just copied and pasted 200 trees from the background as well! So, from the top-down view, hold down the left mouse button whilst simultaneously drawing a rectangle around the house i.e. move the cursor to the top left corner of the house and pull the mouse both south and east until all the house objects are selected. Don't worry too much about the small plants at the rear of the house. When everything is selected, let go of the mouse button, and everything will be outlined. Now, press CTRL-C to copy the objects. We now need to move our field of view to the right of the original house so, click and hold down the mouse wheel button and drag the mouse left. Your view will move to the right. Move the view far enough to the right so that there is enough room to paste your house on the bank. Paste it with the CTRL-V combination. Don't go beyond the yellow eastern boundary. As you can see from the second screenshot, the house is well in the air and will need to be moved down with the mouse/Z key combination. Also note that the pink teleport markers do not move with the house - that's normal - and that they appear to look white in the screenshot - don't know why?
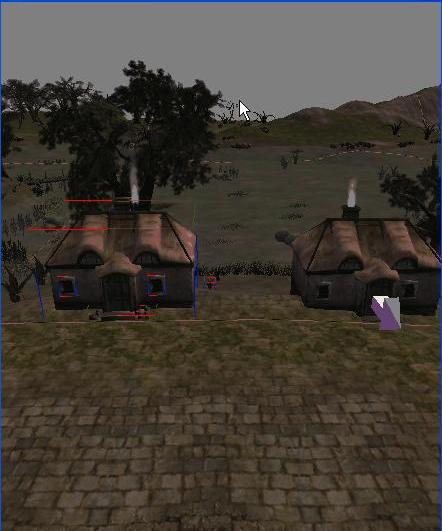
Let's now go back and drop the house into place. As always, ensure the window is selected, then spin your view around by holding the left shift key and spinning with the mouse. Spin it around until you are looking at the front of the house, and make sure that all the objects remain highlighted. Now, hold the mouse crosshairs over the objects and hold down the left mouse button, press and hold the Z key, then move the whole lot down towards the ground. Take your fingers off the buttons, then adjust your view by holding down the mouse-wheel button whilst dragging the view down. Zoom-in a bit by rotating the mouse-wheel button. Drag the house into position so the doorstep just remains visible. Ensure that no part of the house crosses the northern yellow boundary.
And, that's it for now. You have created a new house in Moonrest. You can now save the mod, then load it up in Morrowind, use the console to go there - coe 45, 36 - and view your new house. You won't be able to go in it yet, since it is just an empty shell. In the next tutorial, we'll create the interior and link it to the exterior with a teleport door and marker.
- Conclusion
In this tutorial, you have learnt how to open and setup the Morrowind Construction Set, how to set the preferences for Autosave and how to load your mod. You then learnt how to move around in the CS, the co-ordinate system and the key shortcuts. You created your own house from an original, and placed it in Moonrest. Here's a short list of the keyboard shortcuts that you have learnt.
- Keyboard Shortcuts
- B --------------------------------------------- Borders
- T --------------------------------------------- Zoom to Top View
- C --------------------------------------------- Zoom to Ground Level View
- LShift/Mouse ------------------------------ Move object/s around
- MouseWheel/Move mouse ---------- Move your viewpoint or zoom-in/zoom-out
- Z/LeftMouse ------------------------------- Move object up/down
- CTRL-C, CTRL_V and CTRL-X ------ Copy, Paste, Cut
In the next tutorial, we'll create an interior for the house and link the interior to the exterior with a door and a teleport marker.
Tutorial 2
The first tutorial covered the use of the CS for the beginner including : opening and loading a mod, keyboard shortcuts, coordinate system, copying and pasting another house into Moonrest in the Five Keys of Azura mod.
The second tutorial will begin where the first left-off, i.e. setting up the interior of the house and linking the interior to the exterior.
- Step 1
Open up the CS and arrange it to suit your needs. Open up the mod and focus the CS on the house in Moonrest, where you left off.
- Step 2
We are now going to create an interior for the house. The best way to do this is to copy an existing interior into a new interior cell, then make some mods to the items in order to make it look different in some way. How you do this is up to you; re-arrange the items, get rid of some of the existing items and replace them with something else, etc.
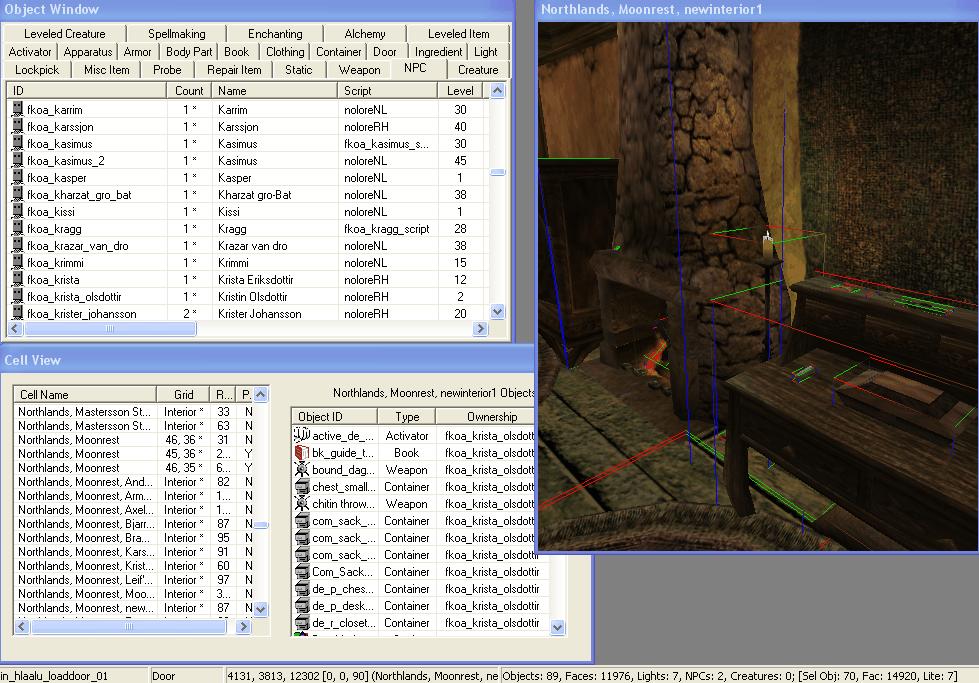
So, first we need to create and name a new interior cell. To do this, go to the menu World|Interior Cell and click on the New button in the pop-up dialog. Type in the name of the new interior cell as - Northlands, Moonrest, newinterior1. Click on the Apply button then on the OK button. Now go to the Cell View window and confirm that it has been created OK. We are going to copy the contents of the original house into this cell. So, how do we know the name of the original interior cell? Well, we need to check the pink teleport marker outside it's door in Moonrest. Ensure the render window is pointing at the Moonrest 45,35 cell, and locate the original house and it's teleport marker. Double-click on the marker and a pop-up opens showing details of the marker. On the right of the window, find the box marked 'Load Cell' and click on the button called 'Select Marker' just below the combo-box; the interior of the cell opens in the render window. See the images below. The interior teleport marker is highlighted.
- Step 3
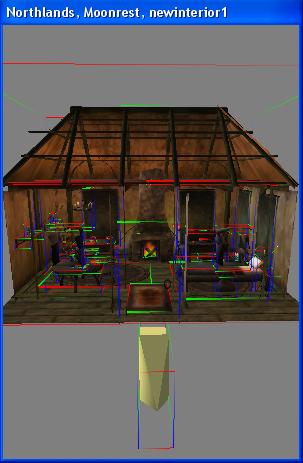
Ensure the render window is current, then zoom-out so you can see all the house shell and interior. Draw a box around everything ( click at top left, hold and drag mouse to bottom right) as per the image below, then CTRL-C to copy everything.
In the Cell View window, locate our new interior cell, double-click to bring it into the render window, ensure the window is current, then CTRL-V to paste the contents. Second image below. Note that the pink teleport marker never copied into the new cell; we will create a new one shortly.
- Step 4
The view is a bit long so make sure the window is current and that everything is still highlighted, then, zoom-in and rotate the contents until you're looking directly through the door - see below. Note the white arrow below the house; this is the North Marker. A North Marker is required to ensure that, when you walk out of the interior to the exterior, you're facing in the correct direction in the external cell.
You can place the North Marker wherever you like in the internal cell, but ensure that it is pointing in the right direction. This is a little hard to explain...Remember the external cell? We were on the northern edge of Lake Moonlight, facing north. So, to walk through the door and into the house, we had to walk towards the south. Imagine now that you have just entered the house from the north; you are facing south into the house, so the north marker must point the opposite way. So, the North Marker is correct as you would expect; we copied the house that was already facing north. Furthermore, the internal teleport marker that we are going to create must point inwards.
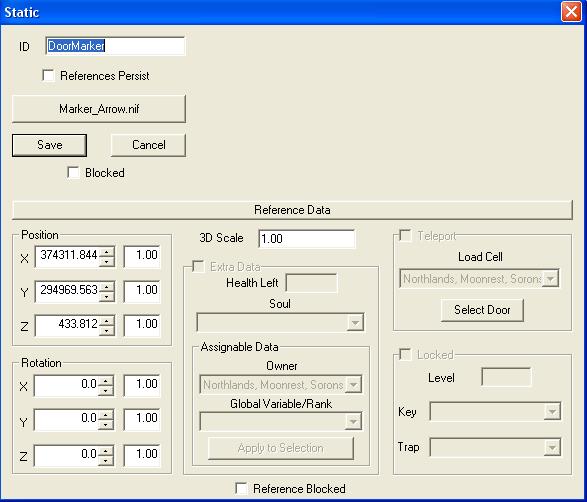
Zoom-in further on the entrance until you can see the outline of the doorframe and the door handle. Click on the doorhandle and note the name of the door in the lower left of the status bar. A window opens up giving details of the internal door. See the image below.
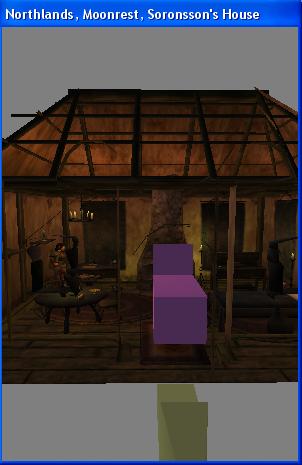
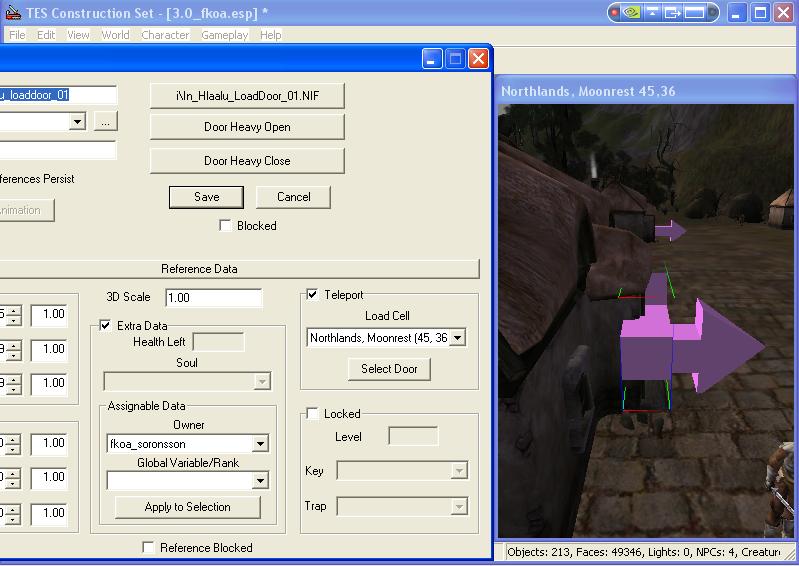
Note the empty Teleport box over on the right of this window. We are now going to link this door to a teleport marker in the exterior cell. The teleport marker will be created when we click in this box then name the exterior cell in the combo-box, then click on the Select Marker button. Do it...scroll down to the Northlands, Moonrest, (45, 36) entry then click the button. You're taken to the exterior view with the pink teleport marker highlighted ( see first image below ). Zoom out some to see it's exact location.
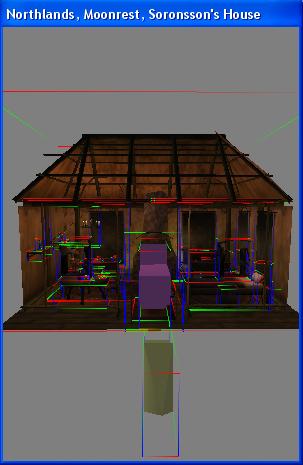
In this instance, the marker is actually on the west side of the village. Sometimes you have to hunt around for it. It might be hidden underground, or inside the shell of the house, or even in the side of a mountain. But, when you find it, you will need to drag it to just outside the door, and point it so that it is facing away from the door. You will need to experiment with this a little. See the new position in the second image below.

- Step 5
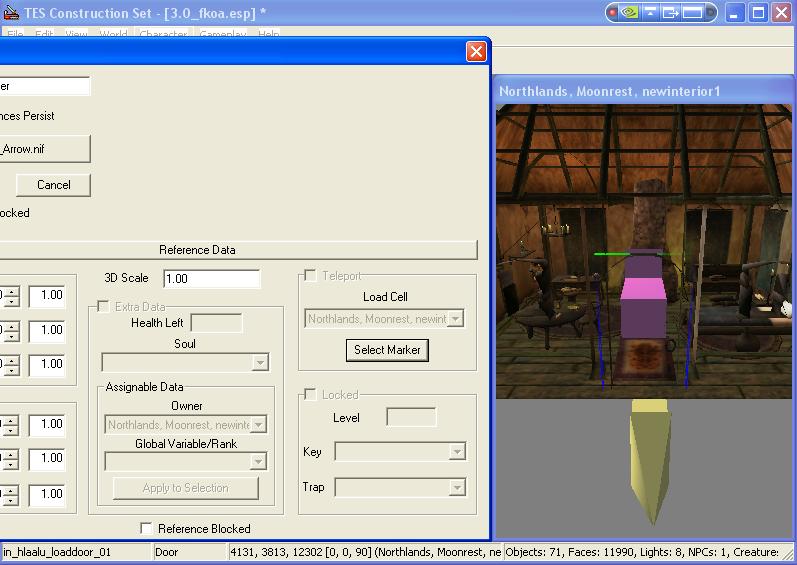
Close the door reference forms so you don't get confused. Now, zoom into the marker using the C key. You should be inside the shell, looking out of the doorframe. See the doorhandle? Click on it and make sure the doorframe highlights. Now, double-click on it to bring up it's reference form.
We now do the same as we did with the internal door. We tick the teleport box, locate the interior cell in the drop-down, then click on the Select Door button. You're taken to the interior cell with the marker pointing in, just inside the doorframe. See the image below. Dismiss the door reference box.
- Step 6
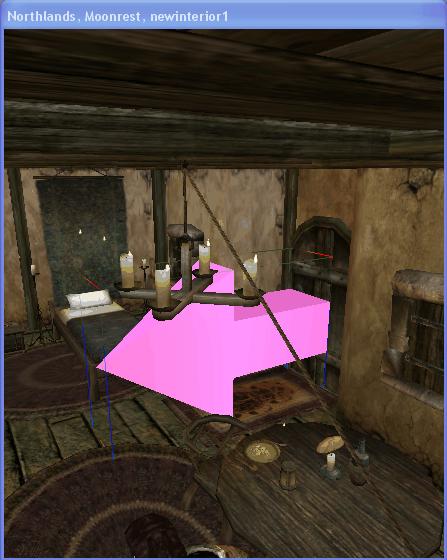
We now need to get a better look from inside the house, so spin the interior around the highlighted doormarker. Move the marker to the position shown in the image below.
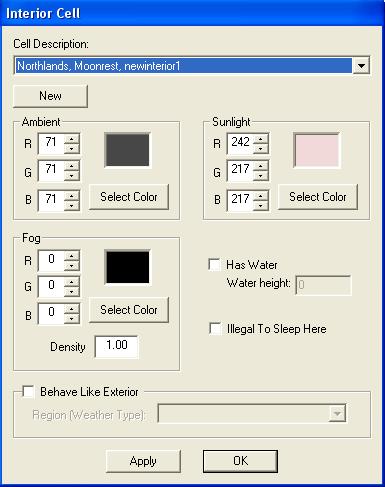
Let's now go back to the interior cell menu for this cell, since we skimped over it when we created the new interior. Also, in the first tutorial I failed to mention the keyboard shortcut for turning on the lights in the render window; it's the A key. Try it. By turning the lights on and off with the A key, you get a feeling for the ambience of the location when you're playing the game. This ambience is created by adjusting the properties on this form. Try turning the lights down, and experiment with the colour of the light. You can also turn on fog, and set whether the player is allowed to sleep in this cell, and whether the cell has water in it. You need to play around with these settings a lot, in order to get a feel for what can be done with lighting and colour to produce the atmosphere that you require. When you've finished, just click Apply then OK to save the settings for this cell. Save the mod.
- Conclusion
In this tutorial, you have learnt how to create the interior of your new house, how to setup the teleport markers, the importance of the North Marker, and how to adjust the lighting. Here's an updated list of the keyboard shortcuts that you have learnt.
- Keyboard Shortcuts
- A --------------------------------------------- Lights
- B --------------------------------------------- Borders
- T --------------------------------------------- Zoom to Top View
- C --------------------------------------------- Zoom to Ground Level View
- LShift/Mouse ------------------------------ Move object/s around
- MouseWheel/Move mouse ---------- Move your viewpoint or zoom-in/zoom-out
- Z/LeftMouse ------------------------------- Move object up/down
- CTRL-C, CTRL_V and CTRL-X ------ Copy, Paste, Cut
In the next tutorial, we'll see how to move the objects around inside the house, how to create new objects and how to set the ownership on those objects. By the end of the third tutorial, you should be ready for doing your very own house mod.
Tutorial 3
The first tutorial covered the use of the CS for the beginner including : opening and loading a mod, keyboard shortcuts, coordinate system, copying and pasting another house into Moonrest in the Five Keys of Azura mod.
The second tutorial set up the interior of the house and linked the interior to the exterior.
This tutorial will re-decorate the house by removing certain object, place new objects, and set-up the ownership on all objects in the house. We'll then discuss the use of NPC's in Morrowind, and place the owner of the house.
- Step 1
Open up the CS and arrange it to suit your needs. Open up the mod and focus the CS on the interior of your new house in Moonrest.
- Step 2
We are now going to modify the interior of the house. First off, we need to know who owns the house, so we'll create a new NPC to be the owner.
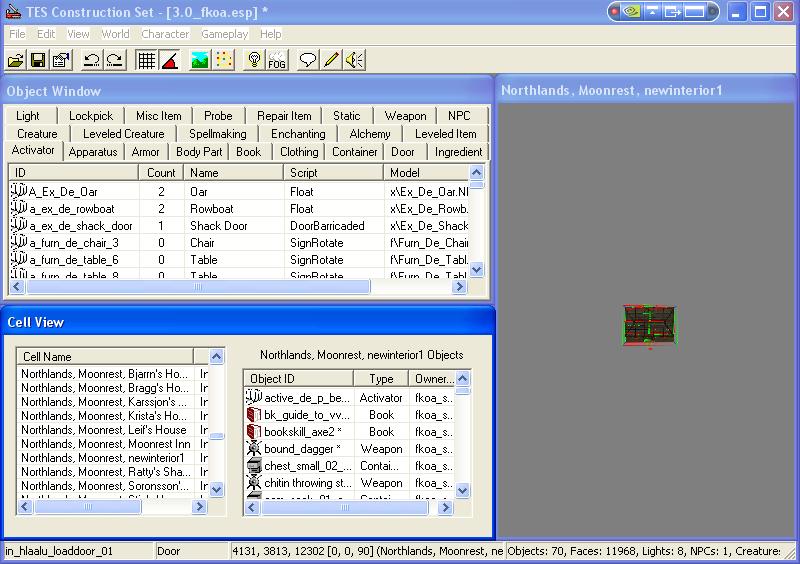
We already have an NPC in the house, the one we copied with the contents of the house. He's in the top left corner. Delete him by ensuring he's the only highlighted object, then press the DELETE key. Now, look in the Object Window and find the NPC Tab. Select it. What I would do now, would be to look through the NPC's that I'm interested in and select him into the house. This is the easiest way, for now, so click in the the ID column header to sort the column alphabetically starting at 'a shady smuggler'.
Let's just talk about naming conventions a little. When creating a new mod, we need to be able to find all our changes quite quickly, and the best way to do that is to ensure the names we give to all the objects we use start with the same combination of letters. So, for instance, we could use our own initials, or the initials of the mod's title. My name is Dave Foster, so we could name every new or modified object with the letters df_ e.g. df_mynewnpc. If you scroll down the column, you will see that I've used the latter, fkoa_ since this is more likely to be unique. The only thing I would say, is to ensure you stick to the convention once you've started.
The first of my NPC's is named 'fkao_pontius_defracto' which I got wrong. That's why I never ended up using it. Note the column COUNT. This expresses the number of objects in the mod with this ID. As you can see, I created this character but never used him. It's OK to do this - if you create an object and don't use it, then you can leave it in the mod with no ill effects - just don't do it too many times, otherwise the more objects in the mod, the bigger the mod will be. Scroll down the list until you reach the 'fkoa_redhand_wander' entry. Here, you will see that this NPC has been used four times. Note the asterisk after the number 4 - this indicates that this entry is an addition to the mod - it's not part of the original game. All fkoa_ entries are the same. Since this mod relies on Morrowind and Tribunal, during loading, Morrowind will be loaded first, followed by Tribunal, followed by the Five Keys. If the Five Keys has modified any of the object ID's from Morrowind or Tribunal without modifying the ID, then the modified object - or referece, as it is called - will overwrite the original object. This is how mods work with the original game - the originals are still there, but they are hidden by the mod's changes. If you need to know where each of the references for 'fkoa_redhand_wander' is used, then right click on the reference and select 'info' - a Use Report window pops up to show you where each reference is used. As you see, the references total four. It is possible to use this window to jump directly to the location of the reference by double-clicking on the reference. Try it on the 45, 36 reference - the render window focuses on the NPC in that location. This is a very useful feature of the CS, and allows you to get to locations quickly and easily. Dismiss the Use Report window.
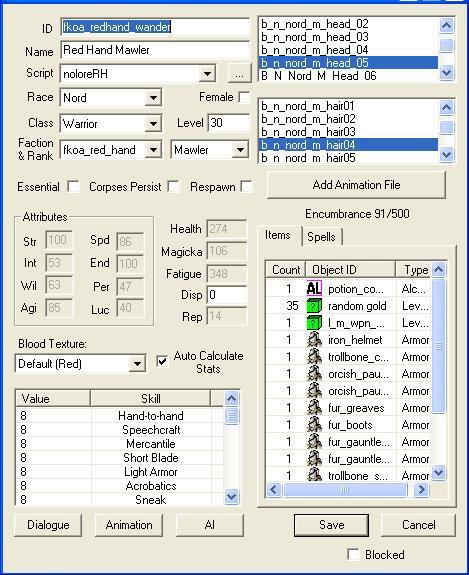
Take a look through the other columns of the NPC window, and figure out what each one does. These columns hold most of the common data related to the NPC. To see all the data, you need to double-click on an object to open the Object window. Do it on the 'fkoa_redhand_wander' NPC. See the screen below.
- Step 3
This screen shows all the details of the selected NPC (or reference, since there are four of this character). Changing the behaviour of any of the references will change the other three, so be careful. The main info on this screen is the ID, the Script, the Race and the Class. You can give the NPC any name you choose to identify each reference uniquely. In this instance each reference is called 'Red Hand Mawler', but it needn't be. You could give each one a name such as Alex or Doug, etc. These are generic characters, so I give them all the same name. We'll talk more about scripts at a later date. The two drop-downs for Race and Class are self-explanatory. You have the choice of Male or Female via the checkbox. This reference has a level of 30 and it is a Mawler in the Red Hand faction - we'll talk about factions at a later date. Some characters in the game must not be allowed to die, otherwise various aspects of the game, the quests etc. would be compromised. To ensure that vital characters never die, just tick the Essential box. If you wish dead bodies to persist in the game, then mark the box Corpses Persist. If you wish dead characters or creatures ( the dreaded Cliff Racers, for instance) to respawn later then check the Respawn box.
Below this set of boxes is the Health and Attributes section. DISP refers to the NPC's dispostion towards the character, and REP refers to the player's reputation in this character's eyes. Auto Calculate Stats ensures the character's attributes are correct for the character's level. If you wish to change them after setting the level, then uncheck the box. Don't worry too much about the Blood Texture box.
We then have the character's skill value readouts which can be changed if you have a mind to. Most of the time I leave them as they are. The bottom left of the screen has the three buttons for Dialog, Animation and AI. We'll talk about those another time.
On the right side of the screen are the body parts, items and spells. You can change the head and hair by selecting a different value in the two edit boxes. Don't worry about the Animation File button. In order to give your NPC clothing and weapons, you'll need to be able to see this window and the object window at the same time. Drag objects from the Object Window into the Items box to give the character something different. To remove an item, click on it and press the DELETE button. The same applies to the Spells window
Some of the existing characters are blocked from Modification, but I have never used the feature, so I cannot say the reason. Don't save anything at the moment, since we'll need to change the ID as well.
- Step 4
Now that we know how the character creation screen works we have two choices. We can either right-click in the Object window then select NEW to create a new character, or, we can modify and save an existing character. I would always choose the latter, since you can find a character that already has most of the attributes that you require, and just modify the ones you wish to change. Try it both ways and choose whatever is best for you.
We are going to create a new character from an existing character, then make some mods in order to give it the intended behaviour. Go back to the house you've created and take a look around. Decide who your character is going to be, and what kind of furnishings that character might choose. Is it going to be a shop or private dwelling. Is the character going to play a bit-part in the game, or is he going to be the subject of a quest? You decide. With all this in mind, create your character accordingly.
As you can see from the original contents of the cell, Soronsson was a single bloke, with a trollbone shield and an iron helmet - sure signs of him being a soldier with the Red Hand. If you choose the character to be somewhat different, you may need to get rid of these by selecting and deleting. If your character is going to be married, then you'll need an extra bed or a double bed. Work out who this person is, and what they'll need - it's up to you. For the moment, I will assume that this is just going to be one of Moonrest's normal citizens, a female that likes nice things around the place, and a lover of jewelry and finery.
So, get rid of the shield and helmet for starters. Let's also get rid of the desk with the book and other stuff on it. Drag the bucket to the left and leave it up against the wall. What we need is a wardrobe for this lady's clothes. We are going to put it up against the wall, to the left of the fireplace, where the tapestry currently resides. Delete the tapestry. A wardrobe can contain other objects, so you'll find them in the Containers category of the Object Window. The easist way to find one is to sort on the Name column, then look for Closet, which is another name for it. There are quite a few of them in the list. Finding one that suits the surroundings can be a bit hit and miss since you cannot see them without dragging them into the render window. There is a utility - an HTML file that someone has written that lists all the objects in the CS with pictures. You could use this to check what each closet looks like. For now, just pick the 'de_r_closet_01_fcloth04' which contains a selection of female garments. Double-click on the item to see it's window. Drag the closet out of the object window into the render window. This is tricky, since invariably the object appears behind the house, not in it. You will need to spin the house around and drag the closet into position.
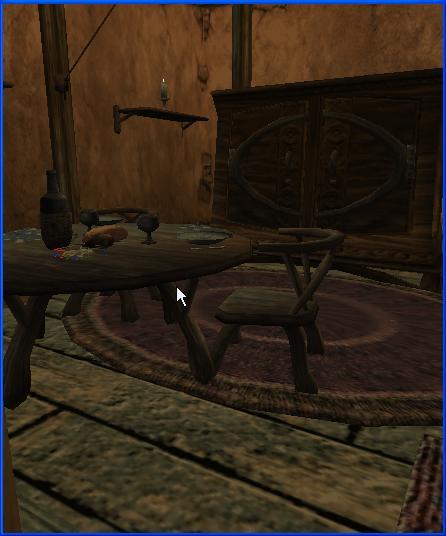
This is a woman's house, so we might expect a bit more finesse when it comes to laying the table. Since this lady appreciates nice things, how about some fancy crockery for her and her boyfriend. Get rid of the candle and the mug, then go to the Misc Item tab of the Object Window, order by name, then find the plates. Take a look through them to find something appropriate. How about the 'misc_com_plate_03' item? Drag a couple onto the table. Best way is to centre the window above the table and drag the plate above it, then use the F key to 'Fall' it onto the table. This is the simplest way of getting objects to sit on other objects - let gravity do the falling. Continue setting up the table with goblets, knives, forks, spoons etc. Layout the table to look nice, then add a couple of napkins 'misc_de_cloth10'. Add a selection of food from the Ingredient tab. That's the table done. See image below.
You could try adding some mats and cushions (furn_de_cushion_round and furn_de_rug from the Static tab, some books from the Books tab, and various ornaments from the Misc Item tab. Just play around with dragging and dropping these items into the render window, then placing them correctly. What about changing the lighting ( from the World|Interior Cell menu ), and replacing some of the existing candles and lamps with something a little more up-market from the Light tab. This is your house - or your character's house, I should say, so create it the way your character would expect to see it.
- Step 5
Now we know something about this character, let's go back to the NPC tab and create this female. She should be a Nord, since this is the Northlands and the people of Moonrest here are predominantly Red Hand and proud of it. This is not Nordheim where the toffs live, so she should probably be a commoner, a commoner that just happens to like nice clothes and other such stuff. She will be a low level character with no direct alignment to the Red Hand. She should be around level 2 to 3. Now, scroll down the list of current NPC's and find a suitable starting point. Click once on the female column then once on the race column. Now scroll down to the section of Nord females that start with fkoa_. What about 'fkoa_janna_tolonen'? She's a level 2 commoner - she'll do. Double-click on her to bring up the NPC window.
The first thing we should do is change the ID; we do not want to modify this character until we have done so, otherwise we could get into a bit of a pickle if we save her by accident. Look at the list of Nord females and try to get an idea of what the name should look like, then find a combination of forename and surname that does not cause an exception ( duplicate id ) to be raised. Let's call her 'fkoa_krista_olsdottir'. Click on save, then dismiss the pop-up 'Create a new Object?' by clicking on the YES button. If everything is OK then the window should close and the new character will be in the Object list. Double-click on your new character to open the NPC window again - you may need to sort the list again on the ID column. Change the name field to 'Krista Olsdottir'. Leave the stats alone for now, and note that she is wearing a couple of expensive items and a couple of common items. This could be expected. If you want to change some, or give her some jewelry, then do so. At this stage you may want to experiment with some of the head/hair combinations before moving on. In order to see the changes, we are going to need to place a reference in the cell. So, drag Krista into the render window, and place her next to the closet. Have her facing towards the door. When you've finished, save the character again.
We'll now take a look at the AI (Artificial Intelligence) for this character. Click on the AI button to bring up the form. You'll see that there are two tabs - Packages and Services. The packages are the AI and the Services are for shopkeepers, ship captains etc. The default tab is the Packages tab. Krista has the Wander package, and the details appear in the right hand box. There's a drop down for selecting the package e.g. wander, follow etc. Her wander distance is set to 0, which means she'll stay where she is, although the list of Idle Chances will ensure that she moves a bit with various head movements and turns etc. We won't go into these at the moment. The Fight, Flee, Alarm and Hello boxes express the chances of this character performing any of these actions so, a Fight value of 30 means she has a 30% chance of fighting if provoked. A 90 to 100% chance means she'll probably attack you on sight. The Alarm value is the chance that this character would shout out if the player broke the law. Setting all these values to 30% is about the norm. Take a look at the Services tab. Everything is self-explanatory, except for, maybe, the Travel Services which we will not be using here. Close the AI screen, then close the NPC screen.
- Step 6
We've now created and modified the interior of our new house, and created an owner for the property. There is one thing left to do, and that is to setup the ownership of everything in the house. The ownership of items ensures that if the player should attempt to steal anything, then the owner will shout out, and attempt to call a guard if there is one nearby. This is a little tricky to get right first time, so don't worry if it doesn't always work. If it does not work then try again.
In order to make everything in the house belong to Krista, we need to select everything first. So, move to a position outside the house so that you can highlight everything that makes up the house. Select everything so that it is all highlighted. We then need to zoom into the house and find an object that has ownership. Static objects such as rugs, tapestries, walls etc. do not have ownership. Misc Items, containers, ingredients etc. do. Zoom into the chest on the table, then double-click on it. This brings up the container screen, since the small chest is of type Container. Every other object in the house is still selected, so by setting the ownership on the chest, we will also be setting the ownership on everything else. This screen has object data above the middle, and reference data below the middle. Remember, there is only one object with any particular, unique ID - but there can be many references to this object. You'll find the Ownership property below the middle, which means that Ownership does not change the object, it only changes the reference. This is a very important point to make note of. Anything that changes the physical object i.e. the properties above the Reference Data, actually requires you to Save the object. When changing the reference to the object, you should NOT save the object. This container 'chest_small_02_misc' has an object inside it called 'extravagant_ring_01'. This chest may appear in the game 100 times. If you change anything in the object data, you are changing every other 'chest_small_02_misc' in the game - and that's very BAD. All you want to do is change this one, which is OK, because you're only changing the reference data. If you need to change the Object data for any of the objects in the game, you must copy the object and paste a new object with a different ID, as we did with Krista.
Getting back to the ownership then - find the reference data below the middle that refers to the ownership of all the selected objects. It's a drop-down box, that currently has ownership set to 'fkoa_soronsson'. Change this to 'fkoa_krista_olsdottir'. Click on the button Apply to Selection. A change notification box pops up notifying you that the change has been applied to x objects. Dismiss this box, then dismiss the container form. DO NOT CLICK THE SAVE BUTTON. I thought I should just drill that in, since saving changes to the object can have disastrous results that will probably require you to reload from a save. You can confirm that the changes have been made by checking the Cell View window that contains the list of items in the house. As you can see, the owner of these items is indeed 'fkoa_krista_olsdottir'. Save the mod.
- Conclusion
In this tutorial, you have learnt how to modify the interior of your new house, how to use the Object window to choose and place new items, the NPC tab for creating a new character for your house, the settings for a character's AI, the importance of ownership, the differences between objects and the references to those objects, and how to setup the ownership on a lot of object references in one easy go. Here's an updated list of the keyboard shortcuts that you have learnt.
- Keyboard Shortcuts
- F --------------------------------------------- Fall an Object
- A --------------------------------------------- Lights
- B --------------------------------------------- Borders
- T --------------------------------------------- Zoom to Top View
- C --------------------------------------------- Zoom to Ground Level View
- LShift/Mouse ------------------------------ Move object/s around
- MouseWheel/Move mouse ---------- Move your viewpoint or zoom-in/zoom-out
- Z/LeftMouse ------------------------------- Move object up/down
- CTRL-C, CTRL_V and CTRL-X ------ Copy, Paste, Cut
That's the end of the tutorials directly related to the creation of a house and it's contents. The next tutorial will focus on scripting, local and global variables, plus a few odds and ends.

All these years and I never thought I could just highlight all the house "components" and manipulate them as one object.
Do you have a link to the HTML file which lists all the items and such in the CS? I'd found it a while ago but I don't think I saved the url and I can't find it again.
Web.archive.org