Requirements:
Character Animation Model - Updated 9-7-2019 - Mega
Character Animation Model - Updated 9-7-2019 - Media
Character Animation Model - Updated 9-7-2019 - Drop
Character Animation Model - Updated 9-7-2019 - Google
From 3d Max to MOW Export Plug in - Official
Gerrys Mod to 3D Max - Google Drive
Gerrys Mod to 3D Max - Dropbox
Garry's Mod to 3D Max - Media Fire
Combine Pack Updated on 23-8-2019 Media Fire
Combine Pack Updated on 23-8-2019 Mega
Combine Pack Updated on 23-8-2019 Google Drive
Combine Pack Updated on 23-8-2019 Drop Box
-First and foremost you have to install Plug-in in 3d Max for exporting entity to MOW, then run 3d Max as Administrator and have to install Multi Script which is basic requirement for vehicle porting.
Step One:
- Well most of models are available at XPS formate or Mesh formate which is not supported by 3d Max yet and only .OBJ and .MAX formates are supported by 3d Max, so to convert such models to .OBJ you have to convert them through XNALara XPS then import them to 3d Max
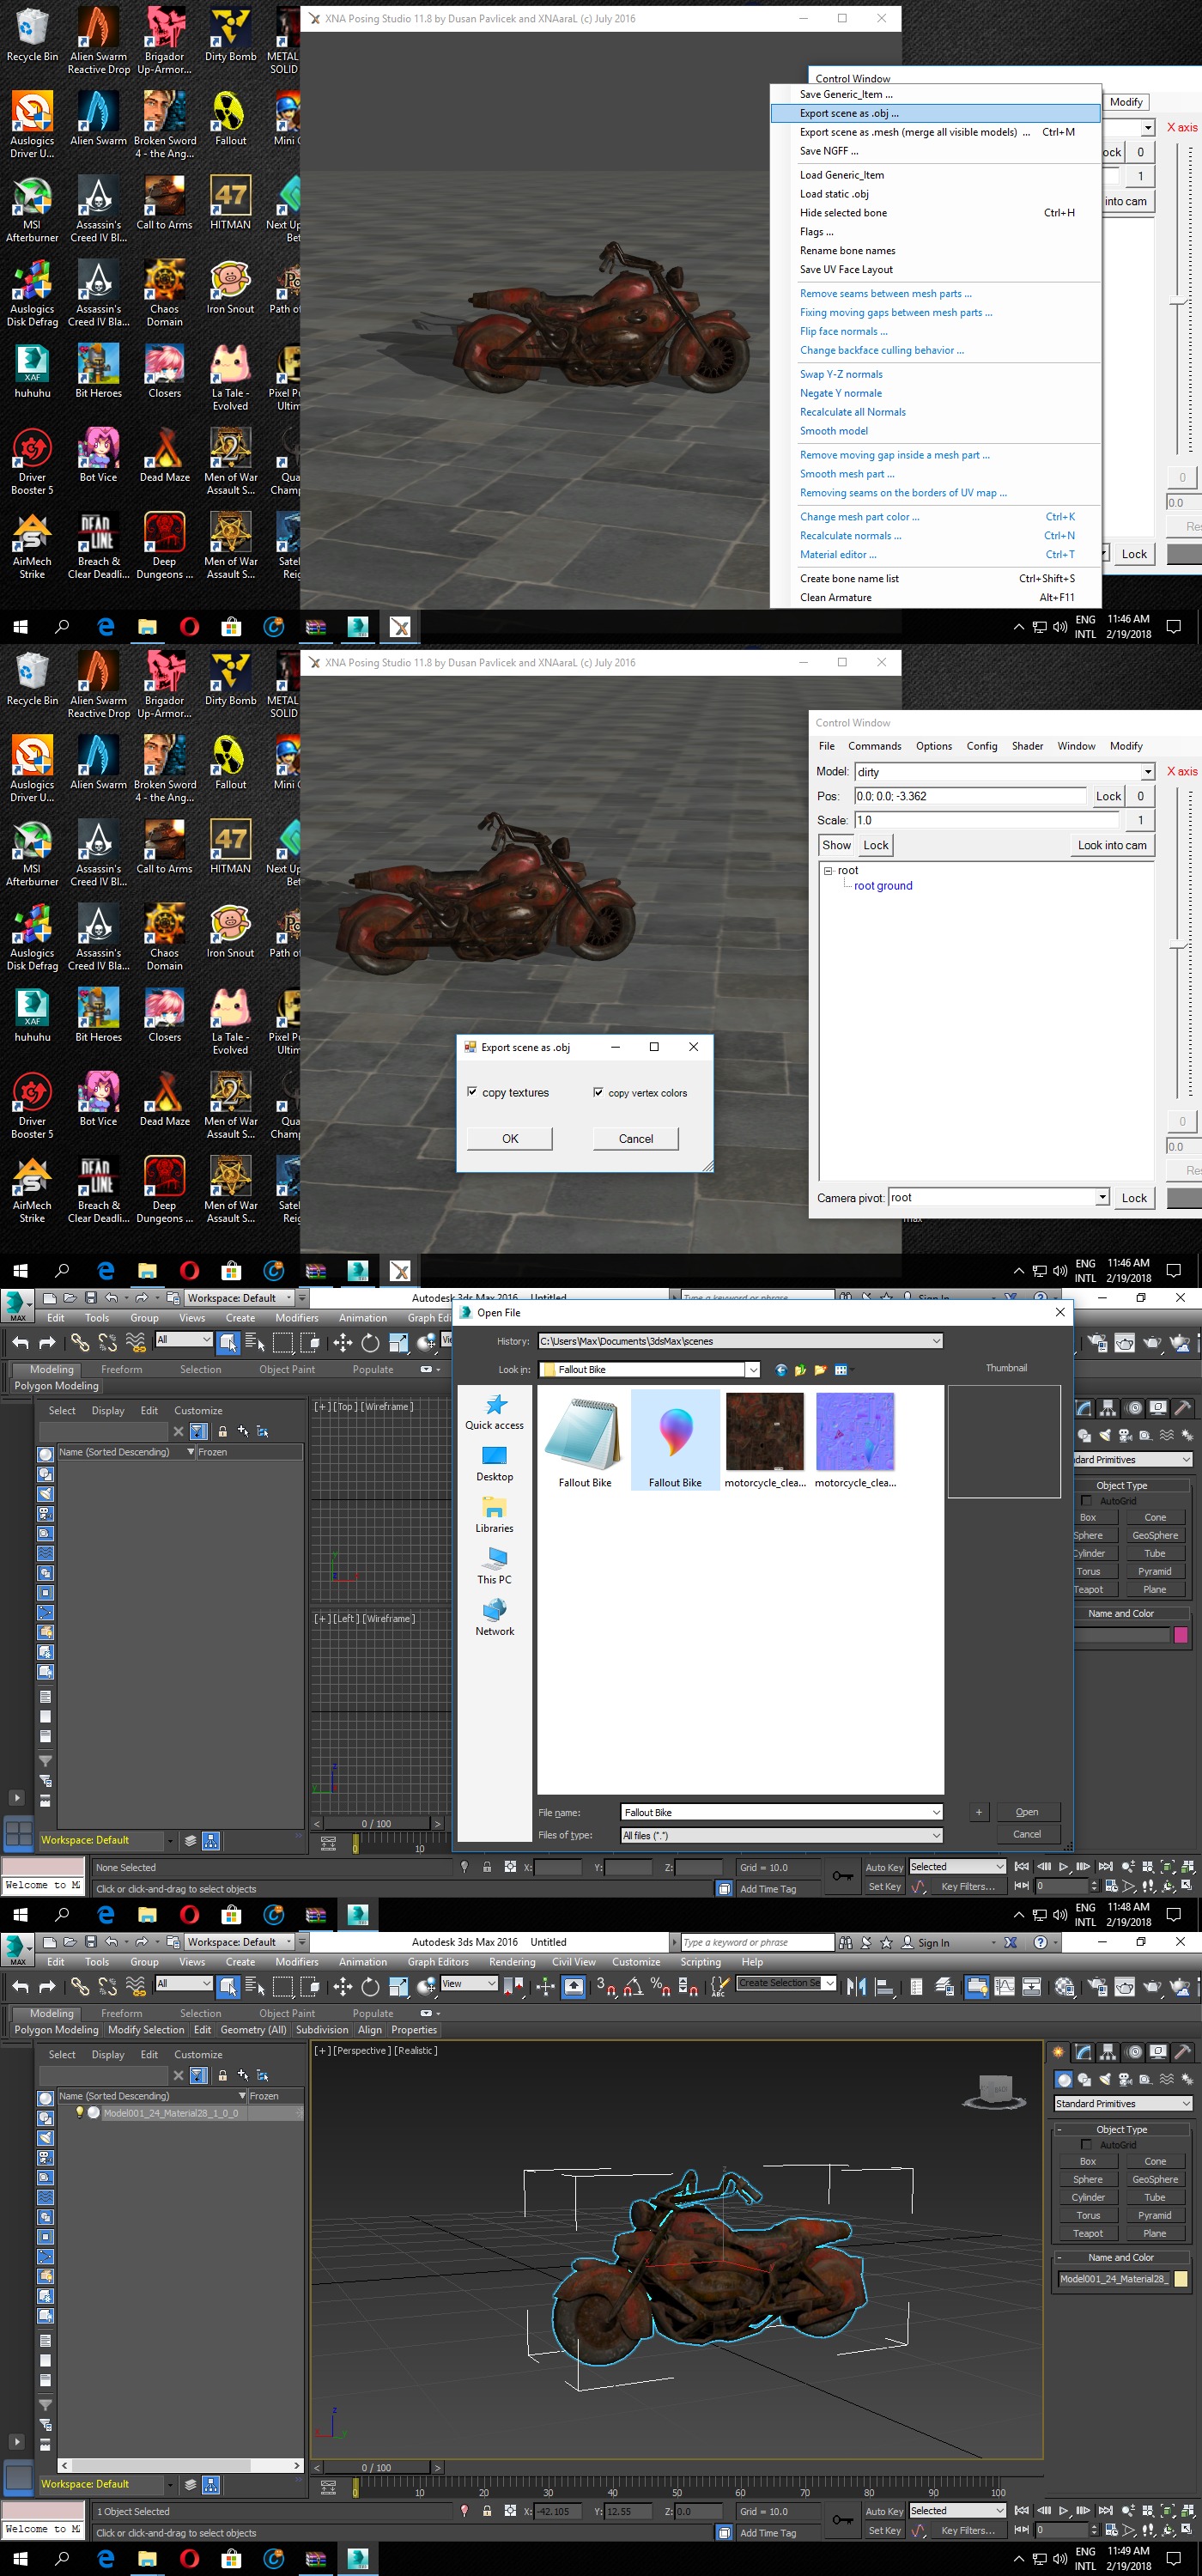
Step Two:
- Most of Objects are combined as one single mesh and to part them according to our requirements you have to following following procedure of detachment of mesh from object.
- For that purpose I highly following two methods of selection and detachment
1st - "Element" = for selecting easy visible object most likely wheels, engines etc
2nd - "Polygon" = for selecting objects whom hardly visible, like wires, door locks etc

Step Three:
- Run Multi Script and provide ID (some object may not get ID by Multi Script, like left wheels system is broken, so to provide ID to them and objects like them, go their properties and mention CommonMesh first then give them ID=LeftWheel or ID=Body etc etc) and Names to Objects, like wheell1 or wheelr1 etc etc.

Step Four:
- Place Pointers by following method, where as far as pointer properties concern, so consider them as trigger point or place of action
- Like Emit = Boarding Animation trigger
- Foresight = place or point in gun from where bullet or shell will fire
- Driver = placement of driver
- They also further use in entity properties in game to configure entity
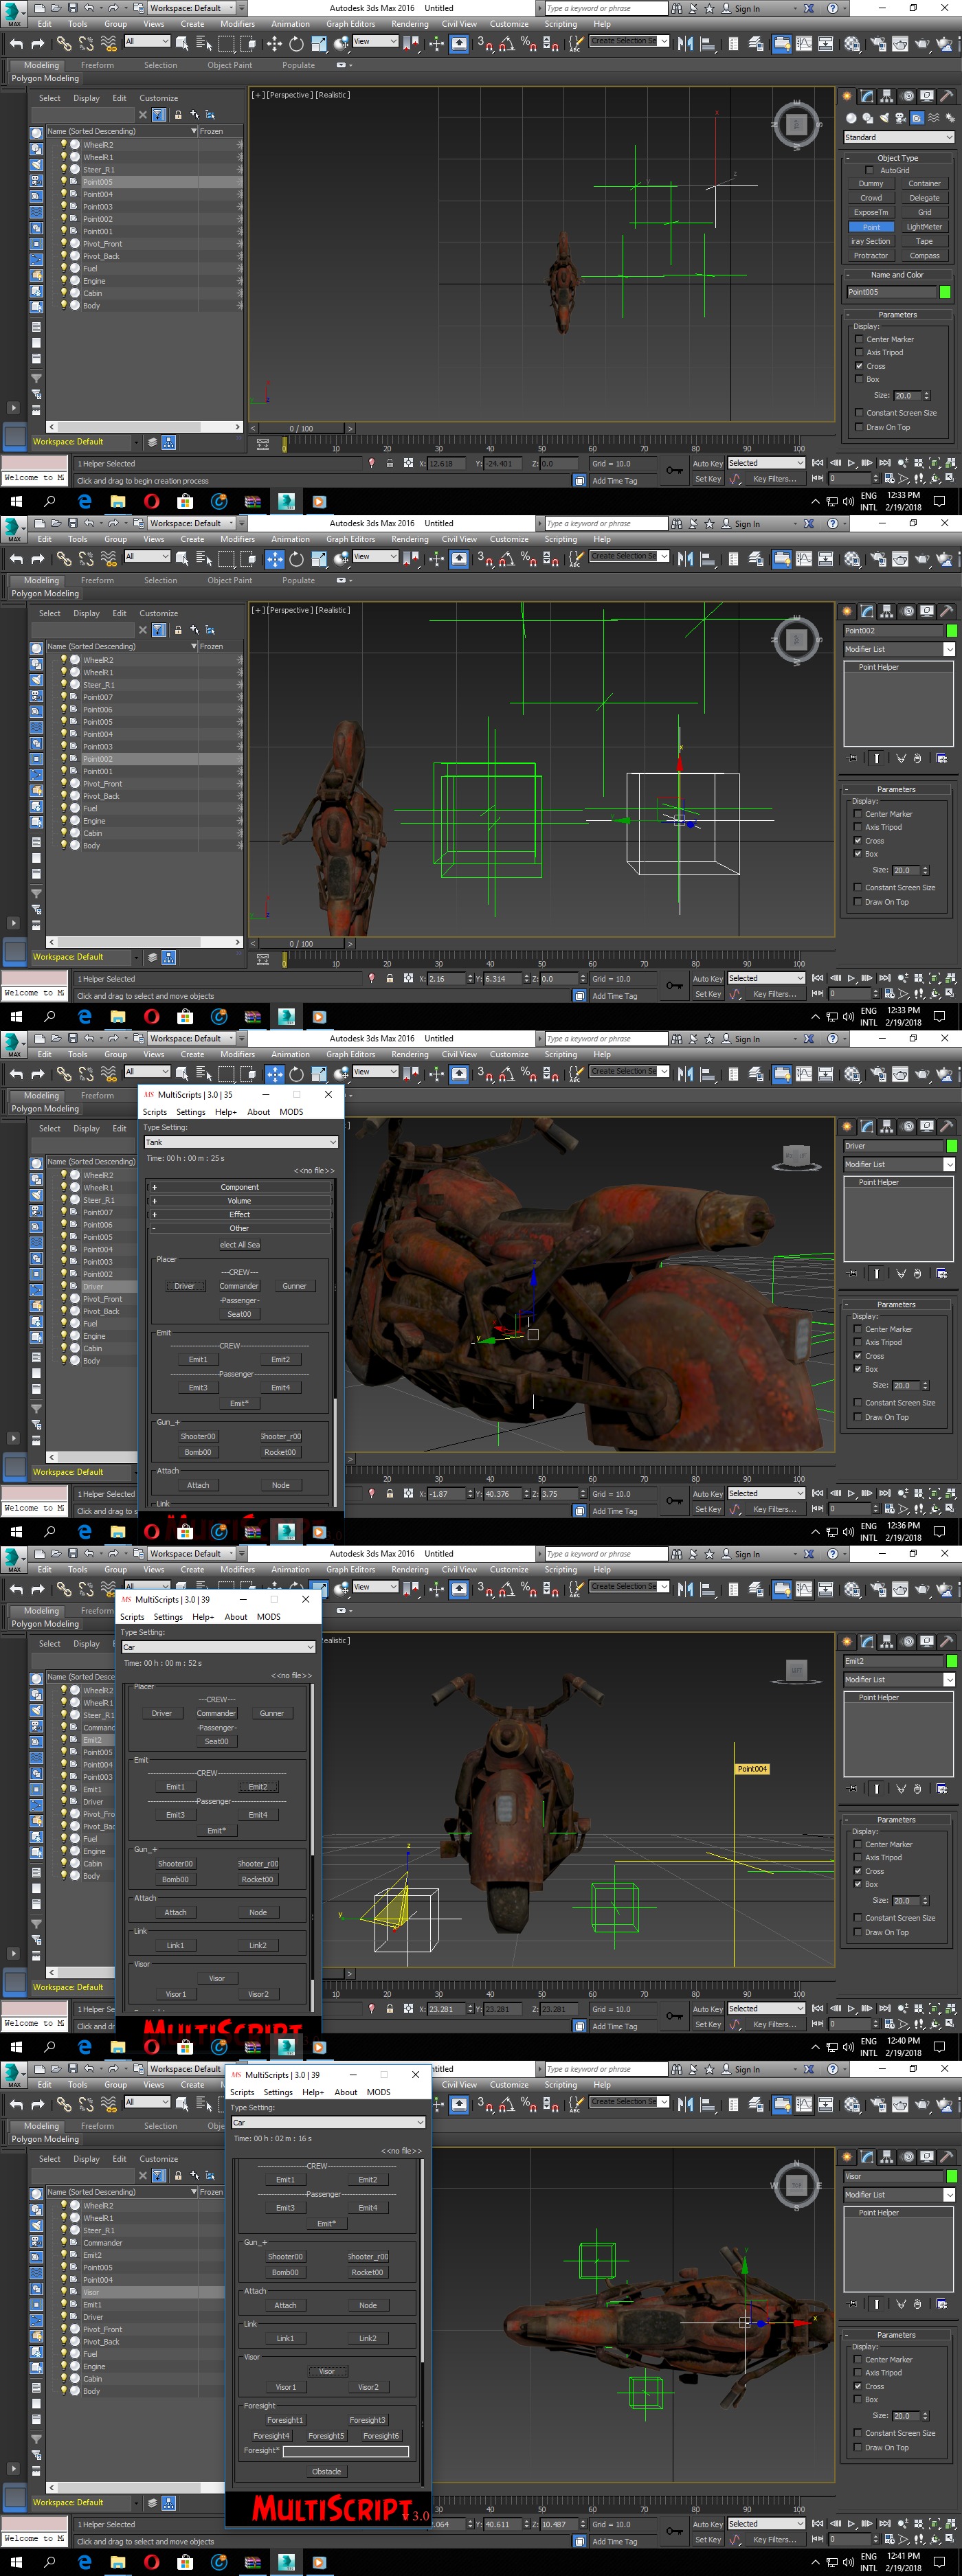
Step Five:
- Primitive Objects are used as volume or Hit Point on entity.
- Like by following example you have to place those primitive object over different part which consider to hit point in game of those objects
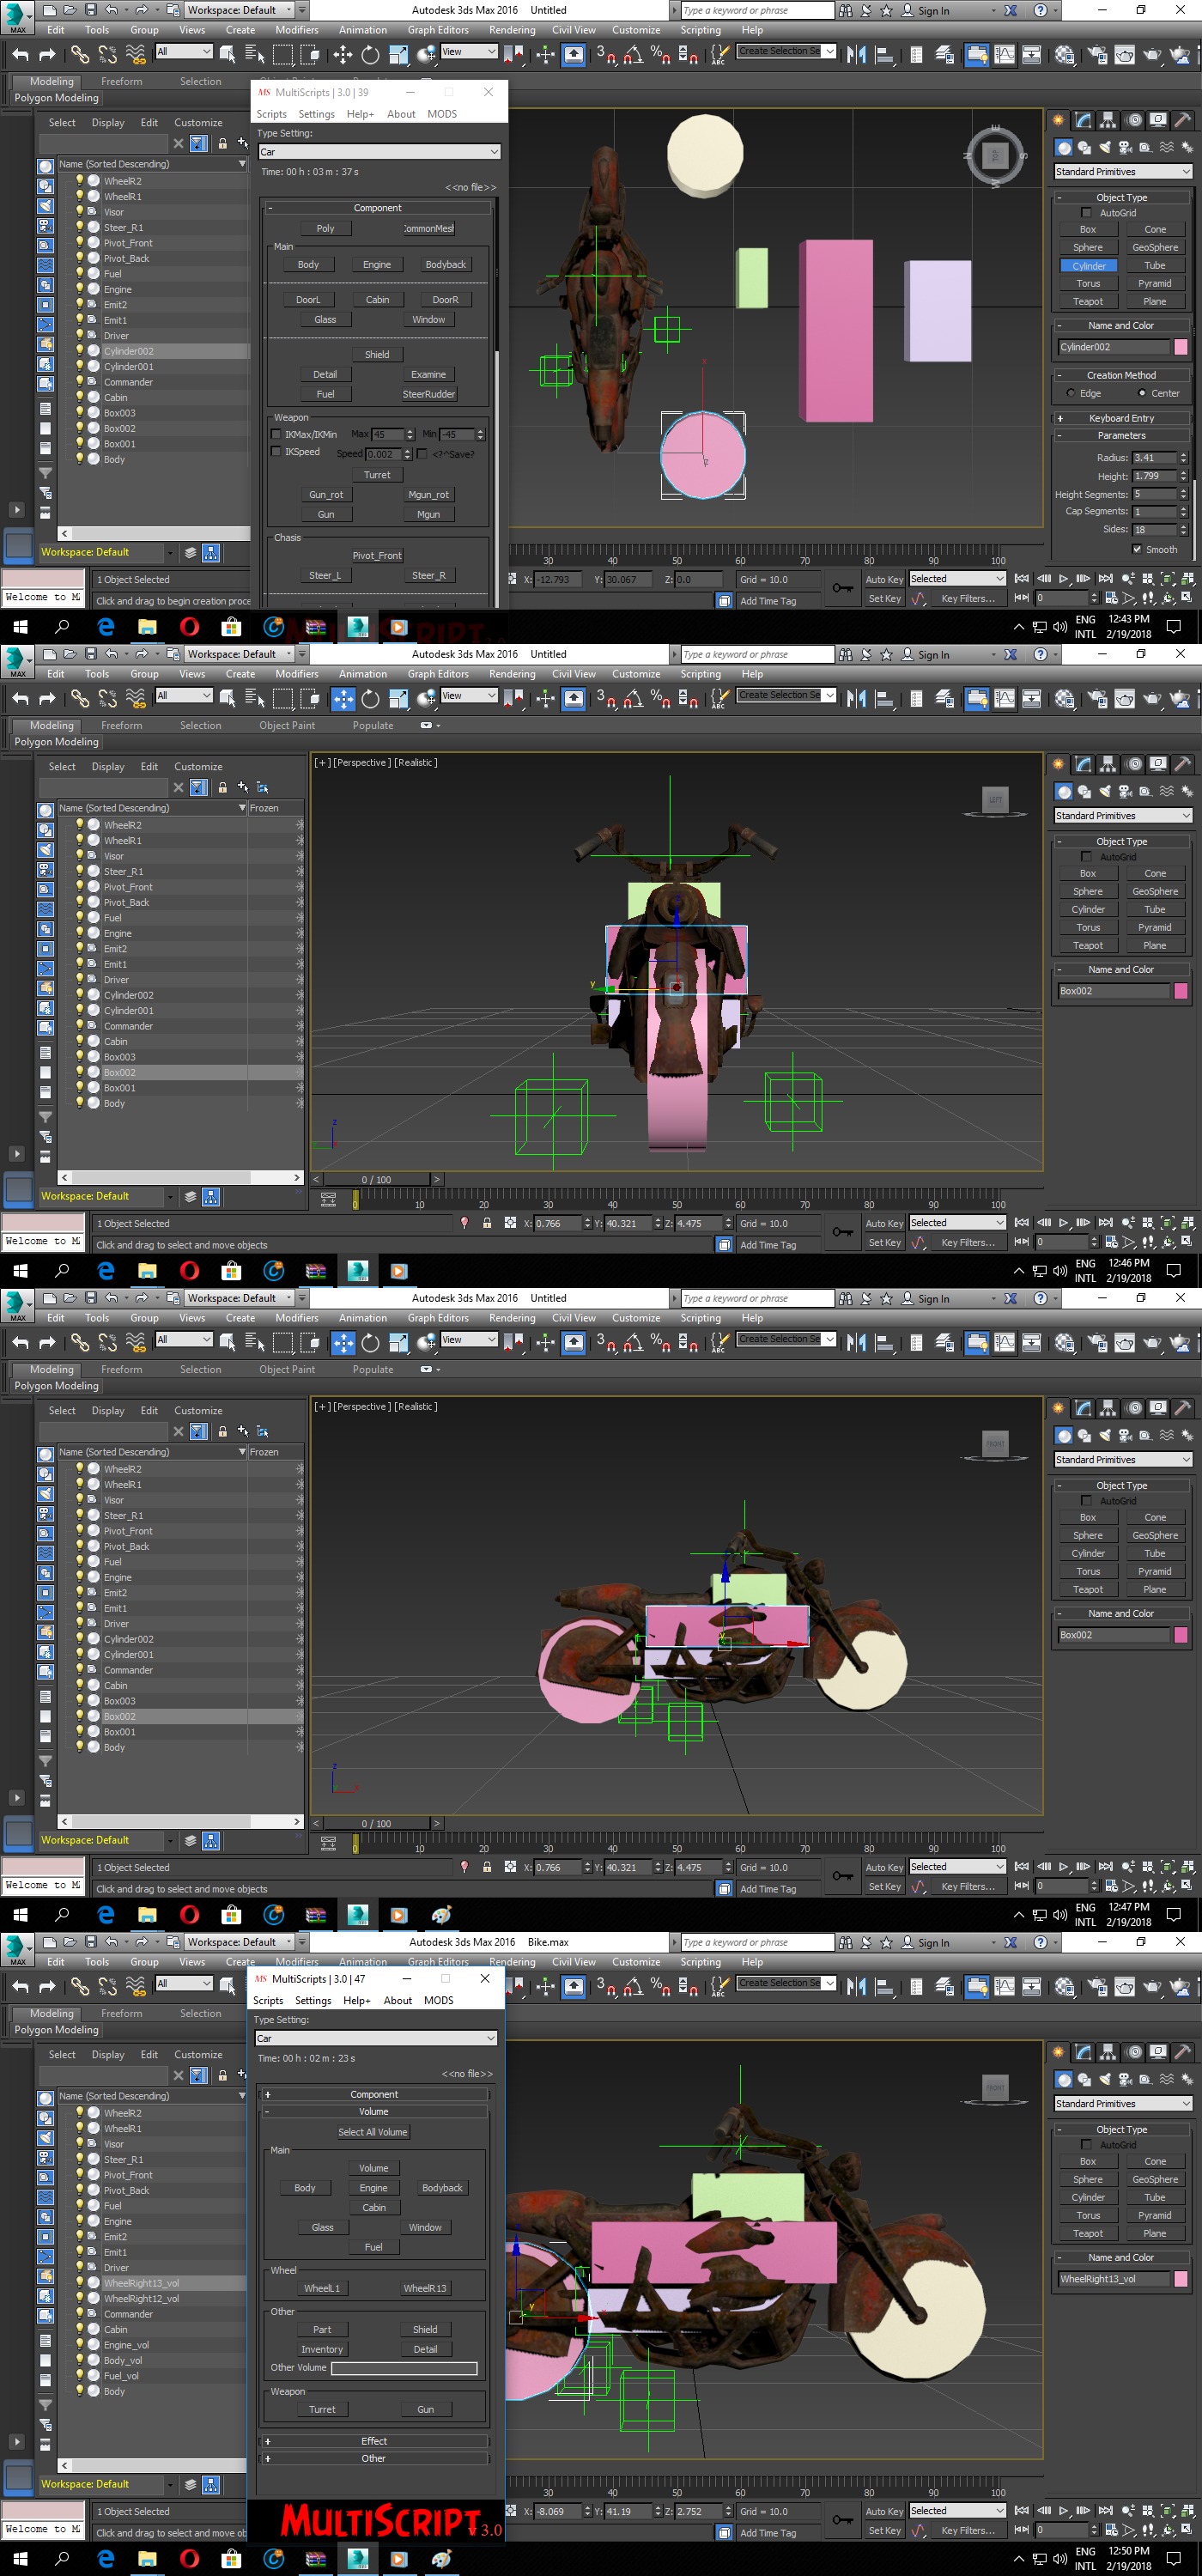
Step Six:
- For animation hide all Primitive Objects and Pointers
- Use Time Configuration (small Icon at right side of Key Filter)
- To increase or decrease maximum frame range
- Most of animations can be between 40 frames so select maximum frames according to your requirement
- Apply default placement of object as default animation by clicking on KEY ICON while all object are selected in selection
- does above step at 0 then at 40 then at 80 and so on to create intervals
- now give first animation by going at frame 20 or any middle frame between intervals and select only those object whom you want to apply animation
- Click on AUTO KEY and ROTATE or MOVE selected object to give them animation
- Play animation to check object response

Step Seven:
- Now create Basis which contain animation data and which is collective combination of all objects
- Follow following step
- Review animation structure as follows:
Example: Animation: Start, Body, 0-40
- in that " Start " is game function for entity to move and " Body " is just name of Animation set, it is NOT a Body as Object. As you can see in pictures, you can change body name to Michal101, JameBond, Zoo etc but you also have to rename animation set
- Animation Set = Set of object on which animation will play on, for example at time of animation you applied animation on engine and fuel, but you only added engine in animation set, so in game, animation will only play to engine not to fuel
- Now by above step and below pictures create animation set

Step Eight:
- Making schematic is simple, you have to consider real life values, like Steer > Pivot > Wheel , if you placed Wheel over Pivot then Pivot will start rolling with wheel
- Rest must be placed like that, where I will explain placing of guns in next tutorial
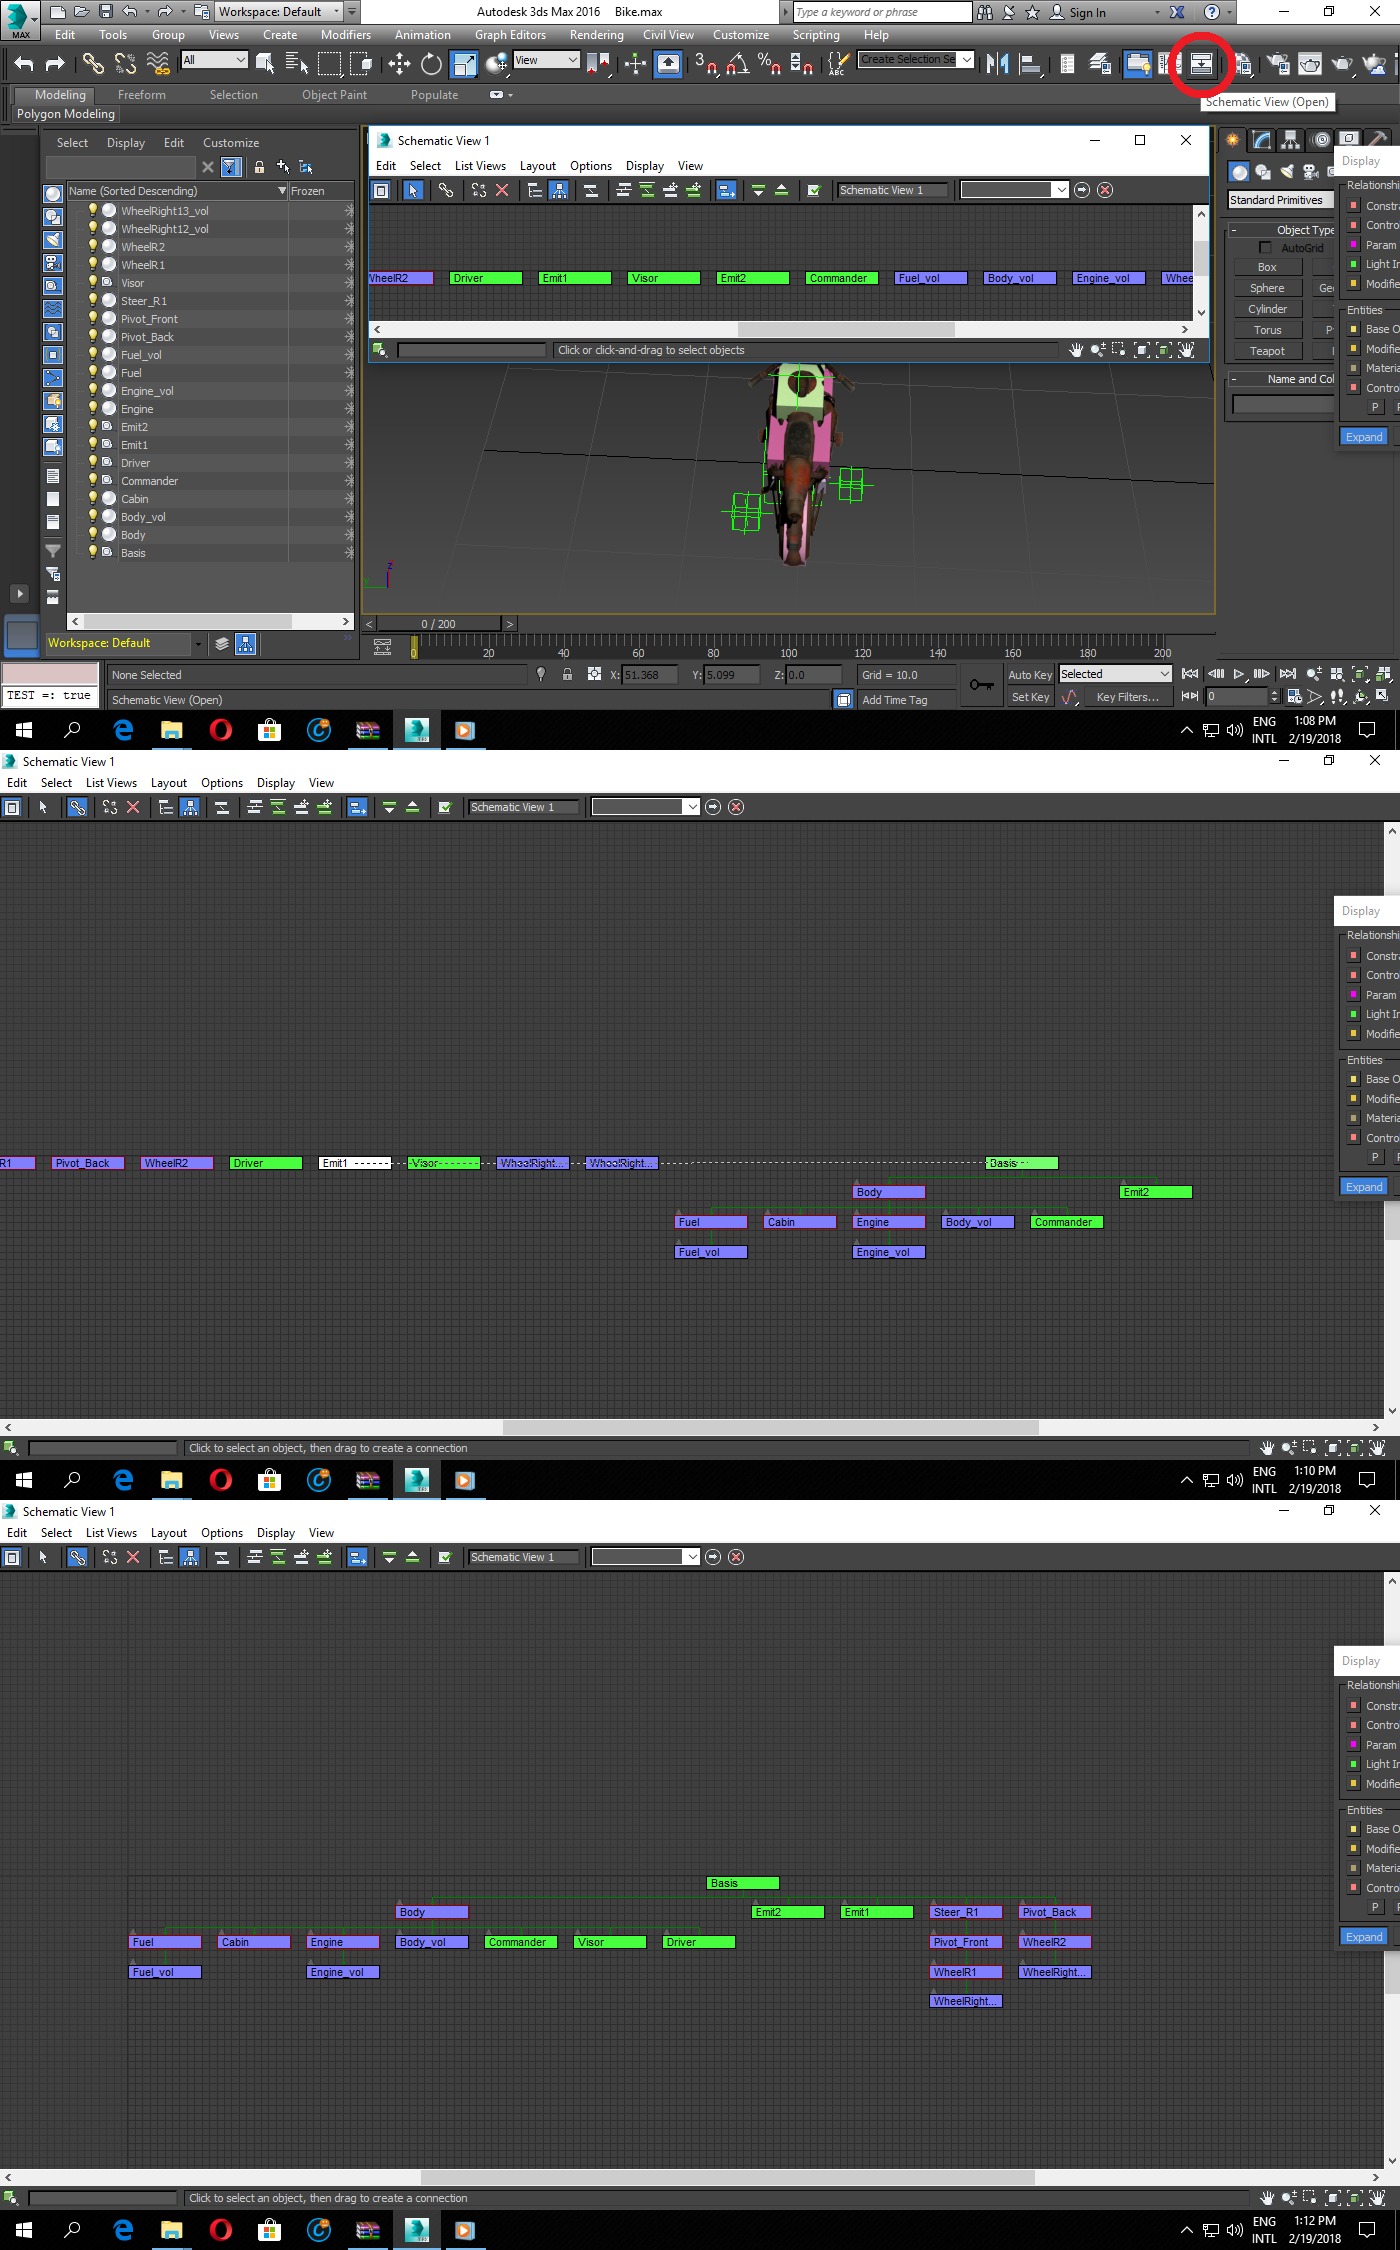
Step Nine:
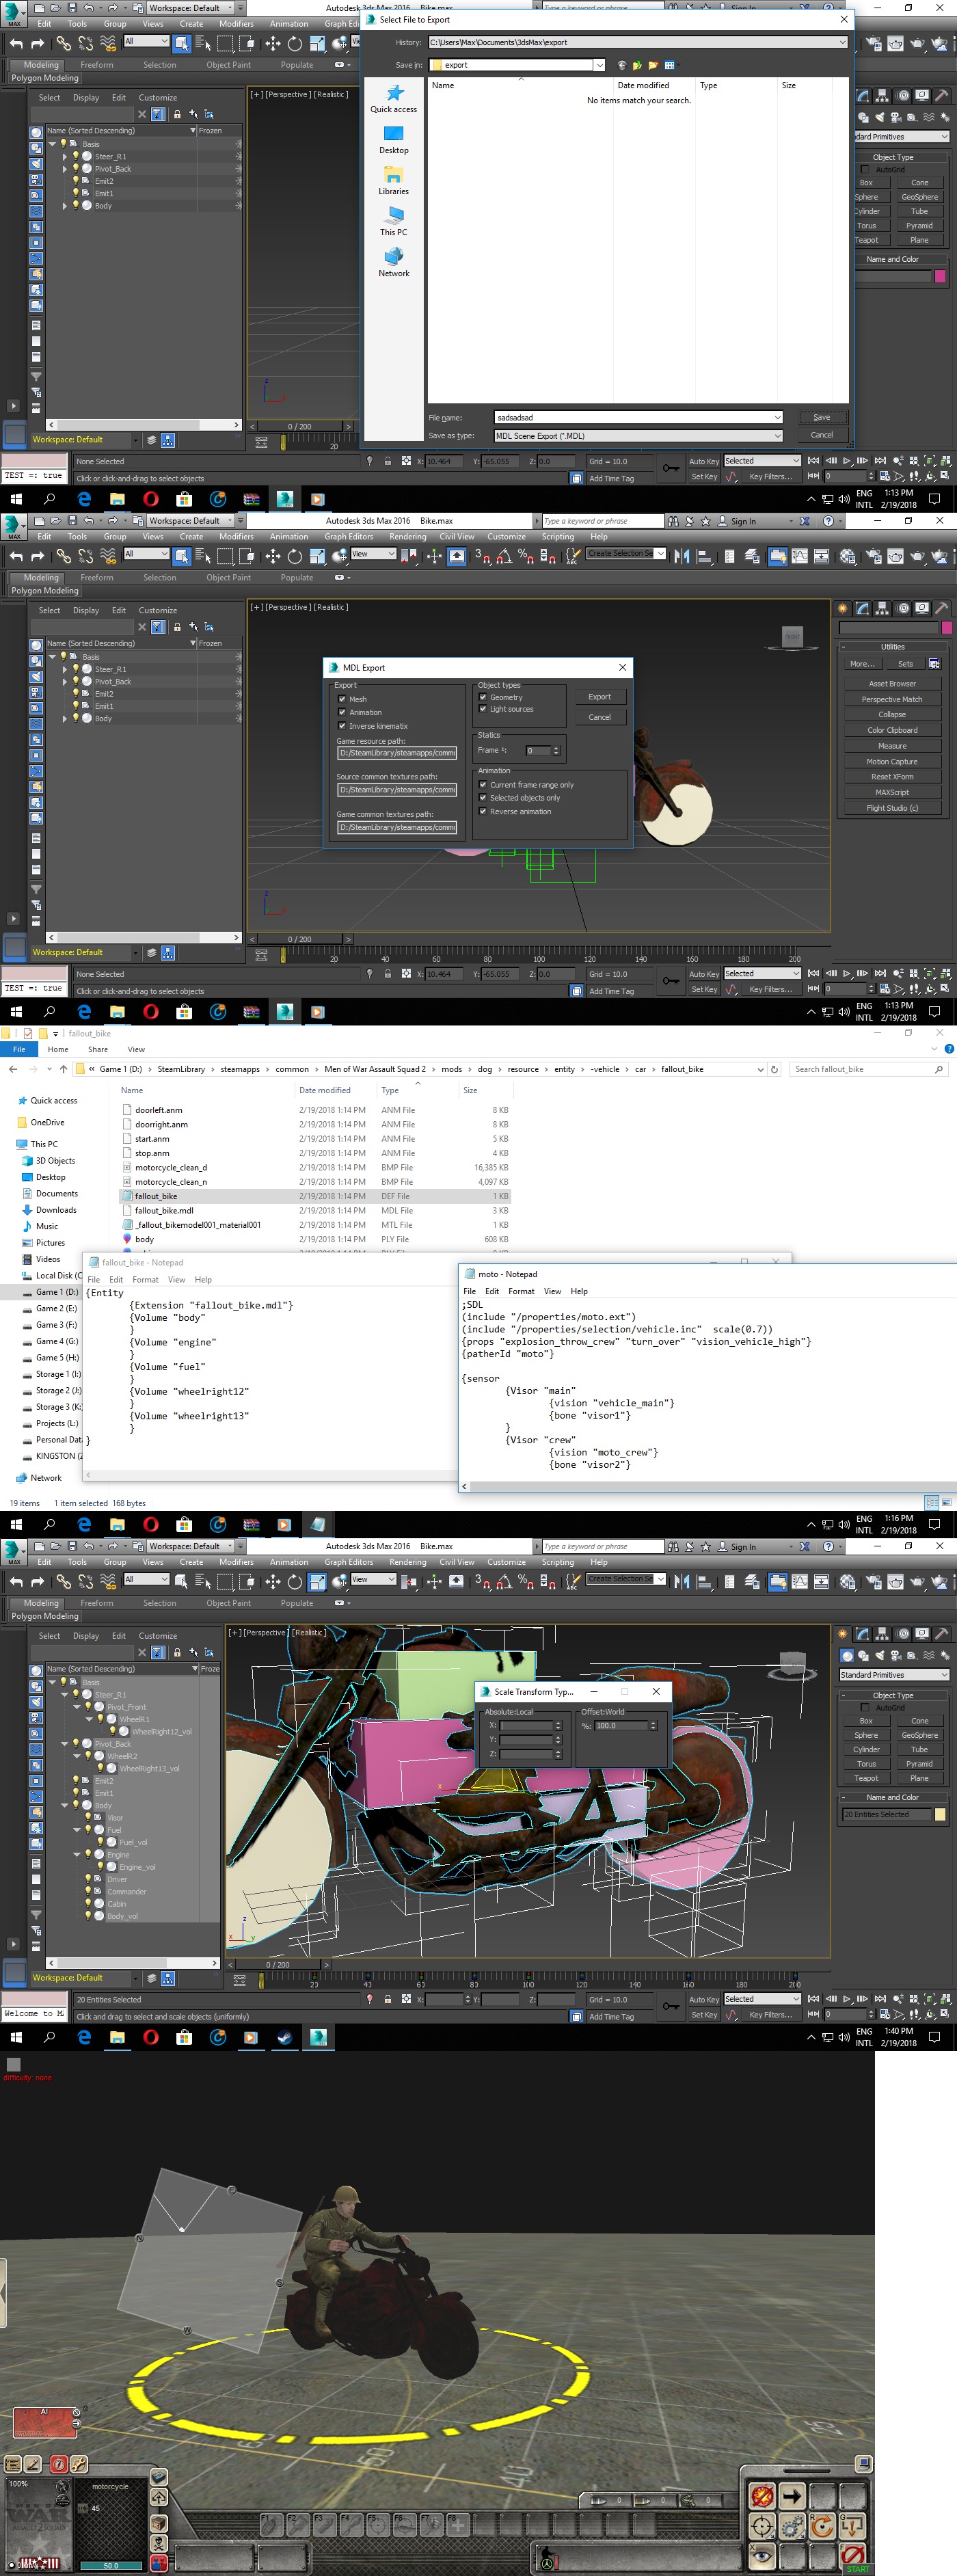
- Now Export it to game directory (Ignore VOLUME related error at time of export, if there is some other error then you have to review steps), while you noticed that Entity file only contain Volumes information (as you can see in pictures), so you have to set it up entirely at your own by follow following entity setup explanation after final step.
Entity Setup:
- Open following file from tutorial files to have understanding of entity setup
- Tutorial with Sample and 3d Max Script for MOW.rar > Vehicle Porting Tutorial > resource > entity > -vehicle > fallout_bike > fallout_bike.def
{game_entity
(include "/properties/moto.ext")
(include "/properties/selection/vehicle.inc" scale(0.7))
{props "explosion_throw_crew" "turn_over" "vision_vehicle_high"}
{patherId "moto"}
Explanation: Moto.ext = properties for motorcycle entity specifically, thats why we placed moto as extension, for cars we have to give it extension of car.ext, Selection is simply the selector over entity
Props are basic argument like explosion can throw crew from bike etc, can also apply similar props other than what are here (but they must be compatible with entity)
{patherId "moto"} = path ID from where or where not this entity can go, there are different pather Id which change vehicle path patten
{sensor
{Visor "main"
{vision "vehicle_main"}
{bone "visor"} }
{visor "view-around"
{vision "moto_around"}
{bone "basis"}
}
}
Explanation: Now if you remind back we placed VISOR at driver seat, that POINTER will now going to placed by that argument, so does other pointers got connected in game by that way, thats why I highly recommend to take screen shot of SCHEMATIC at the time of entity setup.
Special Notes:
-After completion of your ENTITY, You must have to manually REPLACE "Poly" command line with "CommonMesh" in each object PROPERTIES > USER DEFINED or else 3d Max MODIFIERS will not effect on ANIMATIONS or VERTEX based animations will not play upon entity.
-You also have to make sure that all objects whom you want to play vertex based animation with CommonMesh argument, must have ID or else animation wont play upon them, for example if you want to have vertex based animation on Machine Gun, then you have to give it id in PROPERTIES > USER DEFINED as ID=mgun along with CommonMesh argument.
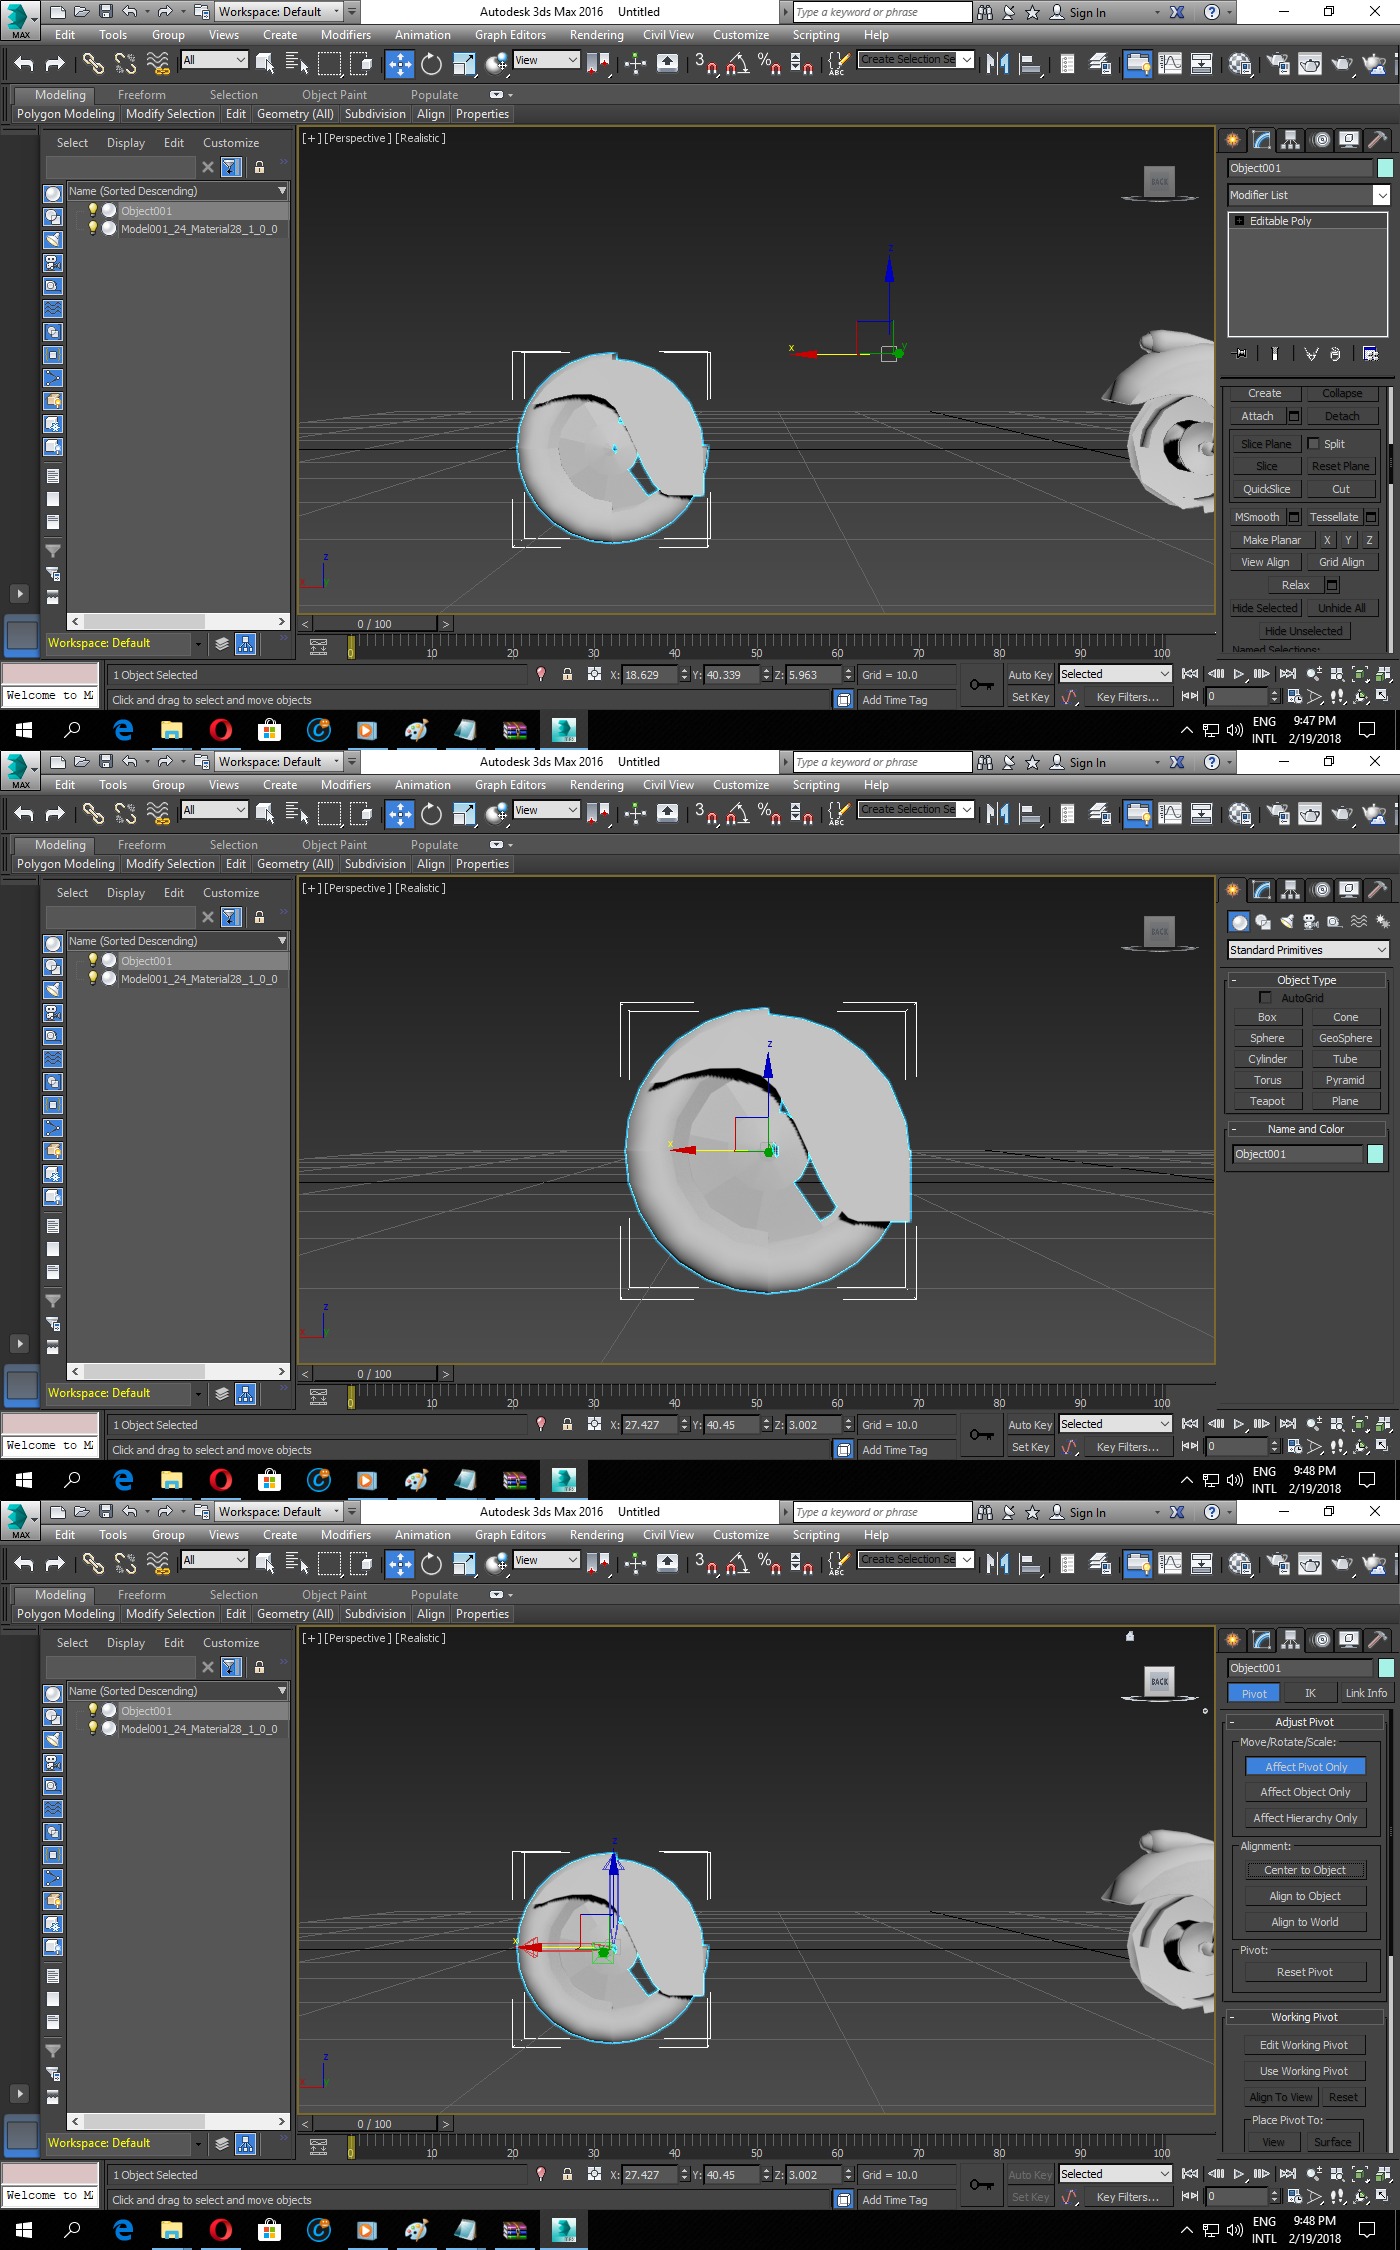
-Follow quick fix for wrong placement of OBJECTS, as pivots are actually the pointers which decide the center and DIRECTION of entity (e.g. if your placed GUN shots from backside instead of front and your placed WHEELS move in wrong direction then its due to PIVOT ROTATION and DIRECTION), for example if you place that pivot outside of wheel, then your wheel will be move in that wrong direction. So to fix TURRET, WHEEL, HATCH and similar entities radius and animation, adjust PIVOT ROTATION and PLACEMENT:
Please comment and share this tutorial while all credit goes to Bethesda Softworks and KONAMI for sample models.
Continue: Vehicle Model Porting Tutorial (Advance)
Also Try following tutorial in regards of vehicle STRUCTURE creation:


When working with MultiScripts have you found any errors?
Most of errors which appear is because of my own fault (like broken link etc.), as far as script error concern, it wont perform commanded action sometime but can be fixed by reseting scene.
Please if you find bugs write me a PM or Docs.google.com
I can't get multiscript to install in 3dsmax 2009. Must I get a newer version? I just need to get past this step and I can then bless the community with all sorts of vehicles
Run 3d max as administrator or else go for 2016 version.
For sure, as the better it gets, the faster we could able to port assets to MOW.
Can you please explain how to port vehicle structure to game?
Here check that K9 Attack Dog mod files (https://www.moddb.com/games/men-of-war-assault-squad-2/addons/k9-attack-dog-unit), you just have to create structure file according to video tutorial and then simple place in designated folder (resource\interface\scene\structure\Entity Name), it will pick from there according to the unique name of that entity.
Thanks for this JoJo, have had a fair amount ask how to do this and don't have enough time to type the whole nine yards and the oldest thing is Cromtech[unsure if I'm saying his name right]
Not just that, that old tutorial is kind obsolete now, as with help of new tools and script you can make better entities, I also found some new ways to give dynamic animation to objects in easy way, like skin over vehicles which was not define before and I never seen in old mods at all, soon will release more models from my upcoming mod to have better example of new techniques.
Author of the post, I will write Your tutorial in the script! in 3.1 it will be!
Best of luck bro 😎.
Does Multiscript work with 3dsmax 2009? I drag it onto the open space and it gives a "rollout error". I cant get multiscript to install and I have tried in different ways. Any suggestions?
Don't know, always used 2016 version, may be anyone else can confirm.
Stop lying. Your script does not work for Max 2016 (I confirmed it) and in your tutorial videos you are clearly not using the 2016 version. What is your purpose, to confuse the western modders?
Great tutorial! Wondering if you could make a tutorial for the aircraft too?
Sure.
Thank you so much! I'm trying to learn how to port aircraft into the AS2 but I haven't found any comprehensive tutorial on the subject.
I installed the multiscript but it doesnt appear in the scripting tab?
Try to run 3d max as administrator.
Thanks sorry for late reply but im having an issue when i try and rotate the steering wheel to create the animation it rotates around a huge area rather than just in its place
Can you make more detailed the tutorial ? Some things not clear for beginners. Like what is the pivot_front, what is the volumes and what use of it ? What is the cabin ? and more.
Hey ugh I got a quick question? I created 3D Vehicles through 3D Builder, and I no longer own 3D Max, is there a way to created the model through the use of either Blender or 3D Builder in order to port the vehicle and guns that I create into Men of War Assault Squad II, I've been trying to find that out for almost 4 years already, and I got so many projects that are sitting and collecting dust.
Just pirate 3ds max lol
I get "An error has ocurred and the application will now close" Whenever i try to export my vehicle to mdl
My vehicle is invisible ,dosent have texture ,and the dont recognise it as a vehicle
whenevr i spawn my models i get an error saying
Hi,
whenever I try to export my vehicle in 3DS MAx 2020, it doesn't export anything although it is said the export is completed, although any errors show up. Any kind of help would be apprecited.
i'am confused with the schematic part because i need to make a schematic for a heavy tank
Hey I Was wondering Is there a way to port vehicles while using Blender.