Requirements:
Character Animation Model - Updated 9-7-2019 - Mega
Character Animation Model - Updated 9-7-2019 - Media
Character Animation Model - Updated 9-7-2019 - Drop
Character Animation Model - Updated 9-7-2019 - Google
From 3d Max to MOW Export Plug in - Official
Gerrys Mod to 3D Max - Google Drive
Gerrys Mod to 3D Max - Dropbox
Garry's Mod to 3D Max - Media Fire
Combine Pack Updated on 23-8-2019 Media Fire
Combine Pack Updated on 23-8-2019 Mega
Combine Pack Updated on 23-8-2019 Google Drive
Combine Pack Updated on 23-8-2019 Drop Box
- First you must have to practice with BASIC tutorial to have understanding of this advance tutorial, as it only explain steps to setup complex structuring of game entities in continuation of basic tutorial.
Step: One
- Go to Vehicle Sample > APC - Final > APC - 3d Max and XPS (from provided file Requirements for MOW Porting.zip).
- Open APC model, which is already setup with all animation and effect where its raw file also available in XPS formate for practice to start from raw to finished entity.

- In reference of previous tutorial, to have VOLUMES apply over entity we have to convert them in to POLY or else they will not take effect in game, so convert them in to EDITABLE POLY before export your entity to game.
Step: Two
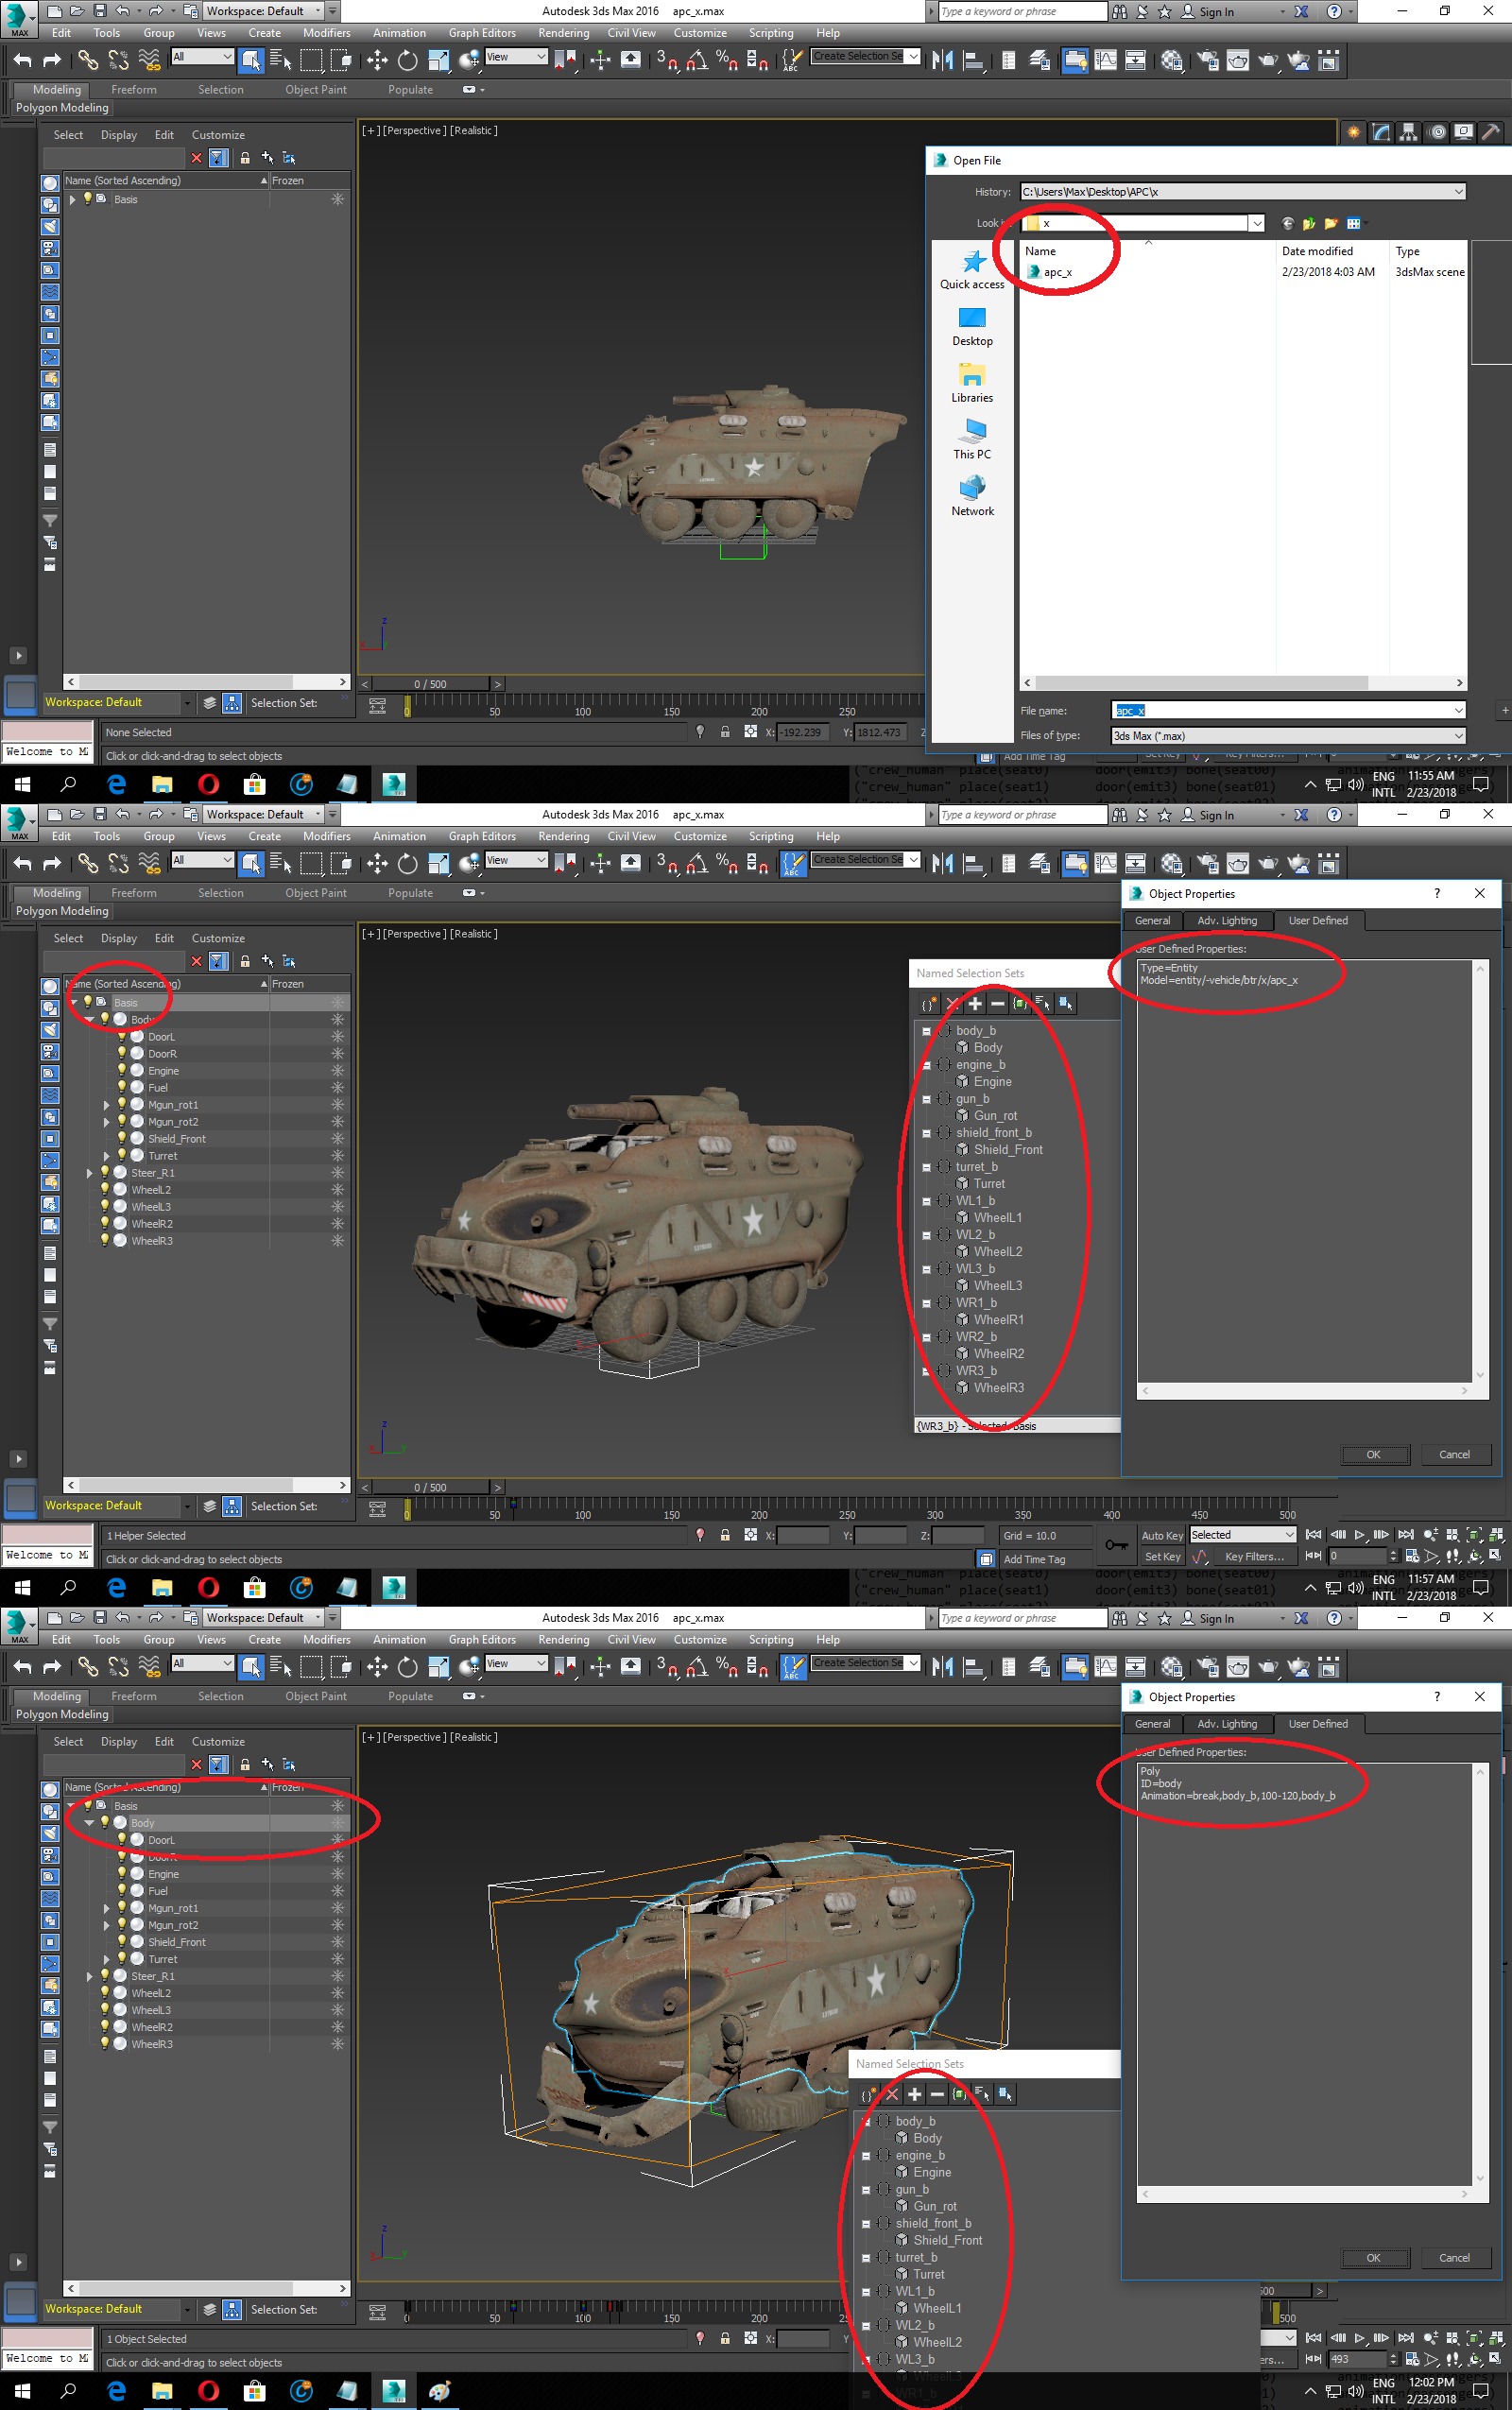
- Now we presume that you already DETACHED entity in to different parts to set it with 2 machine guns, 1 turret, 6 wheels, 1 steer, 1 pivot, 1 chamber from where shells will ejects from etc., in reference of BASIC tutorial.
- Now go to Vehicle Sample > APC - Final > Entity Setup > scripts to merge in - Interactive entity - vehicle.inc.
- In that folder there are 3 files, all of them contain SCRIPT for shell ejection from main gun (heavy shells) and from machine guns (small shells). Various vehicles have different requirement, so you can try each script according to that requirements.
- Now how it works, first we have to understand POINTERS in more detail, and by that you have to follow in game engine pattern like FORESIGHT1 and FORESIGHT2 is by default for main GUN and from FORESIGHT3 and onwards it used for Machine Gun MGUN, and the reason behind setting FORESIGHT is to provide point of MUZZLE FLESH and BULLET / SHELL fire from.
- FX are pointers to provide FX to entities which will link and works with BONES, there are various FX for various purposes, but right now we focus on FXSHELL and FX_INVERSE.
- As you can see in below picture that FX_Inverse linked with turret, but in script its FUNCTION attached with ANIMATION of FIRE, and again by reference of BASIC tutorial I presumed you already setup animation with help of provided sample file, in which DETAIL1 (small mesh part above turret in example file) used as shell ejector while turret nozzle used as gun.
- So by attaching FX_inverse with turret and then linking it with GUN "fire" animation which include Detail1 as well, the shell will eject from that pointer (FX_inverse) while at very same time animation of "fire" which include both GUN and DETAIL1 will play according to provided linking.
SPECIAL NOTE: you can also use 2 guns in same entity and to have shells for them, you have to change script and pointers, like name 2nd gun as GUN2 and 2nd FX as FX_inverse2 and give its animation as FIRE2 while enter whole script as same and only change details like {ani_play "fire2"} etc.
- Now come to Machine Guns, well MGUN structure is bit different but almost same, you can increase number of machine guns and provide then SHELL ejection and MUZZLE flash effect by increases its numbers, example: from FLASHBARREL4 and FORESIGHT4 to FLASHBARREL10 and FORESIGHT10 and as far as SHELLFX concern they are the POINTER link with shell ejection of MGUN at time of fire animation played.
- So by following example you can setup your own LINKED FUNCTION like FLASHBARREL7 , FORESIGHT7 , FXSHELL7 and name then as same pointers to ENTITY in 3d Max.

- As you can see that I linked Pointer of FXSHELL1 and FXSHELL2 with body and by that the Machine Gun (model of machine gun which was selected in WEAPONRY, in APC entity file) appearing in middle of body, but the SHELLS will not eject from it, instead they eject from pointers location while MUZZLE FLASH and every other function works by script on MGUN1 and MGUN2.
- But still if you got model which is kind exposed, like JEEP or some similar vehicles, you can create a new Machine Gun (by sample model in provided sample file, while I also publish weapon porting tutorial) with small objects or a fake machine gun without any mesh / body to get rid of unwanted Machine Gun model like above picture.
Step: Three
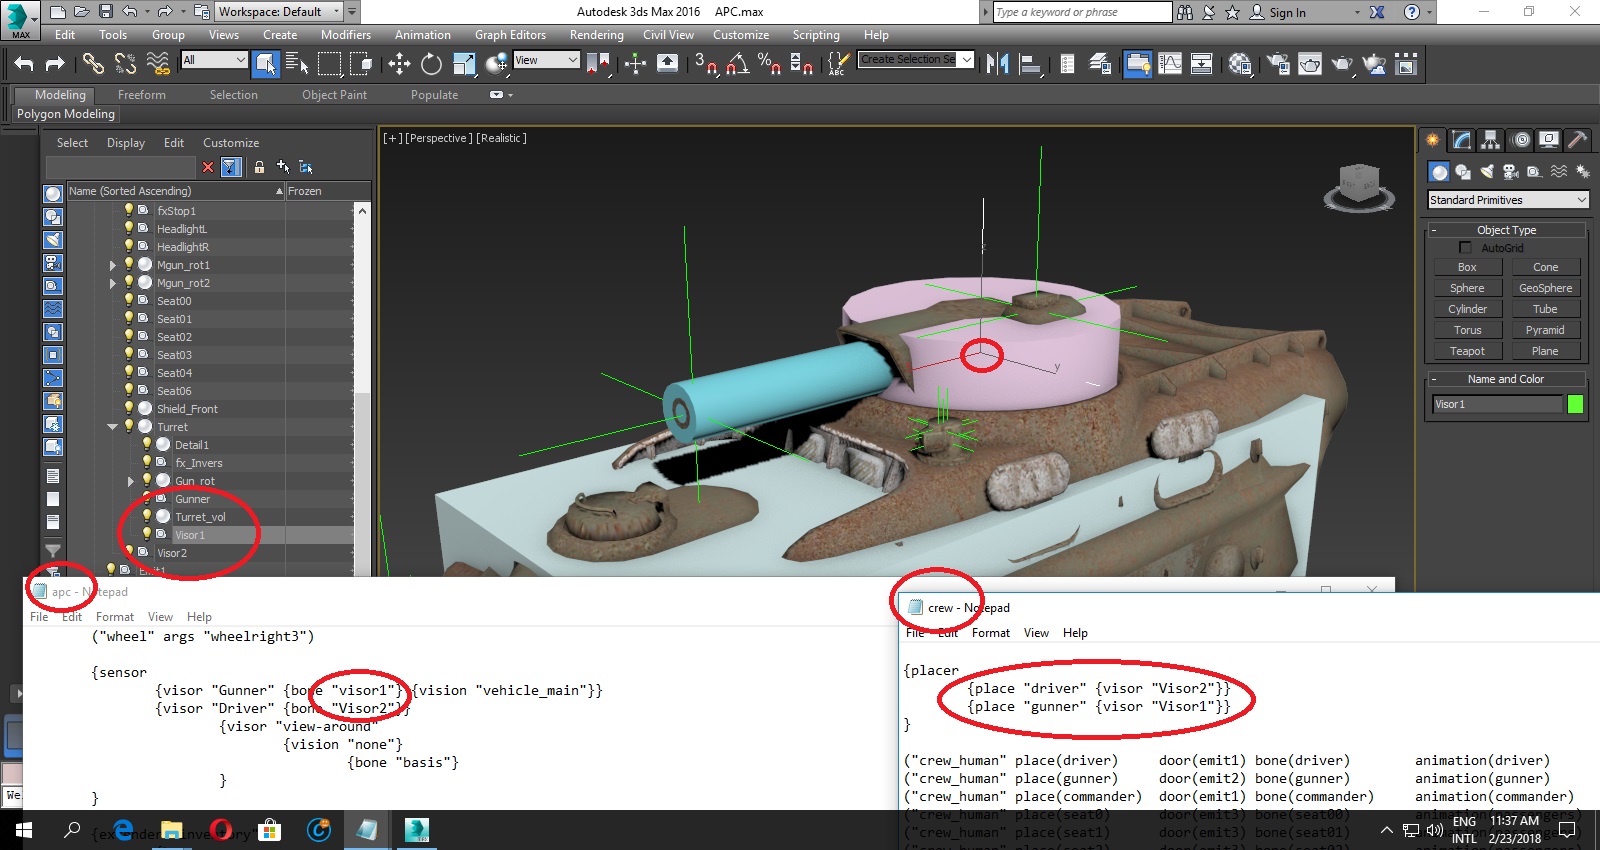
- Now lets go to CREW and PASSENGER setup, first, link provided CREW.ext with any entity by adding following argument:
{extension "crew.ext"}
- ok now review following picture for detail about how to create crew structure while also review explanation as below:
- ANM - Animations, you can select and copy various animation from different in game entities to set it up according to your vehicle, while in animation section, door is consider to be the trigger point at which that animation will play like XYZ boarding animation played along with door ABC.
- EMIT, pointer from where human interact with vehicle to board, like Mr. A will board to seat1 or as gunner place by emit1 not by any other point, as EMIT1 is linked with SEAT1.
- now in PLACER animation = set of animation which you created in ANM argument.
- while door is consider to be the pointer of boarding not DOOR as object because we already provide that detail according to SEAT at start, that who is going to sit at what place, like passenger from seat 1 to 6 will going to board from ""doorright"" by EMIT1 etc.
- VISORS are sensors, you can try different VISOR properties from different entities to get you desired result but it will work by the POINTERS you placed in entities at 3d Max, in short VISOR is a bone at which SENSOR will apply.

Step: Four
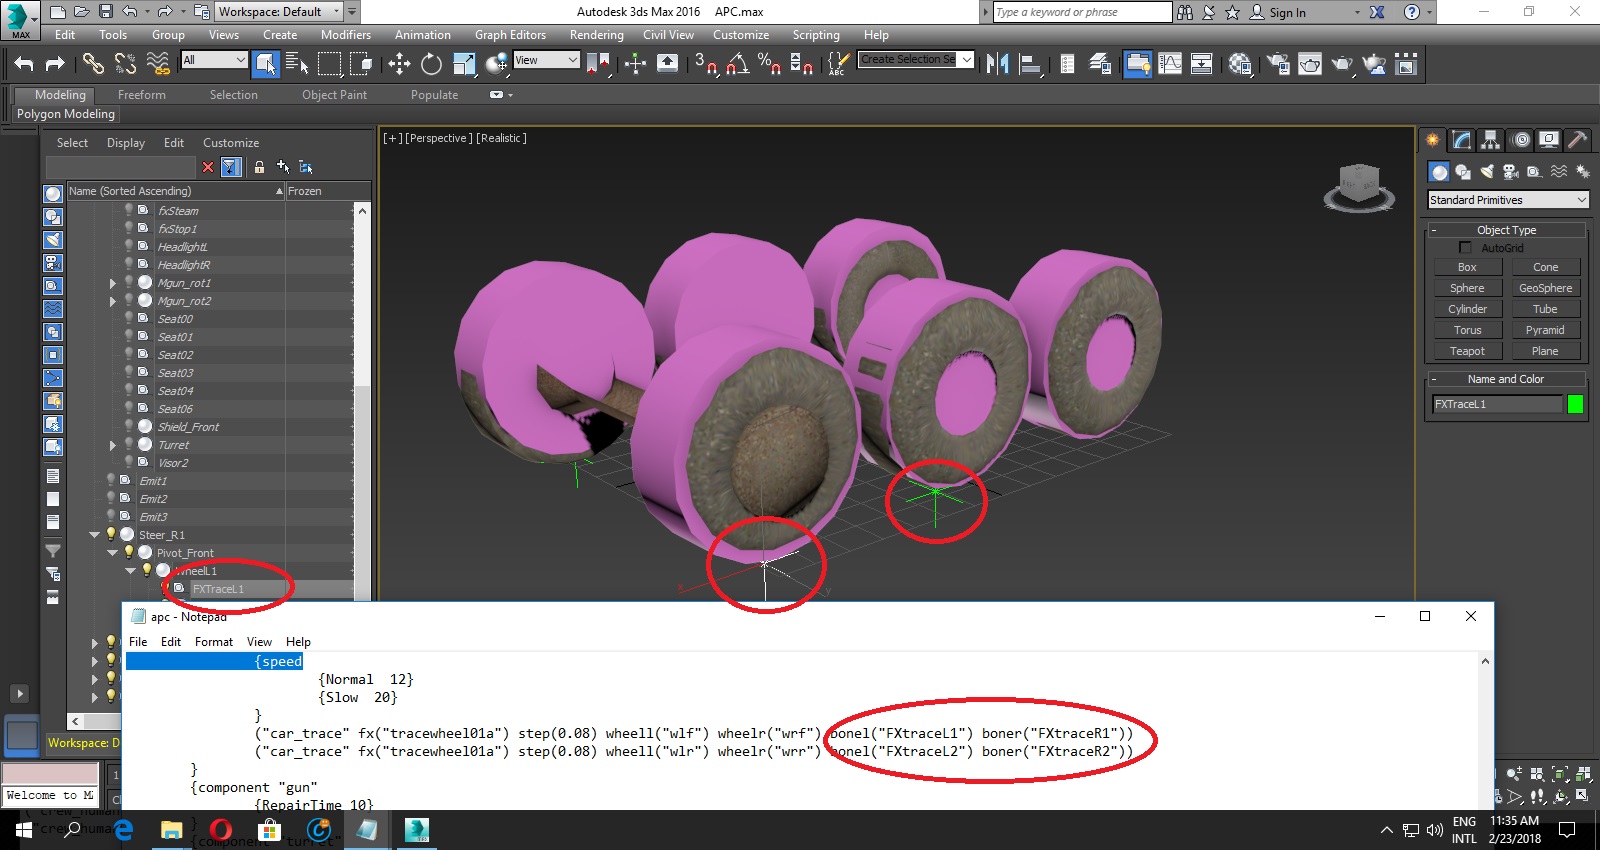
- You can simply set FX on tires or tanks tracks by placing pointers in 3d Max and place that pointers name in argument upon tire FX in entity by follow following picture.
Step: Five
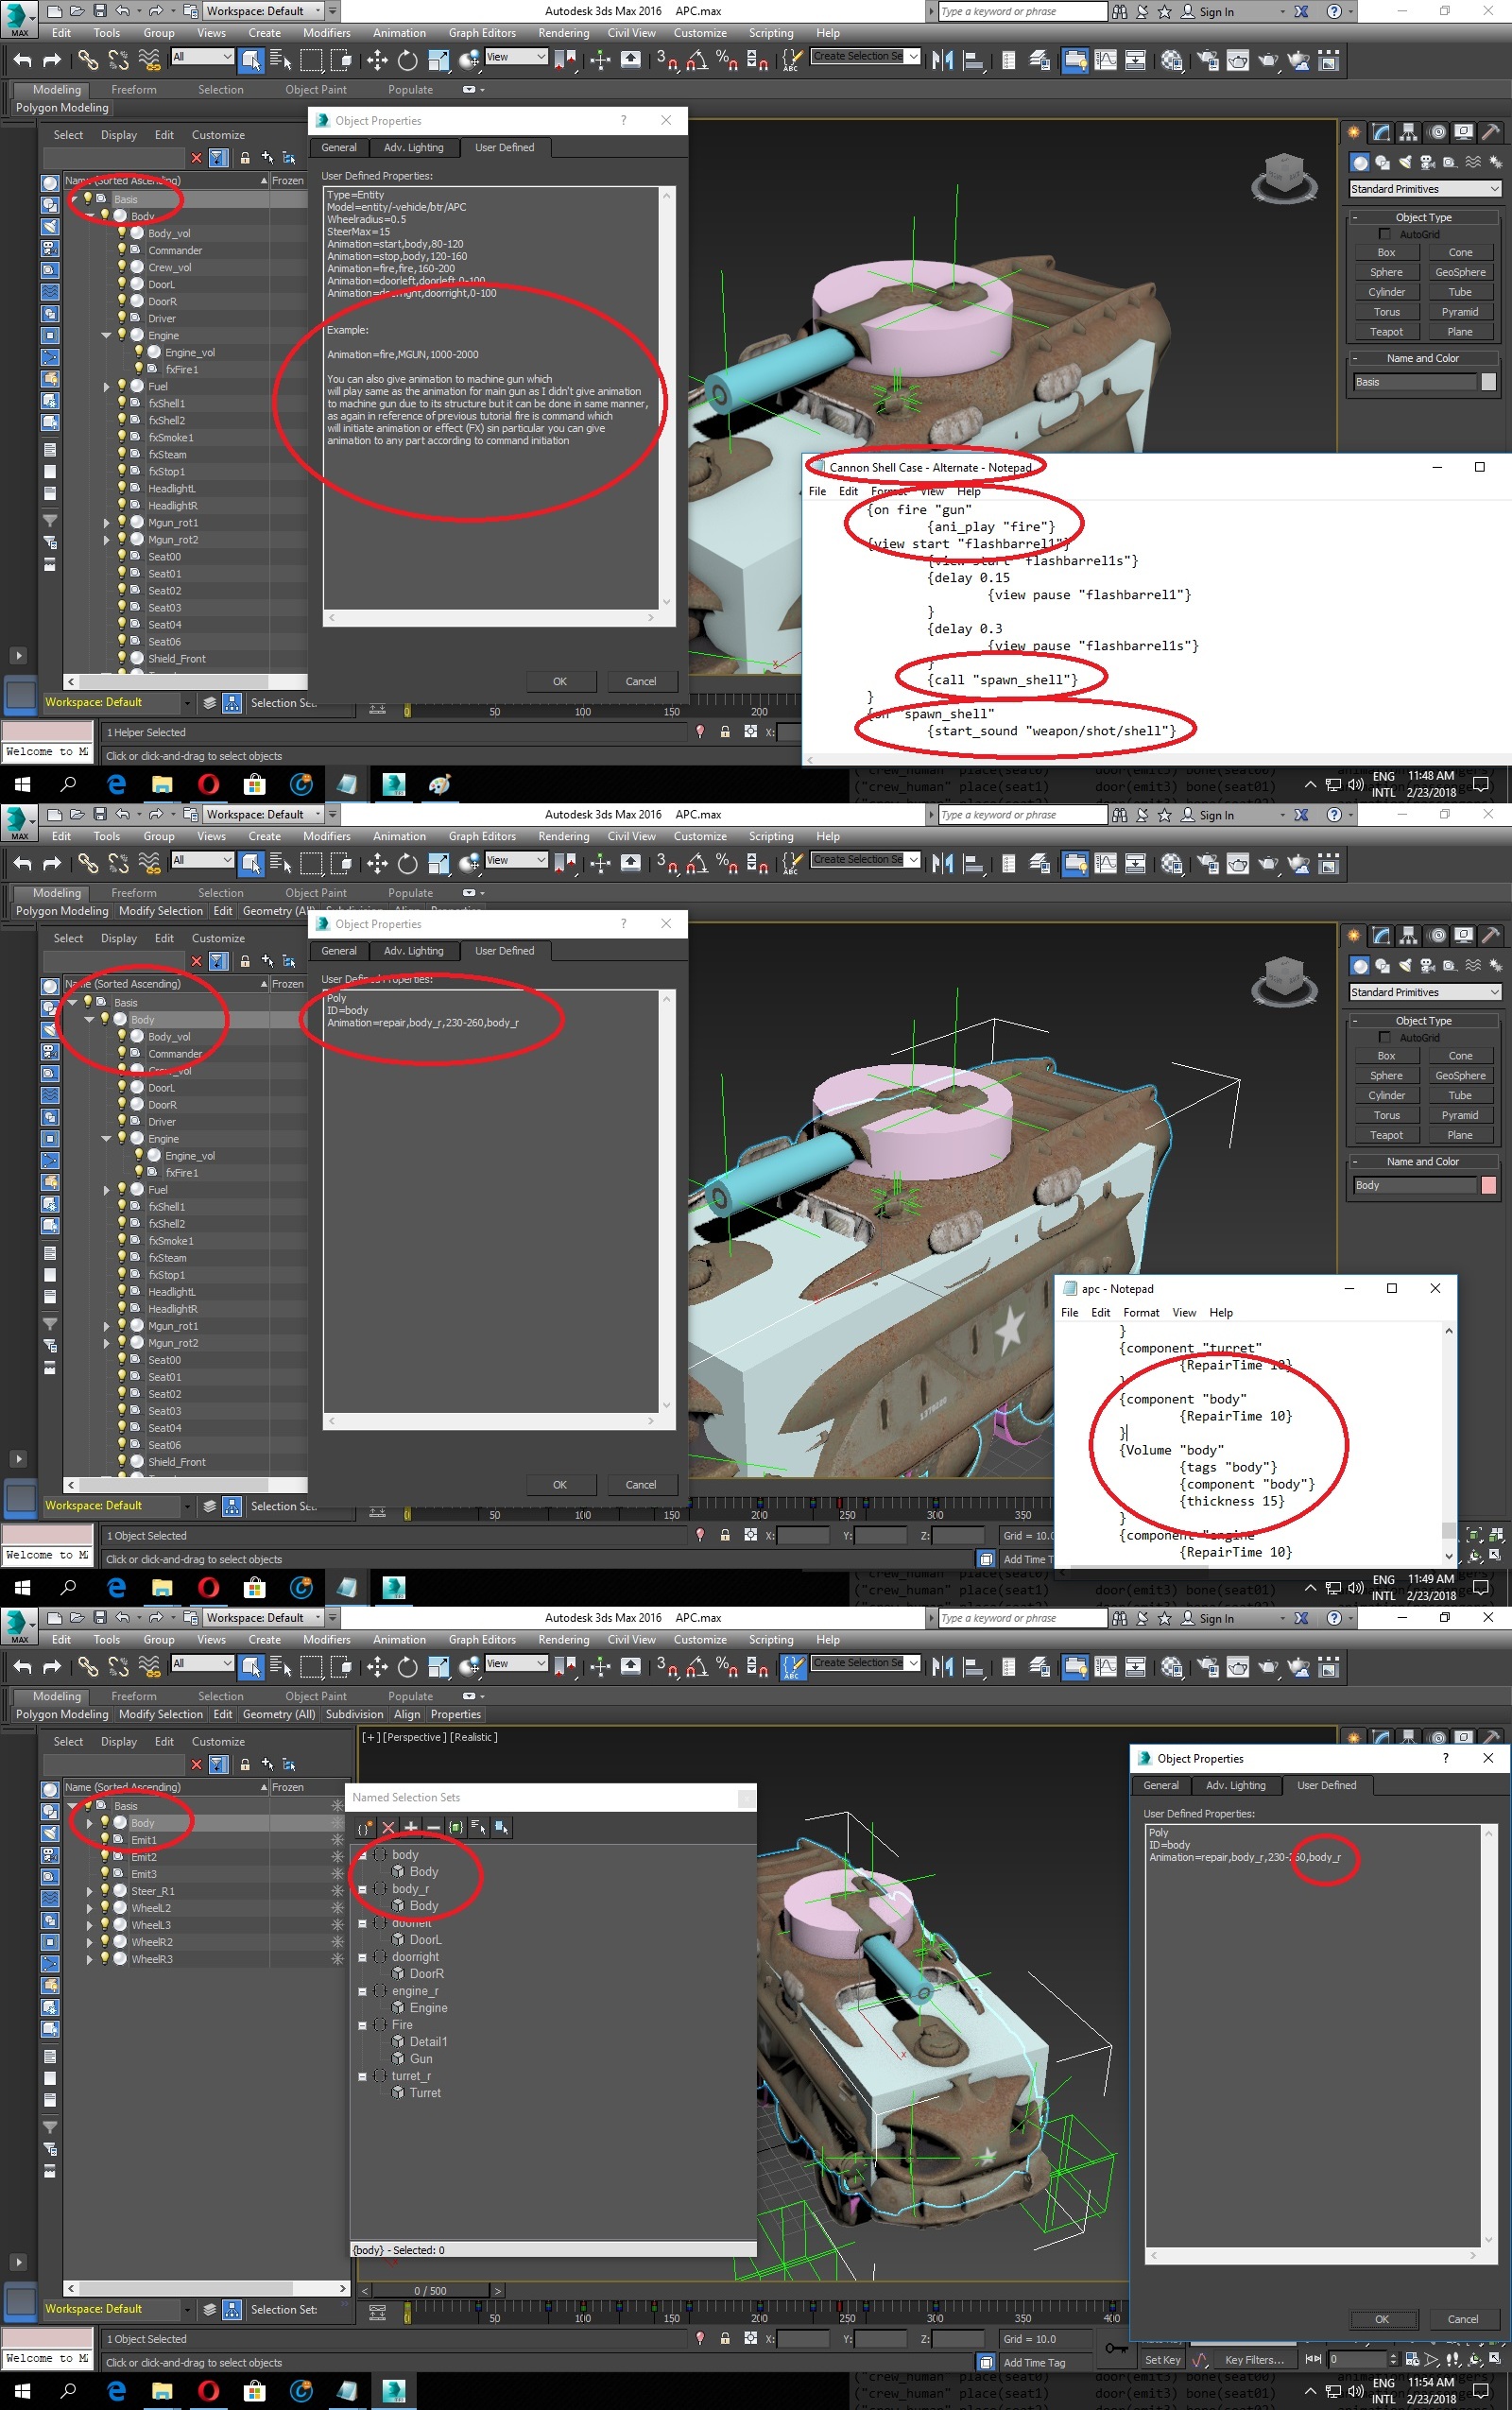
- SHIELDS are additional entities which placed upon main entity as supportive objects, to setup shield, follow following example while you can increase number of shield by adding there name in component and also set VOLUME upon them or else they will not deflect projectile.

Step: Six
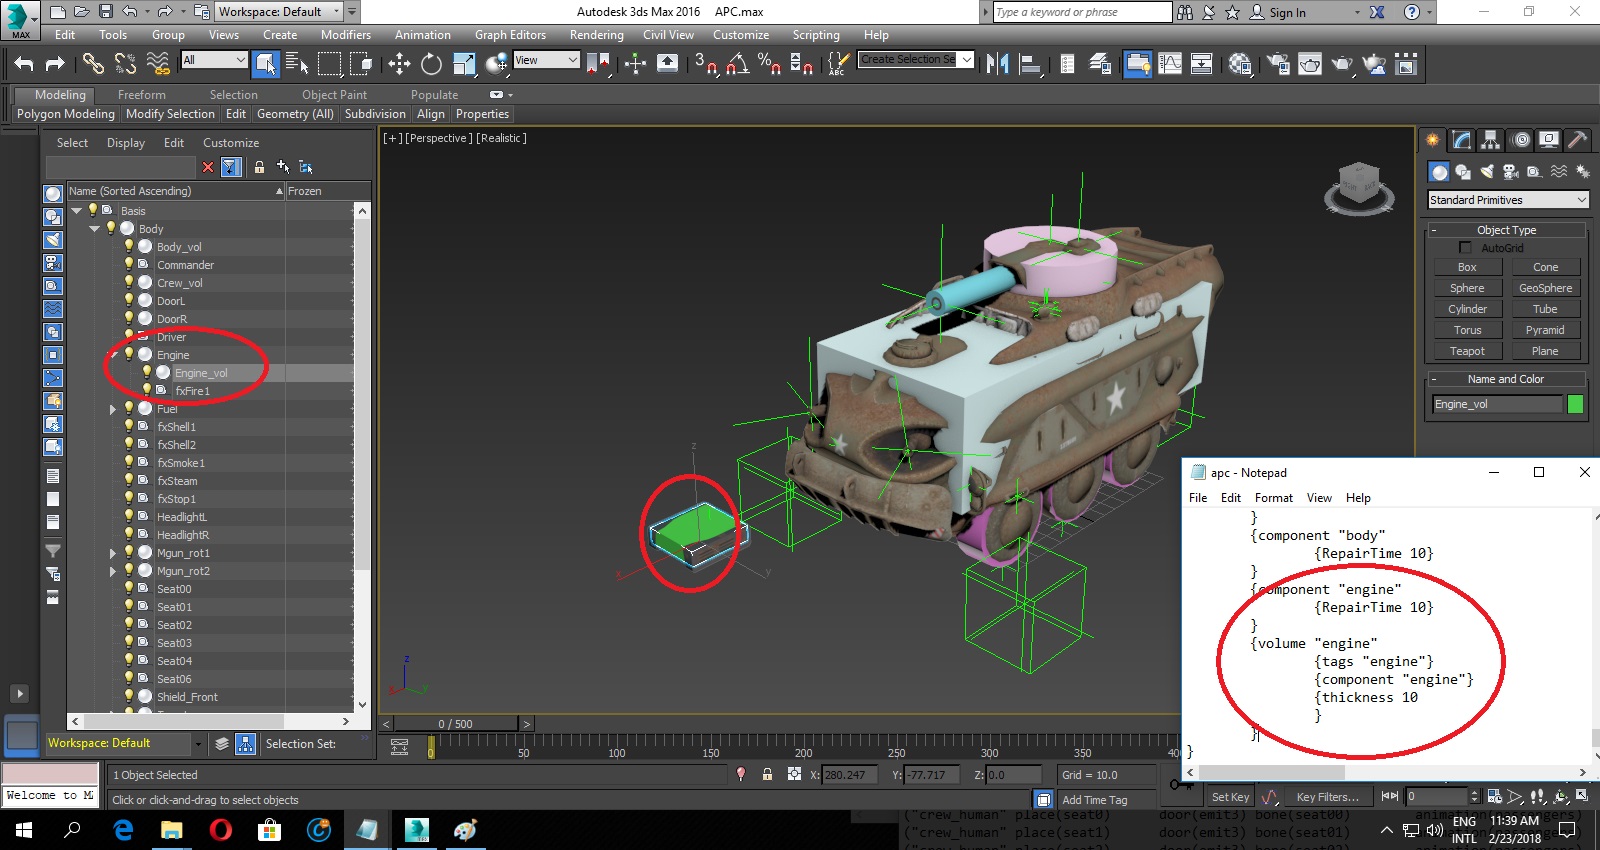
- Placing ENGINE and FUEL is important, as engine is the breaking point of vehicle, as more likely a heart, so set and animate it according to your requirements and yes again it require volume to be as hit point.
Step: Seven
- Now finally talk about REPAIR, Repair animations are related with the point at which your vehicle will got REPAIRED, it had nothing to do with the damage animation so set it in most likely engine start animation, as when your vehicle got repaired in game, it must fells like to stand up upon its feet again and you have to manually put that REPAIR animations as it can not be done with MULTI SCRIPT, and repair animation can place in OBJECT > PROPERTIES, while you can find repair animation argument in sample file objects properties.
- and I hoped you remembered the ANIMATION SET thing from BASIC
Step: Eight
- All vehicles in game have HUSK / DESTROYED models, so now we have to set it up, and for that you don't have to change any in game values, just place those DESTROYED models in X > X (Damaged Model) and XX (Destroyed Model) folder with entity names like if your entity had name PINKY, so name them in X folder as PINKY_X and PINKY_XX.
- Now start with model X, that DAMAGED Model, is packed with animation which will play to ENTITY OBJECTS which will get damaged, like if your turret got damage, it will PICK animation and texture from here so you can provide basic damage animation by reviewing provided sample file.
Important Notes:
-You must have to manually REPLACE "Poly" command line with "CommonMesh" in each object PROPERTIES > USER DEFINED or else 3d Max MODIFIERS will not effect on ANIMATIONS or VERTEX based animations will not play upon entity.
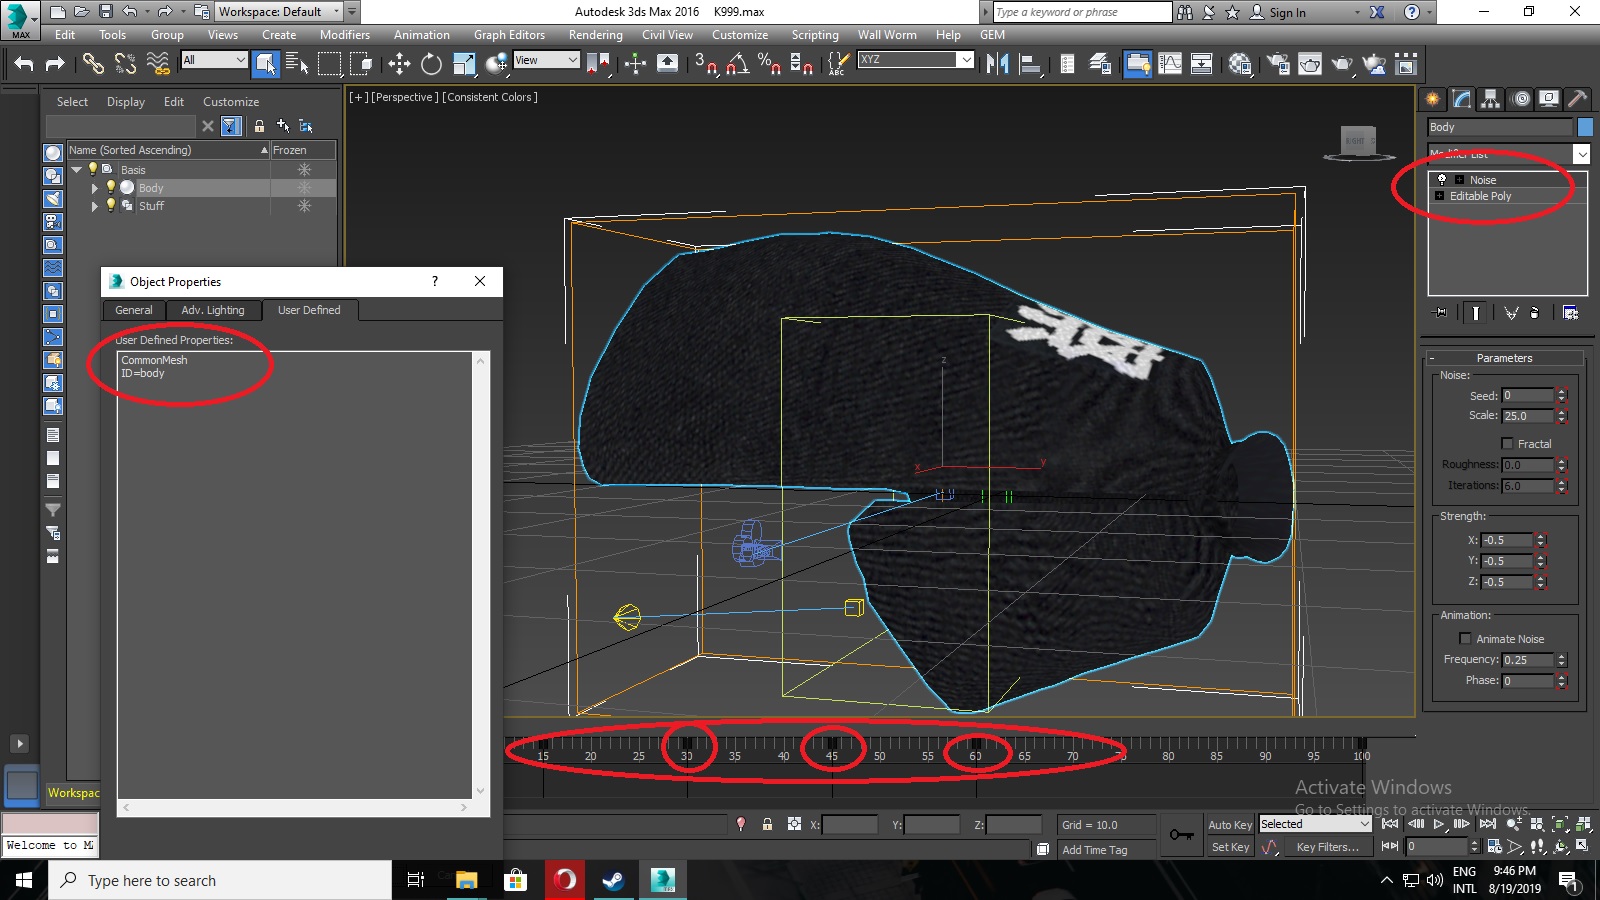
- Things which you got to remember that this entity ONLY contain BREAK animations, it don't contain any volumes or any other whatsoever details.
- Review and understand BREAK animation by provided sample file.
Step: Nine
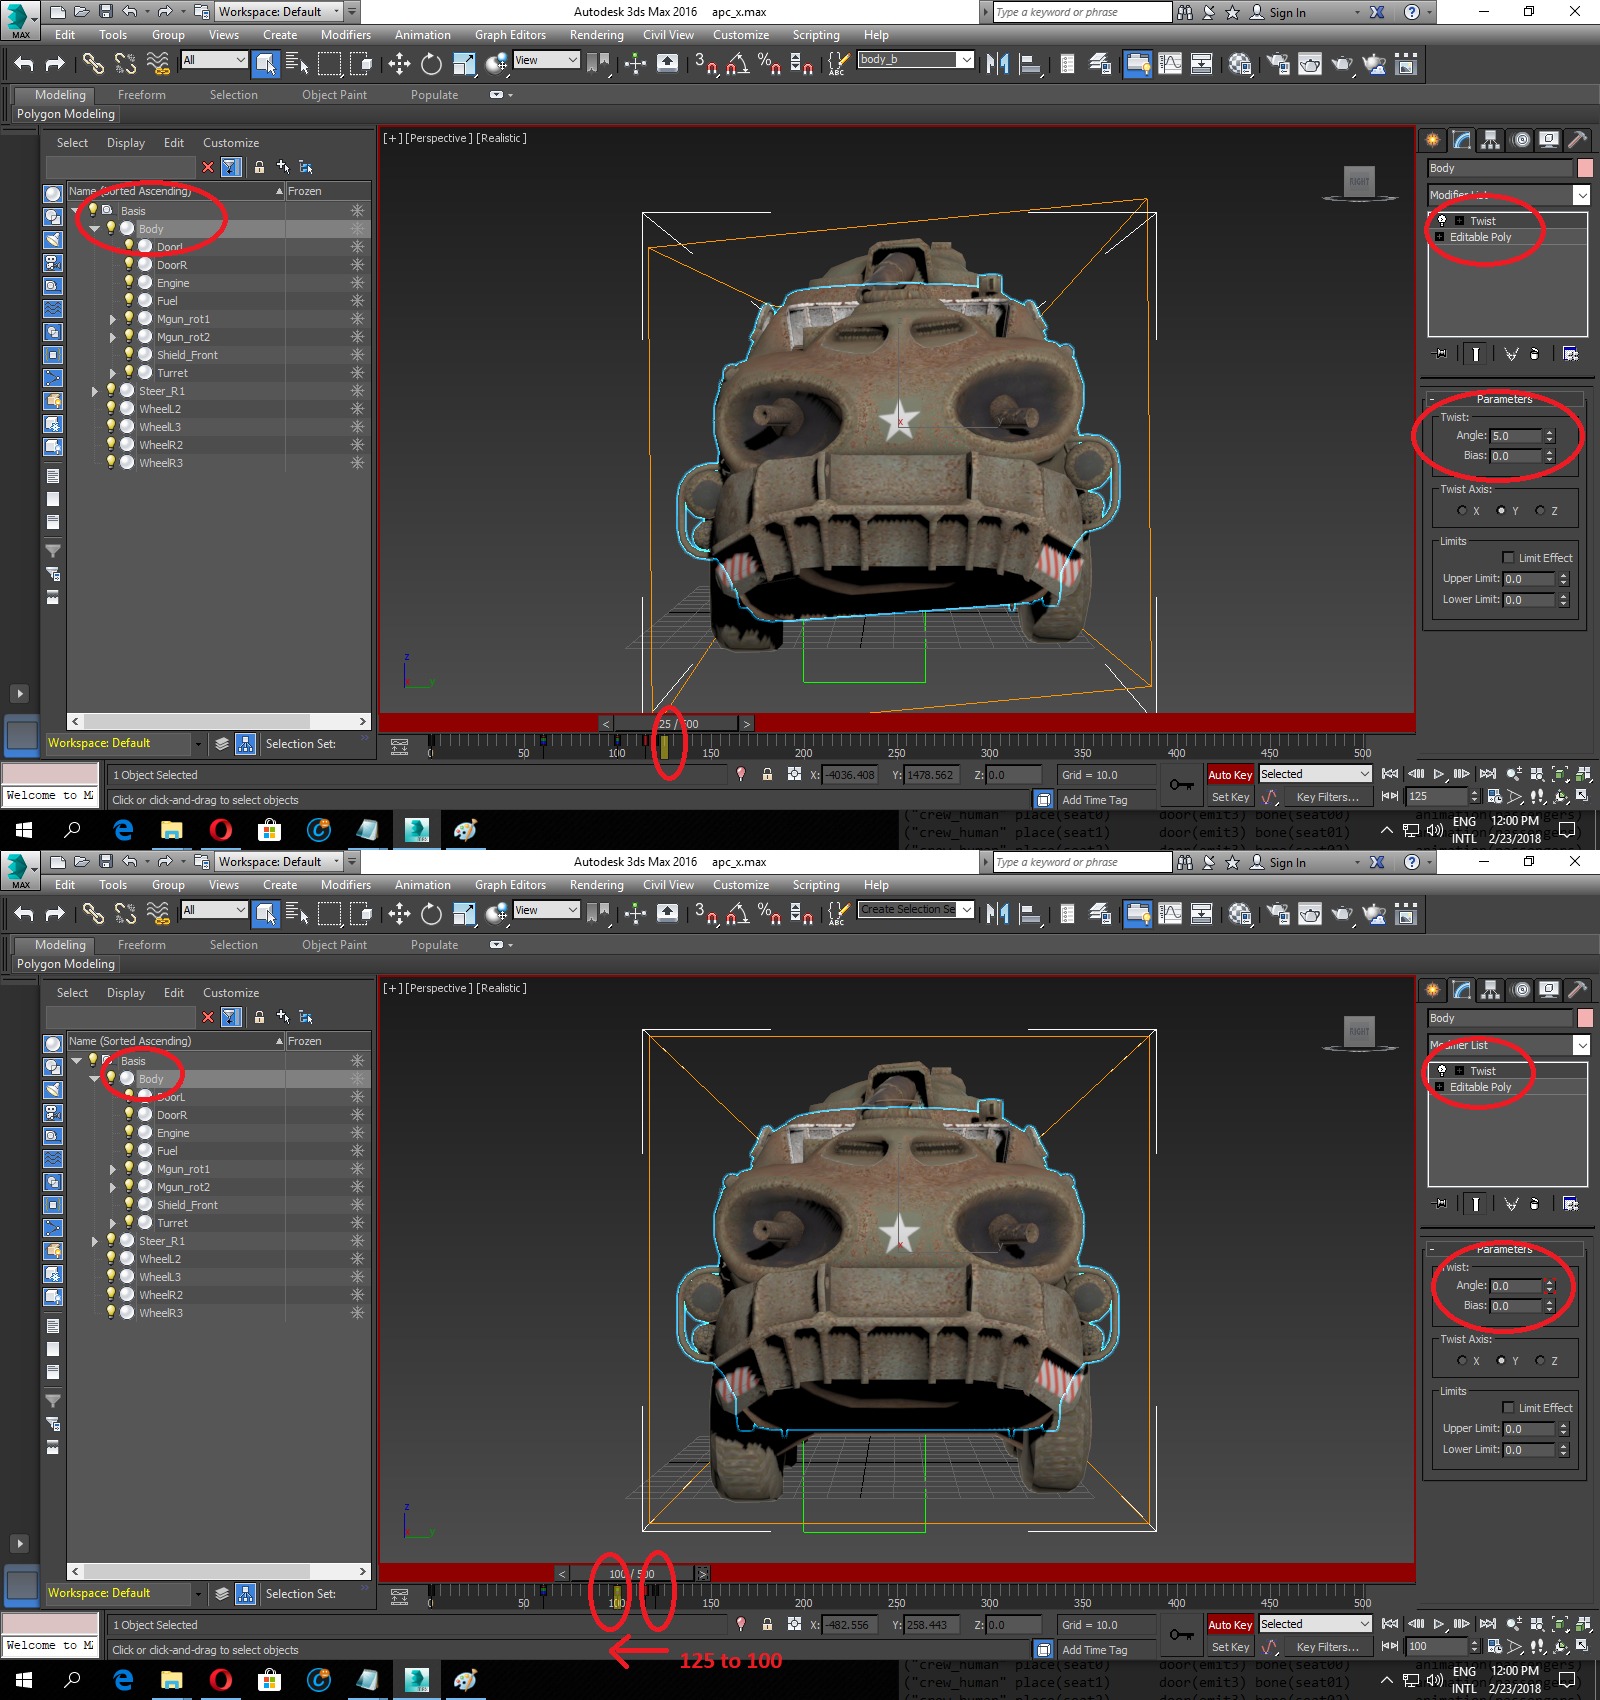
- Providing ANIMATION from rotation and placing is simple, but providing animation with other effects works in opposite way as in BASIC tutorial you applied animation with rotation and move tools between INTERVALS.
- Now to DISPLACE entire object and make it whole again you have to follow following picture and TWISTED at frame like 200 by AUTO KEY and then got back to frame 150 and revert it to its original form, other wise your object will consider to be TWISTED from FRAME 0, not by INTERVAL.
Step: Ten
- Now you can finally setup your ENTITY with this FINAL step, create XX model, its simpler than all, you just have to DELETE extra components which you don't need in final HUSK of your entity, like WHEELS, SHIELD etc.
- But this entity will contain VOLUME compare to X, as it will be used as cover after it become HUSK. so place and attach volumes of remaining parts and then you are good to go with your entity to test in game.

- The possibility of modding is endless in this game, as I covered some basic and advance, now by this example you can create your own MECH, by increasing the height of this vehicle, hide the wheels and place LEGS instead of wheels and move those LEGS by START and STOP animations.
So please comment and share this tutorial while all credit goes to Bethesda Softworks and KONAMI for sample models.
- You can also create STRUCTURE for vehicle by following tutorial:


Thank you very much.
Welcome ✌.
Thanks for this!
Good to know it helpful for you 🤗.
Can you help on how to make open hatch on vehicle before the vehicle start?