These tutorials were originally written by Timothee Besset and Jason Spencer. And were originally posted to QERadiant's website. They are mirrored here for archival purposes. QERadiant can be downloaded here.
Qeradiant Tutorials-
Tutorial 1 - Your First QERadiant Map
1. Creating the "New Project"
First thing you want to do is create a new project. So click on the menu item "File" and then select New Project. It will then bring up a prompt for you to name the new project. You can name it whatever you like. I chose "tutorial" as the name of this project.
After the new project is created it will load in a default map which will have a room and some entities and the likes in it and it will be called tutorial.map. Lets ignore this map for now and go on to making our own map.
2. Preparing Other Things
Next step to making your own map is to just click on "File" on the menu and then select new map. This will then bring up a prompt stating "All changes to map will be lost". Go ahead and click ok.
Now we need to do a couple more things before we start making our first map.
What we need to do now is click on "Texture's" on the menu. You should now have a pop down menu with a list of the available textures to use. Commonly you will see E1U1, E1U2,E1U3, and so on. Lets go ahead and click on E1U1 for now. These are the textures from Episode 1 Unit 1.
If you do not see a list like described as above then you need to check your preferences to make sure that the pak file support is on and the path to the pak file is correct. Also if you do not want to use the pak file then make sure the textures you want to use are extracted from the pak file and our located in your baseq2\textures directory e.i. c:\quake2\baseq2\textures\e1u1.
Now QERadiant will read the textures and then display them depending on the view you are using that you selected in the Preferences. If you selected the original QE4 or the new QERadiant view then the textures will be displayed with out having to use any toggle buttons. If you selected the 4 view mode then you will have to toggle the textures by hitting the "T" on your keyboard.
3. Select A Texture
Ok now that the textures are loaded we can actually start on our map now.
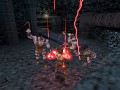
First look around in the textures for a texture you want to use. To scroll through the textures you need to hold down the "right" mouse button and move the mouse up and down. Once you have found a texture you want you need to "Left" click the mouse button on it so that a red outline has appeared around the texture you want. (See fig1_1)
4. Now we create a brush.
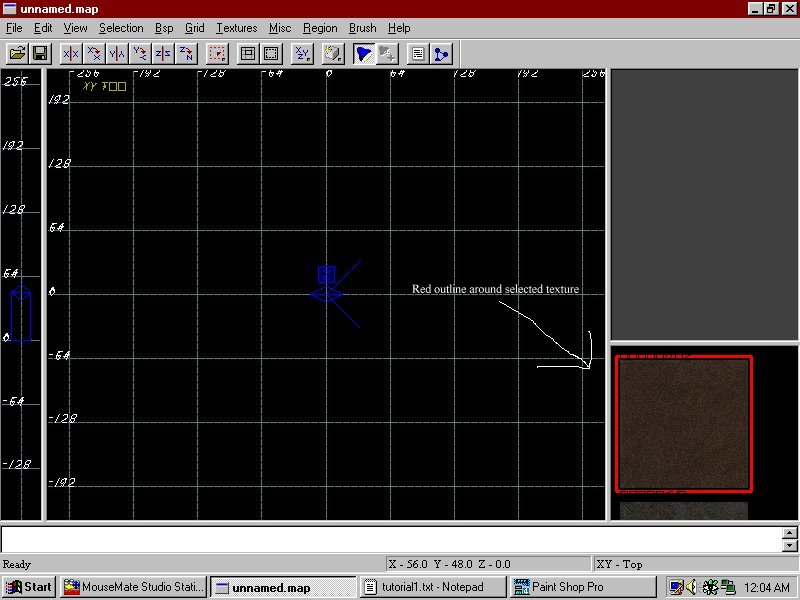
To do this go into a 2/d view preferably xy. Hold down the left mouse button and drag the mouse. You should see a red box appear (see fig1_2). That is the brush being drawn. Lets make the brush in the xy (top) view to be 256x256, and in the xz (side) view a 192 in height. If you need to adjust the zoom factor just hit the "insert" key to zoom out and the "delete" key to zoom in.
If you go into any view (xy, xz, or yz) and you want to move your view of the brush you can hold down the right mouse button in that view and move the mouse at the same time and that will move the view around so that you can center the object you are working with.
5. The Hollowing
We have now just finished creating a solid brush. Of course we cant move around in a solid brush so we need to make this brush hollow. QERadiant has a "hollow" feature which will turn a solid brush into multiple solid brush's so that it will be a hollow area where the player can move around in. This is also known as the player space.
So to make this brush solid you want to either click on "Selection" on the menu and scroll down to "CSG" and then select "Make Hollow", or you can click on the "Hollow" button on the toolbar which looks like this ![]() .
.
Once you have done one of those 2 options your single solid brush will now be turned into 6 solid brush's grouped together to form a hollow room which is now an area for the player to be able to play in. Also you will notice in the 3/d view you can see the room from the inside now.
6. The Player Start
Of course we cant play in a room with out a player start position.
What we need to do now is left click in the 2/d view to make sure that the 2/d area is the current active window. Also you want to deselect the new room we made so now you also have to hold down the ctrl+shift+left mouse button and release. Now the room is unselected.
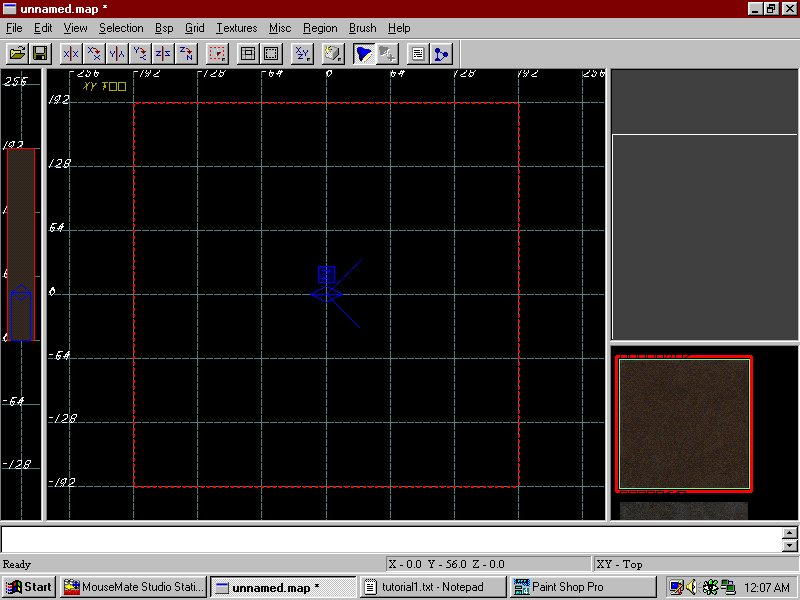
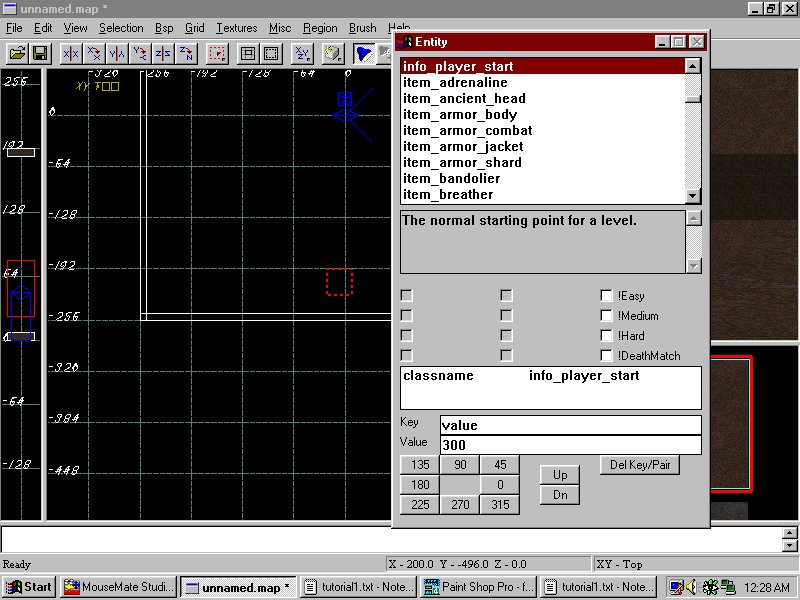
Now inside the 2/d view click the "right" mouse button. A little list should pop up. This list is a list of all the entities that you can use with out brush's and is known as the "Drop Entity" list (see fig1_3). So right now we just want a player start position, so move the mouse down the menu until you get to "Info" and another menu should pop up out of that with another small list of entities. Go ahead and click on the info_player_start.
This should have put a info_player_start entity into your map where you had your curser located at. If the entity did not show up in the spot you wanted it to then go ahead and click the "left" mouse button while holding down the "shift" key inside this new entity. Now the entity should be selected. Go ahead and release the "left" mouse button and the "shift" key. Now while holding down the "left" mouse button with the cursor inside the box area of the entity we just selected just move the curser around and the entity will follow it. Move the entity to where ever you like for now. Also be sure to go to the xz or the yz view of the map and make sure the player is above the floor a little bit.
Ok now we want to adjust where the player is facing. So with the player entity selected still hit the "n" key which will bring up the entity list and show the current information on the currently selected entity (see fig1_4). In this menu we want to change the current position of the player. To do this you can click on the direction in the bottom left corner of this menu which should have "135, 90, 45, 0, 315, 270, 225, and 180. I set it to "90" in this example, which has the player facing to the north of our current map we are making. Once you have selected the direction you want the player to face just hit the "n" key again to remove this window from the current view.
7. Putting in a Light
Ok. Now....I am sure we want a little bit of lighting in this room just for the fun of it. So deselect the info_player_start by hitting the "ESC" key.
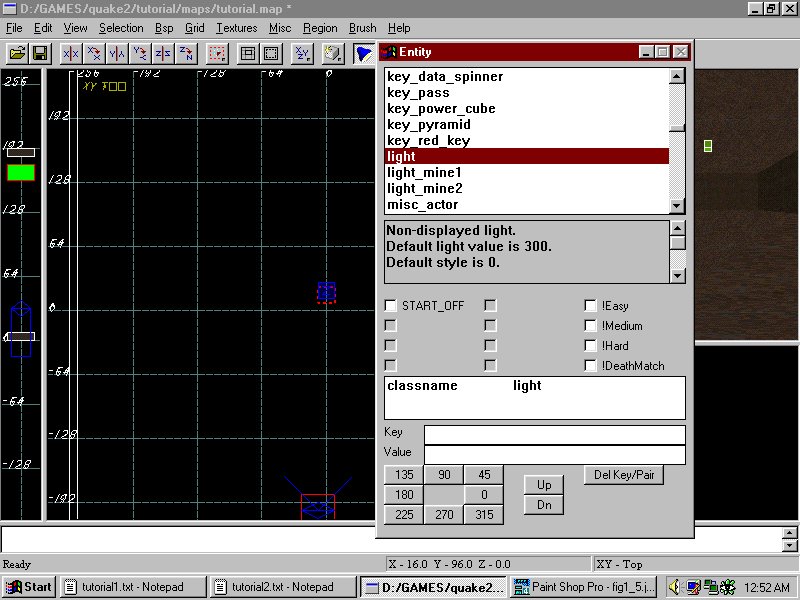
Now that nothing is currently selected go to the 2/d view and "right" click somewhere in the room we created to bring up the "drop entity" menu again. This time we want to select the first "light" in the menu. The one we want is the one that does not have an arrow to the right of it. It should just be "light" all by its self. So just click on that "light" and it should place a new entity in the map for us. This entity should be a green colored entity in the shape of a box. Go ahead and select the entity (shift+left mouse button inside the entity) and move it to the position you want. Do not forget to check the xz and yz views for its height above the floor and below the ceiling. I moved this light entity close to the ceiling and near the center of the room for this tutorial.
Now we probably want to adjust the brightness and of course the color of this light. Why? Just because we can hehe.
To adjust the brightness of this light we need to select the light and hit the "n" key to bring up the entity's information. In this information window we should see an edit box that says key and below that value (see fig1_6). In key we want to type in "light" and in value we want to put the light level in numbers such as 300. Then just hit enter and it will insert that information into the entity's properties. I put 300 for this light.
Go ahead and close that window now by hitting the "n" key again.
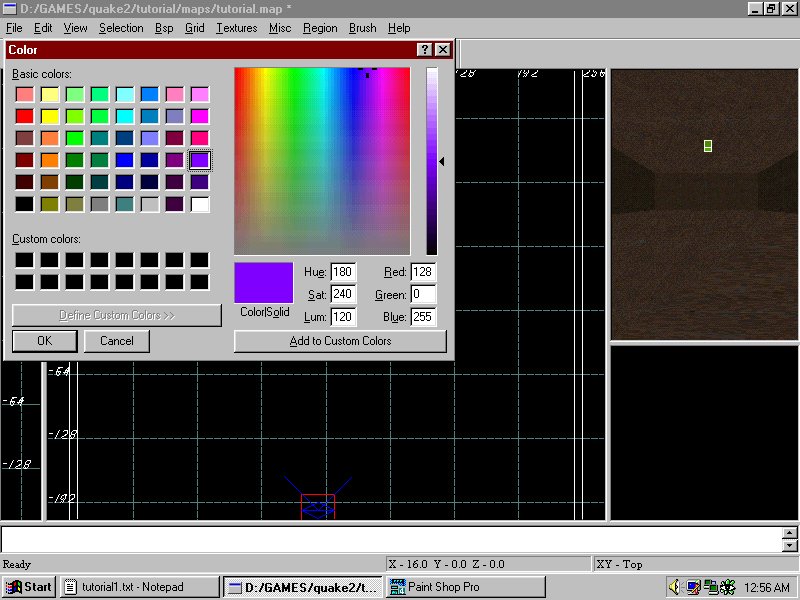
Now we want to give the light some color. This is the real easy part. All you have to do for this is select the light entity and hit the "k" key which will bring up the standard windows palette and color adjustment (see fig1_7). Just select a basic color from the one of the box's so its highlighted and click "ok" and then the information is automatically added to the entity's information. Keep in mind also that you can define your own custom colors as well if you choose to do so.
8. Playing Your First Map
Now we are all set to look at your first room with a colored light and a player start.
Ok so now click on "File" and then select "save as" and save the map as any name you like and save it in the tutorial/maps directory that was created by QERadiant when it made this project. Example dir would be: c:/quake2/tutorial/maps
So now to look at it all we need to do is compile the map. So click on "Bsp" on the menu. Go ahead and select the option that says "Bsp_FullVis (qrad -extra)". Now the level will compile. Once the level is done compiling if you selected to have the editor load your map after compiling in the preferences menu your map will automatically load. If this is not the case then you just need to drop to dos and load quake2 like this: quake2 +set game tutorial +map mymap where mymap is replaced with the name of what you saved this map as.