These tutorials were originally written by HellBringer. And were originally posted to QERadiant's website. They are mirrored here for archival purposes. QERadiant can be downloaded here.
Tutorial #4 - Elevators
Well, here we go again with another QERadiant tutorial!! I'm your host, HellBringer... I just got back from a nice Q2 LAN party - and I've got the necessary fatigue and caffeine/sugar levels to do this. :)
Today we'll be covering Elevators. Now, this is actually going to be a part of a double-tutorial. You see, there are 3 types of vertically-moving objects. Platforms (func_plat was covered in Tutorial 3), Elevators (using the trigger_elevator entity), and Doors that act as elevators (using the func_door entity). This tutorial will make the last of those three. NOTE: this tutorial builds upon Tutorial #3! Please complete that tutorial first; or at least download the map! Also, this assumes you are using the "default" windowing scheme with a large top-down (XY) view and the Z-axis off to one side. This whole elevators thing is getting pretty complex; but that's just because of the sheer number of options that the ID software team gave us... I promise to wrap it all up in my next tutorial by covering the "trigger_elevator" - but I warn you that it is an advanced subject!!
Doors as elevators.
This was pioneered in the days of Quake1; and as far as I know, its still applicable. The basic idea is to create a door (see tutorial #2 and "func_door" entities) out of a thin / platform-shaped brush; and have it "open" upwards when triggered. Normally, a door triggers when a player touches it. Thus, if a player walks on top of our "door" - it will raise up just like a platform (in this instance, a func_plat still works better). BUT, this opens up the possibility for buttons as triggers; and all the other tricks you can do with a door. What we are going to do with this today is make a brush that moves between two "floors" by pushing buttons.
BONUS: You get to learn the basics of using the "func_button" entity!!
REMEMBER: A key is a variable you type into the "key" box in the entity window - and must also have a numeric "value" typed into the value box!
To start, open up the map you created with Tutorial #3 (the "func_plat" tutorial). Save it as a new name (i.e. tutorial4)!! I assume by now you've gone through three tutorials and are familiar with the basics of how to get around in QERadiant; so I will be a bit more brief this time. First, we need to get rid of the "func_plat" entity - but we can still use the brush. So, press shift left-click on the "func_plat" to select it. Then go to "Selection | Ungroup entity" on the menu bar. This should turn the "func_plat" into a normal solid brush.
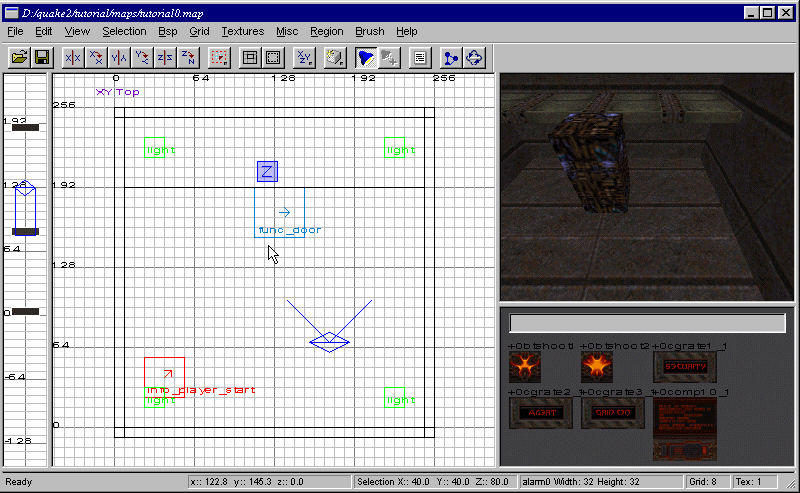
Next, we'll make this brush a moving "func_door" entity. To do this, make sure the brush is still selected (it should be), and right-click the mouse on it. When the pop-up menu appears, choose "func" and then "func_door". You should now see the brush labeled "func_door" in the top (XY) view.
We need to edit the properties of this door so that it moves correctly. The "func_door" works opposite the "func_plat" in that the "func_door" entity starts at its "lowered" or "closed" position when drawn - while the "func_plat" starts at its "raised" position when drawn. This is important to keep in mind!! Since our brush currently is tall, we want it to "open" (move) downward. So, type "N" to bring up the entity window. In the angle selection area (bottom left corner), choose "Dn" (down). Now, this will move the "func_door" down to the "first-floor" brush when activated; but if you were to compile this right now - it wouldn't work quite right. The reason for this is as follows: a "func_door" entity defaults to activating by touch (just like a "func_plat") - so if you were to go into Q2 and run up to your "func_door" elevator, it would lower down - but then just sit there. You see, by standing on top of it, you are constantly touching it; and therefore you are constantly triggering the door to lower! To avoid this, we can do two things. First off, try selecting the "start_open" flag in the entity window. This "reverses" the behavior of the "func_door". Instead of "opening" downward, this will start low and "close" (move upward) when triggered. Go ahead and try it out!
Hit "N" to close the entity window. Choose "Bsp | Bsp_FullVis (qrad -extra)" from the menu bar (if you have chosen not to run Q2 automatically, you will need to start Q2 with your map. See earlier tutorials for how to do this). Watch and try out your new level. Notice how the door still stays "triggered" when you are touching it! By the way, did you notice how it activates BEFORE you actually touch it?? The guys at ID didn't want doors slowing you down, so they activate when you get within a small distance to them. But we can change this totally. :)
Back in QERadiant, we're going to link this door with buttons ("func_button" entities). When a "func_door" is targeted by a button or other object, it no longer activates when you touch it. So, we're going to start by making one button. Let's start by making a wall to mount the button into. This isn't necessary; but makes things look nice...
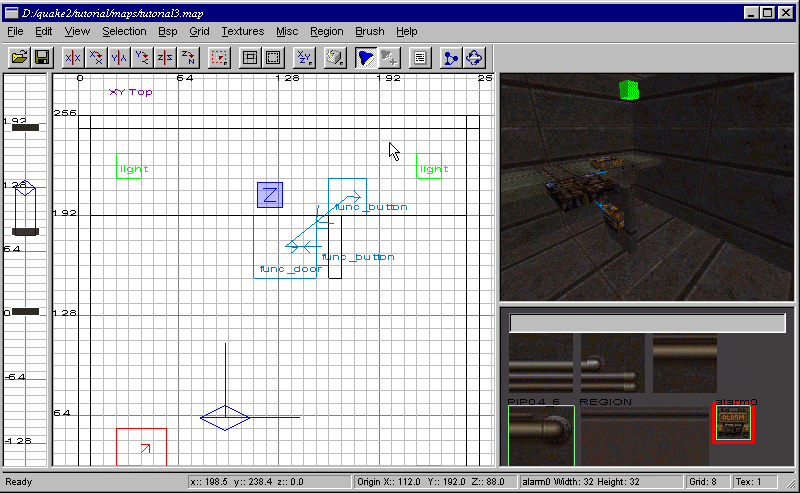
Create a brush (still on a grid setting of 8 units) that is 1 grid square wide (left to right in the XY "top" view), and as long (up and down on the screen in the XY "top" view) as the "func_door". Make it as high as the space between top of the "first-floor" brush and the bottom of the "second-floor" brush. Remember to use the Z-checker if needed. Move this brush so that it sits to the "east" (to the right in the XY "top" view) of the "func_door" by one grid-square (that is, one empty grid-square between the edge of the "func_door" and the edge of the new brush).

Now we'll make our button. Make another brush that is 8 units (one grid-square) "wide" (again, right or left in the XY view), 24 units "long" (up or down in the XY view), and 24 units "high" (Z-axis). Move this brush so that it sits in between the "func_door" and wall-brush you created a moment ago (that's why we left the one-grid-square gap!). Also, don't forget to check the Z-axis!! A normal player is 64 units tall... so make the brush close enough to the ground for the player to be able to get to it. I positioned the button-brush so that the bottom of it was at the Z-axis coordinate 32. Let's make this brush a "func_button", shall we? Make sure it is the only thing selected (Shift-Ctrl left-button-click in the XY view, then Shift left-button- click on the brush in any view that you can see the brush in. Probably easiest to select it in the 3D window). Right-button-click on it to bring up the pop-up entity menu. Choose "func" and then "func_button". Go to our handy little entity window by pressing the "N" key - we need to set the angle that the button will move. To do this, we choose the appropriate "angle" setting in the bottom left corner. If you've made the level correctly so far, the button should get an angle of "0": This is "towards" the "small wall" brush that the button is next to. Close the entity window.
Now its time to "link" the button to the "func_door" - in other editors this involves making sure the "target" (on the button) and "targetname" (on the "func_door") keys and values were the same (In the entity window: "target" or "targetname" is put in the key box, and a name would be typed into the value box. This can still be done manually if the following method doesn't work). In QERadiant, we can use the "connect entities" feature! This greatly simplifies things - and actually draws out the connections for us! To link the button with the "func_door" entity, make sure the button is still selected. The first selected object is always the "trigger" or activator; while the second object selected is always the target. So, select the "func_door" by shift left-button-clicking on it. Now both entities should be selected - and in the proper order (nothing appears to tell you the order, its up to you to remember which ones you selected first). Press Ctrl-K (or "Selection | Connect entities" from the menu bar), and you should see the screen change. Its hard to see since the entities are so small; but there should now be a colored arrow pointing from the button to the "func_door" (There will actually be two arrows, a small one indicating the direction that the "func_door" moves, and a much larger one showing the connection between the button and the "func_door"). Before we run with this, let's make sure we can tell what our button is. To do this, we can change the texture on the surface of the button.
Deselect everything, and then select only your button. Go up to the menu bar and select "Textures | e1u1". When the program gets done loading the textures for that level, go over to the texture window and scroll down (hold the right mouse button and move the mouse up or down) until you find a texture you like. Left-clicking on the texture should change the surface of your button automatically. Try running this map (Choose "Bsp | Bsp_FullVis (qrad -extra)" from the menu bar). Notice how everything behaves. When we continue, we'll be adding a second button and changing a few things around. This might be a good time to take a break and relax. Let the info. you've learned soak in for a while. There's a LOT to this whole elevator stuff...
Back with me?? Okay, great! Hope you're ready to continue; 'cause there's a lot more we can do.
Side Note: Did you notice how your door automatically goes back down after a time, and how the button resets after a certain amount of time?? We can adjust the amount of time before something resets with the "wait" key. Typing this into the key box in the entity window, and specifying a number in the value box changes the number of seconds before an entity can be triggered again.
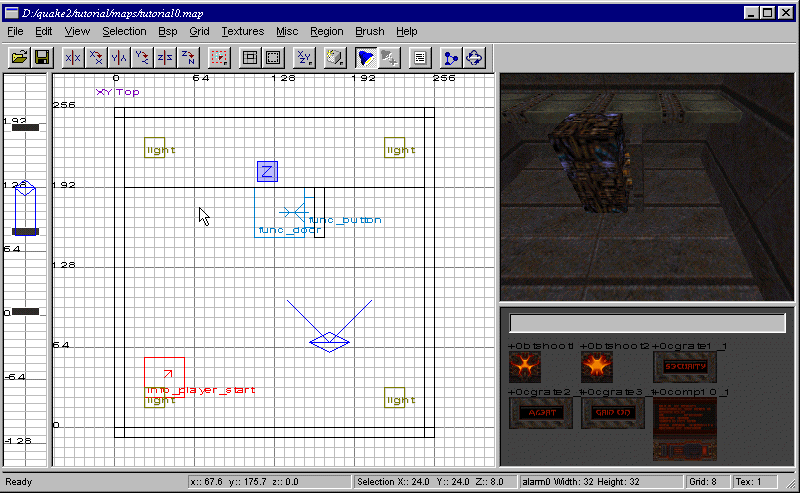
On to a new experiment: adding another button. Unfortunately, QERadiant won't allow us to copy entities yet - so we'll have to make another button manually. Make a brush with the following dimensions (hint: look at the status bar at the bottom of the screen) - X:24 Y:24 Z:8
Move the brush so that it rests on top of the "second-floor" brush (on top of Z-coordinate 88 in my example map). Position it in the XY window so that it is on the "second-floor brush" and close to where the "func_door" raises up to - but NOT IN FRONT OF IT (where the player steps off the "func_door" and onto the "second-floor"). It should have been created with the last texture you selected - so it should be the same texture as your first button (this is for looks only). Make it into another button by selecting it and using the right-mouse-button. Again choose "func" and "func_button". Use the "N" key to bring up the entity window; and choose an angle of "Dn". Close the entity window and select the "func_door" again. You should now have two things selected - the button first and the "func_door" second. We can again connect the entities using the Ctrl-K function.
Side Note: More than one entity can target the same object.
Now, we're almost ready to try this - except for one thing. Each time we trigger the "func_door", it always moves back and resets itself after a while! We can change this, however. Deselect everything and then re-select the "func_door". Use the "N" key to bring up the entity window and look at the flags. There should be one called "toggle". What this does is makes the door "open" when it is triggered the first time, "close" the second time it is triggered, and so on... Check this flag. Now close the entity window and re- compile your map to try it out! (Choose "Bsp | Bsp_FullVis (qrad -extra)" from the menu bar). Notice again how behaviors change. Its a little tricky with the button being mounted in the floor - it would work better if there was another wall to mount it on (above the "func_door" though, so it isn't covered up when the "func_door" moves up) - but this is simply for demonstration purposes.
The last part we are going to cover is the "func_door" equivalent to the "height" key. The "height" key is used on the "func_plat" entity, and can be used to change how far the "func_plat" moves. Unfortunately, the "func_door" does not have this key. Both entities do have a key called "lip", though. The "lip" value is a number that is subtracted from the movement amount of a button, platform, or door. This allows for that "little bit left sticking out" effect (the equation is: [brush height] - [lip value] = movement amount). Normally Q2 automatically sets a certain lip amount; but we can change this with the "lip" key. And not only can we change the "lip" amount, but we can change it both positively and negatively - and in large numbers if necessary. Let's get back to editing, and I'll explain as we go. This is sort of an abstract idea, so its gonna take some thinking. Go slowly!
Select ONLY the "func_door". In the Z-axis, stretch/shrink the "func_door" so that it is thin (1 grid square high). Move it up in the Z-axis so that it is level with the "second-floor" brush. Now, remember that a "func_door" only normally moves as far as it is high - so in this case it is only going to lower/raise 8 units. This is hardly enough to bring it down to the first floor!! (You can compile and check this out if you want) We can alter this, however, by using the "lip" key. First, look at how far it is from the top of the "first-floor" brush to the bottom of the "func_door". This is the distance we need to change by. Remember those algebra classes?? Here's the REAL WORLD application for them (*grin*).
The equation is: [brush height] - [lip value] = [total movement]
By reversing this, we get: [brush height] - [total movement] = [lip value]
So, in our case we start at the floor with a Z-coordinate of "8" and end at the Z-coordinate of "80" (the bottom of the "func_door"). The difference between them is our [total movement] value. In this case, its "72". Plugging this into our equation, we get:
[brush height] - 72 = [lip value]
We know our brush is 8 units tall, so:
8 - 72 = [lip value]
So:
-64 = [lip value]
Now that we know the value, let's open the entity window (make sure that just the "func_door" is selected). In the key box, type "lip" (without the quotes). In the value box, type "-64" (again, without the quotes). Press [enter] and you should see the key/value pair get added to the list in the middle of the entity window. Now close the entity window and re-compile your map. Experiment in the game and see how this works. It should function just the same as before; but the "func_door" brush now is thin.
Extra credit: Try changing the lip amount and see how it affects the movement of the "func_door".
Extra credit 2: Try making a "speed" key for the "func_door" or "func_button"s and see how that affects their movement!
There's lots more you can do with this - keep in mind that a "func_door" moves between two points (along an "angle" key); it doesn't have to be up and down - it could be side to side (changing the "angle" key)! Versatility is the name of the game; just make sure you understand how each entity works, and then tinker with changing that behavior. Good luck, and as always - contact me via email if you have any questions or comments!