Tutorials originally written by Timegate studios. Mirrored here for archival purposes.
FEAR - Destruction - General overview
Introduction
This document covers the basics of the dynamic content, and also spills out some more advanced suggestions about how some things should be done to keep your scripts and all the complex parts maintainable.
NOTE: This document, and indeed all of the documents in the “Destruction” series, assumes that the reader is already familiar with the basic concepts of Worldmodels, Physics, Impulses, Triggers, CommandObjects and Scripting.
THREE BASIC PARTS
The basis of all destructible objects is the worldmodel(s) that comprise the chunks, blocks or debris of the actual destruction. The impulses are the objects that send out physics impulses to debris worldmodels to simulate the pieces getting blown out and about. And the scripting is what controls the whole show and binds everything together.
- WorldModels
- Impulses
- Scripting
The Objects Involved and Their Purposes
Triggers & CommandObjects
These are the objects that act as the controllers for the destruction events. They will contain all of the scripting that set all the events in motion. Either of the entities can be used or a combination of both, depending on how complicated your destruction event is. The CommandObject is usually best suited for this as it is a multi-track command manager that allows for the manipulation and execution of multiple commands on a timeline. Triggers can be used as well. But using a trigger introduces new complications because simulating a timeline would have to be done with many delay commands. Since CommandObjects offer a modifiable timeline, they are better suited for the purpose.
WorldModels
WorldModels are used to specify dynamic geometry in the world that may be keyframed, have physics properties, be destroyed or interact in other ways with the player or other objects in the world. In this case we will use WorldModels to be the actual debris of the breakable items.
DAMAGE PROPERTIES
All WorldModels can handle damage. Each one has a subset property labeled DamageProperties. There are several different values and flags that can all be edited to define how the WorldModel behaves when damaged. Here is a list of the properties that that we will focus on for destructible items:
- HitPoints. Number of hit points the WorldModel has when created.
- Armor. Amount of armor that the WorldModel has when it is created.
- DamagePercentForCommand. When HitPoints are below DamagePercentForCommand percent of the default HitPoints this command will be processed. (Value should be between 0 and 1).
- DamageTriggerCounter. This specifies how many times the object must be damaged before the damage message will be sent.
- DamageCommand. This is the command string that is sent when the object receives damage from any source.
- DamageTriggerNumSends. This specifies how many times the damage message will be sent.
- DeathCommand. This is the command string that is sent when the object has been destroyed.
- DamagePercentCommand. When HitPoints is below DamagePercentForCommand * MaxHitPoints this command will be processed.
- CanDamage. Toggles whether the object can be damaged.
- DamageMask. A DamageMask is a list of damage types that are allowed to damage an object they are applied to. Choose “none” to allow ALL damage affect this object. Each DamageMask is specified in the database.
Physics Shapes
All worldmodels that go physical have to have a physics shape defined. You have several options for this and your choice will depend on how complicated your destruction event is. There are 4 different physics shapes and 2 of those are available directly from the worldmodel itself. The other 2 physics shapes are separate entities that are added to the worldmodel as a child.
- BoxPhysics. This is most basic physics shape and is also the least costly in terms of processing overhead. BoxPhysics can be set in the options of the worldmodel itself with a True or False button. The engine will simply surround the worldmodel with a square bounding physics box at run-time. Box Physics should be used when you have a mostly square item or when you simply have to save performance in an area. Obviously Box Physics would not be ideal for any items that are complex or comprised of curved shapes.
- Hull. This is the most accurate, but also the most expensive physics shape. Choosing Hull as the worldmodel’s physics shape will create a physics bounding box that conforms exactly to the worldmodel’s child BSP brush. Again, this will increase the overhead for physics calculations, so use it wisely. The Hull physics shape can be selected through the worldmodel’s PhysicsShape drop-down list.
- PhysicsShapeOBB. This physics shape is somewhere between BoxPhysics and Hull in terms of overhead and accuracy. It is a separate object or entity that is added as a child of the worldmodel. A worldmodel can have many PhysicsShapeOBB’s, as many as you need to define the collision shape of your object. If you choose to go with a PhysicsShapeOBB you should set the following setting in the worldmodel’s properties – BoxPhysics: FALSE. PhysicsShape: None. And the weight and mass of the worldmodel when using a PhysicsShapeOBB is set through the PhysicsShapeOBBs themselves, rather than the worldmodel, and is equal to the total of all the combined PhysicsShapeCapsules and PhysicsShapeOBB’s that are children of the worlmodel.
- PhysicsShapeCapsule. Similar to the PhysicsShapeOBB, the PhysicsShapeCapsule is a separate object that is added as a child of the worldmodel and whose weight and mass settings control the weight and mass for its parent worldmodel. You will use PhysicShapeCapsules when you have a round object that you want to roll when physical. For objects like barrels which have flat ends on which they stand, you’ll need to use a combination of a PhysicsShapeCapsule in the middle and PhysicsShapeOBBs on the ends. Without PhysicsShapeOBBs as end caps, a worldmodel with only a PhysicsShapeCapsule would roll over. As with the PhysicsShapeOBB, you should set the following setting in the worldmodel’s properties – BoxPhysics: FALSE. PhysicsShape: None. And the weight and mass of the worldmodel when using a PhysicsShapeCapsule is equal to the total of all the combined PhysicsShapeCapsules and PhysicsShapeOBB’s that are children of the worlmodel.
Physics Impulses
Physics impulses are objects that can move physics objects around in the world. There are literally millions of possible uses for a physics impulse. In this case we will be concentrating on how they can be used for destruction events. There are two different types of physics impulses.
- Physics Impulse Radial. The PhysicsImpulseRadial object should be used to apply a physical force in a sphere around the position of the object. All physically simulated objects within RadiusMin distance from the PhysicsImpulseRadial object will have ImpulseForce amount of force applied to them in the direction determined by the vector from the center of the PhysicsImpulseRadial object to the center of the physically simulated object. The force applied to physically simulated objects outside of RadiusMin but inside RadiusMax is linearly scaled between ImpulseForce and 0 between RadiusMin and RadiusMax. The force value is measured in game unit newton seconds.
- PhysicsImpulseDirectional. The PhysicsImpulseDirectional object should be used to apply a physical force the physically simulated objects specified. These objects will receive ImpulseForce amount of force applied in the direction specified by the forward vector of this PhysicsImpulseDirectional object. The force value is measured in game unit newton seconds.
SoundFX
The sounds for your destruction event.
SpecialFX
The particle effects for your destruction event.
FEAR - DESTRUCTION - EXPLOSIVE OXYGEN TANK
We’re going to create an explosive oxygen tank that when damaged, will spit out a pillar of fire that will propel it around a room, banging into objects in its way and eventually exploding into flames and smoke.
This tutorial assumes the reader is already familiar with placing objects in the editor, scripting, physical items and the basics involved in destructive events (covered in “FEAR - Destruction - General Overview.doc”).
Creating the tank
First we need some sort of a room to work in, and then the metal tank itself needs to be created. Luckily for you a good tank prefab has already been constructed and can be found in the prefabs folder in Industrial/Interactive/Hydrogen-tank01. So, make a basic room, light and sector it and then place down that tank prefab.
The first thing we want to do is to turn the tank prefab into a WorldModel.
- You can do this by centering your marker somewhere in the center of the tank prefab and adding a WorldModel (Right click – Add - Object – WorldModel). Once you’ve placed the WorldModel, name it something unique like oxy-tank.
- Now, make the tank prefab a Child of the oxy-tank WorldModel. You can do this by selecting the tank prefab, then Right clicking on the oxy-tank WorldModel and choosing “Move Tagged Nodes Here” from the context menu. This will move the tank prefab under the WorldModel, making it a child of the WorldModel.
- Now, select JUST the tank WorldModel (Left click while holding Shift) to bring up its properties. Set the following properties:
- CollisionProperties: AcetaleneTank
- CollisionProperties controls how a physical item reacts when it runs into or hits another object in the world. It controls the sound it makes on collision and the particle effect that it shoots out (sparks, blood etc).
- BoxPhysics: False
- IsKeyframed: False
- RigidBody: True
- PhysicsShape: None
Adding the Physics Collision Shapes
- Right click the WorldModel, “oxy-tank” and choose “Set Active Parent.” This will make it so every new item you place now will be a child of the “oxy-tank” WorldModel.
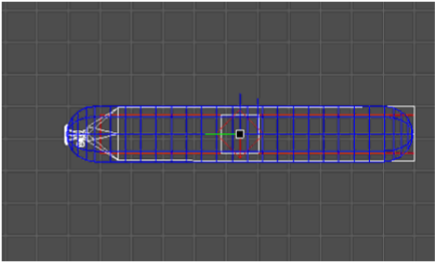
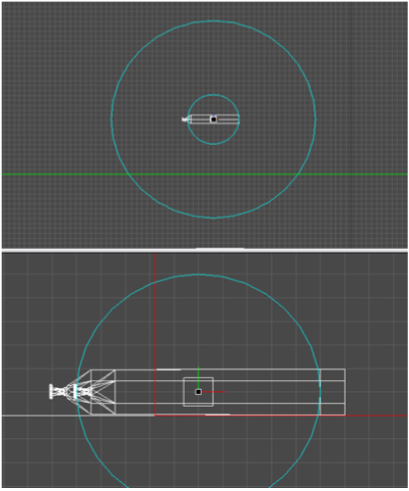
- Now place a PhysicsShapeOBB and size it to be the same length as the tank itself (excluding the valve on the top), and make it quite a bit thinner than the circumference of the tank. You can check out the photo directly below to get an idea of the proper sizes. The PhysicsShapeOBB is the red rectangle in the middle of the tank.
- Next a PhysicsShapeCapsule is needed. Place one down and size it to cover just the tank and the valve as close as possibly. Size the radius of the PhysicsShapeCapsule to match the radius of the tank. This will make the tank roll when on its side. The PhysicsShapeOBB was placed to act as the end caps for the tank to stand on if the tank was placed standing up, so the OBB should extend just a little past the Capsule. Here is a reference picture (the white lines being the brushes which make up the tank, the red being the OBB and the blue being the Capsule).
- Set the MassKg of the OBB to 10 and set the Capsule to 10 as well. The DensityG controls how easily a physical object will pass through other physics objects and let other objects pass through itself. This is mainly for Water Bodies (which are physics objects themselves), but in my experience it DOES affect all physical items as well. The default of 1.1 is good enough for the oxygen tanks.
Place the SoundFX
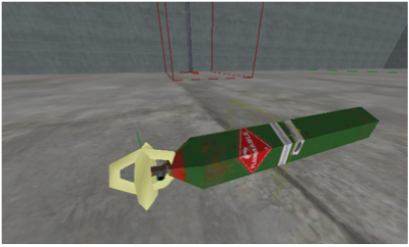
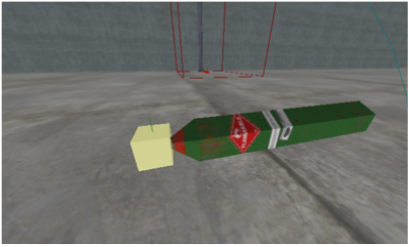
- Now we need to add the SoundFX objects that will play the sounds of the tank spewing flames and when it explodes. We will place a total of 3 SoundFX objects. The actual placement of the SoundFX objects is not overly important, but obviously you’ll want to place them as close to the tank as possible. Here is a picture of with example placements.
- So, place the SoundFX objects and name these new SoundFX SND00, SND01 and SND02.
For SND00, set the following:
- StartOn: False
- Sound: Snd\Events\BET_pipe_explosion_camera.wav
- OuterRadius: 16000
- InnerRadius: 8000
- Volume: 500
- Ambient: True
- Loop: False
- MixChannel: 1
- UseOcclusion: None
For SND01, set the following:
- StartOn: False
- Sound: guns\Snd\Impacts\explosions\extinguisher_02.WAV
- OuterRadius: 20000
- InnerRadius: 16000
- Volume: 500
- Ambient: True
- Loop: False
- MixChannel: 1
- UseOcclusion: None
For SND02, set the following:
- StartOn: False
- Sound: guns\Snd\Impacts\explosions\explode_02.WAV
- OuterRadius: 20000
- InnerRadius: 16000
- Volume: 500
- Ambient: True
- Loop: False
- MixChannel: 1
- UseOcclusion: None
Place the Particle Effects
Next we have to place down the SpecialFX objects that will visually represent the smoke and fire. The first one we will place will be the smoke that trails behind the tank as it whips around. For SpecialFX it makes a difference WHERE you place them and what DIRECTION you make them face.
So, place the 1st SpecialFX at the position of the valve on the top of the tank and name it SpEFX00.
Then set its Rotation to (0, 0, 0) and set its TargetObject to the name of your tank WorldModel, in this case, “oxy-tank”. Set the following flags:
- FxName: Smoke_DebrisTrail_Big
- Loop: True
- StartOn: False
Place the 2nd SpecialFX object at the valve as well, and name it SpEFX01.
For the Rotation, set the YAW to 270. You want the blue line facing AWAY from the tank body, as this will simulate the flames spewing out of the valve.
Then, set the following flags:
- FxName: Fire_Gas_30cm
- Loop: True
- StartOn: False
- TargetObject: oxy-tank
Place the 3rd SpecialFX object (it’s placing is not overly important as long as it is close to the tank, I placed mine right in front of the first two FX I had placed) and name it SpEFX02.
The Rotation for this FX does not matter. This FX will be the extra “view shake” when the tank finally explodes. Now, set the following flags:
- FxName: Shake_Mild_1s
- Loop: False
- StartOn: False
Place the 4th and last SpecialFX object (it’s placing is not overly important as long as it is close to the tank). Name it SpEFX03. This FX will serve as the explosion’s visuals (blast, smoke, etc). This FX also contains an explosion sound. Set the following flags:
- FxName: Impact_Nade
- Loop: False
- StartOn: False
Place the Explosion Object
Now place an Explosion object that will actually do damage to the surrounding area when the tank explodes.
Place the Explosion object square in the middle of the tank and name it, Explosion.
Set the following flags on the Explosion object:
- ImpactFXName: AcidGas
- DamageType: Explode
- DamageRadiusMin: 50
- DamageRadius: 200
- MaxDamage: 300
- RemoveWhenDone: True
- ImpusleForce: 12000
Place the Impulse
The Impulse is the object that will serve as the motor that drives and propels the tank forward once it has been damaged. We are going to be using a PhysicsImpulseRadial. A PhysicsImpulseRadial will affect ALL “rigid-body” physics items within its radius. You could use a PhysicsImpulseDirectional instead of a PhysicsImpulseRadial, but using the radial allows the tank to kick around other small items that it passes directly over. MUCH cooler!
Place the PhysicsImpulseRadial right in the middle of the valve of the tank. Direction of the rotation does not matter as a PhysicsImpulseRadial sends its pulse out equally in all directions. Name it PIRadial.
Set its flags:
- ImpulseForce: 15000
- RadiusMin: 100
- RadiusMax: 100
- RemoveWhenDone: False
Parenting
Now we need to “parent” most of these objects to the tank so they will travel along with the tank when it is moving. Some objects can be set as children or parents simply by placing them underneath or above another object in the node tree (i.e. Physics Shapes), but many other items cannot. For the ones that cannot, you will have to set them as children in another way. In this case our tank, oxy-tank, is the parent for all other items in this tutorial. Using the Attachments field you can list Objects, Models, and WorldModels that will move with the WorldModel object while maintaining their relative position and rotation. This is commonly used to add Props like door knobs to doors. List all Objects you want attached separated by a semicolon and a space.
Go into the properties of the oxy-tank and change the following:
Attachments: SND00; SND01; SND02; SpEFX00; SpEFX01; SpEFX02; SpEFX03; Explosion; PIRadial
Script It Baby
Now you need to set up the CommandObject that will control the timing of firing off all sounds, Special Effects, explosions, etc.
Place a CommandObject somewhere close to the tank. Its exact placement is not important. Name the new CommandObject, COB. There is one important flag to set on COB: NumberOfActivations: 1
Now click on the EventCommands field of COB, where we will set up the events that will happen when the tank takes damage. We will set up 2 different timelines. You might be able to get away with a single timeline, but there is a hard limit on the number of characters allowed for each event table on the timeline. I don’t think we ever did find out the exact number, but during the development of XP-1 I kept my number of characters under 130 whenever possible. So again, we need to set up 2 different timelines. Name the 1st one Go and name the 2nd one Go2. Set an event on Go at 0 seconds. Set an event on Go2 at 0 seconds as well.
Now, pull up the event table for Go and type in the following:
msg PIR on;
msg SFX00 on;
msg SFX01 on;
msg SFX02 on;
delay 0.5 (msg PIR on);
delay 1.0 (msg PIR on);
delay 1.5 (msg PIR on);
delay 2.0 (msg PIR on);
delay 2.5 (msg PIR on);
delay 3.0 (msg PIR on);
delay 3.25 (msg SFX03 on);
delay 3.5 (msg EXP on);
delay 3.5 (msg tank remove);
Pull up the event table for Go2 and type in the following:
msg S00 on;
msg S01 on;
delay 3.25 (msg S02 on);
Now, this could have just as easily been set up using a Trigger instead of a CommandObject, and if you prefer to do it that way, go for it. Or you can use this CommandObject and instead of the delay commands you could actually put those commands in on the timeline instead. In the end, it’s up to you. And honestly, most of the time, putting commands on the timeline is the better way to go.
Damage Properties of the Tank
Now we just need a way to start the COB. We will set things up so that when the tank takes ANY damage from ANY source, it will start the COB and set everything into motion.
Select your parent WorldModel, oxy-tank, bring up its DamageProperties and add the following line to the DammageCommand:
msg CO on;
Then set the following flags in the DamageProperties:
- DamageTriggerNumSends: 1
- CanDamage: True
- DamageMask: <none>
Save, Compile And Run
Now it’s time save out your work. So save the world, then compile the world and run it. Once the world has loaded, press F7 to get weapons and then shoot the new tank you’ve made. It should shoot across the room and explode.
Have fun!
POWER ARMOR SMASH
Introduction
There are many different types of AINavMeshLinks and depending on how creative you can get, you can use many of them for destruction events that the AI initiates. In this tutorial we’ll cover using an AINavMeshLinkDiveThru to encourage a Power Armor enemy to crush a car and flip it aside. There is an example world to accompany this, and you might want to have it open while you read through this explanation. The example world for this tutorial is called, Destruction_PowerArmorSmash_01. Load up this level, run it, and then step up onto the checkered platform in front of you to watch the event.
Like the Wall Break Events, we start the scene with a perfect, pristine version of a car and once the event is triggered, we hide the perfect car and unhide a broken car that has been placed in the same spot. For the example map that goes along with this tutorial, the objects that I will cover are all located in the WORK/CAR folder in the node tree.
Objects involved
The Cars
You will have to set up the objects that the AINavMeshLink will interact with before you lay down the NavMesh and the Links. We have 2 different WorldModels that represent our car:
- CarGood is a Worldmodel that represents the perfect version of our car before it is crushed by the Power Armor.
- CarGood contains the BSP brushes that make up the car
- PhysicsShape is set to Hull.
- MassKg is set to 90 and DensityG is set to 9.1.
- This Worldmodel should start out with StartHidden set to False and RigidBody set to False.
The mass and density are not overly important in themselves (although they do seem to make a difference in what physics items are allowed to pass through), but setting a physics shape is important to keep other physics objects from getting pushed or knocked through the body of the car. All WorldModels have this problem unless they have their PhysicsShape defined.
- CarCrush is a Worldmodel that represents the crushed version of our car.
- It contains the BDP brushes that make up the car.
- BoxPhysics is set to False and the PhysicsShape is set to None because we are using several PhysicsShapeOBBs as our physics shape for the broken car.
- This Worldmodel starts out with StartHidden set to True and RigidBody set to False.
In this case we went with several PhysicsShapeOBBs (set in a pattern that matched the general shape of the car) instead of using Hull. Hull could have been used, but where this car was being used was in an area where the frame rates were already on the borderline of bad, so every extra frame we could get was important. And even several PhysicsShapeOBBs are cheaper than a setting of Hull. A total of 10 PhysicsShapeOBBs were used.
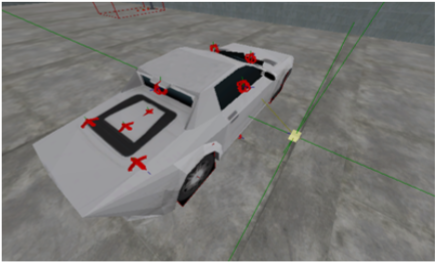
Making a Blocker
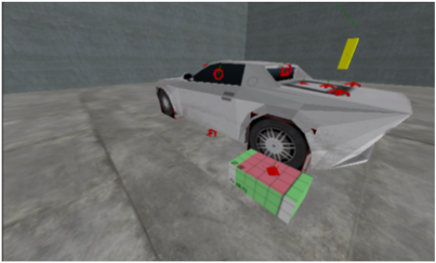
We want the car to appear like it was flipped or kicked out of the way when the Power Armor smashes through it. Unfortunately an impulse fired on a physical object will not necessarily cause any spin or flips on the object. You have to get heavy-handed and force it. One way to do this is to set up a “blocker” that the car will slam into from the force of the impulse, and depending on where the impact point is and how forceful the impulse is, the car will flip at the impact point. Depending on what you want from your flip or spin, you might have to do a lot of experimentation with the placing and sizing of the blocker. In this case, we want the car to spin around and outward from where the Power Armor will smash it, so after experimentation, we discovered that the sweet spot for the blocker placement was at the car’s left rear wheel.
The “blocker” is simply a WorldModel that has a Physics Collision set up on it. Set the following flags on the blocker:
- Visible: False
- Solid: False
- Rayhit: True
- CastShadow: False
- ShadowLOD: Never
- BoxPhysics: True
- RigidBody: False
- StartHidden: False
- PhysicsShape: OBB
- MassKg: 90
- DensityG: 9.1
You would not want the player to ever actually see the blocker and you would also not want the player to run into this “invisible” blocker if they happen to run up along side the car, so the blocker will start out non-visible and non-solid and will later be turned Solid right before the car gets goes RigidBody True and gets slammed with the impulse.
The Impulse
The impulse was a PhysicsImpulseDirectional and it was placed on the right “passenger” side of the car.
- Its Rotation was turned to face the car as this was the side in which the Power Armor would be smashing into it from.
- The Target of the PhysicsImpulseDirectional was the crushed version of the car, CarCrush.
- The ImpulseForce was set to 150000. The ImpulseForce is another value you will have to play around with to hit that “sweet-spot” taking into consideration the total weight of the car and exactly how far and wildly you want the car to flip or spin. Obviously really high numbers will give crazier results.
The Sound and The Fury
You will also want to set up SpecialFX objects and SoundFX objects for the smashing of the car. Since I’ve already covered these in the previous tutorials, I will not cover them again here. If you want to know the SpecialFX and sounds I used, just look at the objects in the map world that accompanies this tutorial.
The CommandObject
Again, it is the CommandObject that controls the show. A total of 5 timelines were used in this CommandObject.
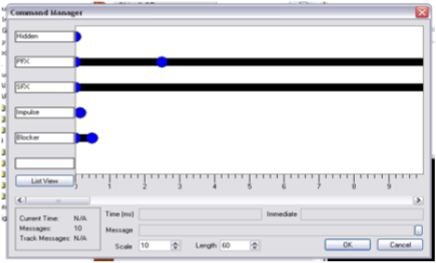
One timeline controlled the hiding and un-hiding of the CarGood and CarCrush. Two other timelines controlled the setting off of the SpecialFx and the Sounds. Another one controlled the impulse. And yet another controlled the “blocker”. The “blocker” was handled in the following way:
- At 0 seconds the blocker was turned Solid with the following command:
msg blocker (solid 1);
- At 150 milliseconds the CarCrush was turned physical and the impulse was set off:
msg CarCrush (rigidbody 1);
msg PID on;
- At 500 milliseconds the blocker was removed from the world:
msg blocker remove;
The NavMesh, The NavLink and the Trigger
To enable the AI to set all of this destruction into motion, an AINavMeshLink and its SmartObject were the main components used. In this case, I only wanted Power Armors to be able to use the Link, so I had to set up a special self-contained AINavMesh (I’ll not cover this here as it is covered in other tutorials) and make the Link a child of the special AINavMesh. As with the AINavMesh, the setup of AINavMeshLinks are covered in other tutorials and will not be covered here except how to tie them into our destruction event of the Power Armor smashing through the car.
- The Link used for this event is an AINavMeshLinkDiveThru with a SmartObject of PAXP_Crush and an Object of Trigg. The Object field of the Link is the name of the object that the Link will activate when the AI crosses.
- Trigg is a Trigger that has its NumberOfActivations set to 1. When activated by the above Link it will start the CommandObject that contains all the scripting to cause the car to appear to get crushed and kicked out of the way of the Power Armor.
If you’ve set everything up correctly, an AI crossing the Link will set off the chain of events you have specified. In this way, AINavMeshLinks could be used for any number of cool things that an AI could do.
You are encouraged to rip apart the example tutorial worlds to see how they work. Also, dive into all the destructible prefabs that were made for Extraction Point.
WALL BREAK EVENT
Introduction
We came up with a couple of wall break events that we used in XP-1 that basically had enemies busting through walls to get at the player. Here we’ll cover the elements that go into one of the simpler wall break events.
The Walls
3 Easy Pieces
There are 3 main parts that comprise the wall break event (along with several minor ones).
- Wall is a WorldModel that is the perfect pristine version of the wall BEFORE it gets broke.
- It has two flat single-sided planes that face in opposite directions and are lined up perfectly with the surrounding walls.
- The textures on these planes are the same textures as on the walls that surround them and their textures are lined up with the textures that surround them as well. So, until broken, the player would not be able to see anything wrong with that wall section at all.
- This section starts “unhidden”. And to ensure that it blocks any physical items that might get thrown or pushed into it before it breaks, you’ll want to set its physics collision box.
- Since it’s really a very simple boxy shape, you can get away with setting the WorldModel’s BoxPhysics to True and its PhysicsShape to OBB.
- Wall_Broke is a WorldModel that starts “hidden” and it represents the BROKEN version of the wall.
- When the event is started, the Wall will get “hidden” and the Wall_Broke will get “unhidden.”
- When combined with the falling wall pieces and debris, this fools the player into thinking that the wall has been busted through from the other side. In this particular case, my Wall_Broke was a fairly complicated combination of several jagged brushes, so using BoxPhysics would have been a bad idea. I chose to go with no physics collision on this as the hole in the middle was much larger than the shell that was left. Although I could have went the route of using several PhysicsShapeOBBs placed around the edges.
- Wall_Fall01 is a RotatingWorldModel that starts “hidden” and that has a BSP brush that is in the general shape of the hole in the Wall_Broke WorldModel.
- This will get “unhidden” at the same time as the Wall_Broke and immediately set to start its rotation. This rotating wall section gives the impression of a section of the wall being knocked in and over.
The Wall Guts
We wanted the “inside” of the broken wall to have a couple of broken 2 by 4’s and rough cement edging around the area where it looked like the wall broke loose. We knew these items would be between the walls and would not be able to be seen when the wall was “unbroken” so they were not put into a WorldModel. I simply put kept them as plain BSP brushes and put them in their own folder (Inside) in the node tree to keep them organized.
Debris & Impulse
We wanted chunks of debris to appear to be blasted outward when the wall got broken, so we set up several physical debris objects that would start out NON-RigidBody and “hidden”. Only when the wall break itself was triggered would the debris be “unhidden” and be set to go physical with the RigidBody setting. We placed these chunks of debris in the air and set up a PhysicsImpulseDirectional that was targeted to all of the debris and set its rotation to the direction we wanted the debris to be blasted. As soon as the debris was made visible and the pieces were turned physical with RigidBody, we set off the PhysicsImpulseDirectional which caused the debris to appear to be blasted out from the breaking wall. We put all of the debris chunks into their own folder (PhysicsObjects) in the node tree to keep them organized.
The SpecialFX
To help cover up the hiding and un-hiding of the different wall sections and simply to make the wall break look more cool and realistic, many SpecialFX objects had to be spread out around the perimeter of where the wall break would be. We put all of the SpecialFX objects into their own folder (PFX) in the node tree to keep them organized. And of course all of these SpecialFX had to be triggered at different times through the scripting.
The effects used for this event were:
- Shake_Severe_1s. Used for the vision shake when the wall gets blasted outward.
- Impact_Nade. I used this effect for the dust and smoke that it puts out, plus it has a great explosion sound for the explosion that blows the wall out.
- Grit. A nice dust cloud for the air around the breakage.
- FallingDust_Fine. A nice dust cloud for the air around the breakage.
- Ball_Exp_2. A nice dust cloud for the air around the breakage.
The CommandObject
This is the object that would be called on to start the whole sequence. We went with a total of 4 timelines.
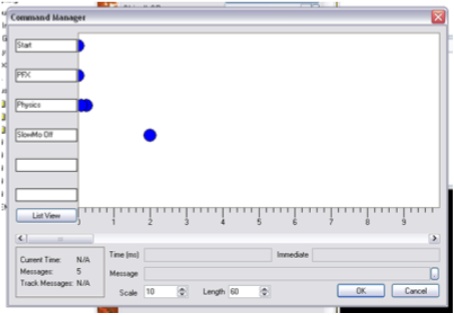
The Start timeline had 1 event at 0 seconds.
This event had the following code:
msg player (slowmo on Default);
msg Wall (HIDDEN 1);
msg Wall_Broke (HIDDEN 0);
msg Wall_Fall01 (HIDDEN 0);
msg Wall_Fall01 on;
What I did there was to force the player into the Default slowmo (just for cool factor), I hid the Wall, I UN-hid the Wall_Broke and Wall_Fall01 and then turned on Wall_Fall01 (which was a RotatingWorldModel) which made it appear to fall forward.
The PFX timeline had 1 event at 0 seconds that controlled all of my SpecialFX.
The code for this event was:
msg PFX01 on;
msg PFX02 on;
msg PFX03 on;
msg PFX04 on;
msg PFX05 on;
msg PFX06 on;
msg PFX07 on;
The Physics timeline had 2 events.
The 1st was at 100 milliseconds and contained the code:
msg PO_01 (HIDDEN 0);
msg PO_02 (HIDDEN 0);
msg PO_03 (HIDDEN 0);
msg PO_04 (HIDDEN 0);
The 2nd was at 250 milliseconds and contained the code:
msg PO_01 (RIGIDBODY 1);
msg PO_02 (RIGIDBODY 1);
msg PO_03 (RIGIDBODY 1);
msg PO_04 (RIGIDBODY 1);
msg PID on;
he scripting in the 1st event was delayed just long enough to allow the hiding and un-hiding of the wall sections and what it did was to un-hide all of the physical debris pieces.
The scripting in the 2nd event was delayed to start just after the debris pieces had a chance to become un-hidden. It turned the pieces physical by setting their RigidBody flags to 1 (true), and it turned on the PhysicsImpulseDirectional that would blast the pieces outward.
The SlowMo Off timeline had one event at 2 seconds.
msg player (slowmo off);
This simply turned off the player’s forced slowmo after 2 seconds
Finishing It Up
That’s basically it for this Wall Break Event. You can make it as complicated or as simple as you need. Of course you’ll also need to script the entrance of your enemies who broke through the wall, or whatever it was that caused the break. The way in which you could use breakable walls are endless. With enough modification, you could change out this basic design and have plaster that falls away from walls in chunks when taking damage or anything else you can imagine. Destruction is good!