Off Limits is a first person multiplayer shooter that is focused on two teams capturing the enemy territory and hunting down and killing their main guy, the Juggernaut.
Guide
| Off Limits Servers |
| Keyboard Layout |
| Spawn Points |
| Juggernaut Health |
| Juggernaut HUD |
| General HUD |
| Team Commands |
| Menus |
| Minimap Icons |
| Drivable Vehicles |
| Off Limits Servers |
|

69.147.229.218:27050 (US)
69.147.229.218:27060 (US)
69.147.229.218:27070 (US)
69.147.229.218:27080 (US)

81.19.210.49:27015 (UK)
81.19.210.49:27025 (UK)

173.199.64.41:27015 (NL)
108.61.254.109:27015 (NL)
|

- There is a bug in Source where you don't see server lists. Before you can play Off Limits you need to work your way around this.
- Go to "Find Servers" like any other Source game. There you will see an empty server list, this is a lie!
- Deselect "Show map list" and then press "Refresh all", then you should see the available Off Limits servers.
| Keyboard Layout |

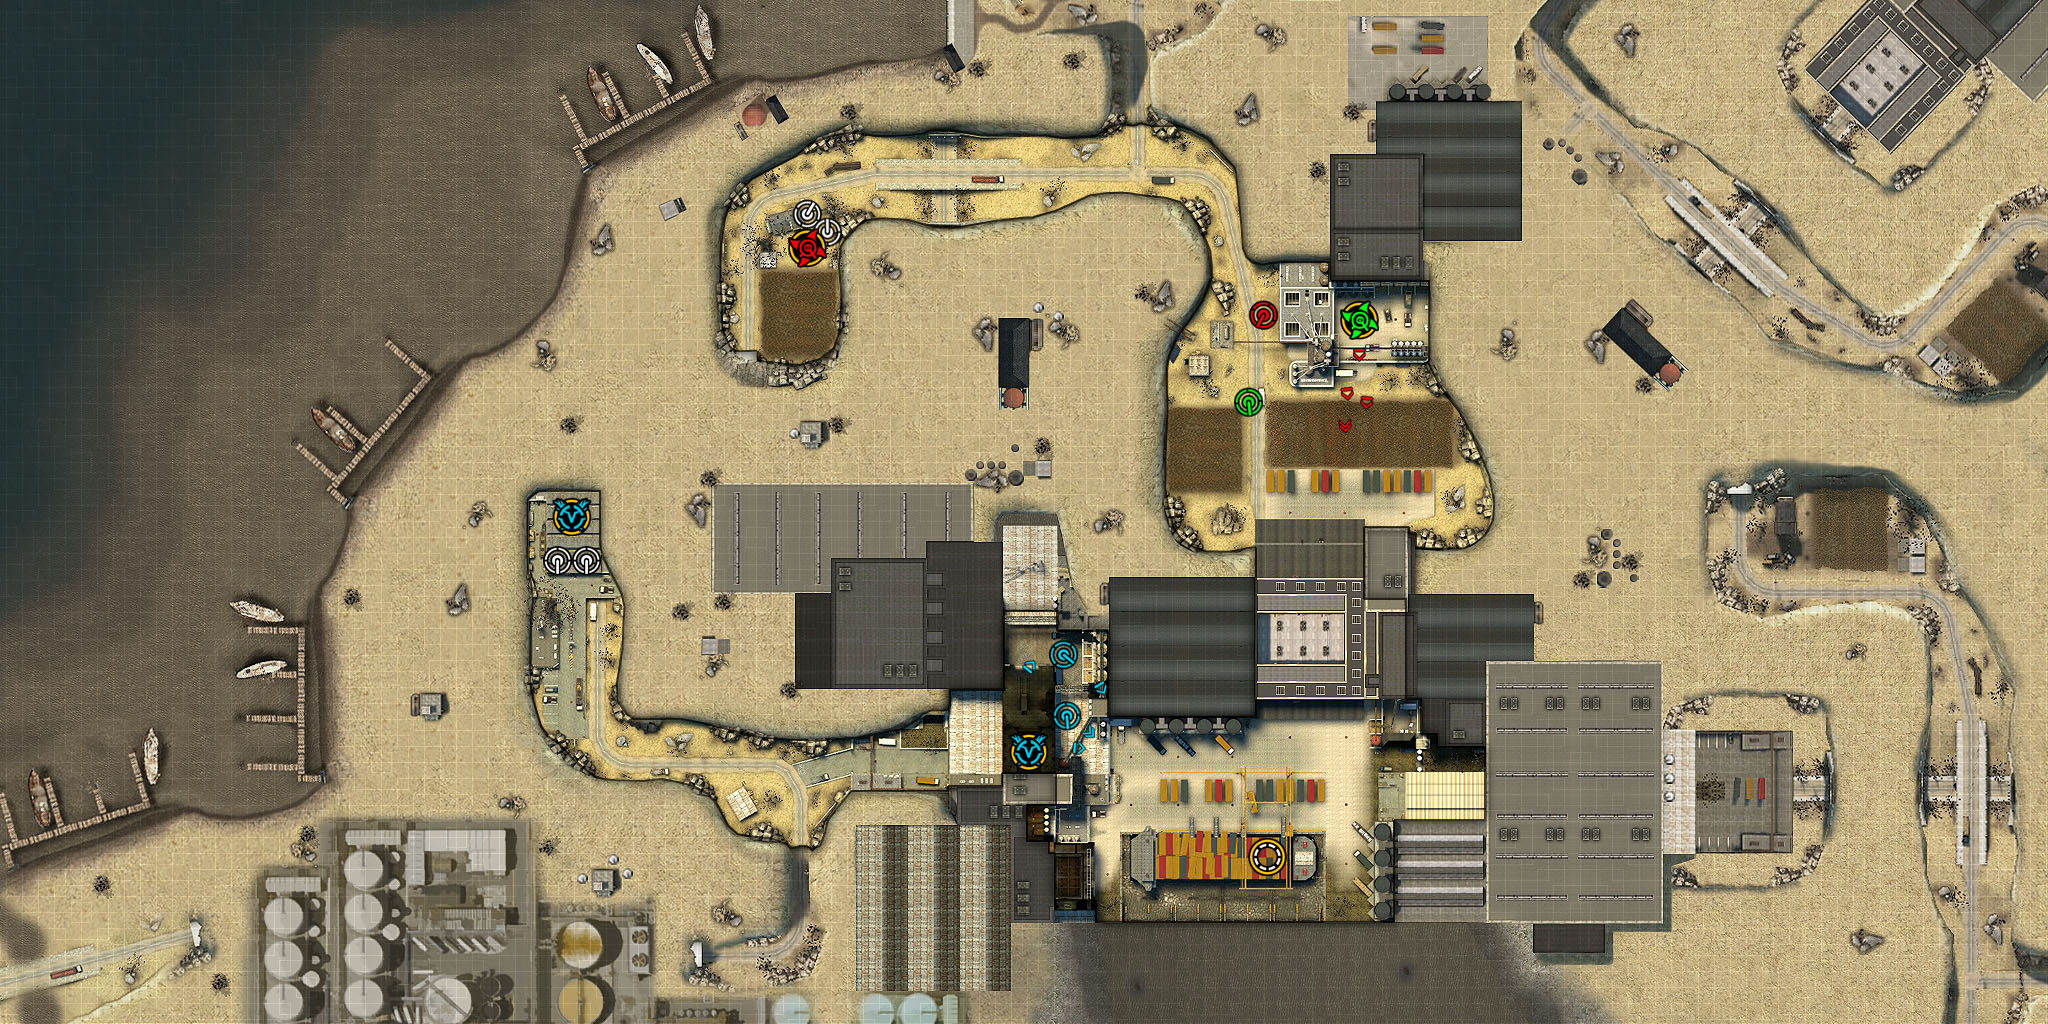
| Spawn Points |
|

- A neutral spawn point doesn't belong to any team and can therefor be taken by either the Vanguard or the Rogue team.
- Both teams and both Juggernauts can still shoot through this spawn points force field.
- Shield grenades can't be deployed inside a spawn point, this made capturing too easy.
- A Juggernaut can't enter a neutral spawn point to capture it.
- Capturing a spawn point goes faster with multiple team mates. 20 sec when 1 player captures it, 8 sec with 4 players capturing it. 4 being the maximum capture speed.
- It's good for a Juggernaut to stick close to his team mates while they capture as they are bound to get a lot of enemy fire rained upon them. This will regenerate them and give them the necessary backup. The Juggernaut will be rewarded when they capture it with an extra 200 HP and take advantage over the enemy's Juggernaut.
- Vehicles can not drive inside neutral spawn points.
|

- Once a Vanguard team has taken a neutral spawn point it turns blue and closes the spawn point from the Rogue players.
- Rogue players and their Juggernaut can not fire inside the spawn point any longer protecting the Vanguard players as they spawn. Grenades however can still be thrown inside an enemy spawn point and do some damage.
- Players are protected inside to prevent the other team from spawn camping and spawn killing. There is no reason for the enemy to camp outside captured spawn points, you need to hunt down and kill the enemy Juggernaut first before you can re-capture it.
- The Vanguard Juggernaut player gains an extra 200 HP when his team captures a spawn point.
- Players who are in the vicinity of the captured spawn point now become visible on your teams minimap. This gives you and your team more control over the map and advantage over the captured areas. This will help you track down the enemy Juggernaut quicker and prevents him from hiding in one of your previous captured spawn point areas.
- You can spawn in any of the spawn points that belong to your team by opening up the "spawn selection" menu and select where you want to spawn after death. This feature is mainly there for when the enemy Juggernaut player is hiding in one of your previously captured spawn points or base spawn.
- Vehicles can not drive inside captured spawn points.
|

- Once a Rogue team has taken a neutral spawn point it turns red and closes the spawn point from the Vanguard players.
- Vanguard players and their Juggernaut can not fire inside the spawn point any longer protecting the Rogue players as they spawn. Grenades however can still be thrown inside an enemy spawn point and do some damage.
- Players are protected inside to prevent the other team from spawn camping and spawn killing. There is no reason for the enemy to camp outside captured spawn points, you need to hunt down and kill the enemy Juggernaut first before you can re-capture it.
- The Rogue Juggernaut player gains an extra 200 HP when his team captures a spawn point.
- Players who are in the vicinity of the captured spawn point now become visible on your teams minimap. This gives you and your team more control over the map and advantage over the captured areas. This will help you track down the enemy Juggernaut quicker and prevents him from hiding in one of your previous captured spawn point areas.
- You can spawn in any of the spawn points that belong to your team by opening up the "spawn selection" menu and select where you want to spawn after death. This feature is mainly there for when the enemy Juggernaut player is hiding in one of your previously captured spawn points or base spawn.
- Vehicles can not drive inside captured spawn points.
|

- Spawn points are always shown on your HUD to guide you which direction you should go to.
- The closest spawn is the biggest on your screen.
- When they are the same size, go to the neutral spawn point and capture it for the team!
| Juggernaut health |
|

- Both teams starts with 2 captured spawn points. This means both Juggernauts have a starting health of 400 HP.
|

- Whichever team captures the middle neutral spawn point first gains map control over the captured area and their Juggernaut will gain an additional 200 HP. This now gives their Juggernaut 600 HP over the enemies 400 HP.
|

- The advantage given by capturing the middle spawn point can give A team momentum and kill the enemy Juggernaut who is now weaker than the team who captured mid.
- If they did manage to keep the momentum going and killed the enemy Juggernaut, the next spawn point will open up as they loose a spawn point.
- Now the enemy lost map control and their Juggernaut lost 200 HP. It's now up to the advancing team to capture the newly opened spawn point and keep pushing for victory.
|

- Once capturing the lost spawn point of the enemy their Juggernaut receives an additional 200 HP. This gives them a Juggernaut with 800 HP and a team with 80% map control.
- With one spawn point left you need to stick closely together and defend your last spawn point with all you got and keep your Juggernaut protected.
- It is still possible to overtake a more powerful Juggernaut and come back, even with only 1 spawn point left (800 HP vs. 200 HP). It's all down to proper team play and changing tactics.
|

- If the loosing team is unable to push back and they loose their Juggernaut it will in turn also mean they lose their last spawn point.
- Now the Juggernaut can't respawn anymore because there isn't a spawn point after this.
- The remaining players can still hold back the attacking enemy while capturing the main base spawn point again. If this happens the Juggernaut will respawn and also any other died team mates.
- The base spawn point automatically recaptures. So even with the entire team dead it could still recapture. It will stop capturing when an enemy players enters it and wins the round.
- In theory if you are the sole survivor of A team and the last spawn point is lost you could run and hide and stall for the spawn point to automatically recapture. Or you could hide somewhere in the base and use a vantage point to kill any attacking enemy players.
|

- If you were unable to hold back the attacking horde of enemy players and they were able to capture the last remaining spawn point you will loose the round.
- If your entire team was killed and the enemy team got to your base spawn point before it automatically recaptured itself you also loose the match.
| Juggernaut HUD |
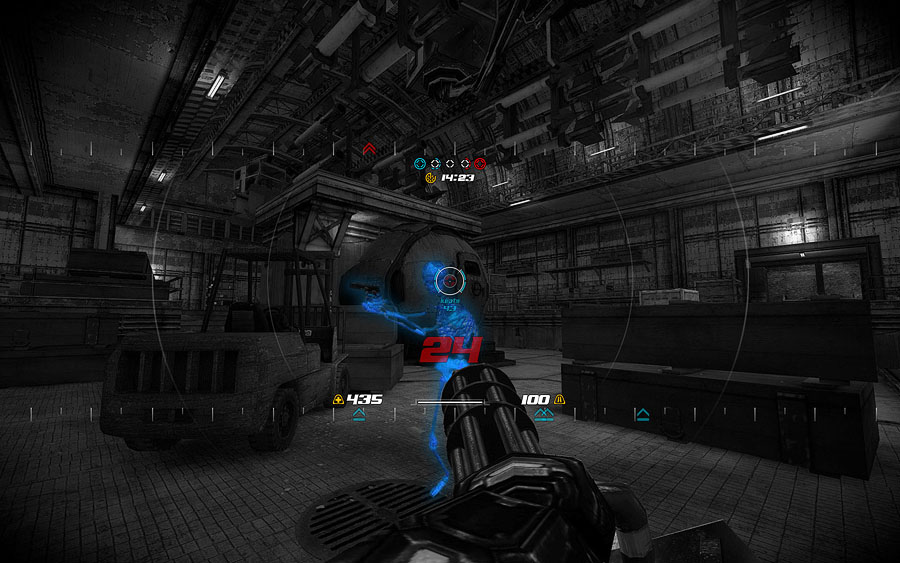
|

- The first and second images show team mates in distress. They have taken up some damage. Their health is dependent on how bright they are colored, bright green meaning very low on health. These are the team mates you as a Juggernaut should assist. Their health will regenerate with your presence.
- Once they have regained their full health they will be back to their full team color. If you are Vanguard your team mates will be blue (3), red for Rogues (4).
- The X-ray vision allows you to see all players at a nearby distance through walls.
- Friendly fire is enabled for the Juggernaut, so be careful when shooting in chaotic situations.
|

- The 1st image shows the crosshair idle, you can see by it's color which team you are on.
- The 2nd image shows the hit indicator for when you are hitting an enemy or team mate (friendly fire for the Juggernaut is enabled, so be careful). For each hit you also hear a sound being played.
- The 3rd image shows your team mates status when you aim over them. The information given is their nickname and health status. Since a Juggernaut can heal team mates from a small distance it's good to know who in your team needs some additional health. Assisting your team mates can play a crucial part in capturing a spawn point.
|

- This is a neutral spawn point which can be captured by either team.
- This shows the progress a team is making while capturing a spawn point.
- This is a captured spawn point.
- This is a spawn point where both teams are currently in and fighting for. So as a Juggernaut it would be wise to get to that point and assist your team mates.

- The image above shows an example of a spawn point status bar as it could occur during a match: The Vanguard Juggernaut would have a maximum of 400 health and the Vanguard team are in progress of capturing the 3rd spawn point, while the Rogue team are still in progress of re-capturing their 2nd spawn point which means the Rogue Juggernaut only has 200 health left and therefore vulnerable. This gives the Vanguard team some advantage at this point (but things can change quickly).
- Same as the regular player spawn point status bar, the color starting from the left is the team you are currently playing for, in this example that would be the Vanguard team.
- Unlike regular players the Juggernaut is unable to capture a spawn point. A Juggernaut is however able to assist his team mates while capturing one by getting nearby and giving them regeneration when being fired upon by the enemy and covering fire as a Juggernaut has unlimited ammo.
|

- In this example the enemy Juggernaut color is blue, which means you are playing as the Rogue Juggernaut.
- This icon can only be seen in areas your team has captured, for instance: if your team captured 4 out of 5 spawn points, you will be able to see the enemy Juggernaut on your radar throughout 80% of the level. If the enemy Juggernaut is hiding in the spawn point area your team is not controlling, you will not be able to see him on your radar.
- This is the upper radar grid, this only shows the location of the enemy Juggernaut. So hiding from the enemy Juggernaut is impossible depending on your teams control over the level.

- This is the lower radar grid, this only shows the location of your team mates.
- In this example your team mates icon colors are red, which means you are playing as the Rogue Juggernaut.
- The lower radar grid only shows team mates in front of you in the level, team mates behind you are not shown. In other words, it shows team mates in the direction you are facing at.
|

- This alerts you when your health goes below 100.
- This will also trigger an alarm sound, making you even more aware that you are in grave danger.
- If you manage to survive and are able to regenerate above 100 health, this warning indicator will disappear.
|

- This indicates your sprint and minigun overheat stamina. As they are both linked you need to be careful what to do in each situation and when (fire or run).
- When you sprint or fire you will see the stamina depleting. You can keep your minigun barrel spinning by using alt-fire without losing any stamina from it. You can not sprint and use alt-fire at the same time, a spinning barrel means walking speed. Release to make a quick getaway.
- Once you go over 50% the stamina bar turns red, at this point it means if you stop firing or sprinting you can not restart until the bar goes over 50% again.
- If you decide to fully deplete the stamina it will take longer for you to gain back the 50% and sprint to safety or return fire again. So it's important you make the correct decision at the right time.
|

- This shows the amount of health you have, the icon is the same as the regular player HUD.
- The difference here is that for a Juggernaut the health regenerates when you received a beating and were able to survive.
- The amount of health a Juggernaut has is dependent on how successful the team is. By default the Juggernaut starts with 400 health (this is for the base spawn point and the initial 2nd spawn point). When a team captured the central spawn point the Juggernaut health increases by 200 (given him now a total of 600). This is the same for every spawn point a team captures. So, if you have good team play you will get more spawn points giving you a stronger Juggernaut and more control over the outcome of the match.
- The maximum health level a Juggernaut can have is 800, the lowest 200. When a team captures all 5 spawn points the Juggernaut would have 1000. But this wins the match.
|

- This shows the amount of armor you have, the icon is the same as the regular player HUD.
- As apposed to health, armor does not regenerate.
|

- This shows the amount of time you have left to win the match. Same icon as the regular player HUD.
- Default matches are set to 15 minutes.
- If a match ends without a team capturing all spawn points a draw is called. This should however be rare.
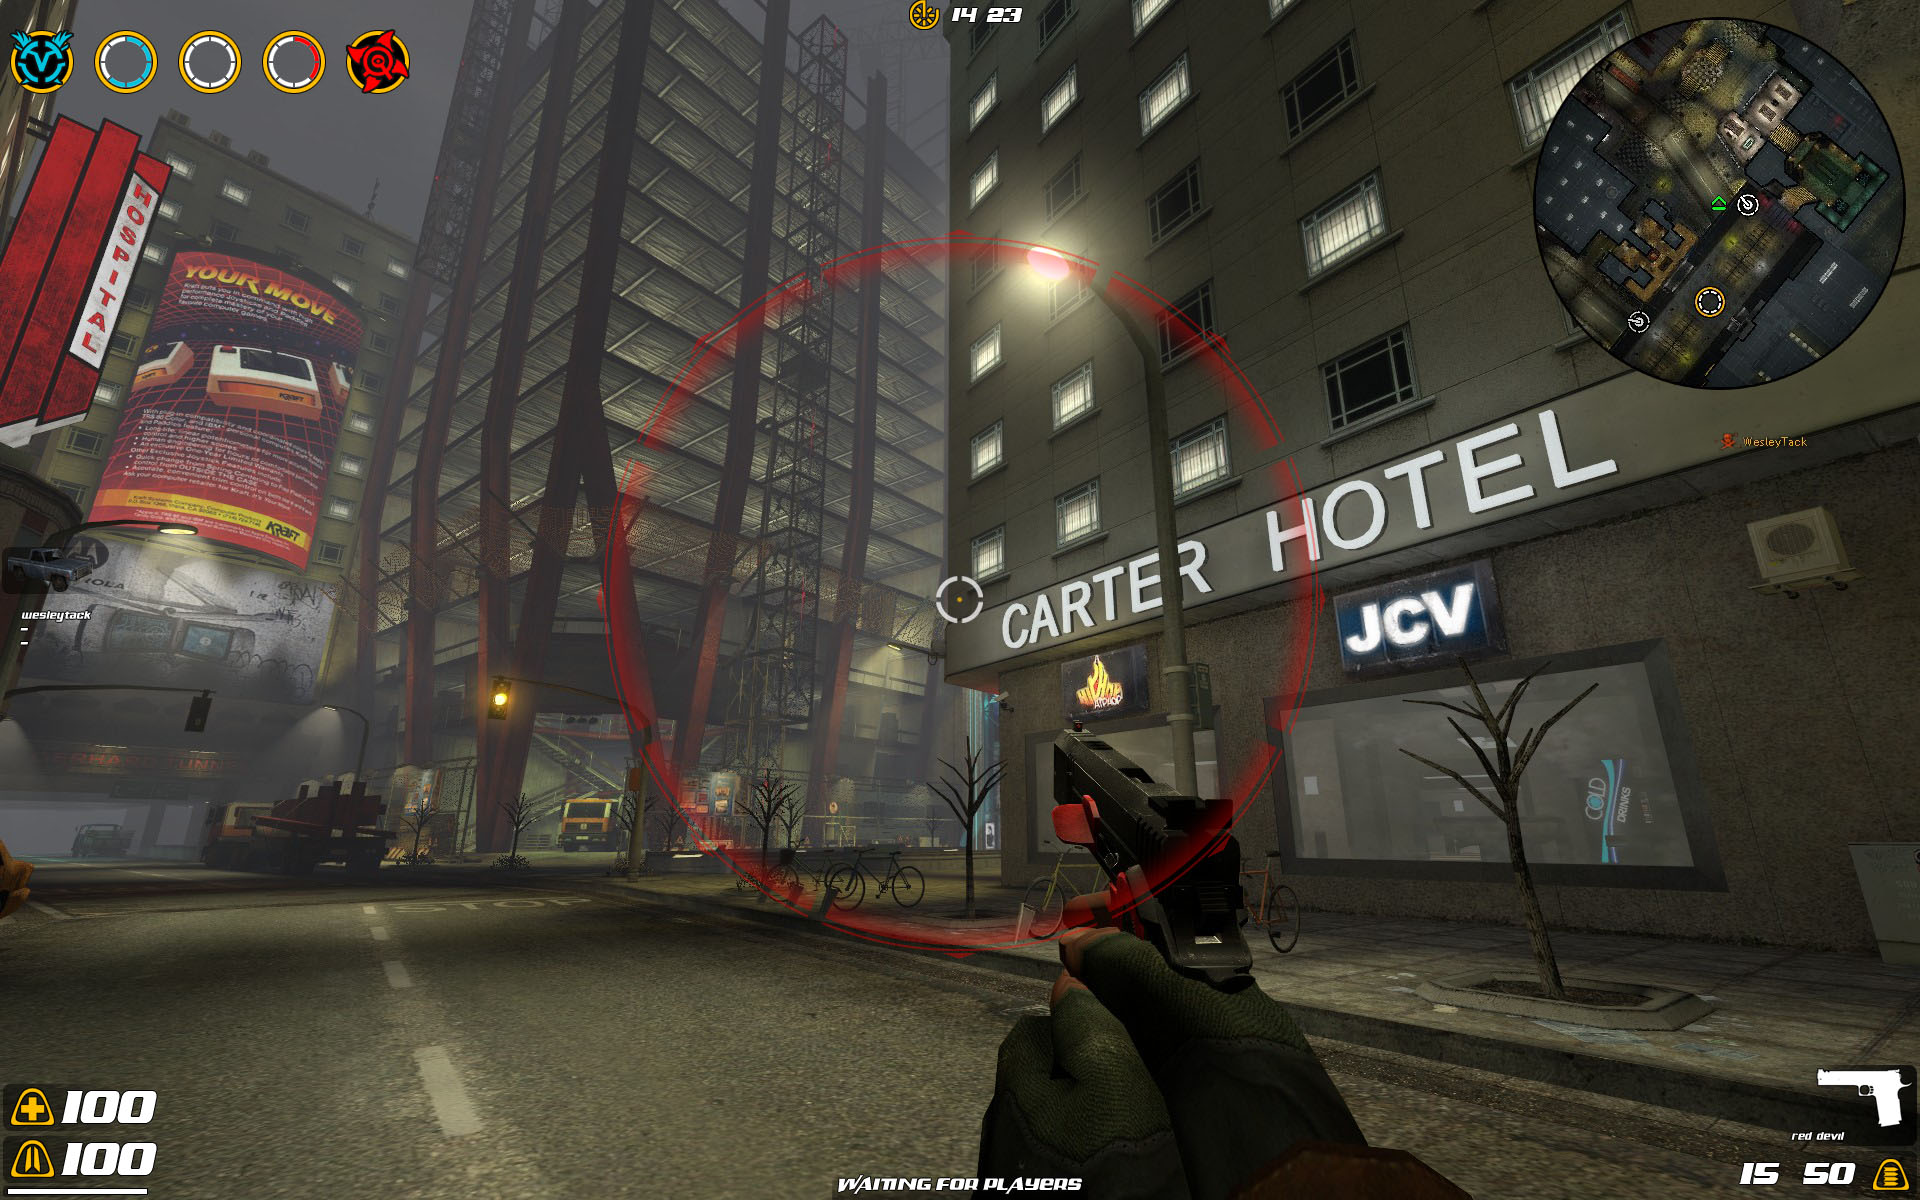
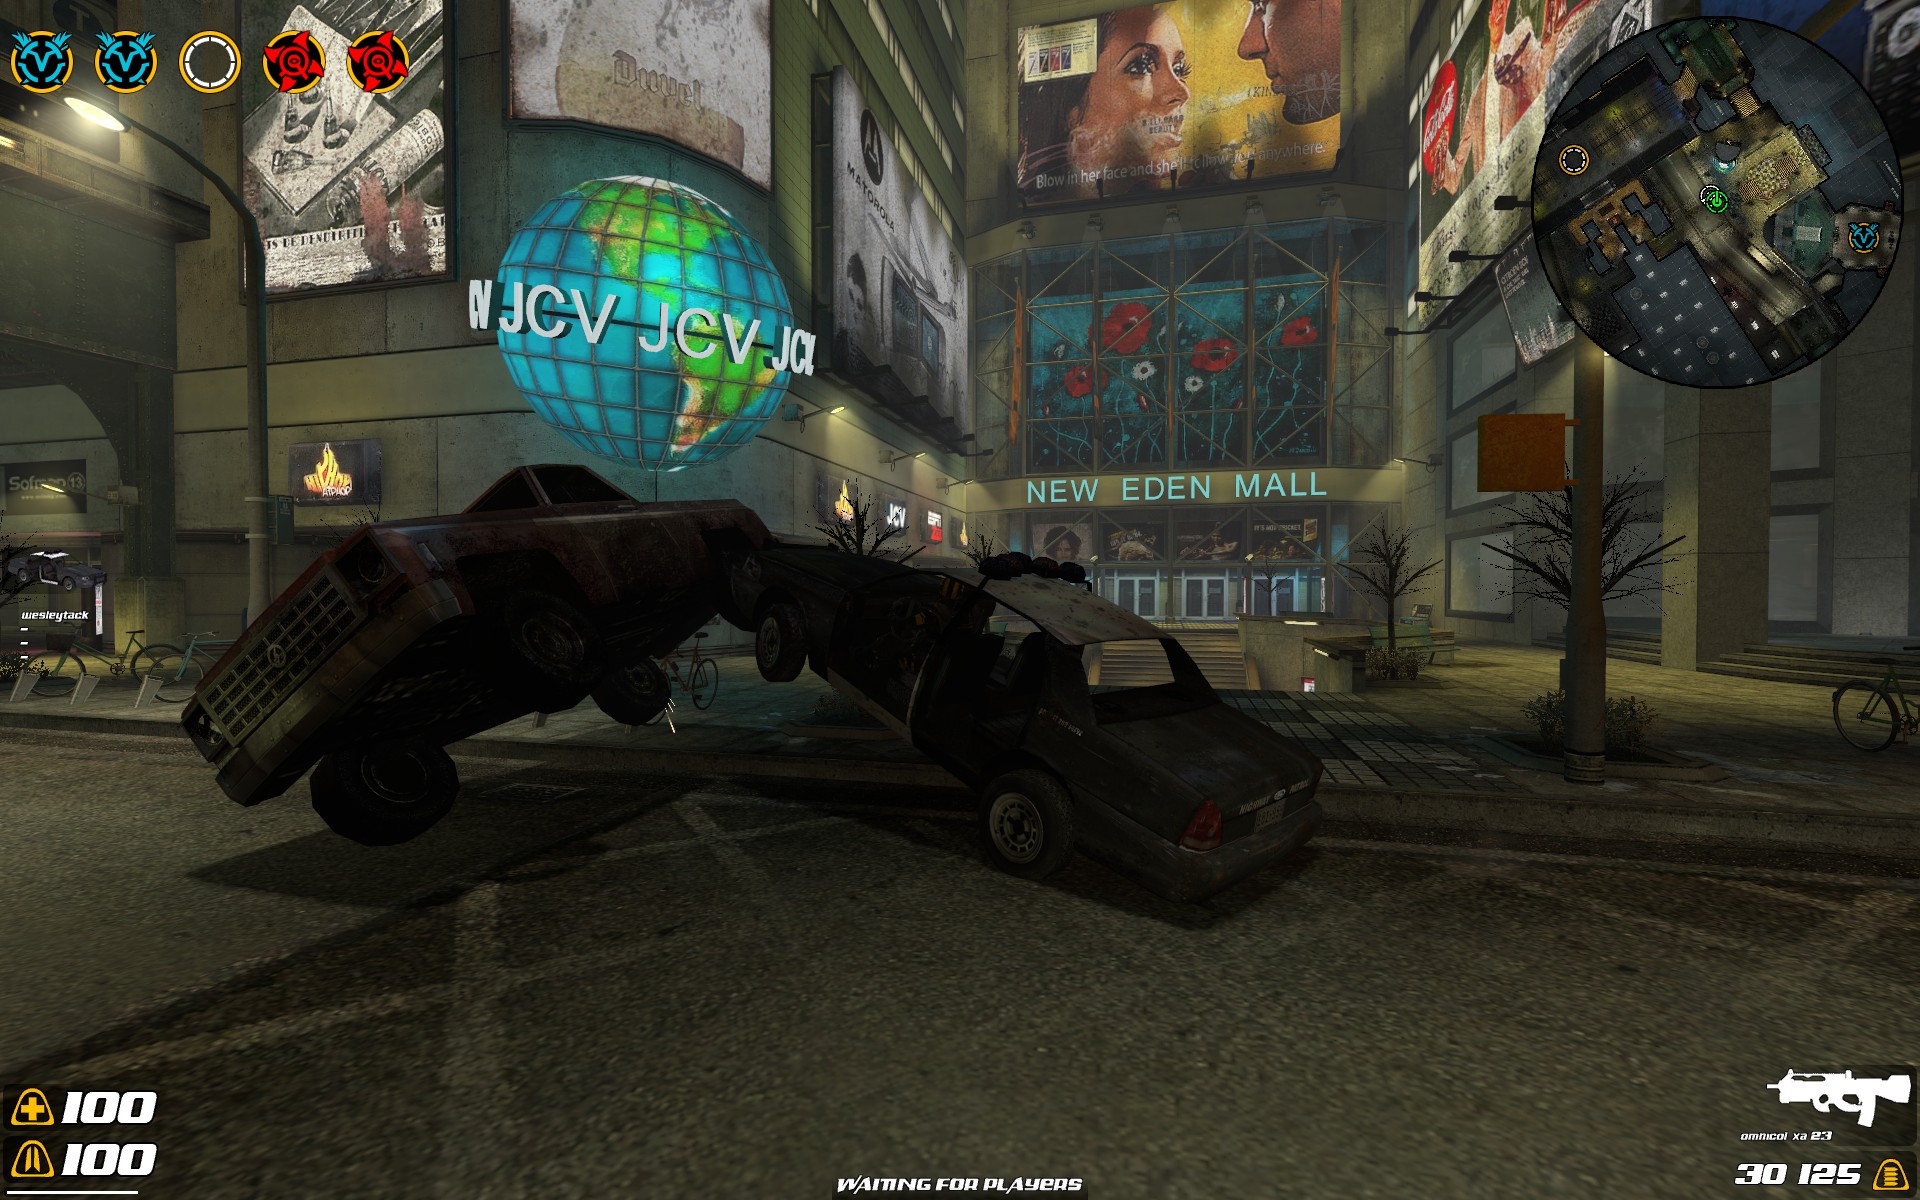
| General HUD |
|

- This is a captured spawnpoint for the Vanguard team.
- This is a captured spawnpoint for the Rogues team.
- This indicates that there is a battle going on for this spawn point, a player of each team is inside this neutral spawn point.
- This is a neutral spawn point ready to be taken by either team.
- This shows the spawn point capture process for the Vanguard team.
- This shows the spawn point capture process for the Rogues team.
- The spawn points are displayed in the same order as they are located inside a level.
|

- The minimap shows team mates, spawn points and vehicles within the location of the area around you.
- Enemy players can also be seen on this depending if the area you are in is under your team control, i.e., only when your team has this areas spawn point captured.
|

- There are 16 different crosshairs in Off Limits. You can cycle through them by binding the "Cycle Crosshair Type" key in the keyboard options and select your personal favorite. The Off Limits default crosshair is 16.
- Each crosshair size can be changed. You can cycle through the different sizes by binding the "Cycle Crosshair Size" key in the keyboard options. The Off Limits default size is 66.
- The crosshair opacity can also be changed by binding the "Cycle Crosshair Opacity" key in the keyboard options menu. The default opacity is 255 (which is 100% visible).
- If you want to fine tune the size and opacity this can be done by using these console commands: "crosshair_size" and "crosshair_opacity".

- When you attack and hit an enemy or friendly player this can be seen inside the crosshair as a red marker.
- This is also indicated by a hit sound. Yes we use the Quake3: Arena hit sound, why? Because it's one of the best multiplayer games ever. After Quake2!
|

- When being shot at you are notified by a hit indicator pointing in the direction the enemy fire is coming from.
- Up can mean in front of you or coming from higher ground. Same goes for bottom.
- When being shot at from a very close distance the hit indicator is shown full circle (as the General HUD preview image shows above).
|

- Death messages are shown below the minimap. This shows who killed who and with what weapon.
|

- The vehicle loadout indicator is displayed on the left side. This shows you when entering a vehicle which vehicle it is and how many seats are available.
- The driver of the vehicle is the one on top.
- When a team mate or enemy enters the vehicle their names will be shown in this loadout list.
- Give team mates time to get in so they to can be transported to the action faster, this can make you win or lose a match.
|

- "Waiting for players" is displayed at the bottom of the screen. This is when a server doesn't has enough players to start a match.
- A match will start when there is a minimum of 1 player and 1 Juggernaut per team, so you need 4 people to start a match.
|

- This shows the amount of sprint stamina you have.
- When you sprint you will see the stamina depleting.
- Once you go over 50% the stamina bar turns red, at this point it means if you stop sprinting you can not restart until the bar goes over 50% again.
- If you decide to fully deplete the stamina it will take longer for you to gain back the 50% and are able to sprint again. So it's important you make the correct decision at the right time.
|

- The weapon information is displayed above the ammo indicator in the bottom right corner. This shows you the name of which weapon you have selected but can also serve for those who prefer to play without a first person weapon visible.
|

- This shows the amount of ammo you have left.
- The first number from the left shows the ammo left in the clip. The right number shows the amount of spare ammo you have left.
|
- This shows the amount of health you have, the icon is the same as the Juggernaut HUD.
- Unlike the Juggernaut your health does not regenerate. You will however regenerate when being close to your Juggernaut.
|
- This shows the amount of armor you have, the icon is the same as the Juggernaut HUD.
- As apposed to the Juggernaut, your armor does regenerate when being healed.
|
- This shows the amount of time you have left to win the match. Same icon as the Juggernaut HUD.
- Default matches are set to 15 minutes.
- If a match ends without a team capturing all spawn points a draw is called. This should however be rare.
| Team Commands |

- Team commands are there to quickly report to your team mates with your current location and status report.
- Locations are marked green, status reports orange.
- The Team commands can be opened by pressing the "Use Team Commands" button, default "m" key.
| Menus |
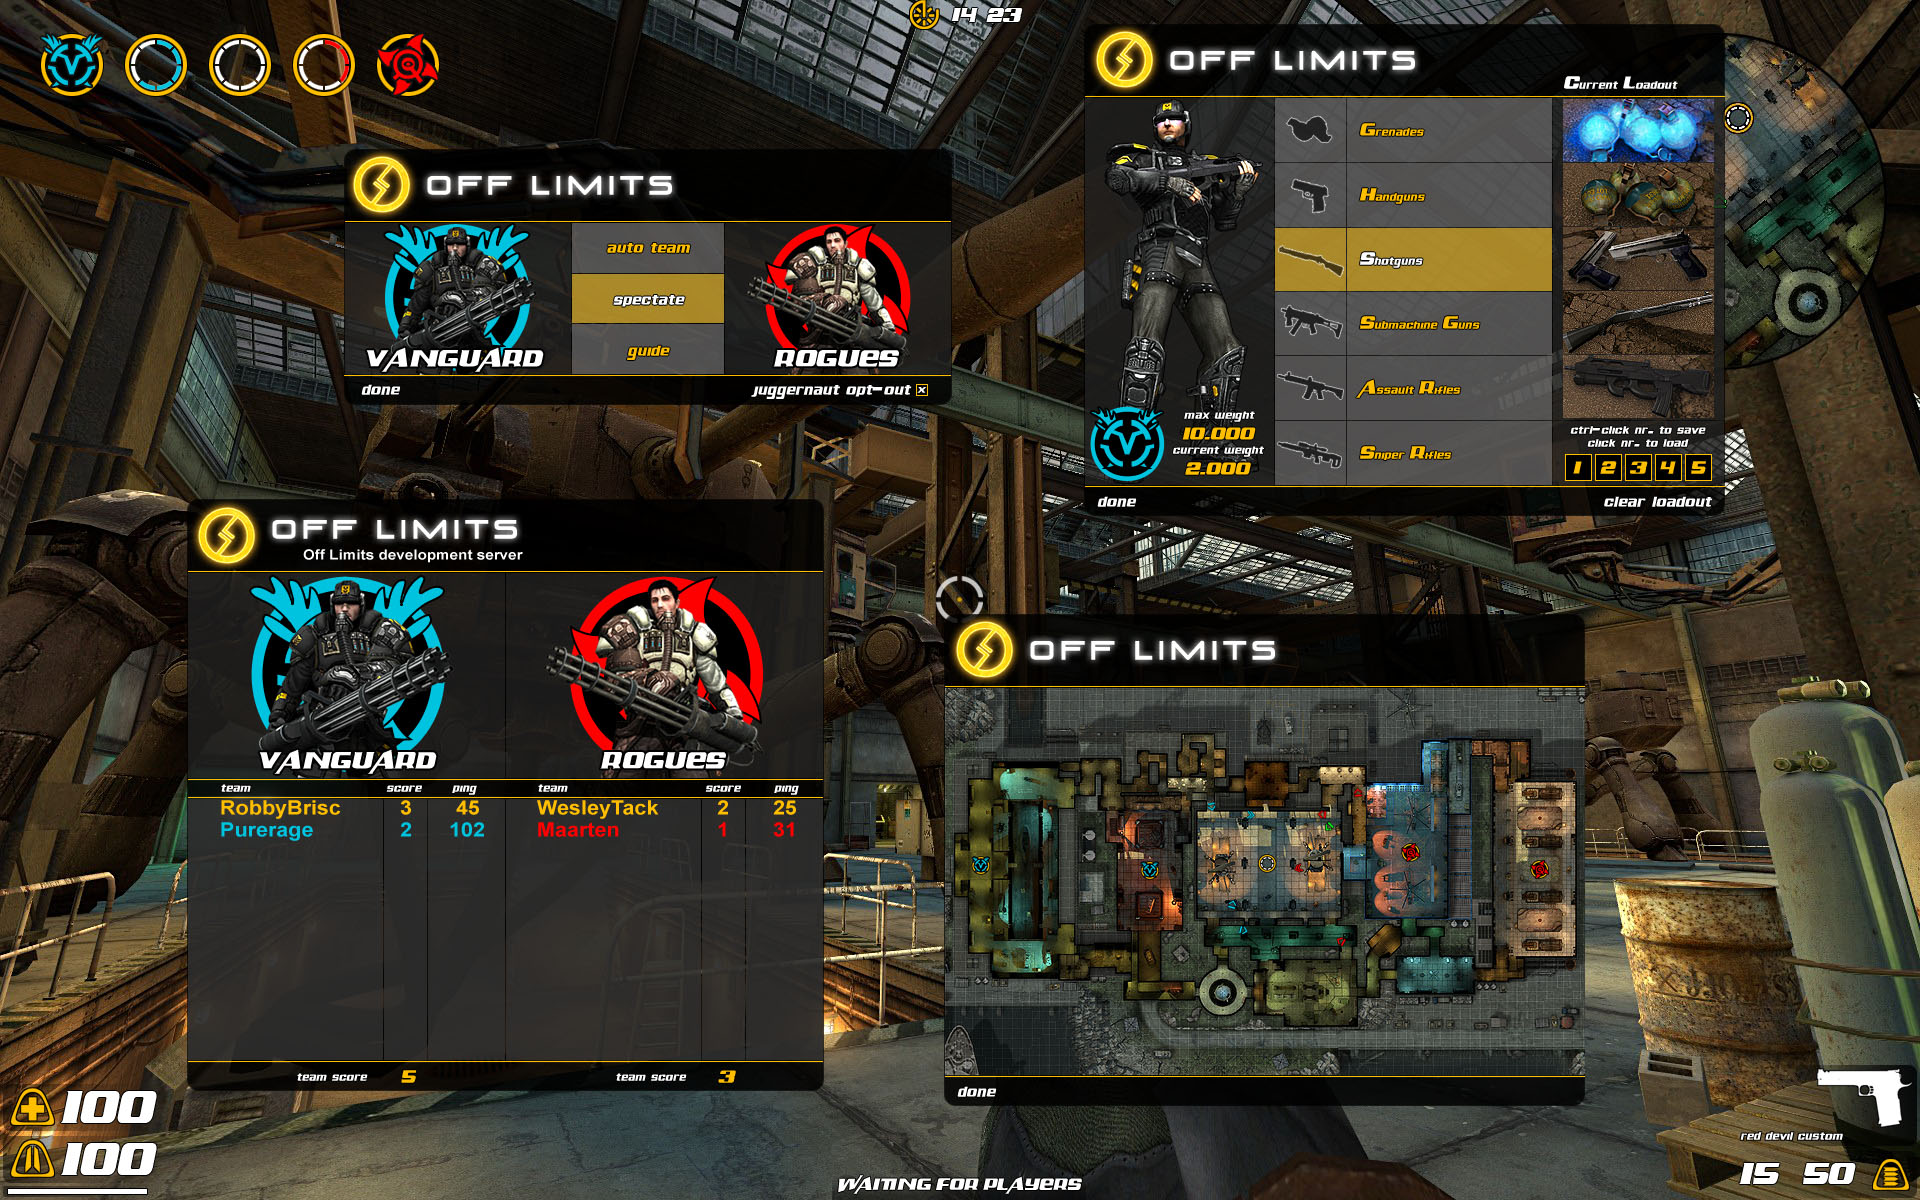
|

- This menu allows you to select your team by clicking either the blue Vanguard team logo or the red Rogues team logo.
- The central menu has the "auto team" and "spectate" function.
- While playing the game you can also check out the "Guide" from this menu so you can check up on items you want to learn more about without leaving the game.
- If playing the Juggernaut isn't your thing you can opt-in by clicking the box next to "juggernaut opt-in" "X" means you will be able to play as a Juggernaut. Turning off the "X" will remove you from the random chosen Juggernaut players list.
|
- After you've picked a team you enter the loadout menu. Here you can select the weapons you want when starting a match.
- The "Current loadout" will start empty first time you play the game. To fill up the personal loadout you can select each weapon by it's class in the central column.
- Off Limits uses a weight based loadout which is visible on the lower left corner. The maximum you can take on each loadout is or 10.000 grams.
- On the bottom right of the loadout screen you have the quick loadout feature. This allows you after selecting your personal loadout to save it for future games. This way you don't have to go into the weapon categories anymore and save time.
- Press and hold down control + left mouse click a number preset to save the "Current Loadout" you have selected. You can save up to 5 presets and call them up at any point during a match by opening up the loadout menu.
- If you have all 5 presets in use and you want to overwrite one you can do this by simply holding down control again and left mouse click on the one you don't need any longer. This will remove the previous preset.
- On the lower right there is an option to "clear loadout". This means it will remove all weapons in the "Current Loadout". Now you can assemble a new loadout by using the weapon categories.
- The quick loadout feature is added for multiple reasons. The first being that it saves a lot of time to select the weapons you want at the start of each match. The second would be during a match given each moment you can pick a new loadout and keep playing. When you are killed upon respawn you will now have the new loadout you picked while playing. This allows you to change your arsenal for any type of combat during the match.

- When you enter the weapon categories menu you will see the available weapons in each category. The "Current Loadout" menu is replaced with the weapons info you have selected.
- The quick loadout is replaced with the option to carry more or less ammo, simply press the "-" or "+" buttons. There is a default amount of ammo with each weapon selected, this allows you to fine tune your weight even further.
- When you have set up the weapon you want in your loadout you can add it by clicking the "add weapon" on the lower right hand side of the menu. When added, the option "add weapon" will be replaced by "remove weapon". This way you can remove a certain weapon from your loadout without having to rebuild the complete "Current Loadout". You need to have the weapon selected to be able and do this.

- Once you have reached your maximum weight your personal loadout will be displayed under the "Current Loadout".
- When you have 5 saved presets you can go over each one from this menu by pressing the "1" through "5" buttons which will preview all previously saved loadouts.
- Off Limits comes with 4 presets available upon start for the first time. These presets have every weapon in Off Limits available. You can use these or create your own custom presets as described above.
- The last loadout you had selected in your previous match is stored. This means next time you play the game you can skip loading a preset all together and go straight to "play" (unless you want a different weapon preset).
|

- The scoreboard can be activated in-game by pressing the "TAB" key. On the left side you see the "Vanguard" players and on the right the "Rogues" players.
- All regular players are shown in the Off Limits orange color. The Vanguard Juggernaut is displayed in blue and the Rogue Juggernaut is red.
- The server name you are playing on is displayed below the Off Limits upper logo.
- The lower bar shows each teams total frag score.
- Killing a regular player gives 1 point. Killing a Juggernaut gives you 6 points. Capturing a spawn point gives you 4 points.

- At the end of the match the scoreboard pops up displaying which team captured all points and won the match.
|

- The spawn selection menu gives you an overview of the level and it's spawn points allowing you to monitor which spawn points are taken and which ones are still for grabs.
- The spawn selection menu can be used for multiple purposes. Mainly it is designed to select which one of the captured spawn points by your team you want to spawn in.
- You can also use this menu to check out your teammates location during the match. This way you can decide whether to spawn closer or further away from the action.
- By default you will spawn in the furthest captured spawn point of your team.

- By left mouse clicking one of your spawn points you can override the default spawn option and spawn in any spawn point your team captured. After selecting it it will turn green.
- This spawn point is now your default spawn point throughout the entire match unless you disable it again.
- A manually selected spawn point can be disabled by simply clicking it again.
| Minimap Icons |
|
- By default you will always start in the nearest spawn point. Red when Rogue, Blue when Vanguard.
- If you want you can select a different spawn point manually by opening up the "Spawn selection" menu. There you can select which ever spawn point your team has control over. When selected it will turn green. This shouldn't be needed much, if ever. This can be used when an enemy Juggernaut player managed to slip through all the way around to the other side and is hiding around your main base, or for other tactical reasons.
|
- Points in the direction a player is looking at.
|
- Points to the direction a vehicle is headed for.
| Drivable Vehicles |
|
- The jeep has 2 versions, a red and blue one. Placed in a position where they will most likely be taken by that team color for a base attack. Of course any team can drive either one of them.
- Controlling the vehicle is done by using the default movement keys. Moving the mouse in combination changes the camera view, enabling you to look in all directions while driving.
- The jeep has 3 seats, 1 driver, 1 passenger and 1 inside the rear trunk looking backwards.
- To enter the jeep simply walk up to one of the 3 seats and press the "Enter/Exit vehicles (Use item)" key.
- To move seats within the car use your "duck" key.
- When entering the vehicle from any other seats your "jump" key instantly moves you to the driver seat, for fast getaways.
- The vehicle has a turbo for quick last second attacks escaping a hairy situation. To activate press your "sprint" key.
- Inside a vehicle you have the option to drive in first person or in third person. Switching between views can be done by using your "Cycle 1st/3rd person view in vehicles" key.
- Enemies can enter a vehicle you are driving as well. Be careful not to take them for a ride and get shot in the back of the neck!
- Leaving a car idle for a minute will cause it respawn to it's original position.
|
- Controlling the vehicle is done by using the default movement keys. Moving the mouse in combination changes the camera view, enabling you to look in all directions while driving.
- The fcvp has 4 seats, 1 driver, 1 passenger and 2 rear seats facing the front.
- To enter the fcvp simply walk up to one of the 4 seats and press the "use" key.
- To move seats within the car use your "duck" key.
- When entering the vehicle from any other seats your "jump" key instantly moves you to the driver seat, for fast getaways.
- The vehicle has a turbo for quick last second attacks escaping a hairy situation. To activate press your "sprint" key.
- Inside a vehicle you have the option to drive in first person or in third person. Switching between views can be done by using your "Cycle 1st/3rd person view in vehicles" key.
- Enemies can enter a vehicle you are driving as well. Be careful not to take them for a ride and get shot in the back of the neck!
- Leaving a car idle for a minute will cause it respawn to it's original position.
|
- Controlling the vehicle is done by using the default movement keys. Moving the mouse in combination changes the camera view, enabling you to look in all directions while driving.
- The 2CV has 4 seats, 1 driver, 1 passenger and 2 rear seats facing backwards.
- To enter the 2CV simply walk up to one of the 4 seats and press the "use" key.
- To move seats within the car use your "duck" key.
- When entering the vehicle from any other seats your "jump" key instantly moves you to the driver seat, for fast getaways.
- The vehicle has a turbo for quick last second attacks escaping a hairy situation. To activate press your "sprint" key.
- Inside a vehicle you have the option to drive in first person or in third person. Switching between views can be done by using your "Cycle 1st/3rd person view in vehicles" key.
- Enemies can enter a vehicle you are driving as well. Be careful not to take them for a ride and get shot in the back of the neck!
- Leaving a car idle for a minute will cause it respawn to it's original position.