Tutorial 14: How to Compile the Source Code for Risen3D.
Game: Doom, Doom2.
Level: Intermediate.
Objective: By the end of this article the reader should be able to build the source code for Risen3D Doom port using VS 2008 Express Edition or VS2003 (.NET).
Resources required: See main text below.
Introduction:
Building Risen3D on VC++ 2008 Express Edition is a bit more demanding than your average Doom port. This port was partly based on an older version of Doomsday (version 1.7.8, I believe). Further an older compiler is used in its development (VS6 of 1998 or VC98) which is also a full version. So we are about to make a jump from using the old and commercial Visual Studio 6 to the relatively new and free VC++ 2008 Express Edition; so be prepared for a rather noisy build process; your compiler will complain a bit but it will do the job for you at the end. Some tweaking is also necessary and more resources are required .However getting your fully working executable at the end of it should be quite rewarding. Needless to say,Risen3D is one of the best looking Doom ports out there;it has lots of resources for eye candy and its development is still active, pay a quick visit to the website here. I strongly recommend that you have a go at compiling the source code as shown in this article, it should be worth every minute you spend on it.Everything you need is listed or linked here.You only have to set up the compiler and its resources once and it should be downhill from there on.
Pre-requisites:
I suggest that you first read through "Getting started tutorials Parts 1 , 2 and 3 on moddb.com , doom section" of this series. This should give you enough information, if you don't already know, on how to set up VC++ 2008 Express Edition and use it to compile a mod for doom.
Procedure:
Stage 1: Download your resources
Step 1:
You need to start downloading the following resources first:
1. Download the complete EAX 2.0 SDK from Creative Labs. It contains all the necessary libraries and headers that support EAX 2.0 , get it from here.
2. Download the fmod libraries from the official website here. (The one you need is the old version 3.75 .If it is not available, google for fmodapi375win.zip. ) . Or get it directly from here.
3. Your compiler also needs 2 important gl header files : glext.h and wglext.h, get them from here.and here
Note: if you have difficulties downloading these files, just open this page:Opengl.org
then locate these 2 files under the heading : "Core API and Extension Header Files "Now just right-click on these two links glext.h and wglext.h , and choose save target as... .If you are using chrome or an up-to-date browser, then just clicking the links should download the files for you.Place these 2 files inside a subfolder, name it GL (yes use upper case letters) and paste it inside the include file in your VC++ 2008 Express folder as shown in figure 1 below:
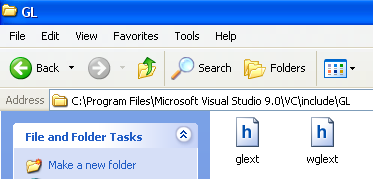
Figure 1
4. Download and install DirectX sdk version February 2010 from Microsoft ,it is quite sizeable (you'll need this particular version if you want to build Zdoom or GZdoom later). Click here.
Note: If you already have directX sdk of any version pre-installed on your hard drive, then it should probably do the job and you can skip this step.
5. You need of course to download the Risen3d source code; get it from here. The latest version at the time of writing this article was v220-12.
Step 2:
You also need to add a few png library and header files to your project. However when using such files one has to be very careful as these resources are widely available on the net and in different versions ,and using the wrong ones could certainly send you on "wild goose chase" when it comes to building a project like this. So we are going to play it safe and use the same header files that were used to build this port. The best place to get these files is from our friends at sourceforge.net; however to save you time looking for the correct versions on this website I've put together a small package for you, download it from here .
Now extract this zip file into a temporary directory ,then copy all the header files and paste them into the Include subfolder inside your source folder as shown in figure 2 below:
Header files to copy are: png.h; pngconf.h; zconf.h and zlib.h
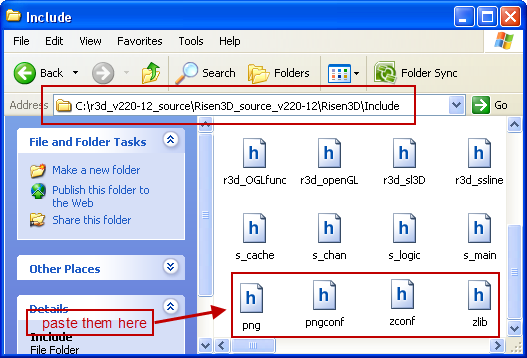
Figure 2
Copy the library files: libz.lib and libpng.lib (and libpngd.lib if you want to build the Debug version) paste them into the lib subfolder of Risen3D source code directory .See figure 3 below.
(Important: set a path for these in VS2008 Express Edition as shown later in figure 5 below).
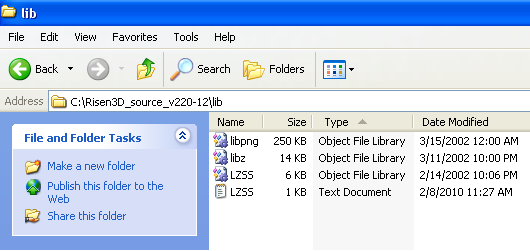
Figure 3
Stage 2 - Preparations:
Step 1:
Make sure to extract all your downloads to suitable locations on your hard drive. Use default directories if at all possible specially when installing the DirectX SDK. Follow the examples given in" Getting Started Part 3 ".
Step 2:
Set up the search directories for all the resources above. Follow the step-by-step procedure in " Getting Started Part 3 "on how to set up the search folders for the include and lib folders for the above resources. This is an important step if not done properly or completely, then your source may not compile. You should end up with something similar to figure 4 and 5 shown below:
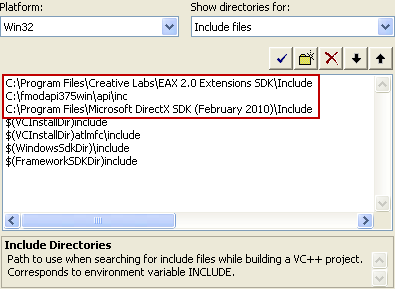
Figure 4
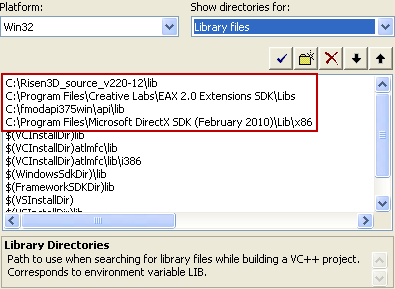
Figure 5
Stage 3 - Build Risen3d.exe:
Step 1:
As I mentioned in the introduction, Risen3d was developed on an old commercial version of Visual Studio, so you need to do some tweaking to the resource file in order to by-pass some restrictions imposed by the absence of certain features in the 2008 Express Edition, otherwise your source, as is, will not compile. This Express Edition does not support editing resource files so you have to use a text editor like notepad to disable some unnecessary code that will prevent you from building your exe. The code we are disabling is not vital .Risen3d comes with its own launcher and you can do without the stuff in this file. So please do the following:
1. Use notepad or your favorite text editor to open the resource file Risen3D.rc (find it in the Src subfolder) and delete or comment out the whole lot leaving only the following 2 lines which we need to create the icon:
#include "resource.h"
IDI_ICON1 ICON DISCARDABLE "icon1.ico"
See figure 6 below:
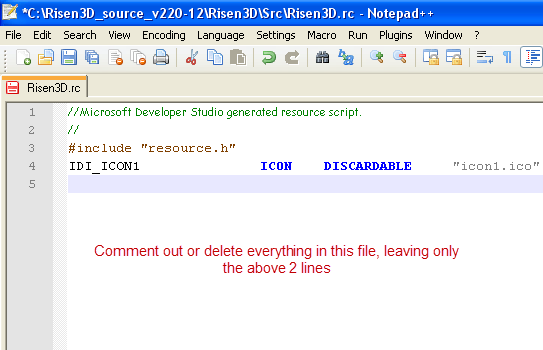
Figure 6
2. Save and close the file.
Step 2:
1. Now navigate to the subfolder "...\Risen3D_source_v220-12\Risen3D" and open the VC++ 6 workspace file named Risen3D.dsw . When it asks you to convert, answer "yes to all". The project should now open in your VC ++ 2008 Express Edition and is ready to compile. Select the "Release" configuration option and then choose Build->Build Solution from the menu.
2. As I mentioned earlier about the warnings; you are now going to get a lot of them. You could make the compiler quite down by hushing these warnings completely as we had demonstrated in the Getting Started Part 2 Tutorial (these warnings are caused by compiler upgrade and not faults in the code itself). To do this go to :
Configuration Properties->C,C++ -> General->Warning Level and select Off or /W0 .
You can also disable many of these warnings by adding preprocessor definitions like:
_CRT_SECURE_NO_WARNINGS in the property page under C, C++ option.
3. After a little wait, your VC++ 2008 Express Edition should produce your new Risen3D.exe in the Bin subdirectory in the Release subfolder. See figure 7 & 8 below:
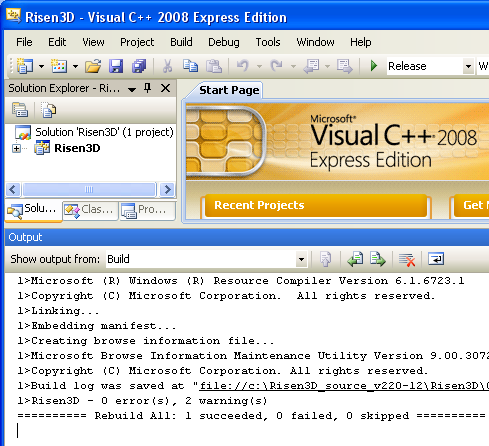
Figure 7

Figure 8 Your Risen3D.exe is finally born!
4. Copy your new exe and test it with your Doom game. Use the original launcher that came with Risen3d distribution; it should work with no trouble at all . I used this method a number of times and test-played the compiled Risen3D.exe for many hours and on several maps without encountering any problems. Please let me know if you face any.
Now you should be able to create mods for this beautiful port!
Tip: You should be able to build risen3d with the above setup and resources if you have VS 2003 (.NET v 7.1) without the need to edit the Risen3D.rc file or hush the warnings. The source code releases so far are fully compatible with .NET and should compile perfectly with just a couple of warnings which you can easily correct by adding a couple of parenthesis.
Please note that I use WindowsXp so your images may look different from mine if you are using Win7.
All my greetings go to the port authors and developers for their excellent and hard work.
A.Delyon
Return to the Tutorials Page.