Tutorial written by ukgamers.net
Mirrored here for archival purposes. Note this is an unofficial tutorial the official Remedy tutorials are located here.
Note I have mirrored the "example" finished level supplied with this tutorial in the "files" section. I recommend downloading it so you can see how it is supposed to look. This tutorial is recommended to be started after completing one of the starter tutorials and built ontop of a first map.
Tutorial 2: The falling wall.
Intro:
If you haven't downloaded the example, then this tutorial will show you how to create a false wall that will collapse when Max goes near it.
In order to do this tutorial you need to have completed tutorial 1 or have downloaded the starting rooms from here. This just gives us a simple two room starting point.
Step 1 : Creating the wall mesh
Fire up MaxEd, if you already haven't done so, and open up the tutorial_1_finish level we created in tutorial 1 or if you downloaded it from this site (see intro). Make sure you are not in wireframe mode <F2>.
Move your camera into the room where the Jumppoint isn't. We'll be working in this room. First off, there isn't enough room to swing a cat in here, never mind adding an extra wall. So, the first thing we need to do is to extend the room. Enter EXTRUDE mode <F4>. Click and drag, with the left mouse button, on the back wall until the room is at least doubled in length.
We are going to create our new wall in the middle of this room - where the wall we just extended used to be. Before we start modelling, we need to position our grid where we want our new wall to be. While still in EXTRUDE mode, hover your pointer over the back wall and press <A>. The grid is now vertical. Enter GRID mode <F12> and use <PAGEUP> or <PAGEDOWN> to move the grid in the centre. Great, except for the spacing of the grid is too much - we want to add more detail to our wall than the current spacing allows. On the numeric keypad press the minus key <-> to decrease the size of the grid by one. This can be done in any mode.

Now to model our wall. Instead of just having a plain big solid rectangular wall we'll make a jagged 'cut-out' that falls away, leaving the sides intact. We'll model our wall in two parts; the outside and inside - the inside part being the bit that falls. We'll start with the outside first...
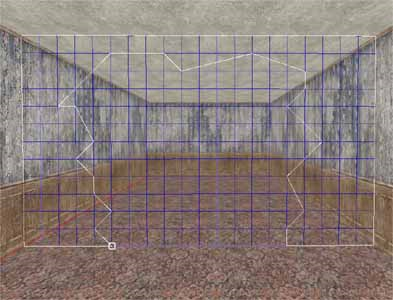
Enter MODEL mode <F3>. In the materials panel on the left, select wood from the dropdown list. Now select the Wall38 texture. This is so that our mesh is automatically textured after it has been created. We'll start modelling the wall from the bottom left of the grid - where it meets the wall and the floor. Click this point. Now click the top left corner, then the top right corner and then the bottom right corner. Now, staying on the bottom line, click a point about five units in. Now for the artistic part. While clicking in small units along the way, create a jagged arch. Right click when you get to the bottom line, again about five units from the left edge. Use the diagram below as a guide.
You should see your new wall, except it is inside out!! This is because MaxEd thinks you are still creating rooms - rooms surfaces point inwards, we want ours to point outwards. This is simple to correct. Enter EXTRUDE mode <F4>. Hover over you new wall so that it is highlighted and press <CTRL>+<F>.
Now for the inner wall. Enter MODEL mode <F3>. Starting from the bottom left of the new opening, work your way around the jagged arch, being careful to follow the same path and clicking on the exact gridpoints the outerwall is on - this is because we want out innerwall to match the outerwall exactly so you can't see any gaps. When you get to the bottom right of the opening, right click to create the mesh. Again it is inside out, so enter EXTRUDE mode <F4> and press <CTRL>+<F> whilst hovering over the innerwall so it is highlighted. That's both walls created.
Now we'll name them so we don't get confused later. Enter TRANSFORM mode <F5> and click on the outer wall to select it. This should highlight its name grey in the World Group hierarchy in the top left of the window. Right click this name and select properties. In the name box type Outerwall. Click Ok. Repeat this process for the innerwall but obviously name it Innerwall. Click OK. Now we'll group the walls into the rooms. Still in TRANSFORM mode. Click on a wall first, just so the view is activated, then press <CTRL>+<E>.
Save your progress.
We'll need to get the textures to look right next...
Step 2 : Aligning the textures
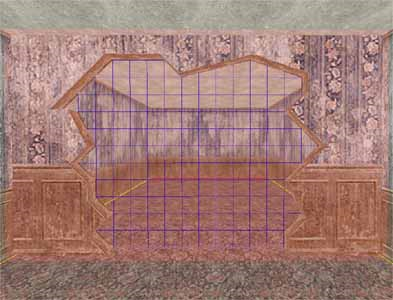
As you can probably see, the textures on your new wall don't line up with the existing room wall textures. Enter TEXTURE mode <F6>. Highlight the outerwall by hovering over it. Press <U>. Enter 3 in both boxes. This is the same scaling as the other walls. Click OK. Do the same for the innerwall.
Now you'll notice, although the texture is of the correct scaling, that you can see the joins - this is because the texture needs to be slid into place (just like real wallpaper!). You could physically move the texture into place with the right mouse button but that would be very fiddly! The quick way is to copy the mapping from the outerwall. Hover over the outerwall and press <C>. Now click on the inner wall to paste the copied mapping. Et Voila!
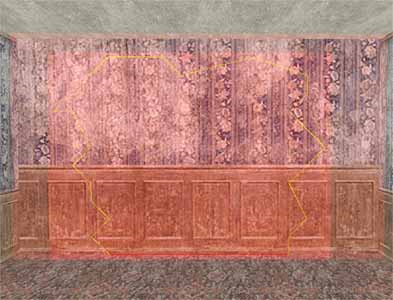
Move the camera to the other side of the wall. The grid should be on this side by the way. Enter TEXTURE mode <F6>. Hover over the outerwall and press <U> like we did before. Again enter 3 in both boxes. Click OK. This time the outerwall doesn’t match the room walls. Coping the mapping won't work this time around though! Instead, use the right mouse button to drag the texture down until it is in line with the room wall texture. Now we can copy the mapping to the inner wall. Hover over the outerwall and press <C>. Now click on the inner wall to paste the copied mapping.
Keep the camera on this side for now.
Save your progress.
Next...
Step 3 : Let's animate
So that we can animate the innerwall we need to make it dynamic. Enter TRANSFORM mode <F5>. Select the innerwall by clicking on it. Press <D>. Answer Yes, twice. You'll notice that dynamic objects are indicated by a cogwheel in World Group Hierarchy. The Innerwall should be indicated by this. Right click the Innerwall in the World Group Hierarchy and select properties. Click the statistics tab. Tick bullet collisions and dynamic collisions. This is so nothing can pass through it! Click OK.
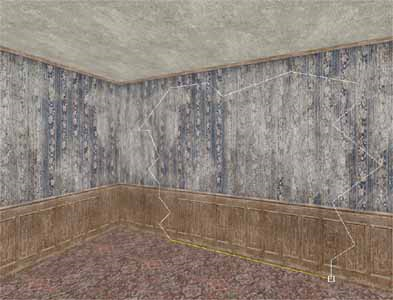
To get the wall to fall, we'll need to rotate it, but we don't want it to rotate around it's middle, we want it's pivot to be at the ground - so it falls nicely forward from where it stands. We'll use the centre point of the grid to do this. The centre point of the grid is indicated by the white, yellow and red axis lines. Enter GRID mode <F12>. Use the cursor keys to move this axis, the grid's centre, to the bottom middle of the inner wall like so...

Press <P>. Answer yes to 'Set pivot to grid centre'. Now to animate it. Enter TRANSFORM mode <F5>. Click the innerwall to select it. Press <TAB> to bring up the object's keyframe dialogue. A quick note about animation. If you have never used a 3D or animation package before then keyframing is the process of setting key positions, rotations etc, along a time scale. The computer works out the in-between bits. For example our wall has a key frame in the up position and soon a keyframe in the fallen position. The computer animates the frames in-between - the actual fall. We already have the first keyframe because MaxEd automatically adds one in the position the object is in when you make it dynamic. Now to create the second keyframe...
In the keyframe dialogue box click Add to create a new keyframe. The new keyframe, 'Keyframe 1', should be highlighted, click Goto to make sure we can edit that keyframe. Click Close to continue. We should still be in TRANSFORM mode. We need to rotate the wall so that it is flat on the floor. Rotations can be made in the X, Y and Z axis by using the <1>, <2> and <3> keys, respectively. My wall needs to be rotated in the Z axis. Press and hold <3> and move the mouse until the wall is rotated towards you, flat on the floor. If your wall rotates in the wrong axis, use a different key <1> or <2> unit you get the right one. You should now have this...

We have set up the keyframes, now to set up the animation. With the innerwall selected press <SHIFT>+<TAB>. The animations dialogue box should appear. Click Add to create a new animation. Start keyframe should be 0 and the end keyframe should be 1. Click OK. Next click Rename to give it an easier name to work with. Name it fall. Click OK. Also, the length of the animation is too long, the default is five seconds. Click the Length button. Enter 1 in the box. Double-click our animation in the list to see it. The animation should play. Please note that this does not always give you an accurate, real-time display - just use it as a guide. Ok great!
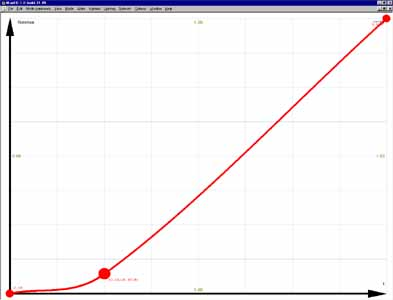
One problem is that the wall just instantly falls, there's no acceleration, it just goes! To make the animation look more convincing we want it to slowly fall gradually and then pick up speed before crashing to the ground. We can control the speed using curve graphs. Highlight the wall again and get back into the animation box by pressing <SHIFT>+<TAB> again. Click the Rotation graph button. This brings up the curve graph for the rotation of the wall. The exact uses of curve graphs are beyond the scope of this tutorial, but basic animation rules apply. To give you an idea, the y axis (up) of the graph represents the actual rotation along the given time (X axis - along the bottom), t. As you can see the red line is straight, therefore the animation is linear.
Starting from the bottom left, go along two grid squares and two up. Double-click on the red line at this point to add a new node. Drag this node down to near the bottom to create a curve. Use this diagram as a reference...
Close the graph window to return to the editor. Double-click our animation in the list again to preview your changes. Ok, that's the animation done.
Save your progress.
We need to add a trigger to set the animation off, next...
Step 4 : Triggering the action
Move the camera back to the other side of the wall and face into the hole - the 'hidden' room if you will. To get the wall back in the upright position we need to get it back to it's default keyframe. Go to the Options menu and click Goto default keyframes. This would also reset every other animation too, if you had any. If you just wanted to goto a specific keyframe in a specific object, just bring up the keyframes dialogue (<TAB>) and goto the frame you want.
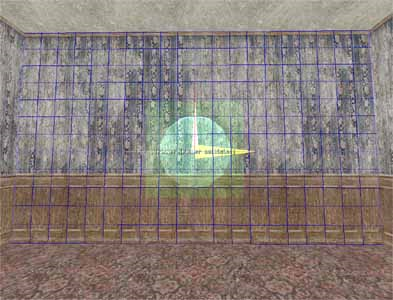
Align the grid to the wall - enter EXTRUDE mode <F4>, highlight the wall and press <A>. We can now add a trigger on the wall, so when the player goes near it, the fall animation is triggered. Enter MODEL mode <F3>, because the trigger is an entity. Highlight a grid point near the centre of the innerwall. Press <N>. In the entity dropdown select Player collide trigger. Click OK. Name it walltrigger. Click OK. We need to group everything before we continue. Enter TRANSFORM mode <F5>, click in the 3D window just to make sure it is activated (grouping doesn’t work otherwise). Press <CTRL>+<E>.
Now for a bit of programming! The MaxFx engine makes it very easy to program almost any aspect of the game. This system is called FSM or messages. Click on the entity we just created and highlight it. Bring up the messages for it by pressing number <4>. Click the Messages button. Click the T_Activate tab and then click the top-most Add button. Enter this exactly:
parent::Innerwall->DO_Animate(fall);
This basically starts the fall animation if the object Innerwall. DO stands for Dynamic Object by the way. So, when the player touches the trigger it plays this bit of code. Problem is, the wall will fall every time it is triggered. We need do deactivate the trigger once it has been used. Click Add again, and enter this:
this->T_Enable(false);
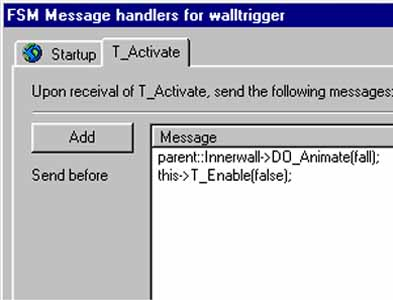
That's basically it, for now. Click OK. Close the remaining dialogue box.
Save your progress.
Before we move on, let's test it out so far in-game. As we did in tutorial one, Export the level - goto the File menu, click Export X_LevelDB. Save it over the level we created in tutorial one - "database\levels\mymod\mylevel1.ldb. Run the game and give it ago. Don't worry about the pink edges! This is just because the level hasn't been rendered. I would recommend Remedy's own tutorial on rendering to help you light your rooms. But let's finish this first...
Return to MaxEd when you’re done. Next...
Step 5 : Adding Effects
Right, fun stuff. We're going to add some sound FX, some particles and a camera shake!
Move the camera back into the hidden room. Align the grid to the floor - EXTRUDE mode <F4>, <A> on the floor (you should know this by now!). Go back to MODEL mode <F3>. Highlight a grid point roughly in the centre of the area when the wall falls on the ground. Press <N>. Select Floating FSM from the list. Press OK. Name it Particles. Enter TRANSFORM mode <F5>. Remember to group it like we did with the entity before. Press <CTRL>+<E>.
Click and highlight the new entity. Press <4> on the keyboard. Click Custom strings in the dialogue that pops up. Click Add and name it debris. Click OK. Click Close and then click Messages.
Click the top-most Add button. Enter:
this->PS_StartEffect(debris_crash_medium, "");
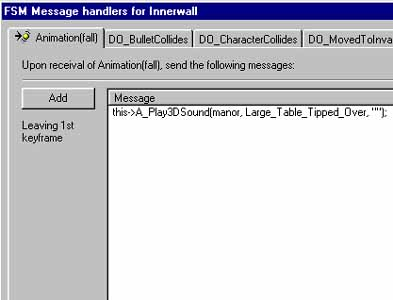
This sets up the particle system to be trigger later. Click OK. Click OK again and close the remaining box. Click and highlight the innerwall. Press <4>. Click Messages. The Animation(fall) tab should be open.
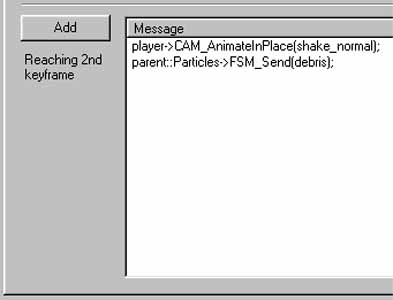
You can see the window is broken into three sections, ignore the middle one, we won't be using it. We just need 1st keyframe and 2nd keyframe sections. In the Leaving 1st keyframe section click Add (the top one). We'll add a sound effect for the falling wall. Enter this:
this->A_Play3DSound(manor, Large_Table_Tipped_Over, "");
That's all we need in the top section. In the Reaching 2nd keyframe section, click Add (bottom one). First we'll add an effect that makes the camera shake. This gives the impression that the wall is very heavy. Enter this:
player->CAM_AnimateInPlace(shake_normal);
Now we'll trigger the particle system we added earlier. Click Add again. Enter this:
parent::Particles->FSM_Send(debris);
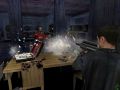
That's it!! Now export the level again and give it a go in-game. Well done. If you downloaded the falling wall example you'll notice the extra features it has over what we have done here. There is no time to go through everything in that example here, so why not see if you can create something similar, now that your'e armed with the right knowledge now!

how to make cutscenes with Maxed tool in our mod?
Unfortunately I'm not sure precisely how to do cutscenes at this time. I haven't been able to find a tutorial that's presentable.