Blade :: 3D (v 0.1 English)
With time, we made levels, textures and more for Blade: Edge of Darkness. But the introduction of new characters, objects and animations in the engine were not so easy. This Tutorial try to remedy that.
Let’s see the tools that came with the game SDK for this very purpose.
We will find 3 plugins.
- -bldexp.dle
- this plugin allows to export objects, characters and animations to the format of the engine.
- - Camera.dle
- We use this plugin to export camera animations to the format of the engine
- - MBWImporter.dli
- This plugin allows to import a level in the format bmw to 3DSMAX, to use as reference in the actor animation, camera animation, etc.
This plugins most be installed with the MSVCRTD.DLL file in the 3DSMAX 2.5 directory installation.
And we know by experience that this plugins only work with the version 2.5 of 3DSMAX we can make the meshes in the newer versions but we need the 2.5 version for the import and export work.
Right, in ours copy of MAX 2.5 we put the 3 plugins in the plugins directory, and we put the MSVCRTD.DLL
in the main directory. We Start the program and look for the plugins. We know that the extensions *.dle refer to the exportation plugins and the extension *.dli for the importation. So we clik in File/Import and File/Export to see if all is correct. In File/Import we will find the Blade World .MBW. everything is correct, so we will see if the others are correct as well, click File/Export but we most be blind because we only see the camera .CAM file were is the bldexp. The file responsible for the exportation of objects and animations. Is not a Max problem is the MSVCRTD.DLL
he most be incomplete. In time we discover that this was the problem. The true is that is missing 4 files, that never came with the SDK, this are the files: PYTHON15.DLL, BBLibc.dll, BBIxc.dll and Raster.dll, that are included in this guide (The ones that came with the game don’t work). We copy this files to the main directory and started the MAX program. We were right.
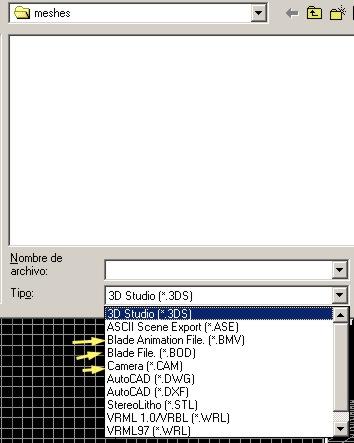
We will find Blade Animation File *.BMV that is responsibly for the animations and objects. Working plugins let us know how they work
When we export any 3D mesh we need to maintain the internal structure of the mesh, are they new characters or objects... The internal structure of all the different models are:
* Model of the object:
One mesh (object) can have the nº of faces that we want, one UVMaping, and the group of softness and ID of subobject that we think is good. For the scale of the object, and to facility the task of scaling this guide came with the metrocubico.max (cubic_meter.max) in the file max. when the model is done with UV and the textures are in the *.bmp format that will be with the help of the SDK imported to the *.mmp format of the engine, we can go to the formalities.
GENERIC OBJECTS
Can’t be picked up by the characters before he sees them.To accomplish this,we only need to attached them to a group (Group/group) called Blade_Object_NombreDelObjecto.(blade_object_nameoftheobject) The name of the object will be displayed by the engine. Later (the group don´t need to be selected) File/Export-Blade File, and we tipe the name of the *.Bod, that don´t need to be the same as the group that have the object inside.
WEAPONS
When we have finished to work in our weapon, we have to be informed of many aspects, to obtain the weapon working as we wanted. First is that a weapon will only work if is defined in the script to behave as we want. To do that we need to introduce some indicators to make them work. They are:
-Anchors:
Must exist anchors to the right hand, left and back of the caracter that will manipulate the weapon after we picked them up. This anchors are not more that boxes, the export program will use the center and the orientation of this anchors. We need to have careful with the anchors position and orientation. And exist other anchor that will determine the position of the object in the inventory. This anchors most be called, respectively, of this manner:
Blade_Anchor_1H_R: Right hand
Blade_Anchor_1H_L: Left hand
Blade_Anchor_2H: Two hands
Blade_Anchor_Inv: Position in the inventory
Blade_Anchor_Back: anchor for the back of the caracter
blade_Edge:
They are necessary to calculate the colision zones of the objects when we make a strike with them. They can be of three types, cutting (blade), empale (spears, tip of the sword) and smash (hammer).
The blade edge are defined by a prism of triangular section. They most be called Blade_Edge_N, as "N" is an number that will allow the engine to detect it. The length of the prism will give us the length of the "virtual" blade_Edge and the cut direction will give us the angle most acute of the triangle of the prism.
From all of this we deduce that a weapon only cuts in the zones determined by the edges and in the direction of the orientation of the edges, it is to say, one sword that cuts in both directions most have two edges opposing one to other.
The second type of edge are the ones that empale, the work in this kind of edge is similar to the Blade_Edge, with the diference that is defined by a pyramid of square section. they only do damage in the direction of the tip, this is to say in the direction of the interior normal of the base pyramid with the opposite vertex. It's name is Blade_spike_N.
The last ones are the smash ones (hammer). This type are equal defined as the first type (cutting), and have the same name Blade_Edge_N
and her length determines smashing zone of the weapon. In this case the direction of the attack is not important because this tipe of edge make 360º damage around the edge that identifies the weapon edge (the most acute again). To differentiate one object that smashs of one that cuts, it must be added one anchor similar to the Characters ones. It is to say a box with the name Blade_Anchor_Crush tha will do all the edges of one weapon to be considered smashing ones. A detail to emphasize, is that the weapons that realize smashing damage don´t reproduce mutilations when the enemy dies.
we emphasize also, that the weapons can´t have cutting edges and smashing edges at the same time, but can have cutting and empaling edges simultaneously.
-Trail:
The trails that the weapons reproduce, we define them as vertex´s that trace a "virtual" line when a weapon perform a blow. To this objects of two vertex's (with out faces evidently) we call Blade_Trail_N, were N (of 1 in ahead) indicates the group of vertex of the Trail.
The weapons can have the number of trails and edges that we want, but we must consider, that more they are more calculations will have to process that weapon.
Once processed these structures, and grouped together with the mesh on the object group, one weapon of the type sword, can have this form:
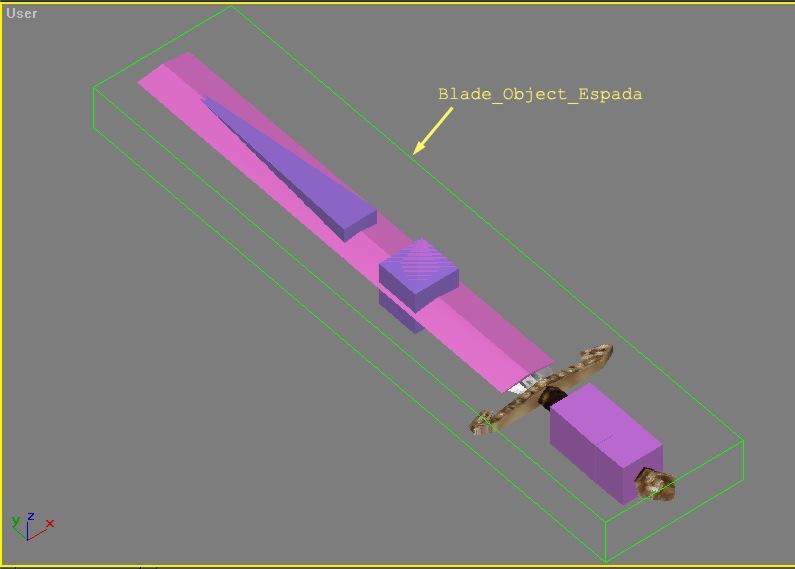
and,more detailed...

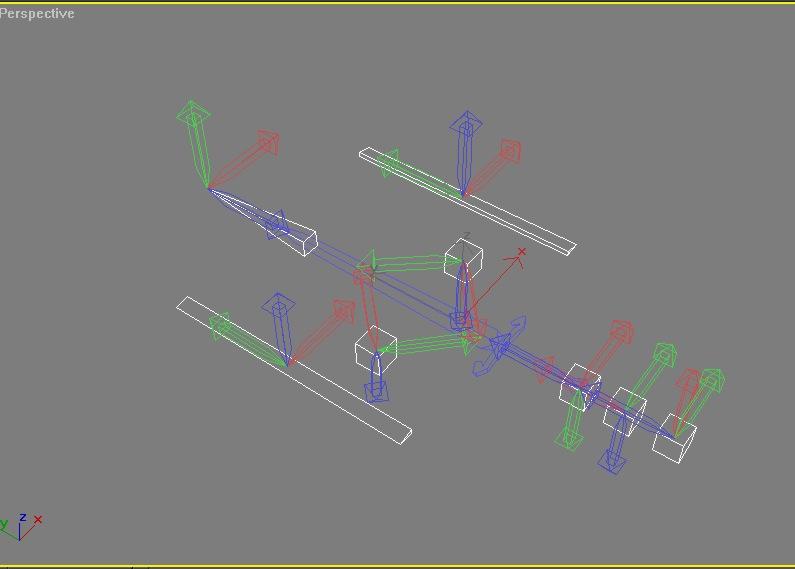
and of a detailed form the pivots of the objects, that affect the operation of the weapon. You should support a direction very similar to this, or we can´t be certainty that the weapon will have a good in game behavior.
SHIELDS
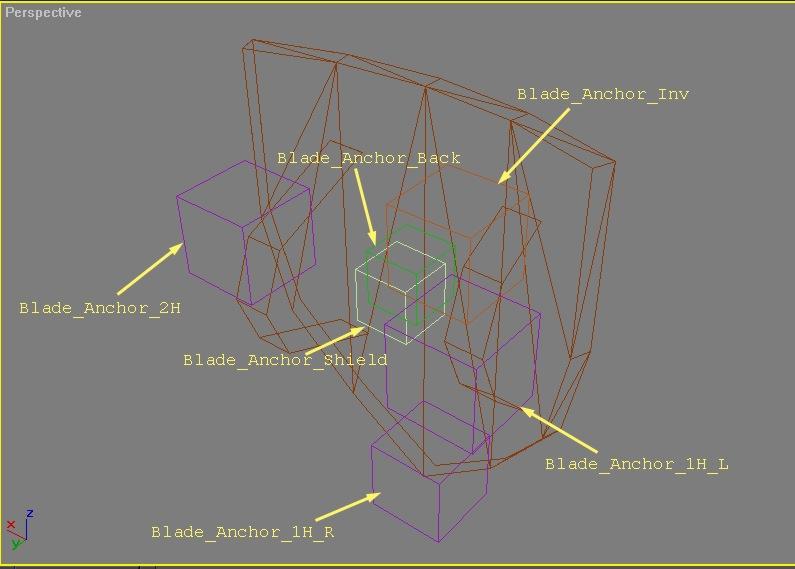
Once finished the mesh of ours shield, we most consider many aspects, for the weapon to work as it is suposed. Are necessary the introduction of some indicators to manage it, as the weapons. To stand out as in the case of the weapons, the importance don't only of their position, but also of their oriention, they are the following:
Blade_Anchor_1H_R :Right hand
Blade_Anchor_1H_L :Left hand
Blade_Anchor_2H :Two hands
Blade_Anchor_Inv :Position on the inventory
Blade_Anchor_Shield :Tells to the engine as he most put the shield in the caracter forearm when is active
Blade_Anchor_Back :anchor that will serve as position to save the shield in the caracter´s back
Once processed this structures, and grouped with the mesh in the object group, one shield can have this form:
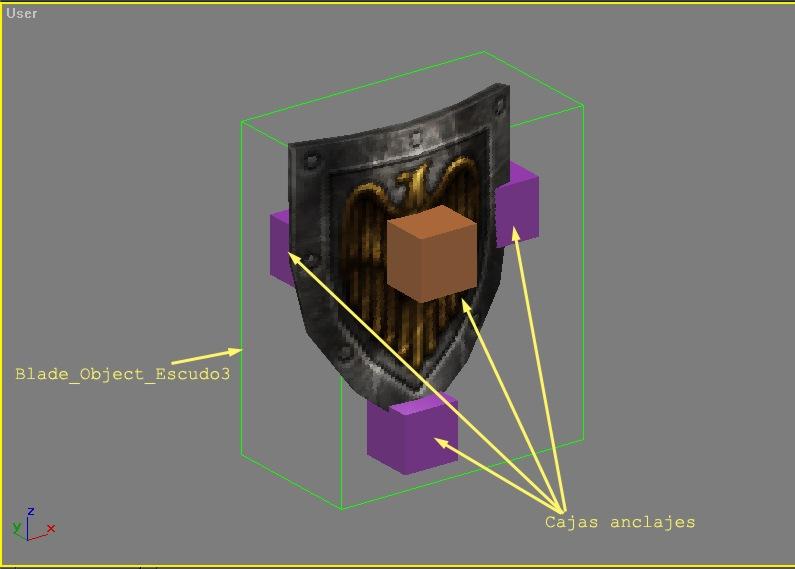
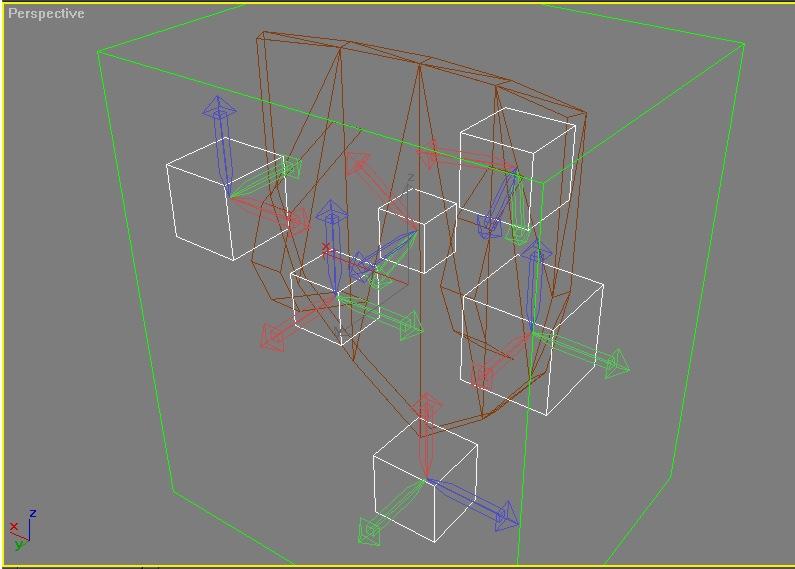
more detail of the anchors...
for last the oriention of the pivots of this anchors...
LIGHT SOURCES
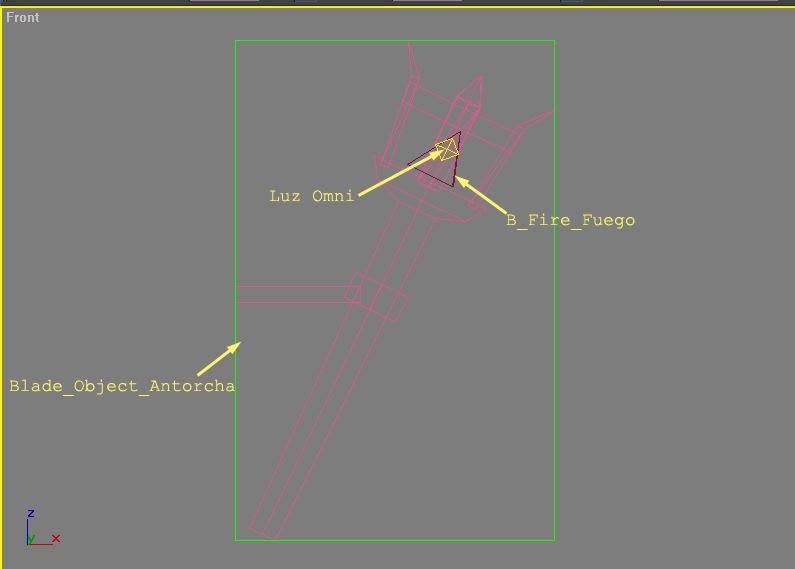
light bulbs, torches and more objects that emite light and particles they must internally have associate a constructed certain structure around a light of Omni type. To this light we attach one object call B_Fire_Fuego that in the engine will be invisible, and whose vertices will emite particles of fire (red and all that.). A common torch, already grouped suitably, would be of the following way:
Good, concluded the objects, I will only coment a litle more about the rest of the plugins, before to enter in the more complex aspect of the engine, the caracters and animations.
As a final note, coment that the process of exportation of the objects, weapons etc... will thank to us. If we made some kind of mistake, the game will be in charge of warn us in the form of hangs or unexpected behavior.
* IMPOSSIBLE WORLDS AND CAMERAS:
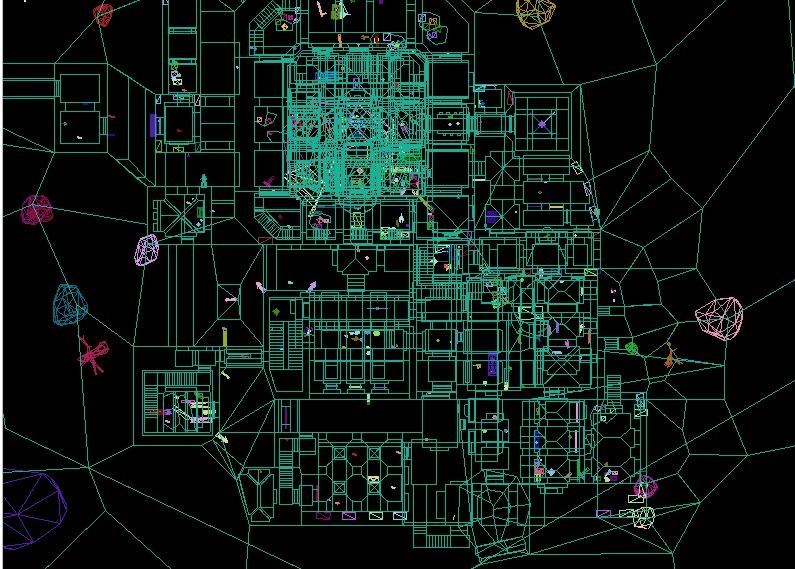
Fortunately, this aspect of the export is very simple. Our goal is to be able to animate a trajectory for the cameras with all the tools available in Max (forgetting the troublesome scripts of python), and export it. Of course that, move the camera without see is a litle ridiculos. Because of that, appears one intermediate tool that will be in charge of showing the map that we created in LED, with objects also. From this world, will not be nothing difficult to export the cameras already animated. The Plugin that do the importation of the map we will find it in File/Import Blade World.MBW. Hmm, the format *.MBW does not seems nothing known by Blade or LED. In order to be able to transform the map made to that *.MBW it will be necessary to make the following thing:
Execute blade with the console (add this to the shortcut of the game -console and run it in window mode )
load the map
In the console put: Bladex.ExportWorld('masklin.mbw')
In the map directory we will export it with the name that we gave to it, in this case masklin.mbw
File/Import:masklin.mbw and it give something like this O_o
The task of move the camera in the map can be solved with a litle of patience. Minutes and hours after, wen you have finish the movement, you only have to select the camera and File/Export:Camera(file_name). In principle, the movement of the camera samples, therefore you can use anything to animate it, and any controller (as noise, waveform and those that your imagination can think). But, as with all the RAS tools, be careful!
* CARACTERS, ENEMYS AND ANIMATIONS:
Maybe the aspect more interesting and more complex. I will try to be concise and brief.
A caracter, in Blade, is not only one mesh, but 3 meshs that define its properties/capacities.
This 3 meshs or groups (in that will be incorporated) form as well another group called Blade_Object_NameOfTheCharacter, similar to the structure of the conventional object.
Let see, what are this 3 meshes or groups, concentrating our effort in the Barbarian:
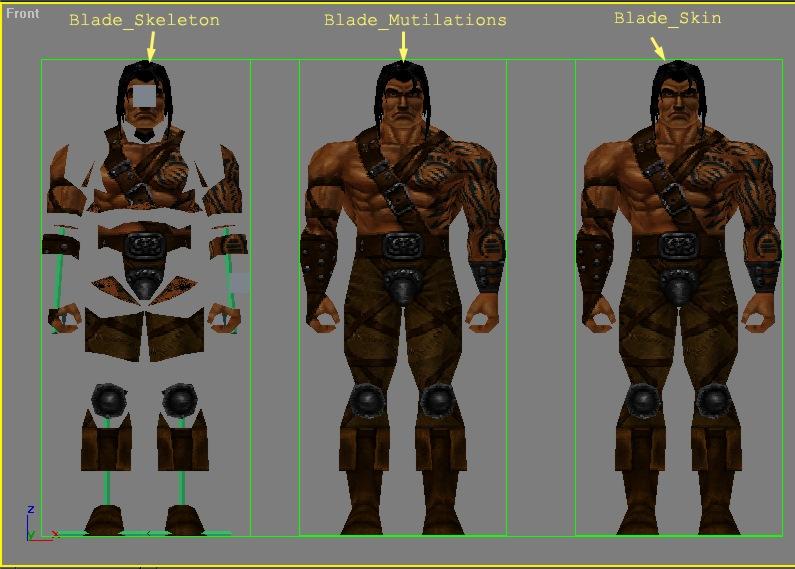
The names of this groups, come indicated in yellow. By its name already they indicate certain things to us.
We will show them in the order inverse to the ones showing above, the most simple to...most difficult.
BLADE_SKIN:: Group of sole-bases and wounds zones
This group is necessary for the exporter to work correctly.
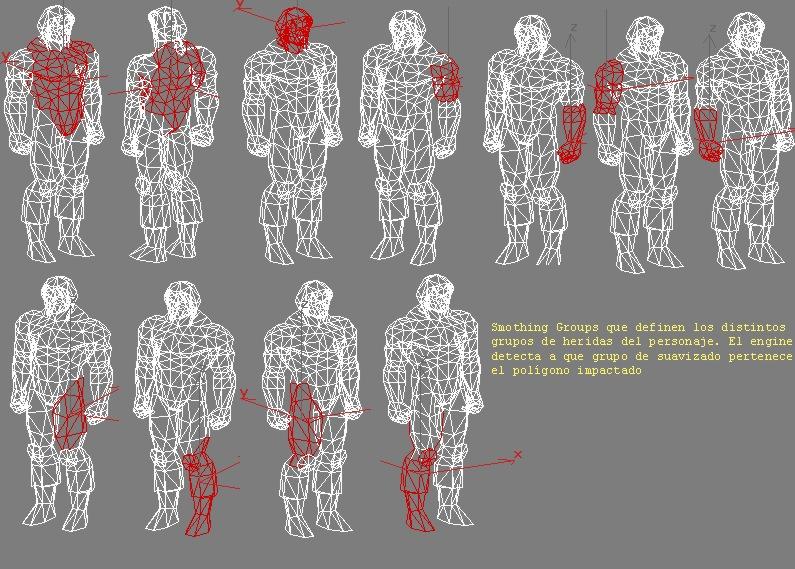
Is in charge of indicate to "the engine" the base constitution of our caracter (volume and map coordinates) and it indicates by means of the groups of smoothed what faces belongs to the same zone of wound (will be faces that have the same "smoothing group" assigned. when one weapon touches in any polygon of the caracter, it will switch the smoothing group it belongs and a change of texture will be made consequently (substituting the actual for the wounded one that we made before) the same will happen to all the polygons that have a smoothing group assigned. Is evident that we will have to be a litle coherent at the hour of assign this groups so that the alignment of the faces don´t be out of place, or without assigning to a group and so that these smothing groups maintain a physical correspondence with the form of the wound to which they make reference. If all faces of the model belongs to the same smoothing group, in the moment that it receives the impact of the weapon all the model will adapt the wound texture instead of it will appering as the wounds are made. If we do not assign texture for the wounds, the above change of texture will not happen.
The wound texture is not defined in the material editor. In principle I assume that "the engine" looks within the mmp for bmp´s with the name of the texture, the BARNF_W.bmp form, where
BARN= Barbarian
F= Front texture
W= wounded
If this don´t happens, the wound file will be indicated by script in phyton. Ease stuff,surely
In the case of the Barbarian, this are the distints smoothing groups that we have assign:
BLADE_MUTILATIONS:: Mutilations group
Every time that a caracter or enemy dies, and if we have the Gore on, it most suffer a visible mutilation of a member or several parts of is body. This mutilations came indicated by this group, that is not necessary
to add in the time of make a character or enemy. In the case of don´t exist this group, the enemy or caracter will die "calmly".If we decide to includ mutilations, we most consider many aspects of this:
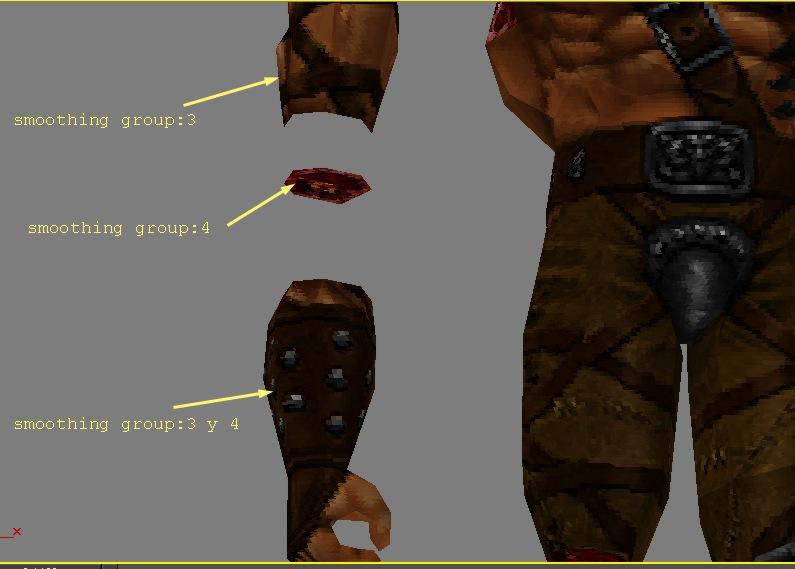
In this group they are indicated of a similar form to the wounds of the previous Blade_Skin, the distribution of faces to determine the mutilations in case of a blow in combat cause is death. This faces are organized according to the smoothing groups that it belongs. Some faces belongs simultaneously to many groups, this is thus when these faces can separate of the original model in several possible mutilations,for exemple one mutilation can cut the entire arm (dragging all with it) or only the hand. For it, we can give to the arm a smoothing group of 2, and to the hand one of 2 and other of 3.
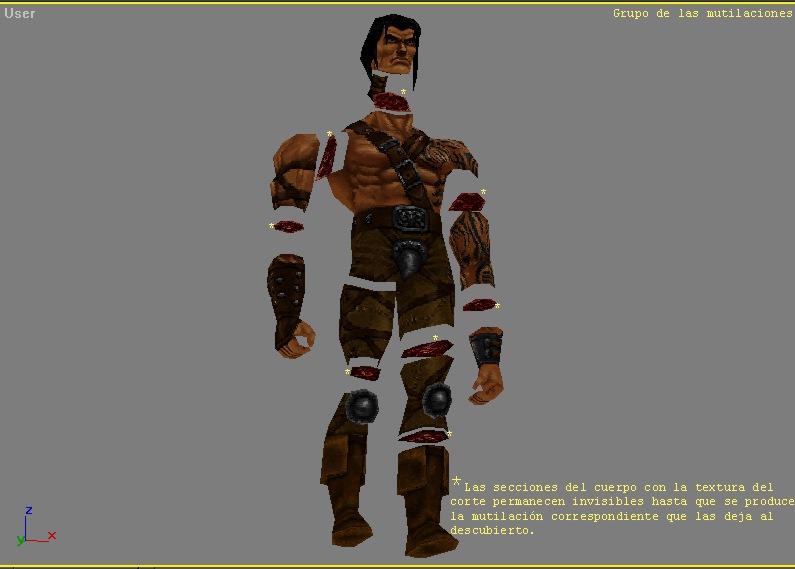
If we paid attention to the effect of mutilation in the game, we will see the wound produced by the cut section in the mutilation. This effect is possible generating an extra layer of faces with the wound texture. The sections of the body with the extra wound texture will only be visible in game when the caracter suffers a mutilation correspondent to the texture. This sections have also a smoothing group. In addition, his number of vertices must correspond with the section which they leave, easy attainable thing, since we will make the geometry with a copy of the end of the mutilated object.
Graphically...
general view of the group:
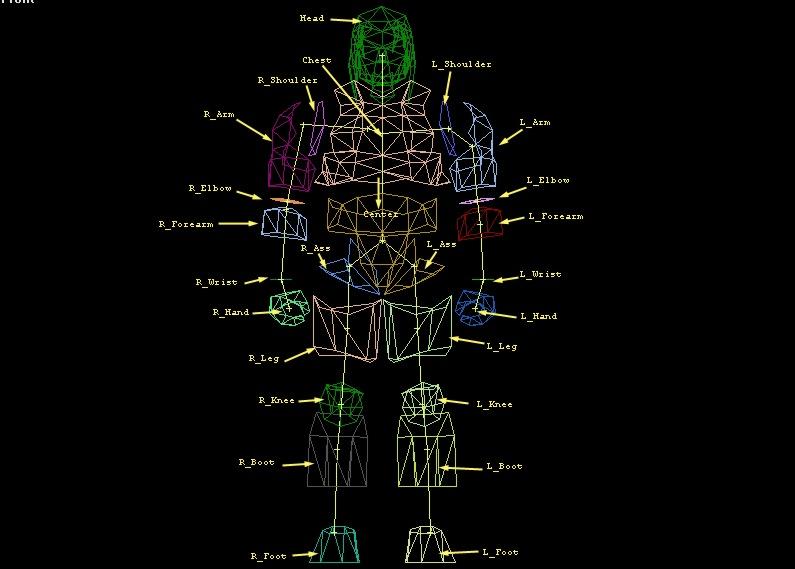
BLADE_SKELETON::Animation group
the most complex group of all. this group most be allways called Blade_Skeleton and is necessary to the good functioning of the exporter.
The method of animating in blade is not of a sistem of deformation of bones. Basically what we do is define a coherent hierarchy, and decide which zones are deformable, that are generated in time to render and that remain invisible in the created skeleton.
By means of this group we indicate to the engine what partes of the model will be rigid and what parts will not at the time of make the animations. The faces of the distinct parts of this group will determine the flexibles edges of the joints that permit the correct deformable animation. This parts most have a hierarchy with a determined order, a concrete name in principal (although all the made tests indicate that he is not fundamental), as well as to be a fixed number of them, if it lacks or it exceeds some, or if the definition order of the hierarchy is not the correct the animation can reproduce undesirable effects once the model is in "the engine". When we talk of a concrete number of parts, we talked about the skeleton that we are working on. For example, in Blade the majority of the characters and enemys share one biped skeleton with a nº of parts X (25 in this case) determined.Thanks to this, the data base of the animation can be passed from a model to another, practically with out problems (except for superpositions by very different scales/volumen of the personage). Then,if what we want is to take advantage of all the existent animations, we most only use the biped hierarchy (that is what will is showing in here, because the spider hierarchy is diferent) with her nº of parts and order, that will detail in the next lines. Because as soon as we add a knot more, for exemple a 3ª arm that leaves from the chest, this animation will be unsuitable, and we will have to make new ones, something expensive for the street citizen.
The hierarchy can be seing clearly in this grafic
In addition, with the skeleton we must include a series of objects "linked" (Because they aren´t) to it, that carry through diferent functions, they are:
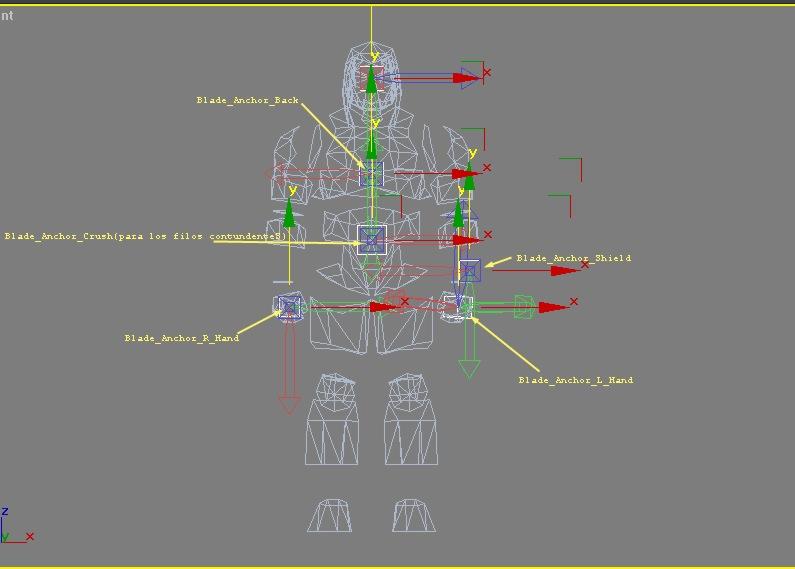
-ANCHORS:
Are cubes with the name Blade_Anchor_name.
This cubes make reference only to the geometric center of the cube and is orientation, as the anchors of the weapons and shields, being the rest inviseble to "the engine". They are used to position objects in different parts of the model, as weapons, shields etc... The name is important for the engine to be able to identify them, they are necessary for the correct operation, them are those ones:
Blade_Anchor_R_Hand :right hand
Blade_Anchor_L_Hand :Left hand
Blade_Anchor_2O ::? Blade_Anchor_Shield :Anchor for the arm to indicate the place of the shield
Blade_Anchor_Back :Anchor for the back
Blade_Anchor_ViewPoint :Anchor for the vision camera of the caracter.
As before, we most take attention to the orientation of (as also to the parts that form the hierarchy of the caracter) the pivot of any of this anchors, since the orientation of the weapons, shields... linked it depends on her. Next I will show the direction of the hierarchy and the anchorages.
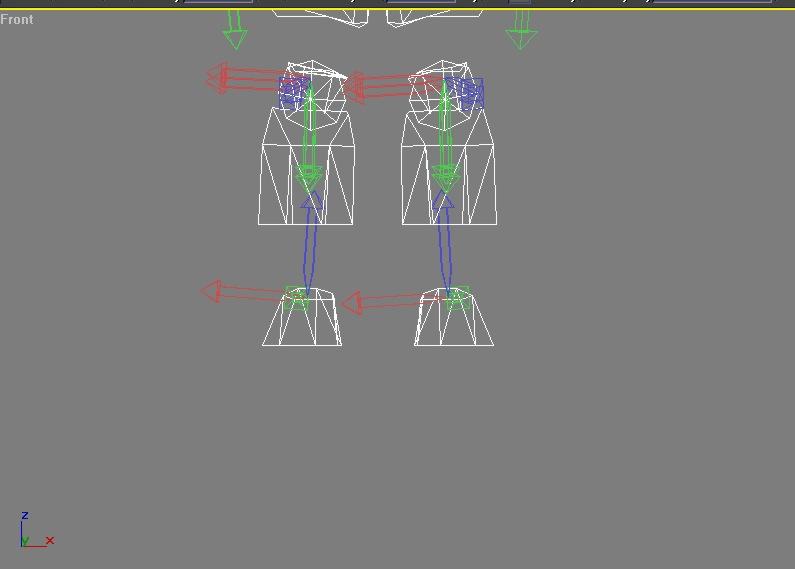
-Edges of hand-to-hand combat:
If, by other side are the edges, that are iqual to the weapons ones, are triangular prisms located in the forearms, hands, calves and feet of the model. Only have logic put them in the player caracter since the enemys are unable to fight without weapon. They most be called Blade_Edge_N were N is a nº used to index it starting from 1.
Her position and length determine the "solid" part of the caracter that will collide with the enemy or object/wall in the case of the caracter make a blow without a weapon.
Of this edges what uses the engine is only the length edge corresponding to the more acute angle of the triangle section of the prism. So that the edges work as smashing zones in place of cutting ones, is necessary (as the smashing weapons) that the model have an extra anchor that will be called the same: Blade_Anchor_Crush and that was not used to link nothing, but only as labels to classify the damage edges.
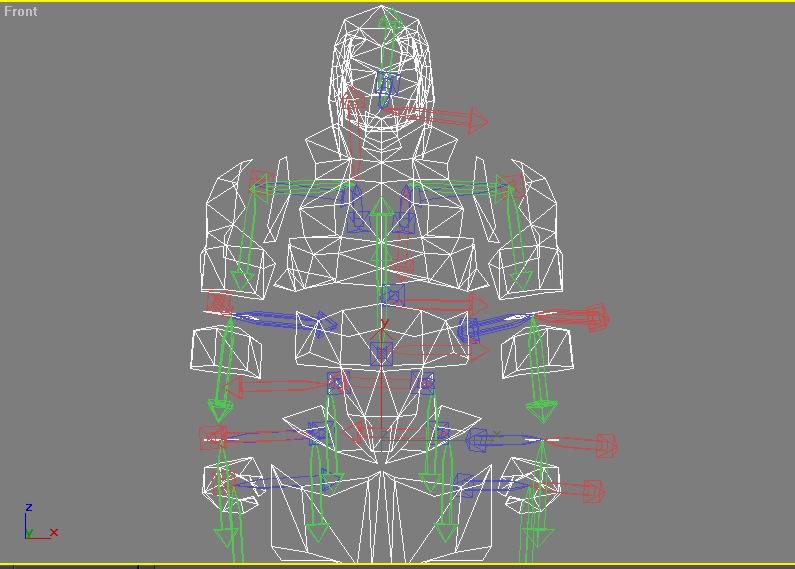
The general aspect of the sheleton group will be this:

Once are finished the 3 groups, what we must do is put them in one commun position (0,0,0 is a good option) and to group them as we have said in the generic group Blade_Object_NameOfTheCaracter, blade_Object_Barbarian_N in the case of our good friend Barbarian, this is the result:

File/Export:Blade File(nameofthearchive don´t need to be the same as the group).
The last subject is the animation.To be able to export a animation what we nedd to do is separate the sheleton group and deblock the hierarchy at it is assigned. Made this, we can erase all the anchors and edges, since the animation don´t use them, only the nodes(25 remenber in the bipeds) and the correct order. Basicly,each piece is animated with keys of rotation and/or position, in principle without limits. Is advisable to use the applied inverse kinematics, to obtain more or less realistic movements, like walking, balance, etc...
We only must consider a small data, and one is to select the center of the animation(objct Center), and to create a single group with which it has the Blade_AnimRoot_NombreAnimacion form by which we will make more late reference from script. If everything were correctly, it would have being able to export the animation correctly.
With this we conclude the exciting world of export/import in blade. With the hope that will help somebody...
Notes:
-----
-when I made this translation still don't exist a BOD to Max converter.
-The same for the animations of the game in the BMV format.
-One archive of Max can't have more than one object or the BOD exporter will give troubles.
-It is quite probable that there are errors and incoherences in some things that I said.
This information was collected with tests and of a first impulse of RAS, Thanks
-The good or bad choice of the rigid and deformable parts of the caracter/enemy to a great extent
determined the visual quality at the time of being applied a file of animation to the caracter.
Is recommendable that the sections "guides" that form the 25 pieces of a standard biped of Blade
have the same nº of vertices that its children, but by the made tests is not essential.
Perhaps somebody will write something more advanced on this pair of aspects, since they would require a tutorial only about them.
Original (Spanish) Guide made by R3D
Translated by Argoon
Any doubt mail at
darkiller@hotmail.com
or R3d.rgba.org

This tutorial was done at first in spanish, while I was uploading it I saw lot of grammatical errors in the translation. It would be very apreciated that if you see one of them, correct it by yourself as it is a wiki.
Thanks for the cooperation.
where is the edit bottom?
Sorry for the grammatical errors but when i made that translation my English was not very good. (not that is now any better :P )
Maybe upload Russian verison this tuts?
Translated by BLADEX.
Can this game be redone with HD Model?
Afaik no, the engine is to old for that. :(
Look is the translation that i did years ago!! Nice to know it was of some use.
Hey guys,
I just cannot understand from where I get the plugins? You say they come with the game SDK...what is SDK B) I have experiance with modeling and textures and I want to change the way that main characters look like in the game.
Thanks for your time!
troty
Yeah, i wish they added more details in the tutorial because i wanna change some stuff in the game too but idk how, also if you figured out how to do it please tell me. I would be appreciated.
Ok... with this guide it's seems we can export .bod files but... how to import them?
...or maybe another question: where i can find .max models?
Thanks
Hi! Is there any way how to install 3DSMAX 2.5 on Win7?