Tutorial originally written by SpazWad
Mirrored here for archival purposes. Note this is an unofficial tutorial the official Remedy tutorials are located here.
1 Introduction
Editting can be difficult at times, but you just gotta stick with it and try not to get burnt out on creating levels. The MaxEd builder seems extremely hairy at first glance, but now that I've used it and know that I understand some of the finer points such as exits, it is almost becoming intuitive. I think that with a couple of days on it under your belt, along with some more tutorials, the Max Payne modding community will be going full force.
2 Setting Up the Editor
Now to get yourself ready to edit. First, open the 'Materials' menu, and choose 'Insert materials from file...'. Find the 'BasicRoom', which is by default in 'MaxEd/Examples/'. Now you have textures. But what good are they without a room? That's the next step.
3 Building Your First Mesh
Okay, in MaxEd, there are different modes that define what type of stuff you can do. For a good reference of each, check the MaxEd reference guide in the help folder. Choose the model mode (F3). Now on the grid, find one of the larger squares, in light blue instead of dark blue. To make a mesh (which is basically the same thing as a brush to those who have previous editting experience), click on one of the corners of the big, light blue square. There is now a line connecting the place you clicked to your cursor. Continue to click around the light blue square's corners until you have clicked all 4. Now right click to accept the shape. Congratulations, you've just built a mesh.
4 Tinkering With Your Mesh

You should have noticed that the mesh seems a bit flat. Well, we can fix that by using the 'Extrude' mode (F4). Now position the cursor over your mesh so that the edges of the ceiling are highlighted. Now click and hold the left mouse button, and raise the roof to make the mesh look as cubelike as possible. Release the mouse button, and now your mesh is ready to go in a level, but first, the editor requires that a certain thing called an 'exit' be created. Exits are tricky, but they become a bit easier when you're used to them.
5 Adding a Room and Doorway
Before we can make our exit, though, we need to have a reason to have an exit. In this case, we're going to make a second mesh, and a hallway mesh connecting it to our original mesh. Since we already know how to make a mesh from scratch, let's try copying one instead of building a whole new one. Goto 'Transform' Mode (F5), and then left click on your cube mesh. This selects your mesh. Goto the edit menu and choose copy (or CtrlC), and then choose paste (CtrlV). You now have a second mesh, but it is in the same place as your first. Make sure you're in 'Transform' Mode (F5), and then left click and drag on your mesh, draggin the mesh left. You now have two meshes, ready to be connected. Go back to 'Model' Mode (F3), and build a third mesh between your two rooms. Make sure that the hallway mesh doesn't fall short. As long as you're using the grid, it shouldn't be much of a problem. Goto 'Extrude' Mode (F4), and raise the ceiling of your hallway, but not quite as tall as the two rooms. Two more steps, and you'll be ready to create your first exit.
6 Joining Meshes
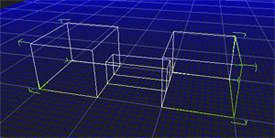
Now for your mesh to be counted as a true room by MaxEd and MP, it must have an exit. Before we can add the exit, we need to unify all our meshes into one, so when we do make an exit, it will mark both of our room meshes as true rooms. If we don't join them, and place the exit in the hallway, the hallway will be split into two true rooms, but our room meshes will not be considered true rooms. This sounds confusing, but it is the best I can put it at the moment. Now to unify our meshes. Goto 'Transform' Mode (F5) and click on one of your room meshes. Either use the 'Mode Commands Menu' and then 'Booleans' and 'Union', or just press the 'u' key. Now click on your hallway. Choose okay, and one of your rooms is now fully attached to your hallway. Check to make sure you're in 'Transform' Mode, (F5), and choose your other room mesh now. Press 'u', and then click on your roomhallway mesh. Choose okay, and you now have a single mesh made into a roomhallwayroom shape. One more step for the exit.
7 Texturing
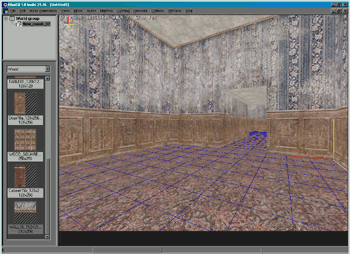
Oddly, I've had to have my level textured before I could define exits, so this step comes before creating your exit. As long as you inserted the textures before you started building, you should be set. Just in case, goto 'Mode', and make sure Wireframe is toggled off (F2). Move around your level and make sure that all surfaces are textured. If you want to texture your level now, go on ahead. Choose a texture from the drop down menu on the left side of your screen, and (while in 'Texture' mode (F6)) left click on the walls/floors/ceilings you want to hold that texture. Right click and drag to pan the texture on the surface. Now to make your exit.
8 The Exit
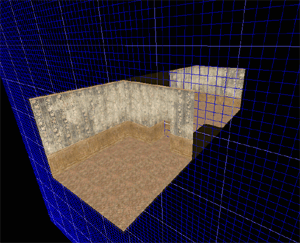
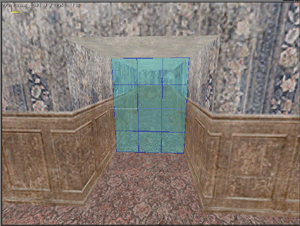
Exits are 2D planes that split up meshes into separate rooms according to MaxEd and MP. We want ours to be placed in the middle of the hallway, or at one of the ends of the hallway. Exits are restricted to where ever the grid is positioned when you make it, so we first need to prepare the grid so it is on the same plane that we want our exit on. Goto 'Move Grid' Mode (F12). Using the '1', '2', and '3' keys, make it so the grid is cutting crosssections of your mesh the short way. Then use 'Page up' and 'Page down' until the grid is positioned halfway through your hallway. If your hallway is too short to get the grid in the middle of it, just position it so it is at the end of the hallway. Now position your camera so you can see straight down the hallway, and you can see all four edges that you'll need to make your exit. Goto 'Exit Creation' Mode (F7), and I find it is easier to do with wireframe off (F2). The grid should be in front of you, so now just click on the four corners of the grid that mark the hallway (it could also be seen as clicking the four edges of the hallway that touch the grid). Make sure you only click the four, and that you go in order (CCW, CW, doesn't matter). Now right click, and you'll get a message, "Mesh is separated into two by exits." Voila, your first exit. There's still more before you can compile your level, though.
9 Entities
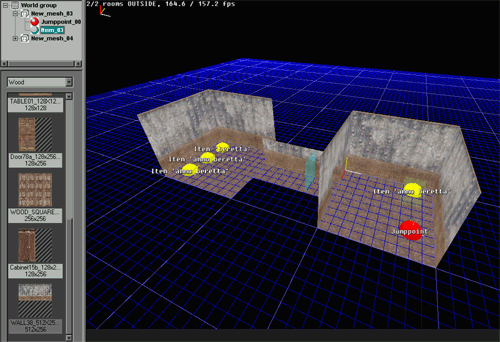
First we need to reset the grid, so in 'Move Grid' mode (F12), press 'r'. We need to place some entities in order to let the editor know where Max will start, as well as fun stuff to fiddle with like guns. To make an entity, goto 'Model' Mode (F2). Now, move the cursor to where you want Max to start at, and press the 'n' key. In the menu that appears, choose 'Jumppoint' and click ok, then click ok again to set your jumppoint and its settings. If you want to add guns and items, do the same, but instead of choosing 'Jumppoint', choose 'Level Item'. And then from the next dialogue, goto the Entity Tab and change the menu to whatever item you want.
Place whatever you want, where ever you want. Now to group your entities to the rooms. Goto 'Transform' mode (F5) and click on one room (not an entity). Now press 'e' to automatically group all entities to that room. Do the same for your other room too. Then go in and texture your map properly (see section 7). Now you're set to compile, and then play, your map.
10 Compiling and Playing
I'm going to gloss over this a bit, but here's the basics. First, in the File menu, choose 'Export X_LevelDB'. Then to archive it as a mpm, we need to first uncompile the basicexample mod (NOT map)to sorta steal the text files and directory setup. Once you uncompile it, (rasmaker x "Basic Room Example Mod.mpm"), go into the levels.txt file, and edit the [Basic_Room] section to accomodate your level. Pay attention to these lines.
[basic_room]
LevelName = "Basic Room";
Level = basic_room.ldb;
PlayerStartingPlace = "::StartRoom::Jumppoint_00";
Obviously, you change all the values to more reflect what your level is, and basic_room.ldb must be the name of your level db. Make absolutely sure that your jumppoint is grouped in the mesh that you put between the colons. Also open the menu.txt file and pay attention to these lines.
name = "Load Basic Room level";

ToolTip = "Loads the example level installed by the Basic Room mod";
[Message] String = "maxpayne_gamemode­>gm_init( basic_room );";
Thanks to xmod2 for pointing these out on VE's BB. The beginning tag in levels.txt "[basic_room]" needs to match the "gm_init( basic_room )" value. You can alter it, but just make sure they still match.
Now that you've editted those lines in the text files to fit your map, run rasmaker again (rasmaker a data yourlevelname.mpm). Now move yourlevelname.mpm
to the maxpayne directory and run MP. Before you press 'Play', choose your map under the 'Choose Customized Game' menu. Run it, and then load your map.
You just made your first MP level. Good luck with future ones.


Please I need MaxED 1 without a, Max payne 2
MaxEd 1 is only for Max Payne 1. It can be located here Moddb.com
Hey, are there any more tutorials on how to add doors and objects such as closets/ beds/ sofas/ tables... ?
I appreciate you're tutorials very much! Thank you! :)
I didn't create this tutorial sorry, it's an archive I reuploaded here.
Other objects were made using booleans which are best explained via the official remedy tutorials. Since the site is now broken I'll probably reupload the content from them here at some point.
EDIT: Nevermind I Found an offline archive in one of my files. Here are the official MaxEd Remedy tutorials.
Moddb.com
I've also archived the official ParticleFX tutorials and all of the additional files Remedy supplied for Max Payne
Moddb.com
Moddb.com
Can we edit audio files with this?
Audio files are included in the .ras files
I still didn't understand about the objects. I press N on the keyboard and nothing happens. Please help me. And more: how to insert music into a level? In fact, you can somehow make a trigger that will play music.
You have to be in model mode to place objects. Model mode is initiated by pressing the F3 key.
Music is triggered, triggers are explained in greater detail in the official Remedy tutorials
Brother, I have a question. How do I activate the AI of the NPCs I put on my maps? Thank you very much in advance for taking care of rescuing the tutorials, I really appreciate it.
EDIT: Dismiss that question, I found the link you shared of the .rar file with Remedy official tutorials, but now I have another question.
I go through the whole process to calculate my level's AI network, but when I close the game, the .ai file doesn't show up anywhere, neither in my level's directory nor in any folder, I don't know why.
If someone could help I would really appreciate it :)
It's possible it didn't save the .ai file because of administrator permissions. Try running MaxEd as an administrator.
how do I pack ldb files???
It's explained in this tutorial under section 10.
I unpacked ldb file by using 'ldb rip' tool and edtied some texture jpg images by using ms paint , now I want to repack all these files into a single ldb. I didn't understand that Compiling and MaxED things you've talked about
You're on a tutorial on how to make a custom level. Ldbrip only extracts the textures. The only way I know of to create an ldb file is to use MaxEd. You'd have to ask someone who has made a texture replacement mod how they did it.