
This is the official ParticleFX tutorial created by Remedy. I've copied all of its content into this one article. This is due to Rockstar taking down Max Payne 1's level editor website recently.
You can find the rest of the official tutorials here.
ParticleFX Tutorial
What is ParticleFX
ParticleFX is a powerful particle effect editing tool that was used to create all the fire, smoke, explosions, muzzle flashes and snowstorms you saw in Max Payne. The idea of the tool was to give the graphic artists a separate environment for particle effect creation and previewing, allowing to effectively focus on the effects themselves.
The purpose of this documentation is to introduce you to the basics of ParticleFX, give you a step-by-step tutorial in creating a particle effect, and familiarize you with all the parameters available.
This should cover most of the issues and features of ParticleFX. We sincerely hope you find this tutorial helpful and informative.
Please note, that these Tutorials are work-in-progress. Remedy will make frequent updates: plenty of new items will be added and old ones fixed in the following weeks.
Yours,
Max Payne development team
The Basics
If this is the first time you’re using the particle editor, it’s advised to read this section first.
"OK, I’ve started the editor and set my display driver settings. Now what?"
Before you can do anything, you need to either open and modify an existing particle effect, or create a new one by pressing New. For now, try opening one of the example .PSE files and read on.
Editing an effect
Particle effects consist of two basic elements: Particles and Emitters. Particles are the things you see flying on the screen, and Emitters are the gizmos that spew them out.
However, before a particle and an emitter become a working effect, an Emission must be created, which determines which particles are spawned by which emitters. You can see how these are arranged in the example particle files provided with the editor.
Previewing the effect
When editing an effect, you can preview it by pressing F2, or by clicking the “Run Preview” button in the top toolbar. When in preview mode, you can do the following:
- Press F2 again to restart the effect
- Press F3 to pause / continue the effect (you can still rotate the view)
- Use the arrow keys to rotate the view around the effect. Use Page Up and Page Down to zoom in and out.
- Hold down Ctrl when rotating and zooming to speed up the movement
- Hold down Shift when rotating and zooming for slow, precise movement
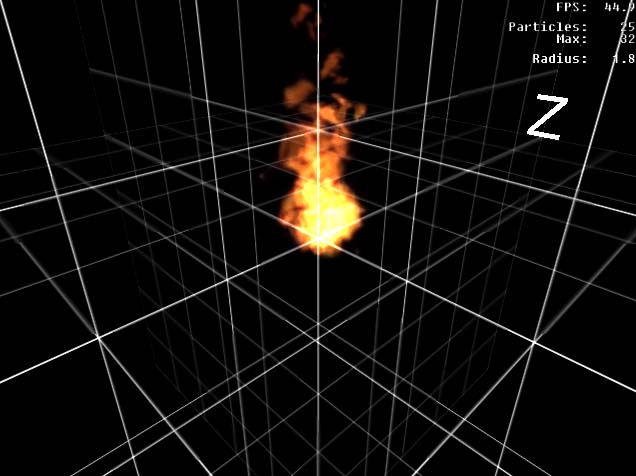
In preview mode, there are some informative numbers in the upper right corner of the screen.
- FPS: The framerate counter. With this, you can measure how much CPU your particle effect is using.
- Particles: The number of particles currently active in the effect. If this number turns red, it means that the set maximum set limit has been reached and exceeded.
- Max: The peak number of particles that have been active in the effect. If this number turns red, it means that the maximum set limit has been reached.
- Radius: The radius of the whole particle effect in meters. The radius is determined by the particle furthest away from the emitter origo. It is advisable to avoid the effect from growing too large due to loose particles traveling too far away from the center.
When you’re finished viewing the effect, press F4 to close the preview. Note that any changes you make to the effect, while the preview window is open, won’t be applied before you’ve closed the view and opened it again.
Editing graphs
As you may have noticed at this point, some buttons pop up a window containing an editable graph when clicked. This is how many of the particle effect’s properties are defined. Unlike constant values, graphs smoothly change the value of the parameter through time. Graphs can be easily edited by moving, adding and deleting nodes, the points that are connected by the line.

Actually the graphs themselves don’t determine the final values in the particle effect. The graph is in fact sampled by the particle engine and converted to a set of delta-reduced values. The thin line trailing along the graph represents the sampled result. To change the sample rate of the graph, press / and * on the keypad. The sample rate (sr) is displayed in the upper right corner of the graph window. Adjust the value and see how it affects the thin line. To optimize the particle effect it is a good idea to use an as low sample rate as possible. If you use the graph for a constant or a linear ramp value, a sample rate of 2 is enough. If, on the other hand, you want to use a very complex graph with small rapid changes, you may need to increase its sample rate.
Some Emitter graph parameters contain two graphs instead of one. This means that the actual values are randomized between the two graphs whenever a particle is emitted. The further the two graphs are from each other, the more diversity the resulting values have. If the graphs overlap completely, there is no randomization.

A Double graph. The final value is picked at random between the two graphs.
Finally, the particle coloring and the emitter lights have a Color Graph. There are three graphs, one for each color element: Red, Green and Blue.
An RGB color graph.
The graph window can be scaled freely like any window by clicking and dragging its corners. When you close the graph window, its contents are automatically saved.
Graphs can be copied to and pasted from the clipboard between files. Please note that this only works between respective graphs. You cannot copy a Size Graph to a Color Graph.
You can edit the graphs by doing the following:
- To zoom the graph display vertically in and out, press + and - on the keypad, or click the Zoom In and Zoom Out buttons on the toolbar.
- To adjust the resolution of the background grid, press Ctrl-G or click the Grid Resolution button on the toolbar. The grid is just a visual aid.
- To insert a new node to the graph, double click on the graph with the left mouse button at the point where you want the node inserted. To remove a node, select the node by clicking on it with the left mouse button, and press Del.
- To move a node, click and drag it with the left mouse button. If you press and hold Shift while dragging nodes, all the nodes in the respective position of the other graphs will also move (only applicable if the value has multiple graphs). If you hold down Ctrl while dragging nodes, the node’s movement is restricted to vertical axis.
- If you click and drag a node with the right mouse button, the entire graph will shift up and down.
- To enter a numerical value for a node or set of nodes, select the node by clicking on it with the left mouse button, then press N. If the graph is a Color Graph, you can edit the color values with a Windows color picker by pressing C.
- To scale the entire graph vertically, hold down Ctrl and drag a node with the right mouse button.
A Step-by-Step Tutorial
This section familiarizes you with creating a particle effect from scratch with a step-by-step procedure. If you’re already familiar with the process and need more specific information, skip this section. Creating your own bitmaps and plugging them into the particle editor is described later in this document. This procedure uses the example bitmaps provided with the editor, and the resulting effect is available as one of the example files (well, almost...). But now, let’s get into the tutorial.
Creating a Fire Effect
Start ParticleFX and create a new effect by clicking the New button. A new document window appears.
It’s handy to have something in the background of the preview scene to see how large the effect is. Click the <none> button next to “KF Scene”, and browse into the Examples \ Backgrounds directory. Select grid.txt and press OK. This puts a translucent grid with 1 meter squares into the preview scene.
Now you need to create a Particle. Select “Particle” from the selector under the “Element and Emitter properties” then click the New button in the lower left corner of the window. This creates a new Particle and opens the properties window for it.
The particle is named “Unnamed Particle” as default. Change the name into something appropriate, like “Flames”.
First off, your particle needs a bitmap. Click the Import button under “Particle Bitmaps”. A file browser opens. Go to the “Bitmaps” directory under the directory where you’ve installed ParticleFX, and open the bitmaps.txt file.
The bitmaps.txt file has several particle bitmaps plugged in. A selector appears. Select the reelflames_additive one (the second lowest in the list) and click OK. The “Reel Flames” are a set of flame bitmaps captured from real flame footage. There are 6 sequences in total, each consisting of a different number of bitmaps. (If there are several “containers” in one particle bitmap set, ParticleFX automatically randomizes between the bitmap sets. This gives the particles variety. A particle effect can appear artificial if all the particles look identical.)
OK, the particle now has a bitmap, so it can be previewed. Skip this step and move to the next step if you can hold your curiosity for a little while. However, if you can’t wait to see what the effect looks like at this point, select Emitter from the Element and Emitter properties then click the New button to create a new Particle Emitter. After that, go to Emission Control, and click New to create a new emission, select “Flames” and the emitter you just created (“Unnamed Particle Emitter”) from the pop-up window and press OK. Press F2 to view the effect. You see a fountain of flame-like glowing, repetitively looping blobs spewing out of the emitter. Doesn’t look like flames? Of course not. There’s still a lot of tweaking to do. Close the preview by pressing F4.

This is what the results should look like with a flame bitmap and default parameters applied
First off, you need to change some of the particle’s properties. Go back to the Particles section of the Element and Emitter properties, and double-click on the Flames particle to open it up. Here’s what you need to do:
Change the Animation type to Lifetime. The flame bitmaps consist of sequences where a few different flames die away, so they should not loop.
-
Ignore the animation FPS and random 1st frame properties, as they only apply to looping bitmap sequences.
-
Set the Particle Random Rotation from –180 degrees to 180 degrees. This randomizes the particles’ on-screen rotation by 360 degrees, giving the flames further variety. Also check the Randomize rotation direction checkbox.
-
Check the Random mirroring X and Y checkboxes. The particle bitmaps will now be randomly mirrored by both axes, to give further variety to the particles.
-
Flames tend to travel upwards. Change the flame’s Gravity multiplier to –2.5. It’s a good idea to use negative gravity instead of directed emission. This ensures that the flames always travel upwards regardless of the orientation of the emitter.
-
Change the Air Resistance (El. Velocity) to Cubic. This increases the flames’ air resistance when they gain velocity, preventing them from flying up way too fast.
-
Change Air Resistance (El. Size) to Linear. (With this particular effect though, the size-related air resistance has little effect).
-
Set the Air Resistance Constant to 4. Flames should have a reasonable amount of air resistance.
Try previewing the effect now, and see what happens. A tower of flames flying upwards. Looks better, but still not quite there! Let’s do some further tweaking with the particle before moving to the emitter. Click the Size Graph button, and edit the graph to look something like this:

Since the graph is not very detailed, drop its sample rate to 8. The graph dictates that the particles will start from zero size, then grow up to size 1 (full size), and towards the end of their life cycle, shrink a little.
Click the Rotation Graph button, and edit the graph to look like this:
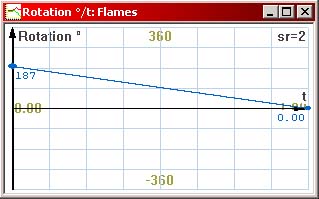
This makes the particles to rotate at a constant speed from –187 degrees to 0 degrees. The “Randomize Rotation Direction” checkbox randomly flips this graph for different particles for variety (the emitter’s Rotation Multiplier also affects the particles’ rotation, we’ll get into that later). Again, since the graph is only a straight line, you can reduce its sample rate to 2.
Next, click the Vertex Alpha Graph and edit it to look like this:

Because the flame bitmap sequences don’t have that many frames, this helps to smooth out the last frames where the flame dies out.
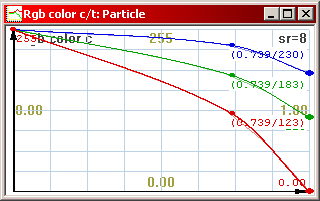
Finally, click the RGB Color Graph button, and edit the graph to look like this:
Just if you want to be fancy. This fades the flames’ color towards red as they die out.
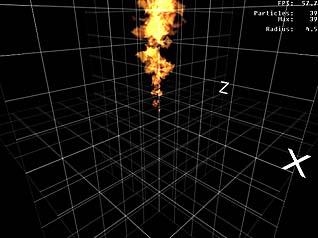
All right! You’ve created a working flame particle! If you preview the effect now, it looks like a flame tower, and it still leaves a lot to be desired:
You see, particles alone don’t make the effect. The Emitter also needs to be tweaked carefully, because the Emitter has a lot of influence on how the particles behave.
Tweaking the emitter
The next thing to do is to start tweaking the Emitter you created. Select Particle Emitter from the Element and Emitter properties and double-click the “Unnamed Particle Emitter” to open its properties window.
The emitter needs a better name. Change it to something appropriate, like “Flaming”.
Since the flames travel upwards on their own, emission direction is not needed at this time. Leave the Direction graph unedited (except maybe dropping its sample rate to 2).
Just for the hell of it, also leave the Emission Random Velocity graph as it is. As default, the flames get tiny random velocity variation, but not much. Reduce the graph’s sample rate to 2.
Now let’s move to the Emitter Shape section. The flames probably look best when emitted from a flat plane. Change the Geometry under Emitter Shape to Square.
Set the minimum and maximum values for X to –0.15 and 0.15 meters. Leave the Y min and max values to 0. Set the minimum and maximum values for Z to –0.15 and 0.15 meters. This creates a flat square 30 by 30 centimeter plane inside which all the particles are generated. The origo of the effect is in the center of the plane.
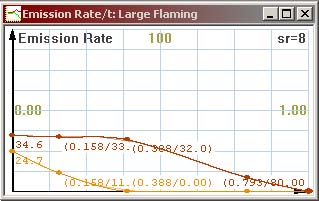
The flame effect we’re working on is constant, and meant to loop indefinitely. Set the Cycle length to 20 seconds, and edit the Emission Rate graph so that the upper graph is at roughly 80 and the lower graph roughly at 10. This is easiest to do by dragging the graphs up and down with the right mouse button. It doesn’t matter which line is higher and which lower. Since the graphs are used only for constant values this time (ie. horizontal lines), reduce their sample rate to 2. The particle effect will now run for 20 seconds after started, and emits 10 to 80 particles per time unit. Check the Cycle Looping checkbox. Particle effects can be either looped by checking this checkbox, or set to “looping” in the scripts (these details will be covered in other documentation).
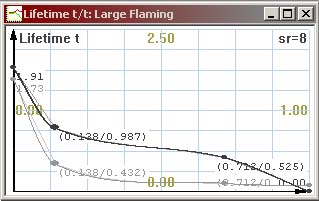
Edit the Element Lifetime Graph so that the upper line is roughly at 1 and the lower line is roughly at 0.3. Again, drop the sample rate to 2. As a result, the emitted particles will have a lifetime between 0.3 and 1 seconds throughout the 20-second cycle.
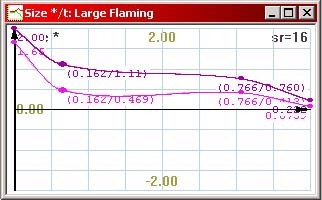
Edit the Size Multiplier Graph so that the upper line is roughly at 0.9 and the lower line roughly at 0.4. The particles’ size will be randomized between 0.4 and 0.9 units throughout the cycle.
As with the above graphs, edit the Rotation Multiplier Graph to 0.2 and 0.6. This way, some flames will rotate less, some more. A rotation multiplier of 1 has no effect on the particle’s rotation graph; values larger than 1 increase the rotation, and positive values smaller than 1 reduce it.
Try previewing the flames. Looks much better now, doesn’t it?
The example file provided is actually a combination of two flame effects. The original emitter was cloned with the Clone button and edited a little. The first emitter spews smaller flames with a bit shorter lifetime, and the other one spews larger flames with a longer lifetime. This was done to prevent the smallest flames from flying too high up, which happens if you try to emit all flames from one emitter with a lot of size variation. This can result in very long-living, small flames if you’re not careful.
You may have noticed that the example fire effect that came with ParticleFX also contains a pillar of rising smoke. As an exercise, try to re-create the smoke from scratch. Here’s some pointers:
- The smoke bitmap provided with the example files is very bright in itself. Use the Color Graph to darken it.
- Smoke fades out smoothly. Ramp down the Vertex Alpha Graph. Since the smoke bitmap is quite opaque, you can start the opacity graph at an already low value and go down from there.
- Smoke rises upwards, but slower than flames. Use a smaller negative gravity multiplier.
- Smoke clouds tend to live a lot longer than flames. Random Element Lifetime from 2 to 5 seconds should be fine. Because of their long lifetime, they should be emitted at a lower rate to prevent excessively dense smoking.
Another interesting exercise could be to change the fire effect into a fireball-style explosion. Change the flame cycle’s length to 10 seconds, then give the Emission Rate, Size and Lifetime graphs more resolution, and make the effect first emit a lot of very large, long-living flames, then ramp the values down. As a result, the fire should start with a blast, then burn away until the flames go out. Here’s how to change the graphs:
Parameters explained
Main screen
Emission Control: Even if you’ve created a Particle and an Emitter, nothing will happen before you’ve created an Emission. The Emissions determine which particles are emitted by which emitters. To create a new Emission, click New, then select the appropriate particle and emitter from the dialog. Emissions can be deleted by clicking the Delete button, and disabled with the Disable button. When exporting particle effects, the Disabled effects are not included.
Max # of particles: This sets the maximum number of active particles used in the particle system. The amount of memory allocated for the particle effect is determined by this number. If the maximum value is 500 particles, but the effect uses only 20 particles, it is recommended to set the maximum value to 20 to save in-game memory. Generally it is a good idea to create the effects with as few particles as possible to conserve CPU. There are several pointers concerning this in the Optimizing the effects section.
Particles emitted into:
- Worldspace: the particles are emitted into the world coordinate space, and aren’t connected with the emitter. If the emitter moves, the particles leave a trail. This is the default setting, and useful in most applications.
- Objectspace: The particles are emitted into the object’s own coordinate space, and follow the object around as it moves. This is handy for glow / force field style effects.
New particles when maximum reached: this determines what happens when the maximum number of particles has been reached and further particles are still being emitted.
- Wait: No new particles are emitted before the old ones have died. If your particle emission rate is very high and the maximum amount limited, you may experience breaks in particle emission.
- Replace oldest: When new particles are emitted, the oldest particles (eg. the ones that have been in the scene the longest time) in the effect disappear.
- Replace random: When new particles are emitted, random particles will disappear.
Preview Configuration
KF Scene: Allows you to load a background scene to the particle preview screen for preview purposes. One background is scene is provided with the example files, you can find it in the examples\backgrounds\ directory (grid.txt). Click on the wide button (labeled <none> if no scene is present) to load / change the background. The scene is static and doesn’t move with the particle system. Press Clear to remove the scene from the preview.
To create a KF Scene, model it in 3DS Max (or another modeler that exports KF2 format), export it into a KF2 file, and create a script for it. Here’s the script file of the Grid background as an example:
[10m_grid]

{
       [Geometry]
       ExportData = data\grid.kf2;

       [Animation] // block redundant if the scene has no animation
       Index = 0;
       filename = data\grid.kf2;
}
KF Object: Allows you to insert an object to the preview in order to see how the effect looks like when attached to an object in the game, and to adjust its relative position to the object pivot. One object is provided, you can find it in ..\examples\backgrounds\deserteagle.txt. The KF object can move through the scene and the particle system is attached to it. The object aligns itself to the movement direction like the projectiles in the game. Press Clear to remove the object from the preview. NOTE: If you want to place the muzzle flash of a gun correctly in relation to the weapon, you must adjust the Emitter’s Relative Position values. The preview configuration’s position offset values are only used for preview purposes and are not exported.
Creating a KF object is done through the same procedure as a KF scene. You can use the example Grid file as a KF Object if you want, although this is not very useful.
Gravity: This sets the global gravity of the particle editor, allowing you to preview the effect in different gravity settings. Note that this does not affect the gravity setting used in the game. Default: 9.81m/s^2
Time scale: Changing the time scale multiplier allows you to preview how your particle effect looks in slow motion. If you set the multiplier to 0.1, the time passes one tenth of the default speed. Values above 1 speed up the time.
Max. FPS: By changing the FPS, you can preview how a lower frame rate affects the particles’ behavior. Some extremely quick particle effects may be affected by skipped frames. The default value is 85.
Camera follows at maximum distance of meters #: When checked, the camera will follow the particle system. When not set, the camera only orients itself towards the particle system.
Scene position is locked: Useless feature, keep it unchecked.
Gravity affects system: When checked, the particle system will fall down, affected by gravity. Useful when testing particle effects that are meant to be attached to projectiles.
Frontplane: Sets the front clip value of the particle system. If the camera moves closer to a particle than the Frontplane value (in meters), the particle will not be drawn.
Backplane: Sets the back plane value of the preview. If the particle is further than the Backplane value in meters, the particle will not be drawn.
Object Offset XYZ: Sets the position of the KF object in the scene for preview purposes. Note that the particle system is always attached to the object, so if you offset the object, the particle system moves with it.
System Offset XYZ: Sets the position of the particle system in relation to the object for preview purposes. NOTE: this does not affect the offset of the exported particle system. If you need to offset the particle effects in order to correctly place the muzzle flash on a weapon etc, you need to set the Emitter’s own Relative Offset values.
System Rotation XYZ: Rotates the particle system for preview purposes, allowing you to see how the particle effect looks with different rotations. Does not affect the exported particle effect. To orient the effect in the game, the emitter must be rotated.
Object/System Velocity: Gives the particle system a velocity to the specified direction, allowing you to preview how the particle effect looks when attached to a moving emitter. Combined with gravity, this allows you to “simulate” rocket smoke trails, etc.
Particles
Particles are the basic elements of particle effects; the things you see flying, falling and floating. They are actually flat, square polygon “billboards” which always face the camera. They can be either Additive or Alpha blended.
To create a particle, select “Particle” from the selector under the Element and Emitter Properties, then click the “New” button. Double-click on the particle to pop up the particle properties window to edit its parameters. NOTE: you can copy particles to the clipboard by selecting them in the list and pressing CTRL-C or the Copy button. This allows you to transfer particles from one file to another.
The particle’s parameters are as following:
Name: The name of the particle. Standard text editing features apply. You can also rename a particle by clicking on it in the particle list and waiting for one second without moving the mouse.
Enable Particle Lighting: When this is on, the particle’s shading is affected by the dynamic and point lights in the level – in addition to the Color Graph. NOTE: If the level’s point/spot lights are incorrectly set, this may lead to strange results (all particles end up black since they receive no light). This also increases the CPU load of the effect, so using this is not recommended except in special cases, for example, if you have a room full of smoke and a flickering spotlight.
Gravity Multiplier: This determines how the gravity affects the particle. If the value is 1, the particle is directly affected by the gravity. Values smaller than 1 divide the effect of gravity, values larger than 1 multiply it. If the value is 0, the particle is unaffected by gravity. Negative values make the particles “fall” upwards (useful for flames and other lighter-than-air particles)
Air Resistance (El. Velocity): This determines how the velocity of the particle affects its air resistance. The faster a particle moves, the higher its air resistance.
-
Linear: The particle’s air resistance is directly affected by its velocity.
-
Quadratic: The velocity affects the air resistance to the second power.
-
Cubic: The velocity affects the air resistance to the third power.
Air Resistance (El. Size): This determines how the size of the particle affects its air resistance. The larger the particle, the bigger its air resistance, if so desired. Both the size multiplier and the particle’s own size graph are taken into account.
-
None: The particle’s air resistance is unaffected by its size.
-
Linear: The particle’s air resistance is linearly comparable to its size.
-
Quadratic: The particle’s air resistance is affected to the second power.
Air Resistance Constant: The overall air resistance value of the particle. Generally, the higher the value, the higher air resistance the particles have, and the sooner they slow down. The constant is affected by the above two values (El. Velocity and El. Size). If the value is zero, the particle has no air resistance. Negative air resistance value actually accelerates the particle to whichever direction it is traveling, giving rather interesting – or strange - results. Experiment with these values until you get the results you want.
Particle Animation
Animation Type: This determines how the particle bitmaps animate.
- Looping: The bitmaps loop the sequence at the determined frame rate. Example: a rotating piece of debris.
- Lifetime: All the bitmaps are displayed in a sequence throughout the particle’s lifetime, from first to the last. Example: a blob of foam that dissipates into droplets.
Animation FPS: Determines the frame rate of the particle bitmap sequence. Only applicable if the animation type is set to Looping.
Random 1st Frame: When on, the bitmap sequence starts at a random frame when the particle is spawned – to avoid all particles looking “synchronized”. Only applicable if the animation type is set to Looping.
Random rotation from # to #: Determines how many degrees the particle billboard on-screen rotation is randomized when emitted. If the values are equal, no randomization takes place. You can set both values to (for example) -90 degrees to have all the particles rotated by 90 degrees counter-clockwise but not randomized.
Randomize rotation direction: Randomly inverts the Rotation Graph of the particles.
Random mirroring: Randomly flips the bitmap by X or Y axis to increase particle variety. Some particles (for example, the gasoline explosion fireball) should only be flipped horizontally and some others only vertically, hence these are separate.
Size Graph: This graph determines how the size of the particle changes through its lifetime. NOTE: if you want all the particles coming from the emitter to be larger, it’s a better idea to adjust the Size Multiplier value of the emitter than the size graph, because some other emitter in the effect may also be spawning the same particles.
Rotation Graph: This graph determines how the particle rotates through its lifetime. This graph is inverted and multiplied by the Emission Rotation Multiplier and Randomize rotation direction values.
Vertex Alpha Graph: This graph affects the alpha blend opacity of the particle. With this you can make the particles fade in and out. Note: all values in the graph that go above 255 are normalized to 255.
RGB Color Graph: Allows you to determine how the color of the particle changes throughout its lifetime. There is a separate graph for each color element (Red, Green and Blue). Press C to activate the Windows Color Picker for easy value editing. NOTE: the particle coloring is multiplicative. If the particle bitmap has color in itself, any coloring applied will darken it and mix with the bitmap. The best idea is to create all particle bitmaps as white as possible, then use the color graph to color them. This allows you to use the same bitmaps for multiple purposes.
Emitters
The particle emitters are the ”machines” that spew out particles according to their parameters. To create a new Emitter, select “Particle Emitter” from the selector under the Element and Emitter Properties and click the “New” button. To edit the emitter’s properties, double-click on it with the left mouse button. NOTE: you can copy emitters to the clipboard by selecting them in the list and pressing CTRL-C or the Copy button. This allows you to transfer emitters from one file to another.
The parameters are as follows:
General
Name: The name of the emitter. Standard text editing features apply.
Positions and Directions
Relative Position: The X, Y and Z coordinates to change the relative position of the emitter. For example, the muzzle flash effects of the guns are created at the gun pivot point, and must be offset by the Relative Position value to be placed at the gun muzzle.
Emission Direction Graph: This graph determines how the direction of the particle emission changes through the emission cycle. There are separate graphs for each direction (X, Y and Z).
Example: You can create a circular ring-like emission by setting the emission cycle length very short (0.01 seconds), then changing two of the graphs into sine curves offset by 90 degrees. This is how the ring-like “body fall” dust clouds in Max Payne were created.
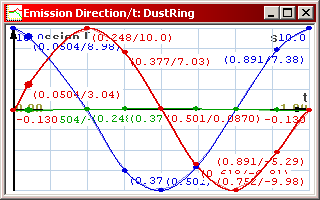
A circular emission
X +/-, Y +/-, Z +/-: These constant values determine how much the emission direction is randomized to each direction. If you want to “spread out” the particles more when emitted, increase the values perpendicular to the emission direction. If you want the particles to be emitted at different velocities, increase a value parallel to the emission direction.
Velocity Inheritance Factor: Not applicable. Feature not implemented.
Element Random Velocity Graph: Determines how the particle emission direction is randomized overall throughout the emission cycle. The value has two graphs, determining the maximum and the minimum amount of randomization to be applied. This randomization randomizes the emission in all directions (X/Y/Z).
Example:If you want to create a spray of water that first spreads a lot, then turns into a uniform stream, create a graph that starts off high, then quickly fades to zero.
Emitter Shape
The emitter shape determines what kind of an area the particles are spawned in. You can choose between two emitter shapes: Square and Sphere.
Square: The particles are created within a box whose dimensions are adjustable. Setting the values of any one axis to zero creates a flat emission plane. Setting two axes to zero creates a line. If you want the particle effect’s origo to be in the center of the box, the values must be determined between symmetric negative and positive values (for example: Min –2 meters, Max 2 meters makes 4 meters in total). If all three dimensions are set to zero, all the particles will be created in the same point.
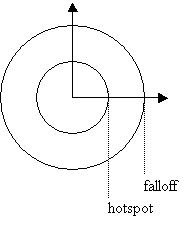
Sphere: The particles are created inside a spherical area whose radius is adjustable. The Hotspot radius is where the most emissions take place, and the Falloff radius “fades out” the particle emission probability to zero (you can experiment with this by creating a very short effect that creates thousands of tiny stationary particles, then tweaking the hotspot and falloff values). The Falloff must be equal to or larger than the Hotspot. If both values are set to zero, all particles will appear in the same point.
Emission
Emission Rate graph: This graph determines how many particles are emitted per time unit throughout the emission cycle. The value has two graphs, and the number of emissions is randomized between the two values. Example: if you want to create a trickling water effect that starts as a gush then reduces to slow dripping, start with a high value, then ramp down the emission rate graphs. If you want the emission rate to be completely steady, set both graphs to exactly the same value. If you want the emission rate to be very uneven throughout, set one of the graphs to zero, and set the other graph with a high value.
Cycle Length: This value determines the overall length of the emission in seconds. You can randomize the length of the emission by entering a second value in the +/- field. The randomization value must be smaller than the cycle length. The cycle is then of different length every time it is initialized. Example: If you shoot at the water coolers in Max Payne, you can notice that some water trickles last longer than others. This is done with cycle length randomization.
Cycle Looping: When checked, the emission will restart immediately after it has ended. Example: You can create a random flicker-like effect by looping a short emission whose length is randomized a lot. Note that rapid cycle restarts cause some CPU overhead in the levels, so use this sparingly. If you need to create a long, steady looping particle effect, it's a better idea to leave this flag unchecked and instead set it to loop in the script (looping = true.)
Element Lifetime Graph: Determines how long the emitted particles live. The graph has two values, and the lifetime of each particle is randomized between these two. Example: Being a graph, the lifetime of the particles emitted can change through the cycle. For example, if you have a fire effect that lasts 20 seconds, the values can start off high, creating long-living high-reaching flames. As the cycle continues, you can ramp down the curve so that the fire becomes lower and lower, with the flames flickering with shorter and shorter lifetime, until the fire goes out.
Particle Emitter
Size Multiplier Graph: Determines the size of the particles emitted through the cycle. There are two graphs, and the size of each emitted particle is randomized between these two. If you want all the particles in the effect to be larger or smaller, it is a better idea to adjust the size multiplier graph than the particle’s own size graph – since you may be using the same particle with another emitter too. Example: With a ramp downwards, the effect can first emit large particles, then as the cycle continues, the particles start off smaller.
Rotation Multiplier Graph: Multiplies the particle’s Rotation Graph. There are two graphs, and the rotation multiplier of the particle is randomized between them. With values greater than 1, the particle rotation increases, and with values less than 1, it decreases. Negative values invert the graph. If all graphs are reset to zero, the particles do not rotate, regardless of their rotation graph. However, the particle’s Rotation Random still applies. Rotation Multiplier Graph is somewhat less useful than the other parameters, and is usually best used as two constant values (horizontal lines) with the sample rate set to 2. Example: if you create a particle rotation graph that goes up and down like a roller coaster, the particle “swings” through its lifetime. The magnitude of the swinging can be varied with the Rotation Multiplier Graph. This is how the snowflakes in Max Payne were created.
Light
In addition to particles, the particle emitter can also create a Gouraud point light which illuminates the environment and the characters (and the particles whose lighting is activated). The light is always attached to the emitter and moves with it. To activate the light, check the Use Light checkbox. All emitters that have the light active have an (L) in their name (this helps to avoid using several lights in an effect, as lights cause graphics overhead). If you want to use the particle effect only for light, you need to create a “dummy” particle and a “dummy” emitter with all other values set to minimum so that no particles are emitted.
The parameters are as follows:
Light Falloff Graph: Determines how the falloff radius of the light changes through the emission cycle, ie how far the light reaches. NOTE: rapid light falloff changes result rapid level geometry tessellation that cause CPU overhead. It is recommended to use the falloff graph only in special cases. A constant value works well most of the time. To fade out the light, it is a better idea to use the color graph.
Light Color Graph: With this, you can change the color of the light through the emission cycle. The color consists of three graphs, one for each color element (Red, Green and Blue). Press C when the color graph window is active to open the Windows Color Picker for easy editing. The lower the color values, the dimmer the light is.
Brightness: This value has no effect in the current version of ParticleFX.
Light Position Offset: You can offset the position of the light from the emitter position; this may be necessary in some cases. The offset value depends on the emission’s own Relative Position offset. If you change the emission position offset, the light offset moves with it.
Optimizing the effects
Since your mod most likely has a lot of stuff happening simultaneously, it is a good idea to optimize all the particle effects to minimize their CPU usage. We don’t want the frame rate to drop drastically every time you start a cool particle effect now do we? This section gives some pointers for advanced users on how to extract the best performance from their particle effects.
The number of particles: This is the most rudimentary way to reduce the effect’s CPU usage. In general, try to create your effect using as few particles as possible. Also make sure to set the number limit to roughly the same number as the effect uses. This way, no extra memory is wasted on particles that never occur. Watch the frame rate counter when adjusting the amount of particles. As a guideline, small, frequently triggered effects such as bullet impacts should be done with 10-40 particles, explosions should be around 150-200 particles and large snowstorms some 400-600 particles.
Particle size: It is a known fact that huge screen-filling particles cause fill rate overhead. Use them wisely, only a few at a time.
Emission Rate: If your cycle lasts 0.1 seconds and the effect is set to use 20 particles maximum, there is no point in using a massive emission rate that emits and replaces 20 000 particles during the cycle, out of which only 20 remain alive. Lower the emission rate so that it is in par with the maximum particle limit.
Rapid Cycle Looping: If your emission cycle is very short and set to loop, the frequent re-starting of the effect causes some CPU overload. Use only in special cases. For steady looping effects found in levels, such as steam coming out of sewers or a fire in a fireplace, the optimum effect length is 5 to 10 seconds, and the looping of the effect set on from the script, not from the editor.
Particle Lifetime: The particles continue to live even when they’ve fallen out of the level – they do not collide. For falling debris, set the lifetime of the particles just long enough for them to reach the edges of the room.
Graph Samplerate: If you use the graph only for a constant value (horizontal line) or a linear ramp, there is no point in having the sample rate at 16. Lowering it to 2 does the job just as well. If you don’t use some values at all (for example, when using the particle effect only as a light), make sure to reduce the sample rates of them minimum. The editor sets 16 as the default rate for all graphs, used or not.
Effect Overall Radius: The further the particles travel from the emission center, the larger the overall radius of the effect. Very large effects or very long smoke trails will need to be drawn inside every room that is inside the effect radius, causing overhead. Try to ensure that the radius of the effect doesn’t grow too large.
Use the lights wisely: If your muzzle flash effect has several separate flames coming from here and there, it’s still enough to use only one light. Using 4 lights in one particle effect is a bad, bad idea in terms of overhead. A good idea can be to handle the lighting with a separate dummy emitter (with everything else but the light set to minimum/disabled) and a dummy particle.
Rarely use the Light Falloff Graph: Whenever the light radius changes, the level geometry is re-tessellated to accommodate the light. Changing the light radius a lot causes CPU overhead. Only use it in special cases.
Combine the bitmaps: Once you’ve built a set of particle effects for the game, include all the particles it uses into the _All_Particles.pse file. All the bitmaps will be combined into one large bitmap, so several different effects can share the same bitmaps. This helps to save texture memory, especially if your effect has several different particle types that all share the same bitmaps.
Creating and adding new bitmaps
The bitmaps the particles use cannot be plugged straight into the particle editor. They must be first defined with the particle text file. As your particle database grows, you may want to create separate text files for flames, explosions, smoke and other bitmap types, with the bitmaps in their own subdirectories.
As for formats, it is recommended to use .jpg for color maps and monochrome .pcx for the alpha maps. Other formats also work, but we have found these optimal.
The basic structure of a particle bitmap set is as follows. All the lines behind a double slash // will be ignored by the particle editor, and can be used as comments. You can also comment out sections of the file with /* for the beginning and */ for the end. Everything between the /* and the */ will be ignored.
[your_particle_name]
{
       [Settings]
       Extension = jpg;
       AlphaExtension = pcx; // only applicable if blend mode is alpha
       BlendingMode = alpha; // available modes: alpha, additive

       [container] // every particle must have at least one container
       bitmaps\fire\flame01_d; // d means a cyclic number with 4 digits.

       [container] // additional containers can be used for variety
       bitmaps\fire\flame02_01; //can also use a sequence of exact filenames
       bitmaps\fire\flame02_02;
       bitmaps\fire\flame02_03; // you can create a 'ping pong loop' by
       bitmaps\fire\flame02_04; // inserting the sequence first forwards then
       bitmaps\fire\flame02_05; // backwards. Duplicate filenames use no extra
       bitmaps\fire\flame02_06; // texture memory.
}

[your_particle_02]
{
...
} The directory paths are recursive.
Using the particle effects in the game
To use a particle effect in the game, it needs to be exported. Open a particle effect and select Export from the File menu. The effect is exported into a .RPS (Realtime Particle Set) which is a stand-alone file, containing the bitmaps and the needed parameters.
If you have created a large set of particle effects and bitmaps and then modify one bitmap set, it can get difficult to re-export them all. To help with this, you can export particle effects with a command line. You can create a batch file, which exports all the particles to their respective folders. Here is an example export command line (NOTE: this is only an example; the paths and directories need to correspond your setup).
ParticleFX.exe -y -e "\particle effects\fire\*.pse" -d "\database\particles\fire\"After the effects have been exported, they need to be plugged into the game’s database thru the particle script file. This file (particles.txt) can be found in the game’s data\database\particles\ directory.
Once in the game, the effects are started with the ps_starteffect message. For further info, consult the level editor documentation.
Additional Bitmaps
This bitmap pack contains a selection of more high quality bitmaps for use with ParticleFX.
Readme:
Particle bitmap add-on pack
This pack contains some more of the particle bitmaps sequences used in Max Payne. You can add them to the existing examples by simply extracting this .ZIP to the Examples directory under the ParticleFX directory.
The sequences are divided into categories as separate .txt files:
Debris.txt contains:
- Paper_Confetti - fluttering pieces of paper
- Wood_Splinters - bits of wood
- Glass_Shards - shards of glass
- Shreds - irregularly shaped pieces of debris
All these bitmap sequences are white as default, and must be colored by using the particle's Color Graph. This allows you to save texture memory by using the same bitmaps for several different purposes.
These bitmap sequences work best when set to "Looping".
Liquid.txt contains:
- Liquid - a random liquid droplet splat (3 randomized sequences)
- Droplet - a single transparent round droplet
As above, these sequences can be colored with the Color Graph to make blood, etc.
These bitmaps work best when set to "Lifetime" (however, the droplet is just a single bitmap so it will work the same regardless of the setting)
Explosions.txt contains:
- Explosion - a basic explosion
- Fire_Explosion - an uprising gasoline fireball
These bitmaps are additive and unlike the alpha blended ones, they are colored. If you colorize these with the Color Graph, the color of the graph will be multiplied on the bitmap.
These bitmap sets work best when set to "Lifetime".


app download?
It's included in the Max-FX tools which are located here:
Moddb.com