Tutorial originally written by Javokis for e-mods.net. Mirrored here for archival purposes as his website is now down.
This tutorial will teach you how to make a new sword in Redemption using only NOT Editor. No modeling skills are needed, but modelers might want to look at this to figure out how to get their new sword model to appear in-game. This tutorial has tons of pictures and step by step information on a specific kind of sword we are going to make as an example. This sword will use existing models available in Redemption hence why no modeling is needed.
-Be sure to download the NOD SDK so you'll have NOT Editor for this tutorial.
-The first step is to go to your main Vampire - Redemption folder.
-Find the Resource.nob file and open it with Winzip.
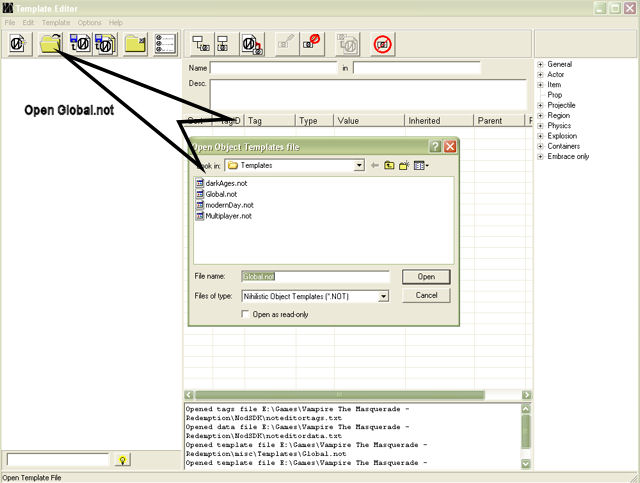
-Search for Global.not, darkAges.not, modernDay.not, and multiplayer.not files of (Resource.nob)'s misc\Templates.
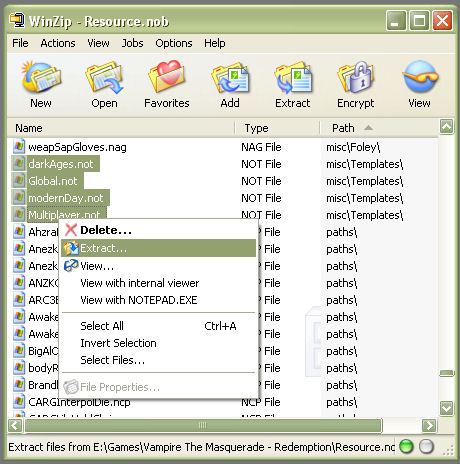
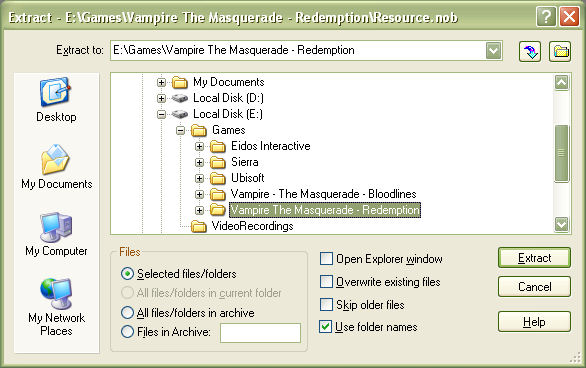
-Extract the 4 .NOT files into your main Vampire - Redemption folder.
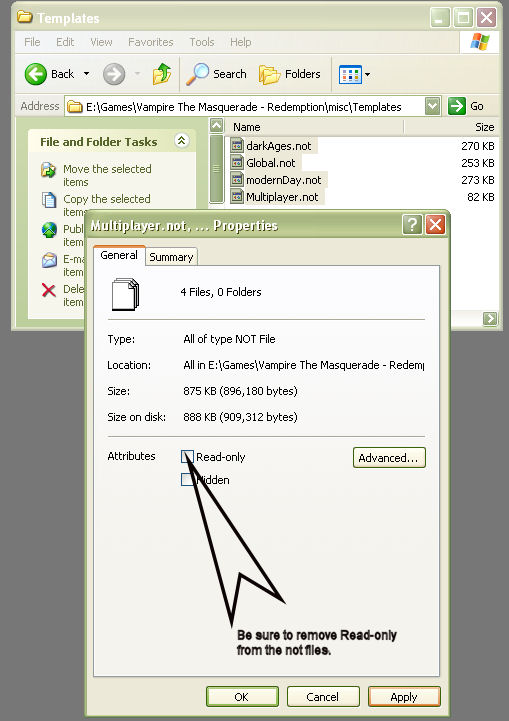
-Goto the misc\Templates folder newly created and find the 4 .NOT files.
-Remove the Read-only tag from them.
-Start up the NOT Editor
-Now open up Global.not
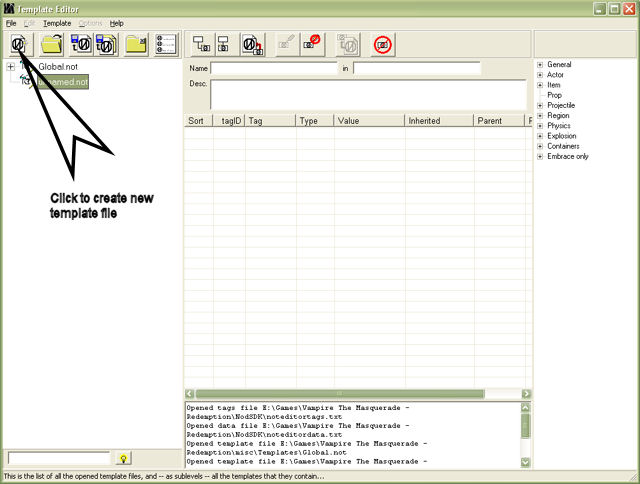
-Now click create New Template File
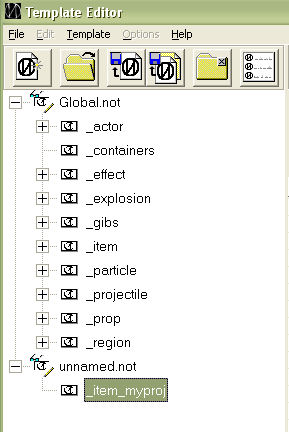
-Now expand Global.not by clicking the + sign next to its name.
-Now select the _item parent template from Global.not and copy the template.
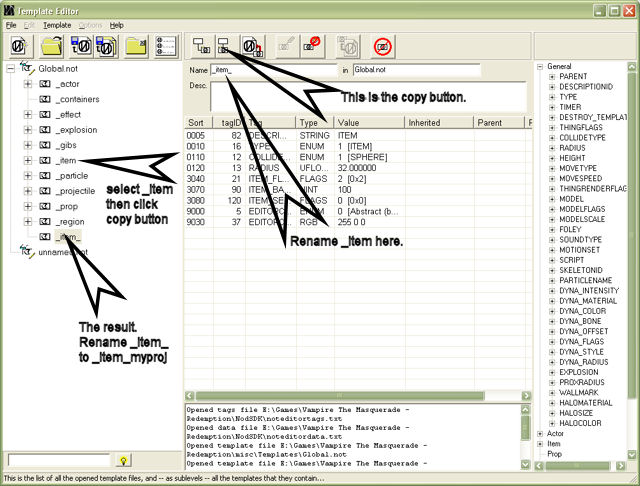
-Rename the new parent template to _item_myproj
-Drag the newly renamed copy of _item parent to your new Template file.

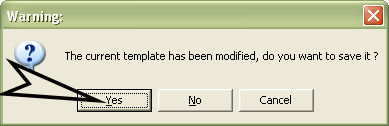
-NOT Editor will ask if you want to save the template. Click YES
-You should now have a new parent template in your new template file.
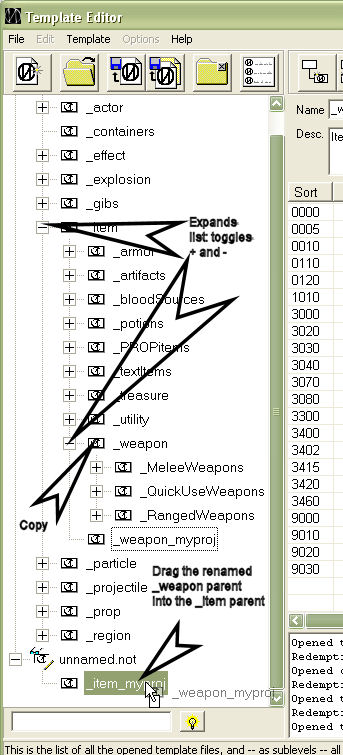
-Expand the _item template by click the + sign next to it.
-Select the _weapon template and copy it like you did with _item.
-Drag the newly created and renamed _weapon parent to the _item parent of your new template file.
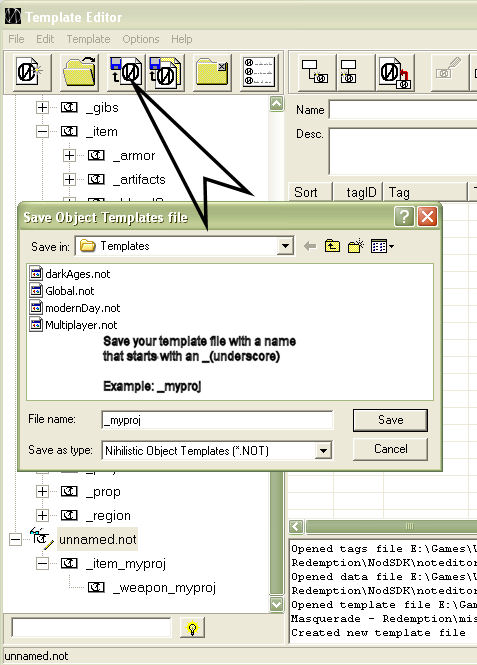
-Save your new template file and give it a name that starts with an _(underscore)
-Be sure to save it to the same location as the other template files.
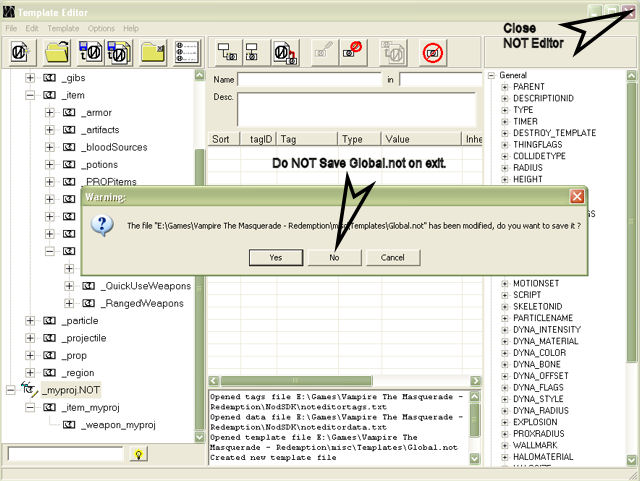
-Now we'll need to exit NOT Editor to avoid bugs.
-If NOT Editor asks if you want to save changes to Global.not, say NO!
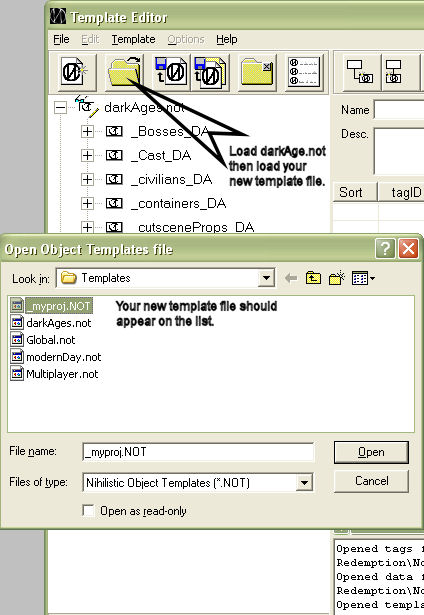
-Now start up NOT Editor again and this time load up the darkAges.not file.
-Your new template file should also appear on the open template list. Open it up too.
-Now expand the _item_da parent in darkAges.not by clicking the + sign.
-Do the same to _weapon_da within _item_da
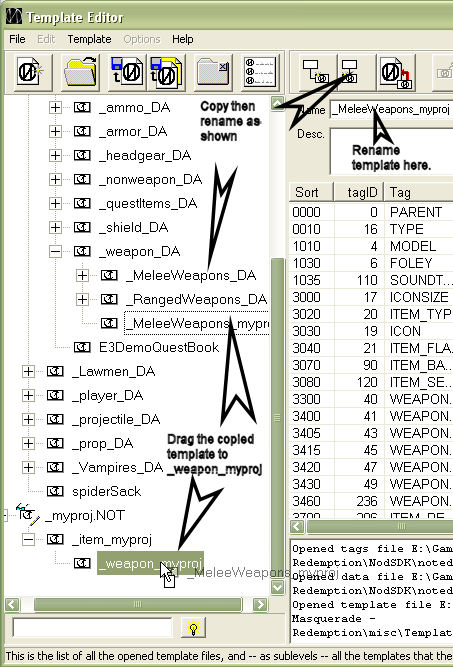
-Now make a copy of the _MeleeWeapons_da template and rename it.
-Drag the new parent template of _MeleeWeapons to your _item\_weapons of your new template file.
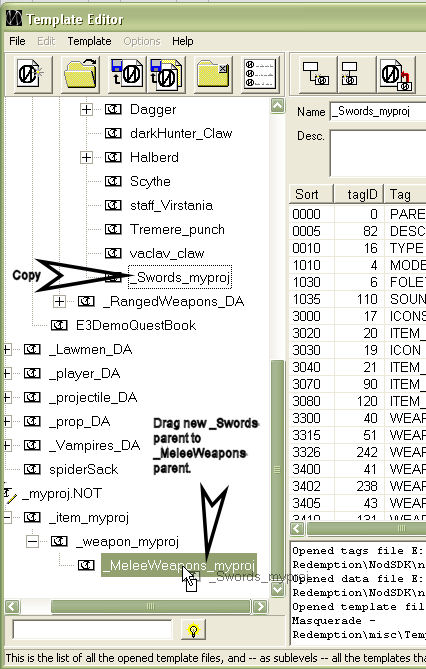
-Now expand the _MeleeWeapons_da parent of darkAges.not and make a copy of _Sword parent too.
-Drag the copy of _Sword on over to your new template file as shown below.
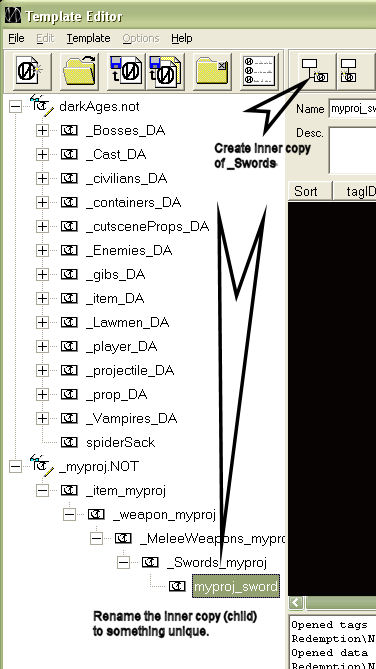
-Now create an inner copy of your custom _Sword parent within your new template file.
-Give the inner copy a unique name as shown below. Keep simple, unique, and don't use simbols or spaces.
-Now we're ready to start editing our new (soon to be) sword template.
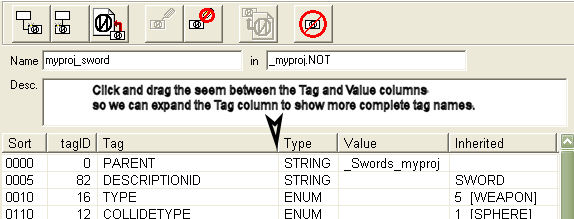
-To make things easier let's expand the tag window some more and make the tag column bigger too.
-This'll make it easier to see what we're about to edit.
-The first thing we should do is make sure collisions are set right or our sword will crash us to desktop if we attempt to spawn it. As it is now, it is only a copy of an abstract parent template - very unstable.
-Let's set the collide type first to CYLINDER - items should NEVER be SPHERES.
-Double click the tag row for COLLIDETYPE and change the settings as shown.
-If you get a message asking if you're sure you want to change an inherit tag value, click YES. We'll get messages like that a lot.

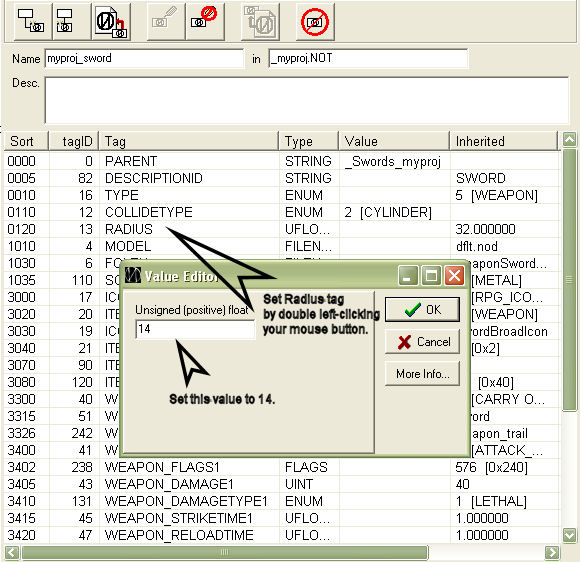
-Now let's change the RADIUS of the collision to a slightly smaller size as shown below.
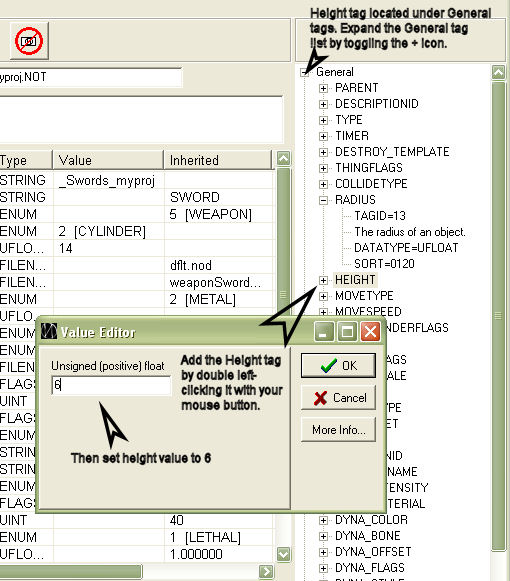
-Now we have a missing tag we need to add. The tag we need is HEIGHT.
-Let's add the HEIGHT tag located on the tags list.
-This is the bare basics of stability for the sword, it could be spawned in-game now, but let's finish it first.
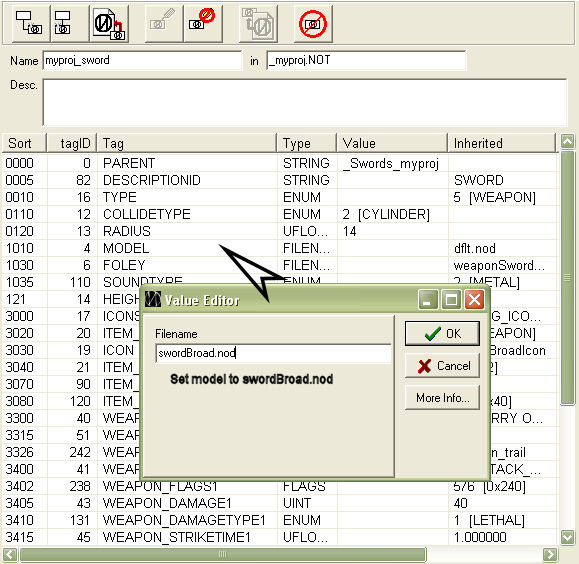
-We surely need a model for it so let's set the model for our sword using the MODEL tag.
-This will effect how the sword appears on the ground.
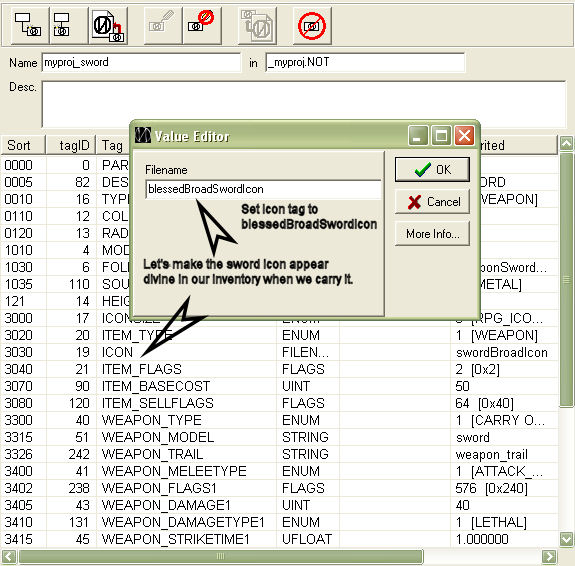
-Now let's set the icon image for how the sword appears in our inventory.
-Set the icon image to blessedBroadswordIcon to give a divine look in our inventory screen.
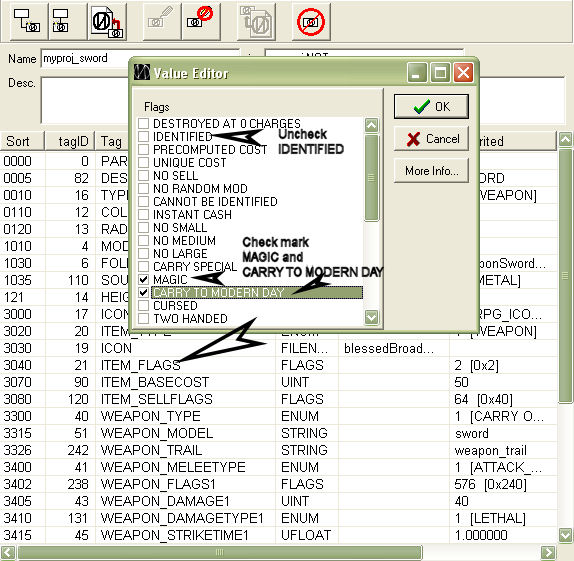
-Now let's setup the Item Flags.
-The Item Flags screen shows lots of cool options, but only three will be covered in this tutorial.
-The IDENTIFIED flag can be unchecked if you want the items stats to be hidden untill someone uses spirit touch on it.
-The MAGIC flag can be checked to give the word description of the item a nice Blue font coloring.
-And the CARRY TO MODERNDAY flag can be checked if you want your sword to travel to the Society of Leopold with you in single player. The item will be placed somewhere in SoL labs like all the other CARRY TO MODERNDAY items.
-The rest is will be covered later.
-Now we want to set the WEAPON_MODEL tag. This effects how the weapon appears when equipped.
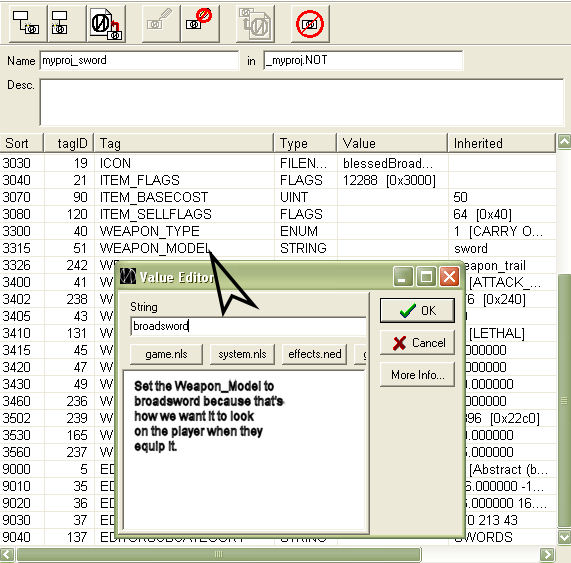
-You do not input a .nod file extension in WEAPON_MODEL tag like you do in MODEL tag.
-WEAPON_MODEL tag looks for more than one model based on the type of boneID of the user.
-There are 4 major bone IDs looked for and those are _0, _1, _3, and _4.
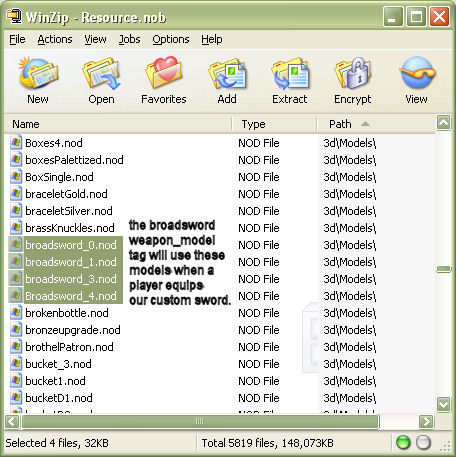
-These special models are located in Resource.nob and can be identified by those _#.nod extensions.
-In our case we choose to look for these models based on our WEAPON_MODEL tag input:
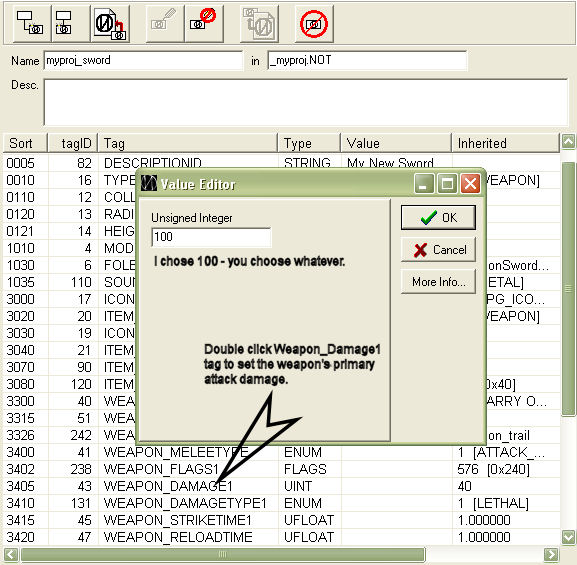
-Now for the really fun parts
-Let's set the damage of our sword by editing the WEAPON_DAMAGE1 tag to something noticable. Like 100.
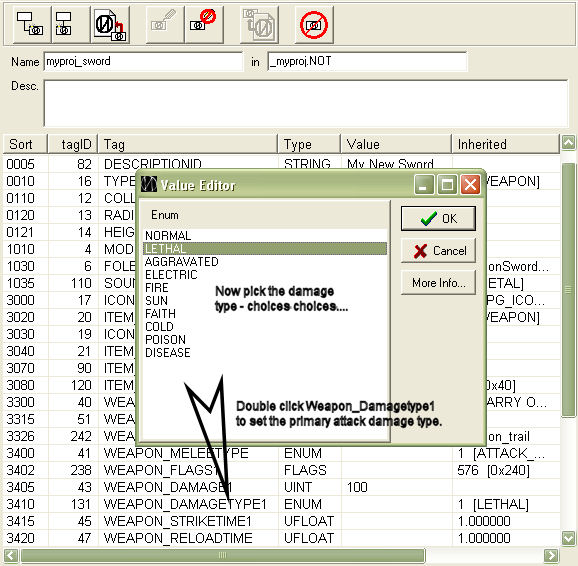
-With the WEAPON_DAMAGETYPE1 tag we can choose from a list of damage types.
-Let's set our sword to do AGGRAVATED damage. Wheee!
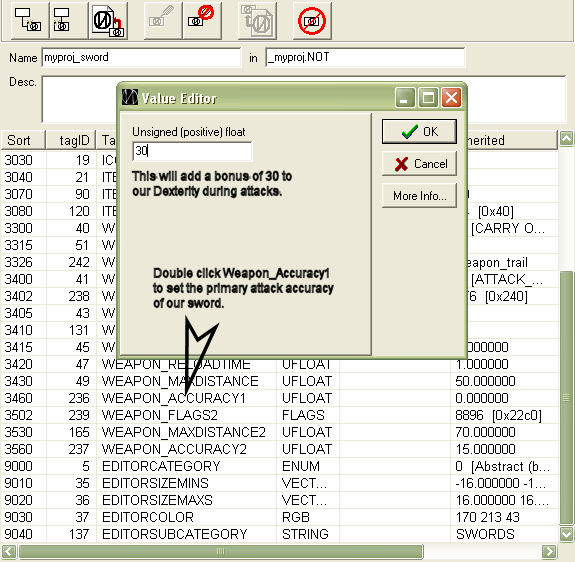
-Now it's time to set the accuracy of our sword.
-Edit the WEAPON_ACCURACY1 tag to 30 accuracy. This will give a bonus of 30 to Dexterity to hit a target.
-OK I guess you may be wondering what the WEAPON_ACCURACY2 type tag is doing.
-The tags that end with 2 represent a secondary attack property for a weapon. (A SHIFT+LEFTMOUSECLICK attack).
-Let's make our sword have a secondary attack because what tags exists right now wont enable the option just yet.
-We have a few missing tags we'll need to add from the tags list on the right.
-Let's add the WEAPON_MELEETYPE2 tag first and choose ATTACK_SWORDSLASH.

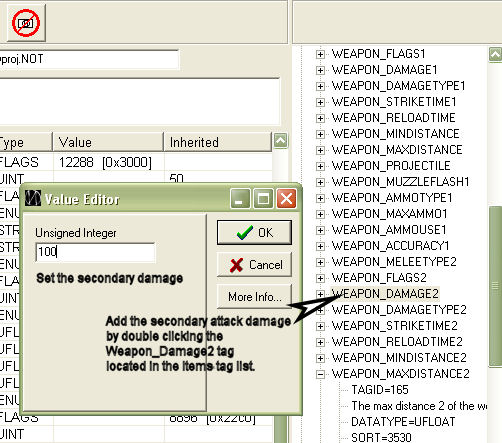
-Now we need to add WEAPON_DAMAGE2 to our sword and set it to 100.
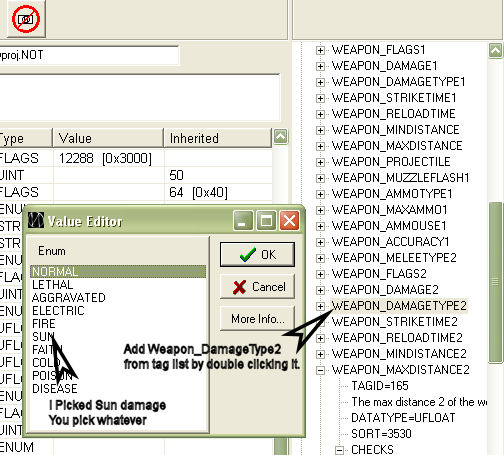
-Let's change the secondary attack damage type to SUN.
-Add the WEAPON_DAMAGETYPE2 tag and set it to do SUN damage. hehe
-Ok we need to setup a speed for the secondary attack. There are two tags needed for this.
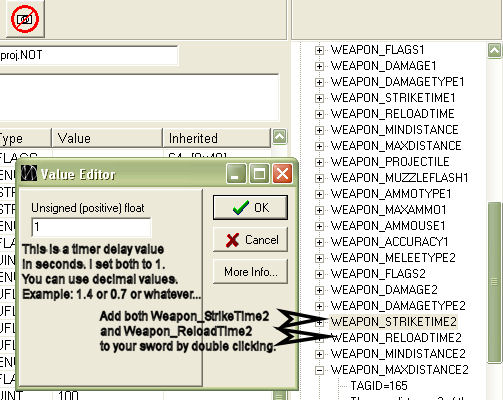
-We need to add WEAPON_STRIKETIME2 and WEAPON_RELOADTIME2 tags to our sword.
-These 2 tags are based on seconds and allow decimals to be used. I just set both tag values to 1 second.
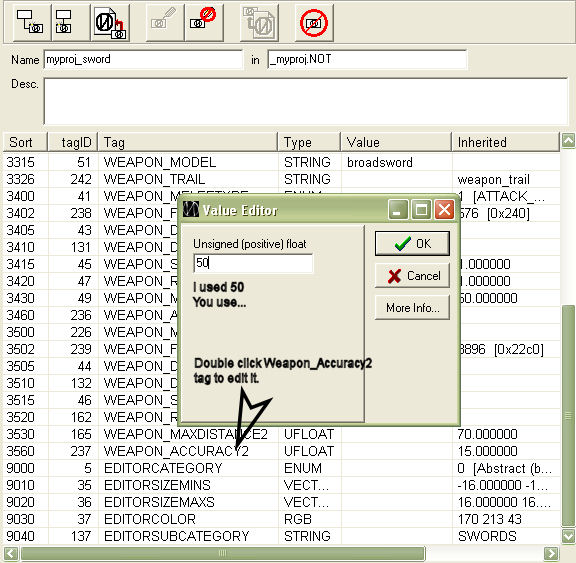
-Now lets set the WEAPON_ACCURACY2 tag (We don't need to add it sense it already exists).
-Now if you look at the WEAPON_FLAGS2 tag that exist on our sword you may notice that our secondary attack comes with a neat STRIKETRAIL flag. Unfortunately, it wont look right till we setup our bladestart and bladend coordinates.
-Let's do that now by adding the missing tags.
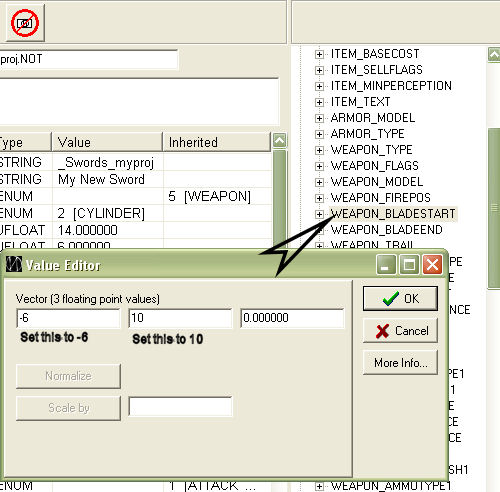
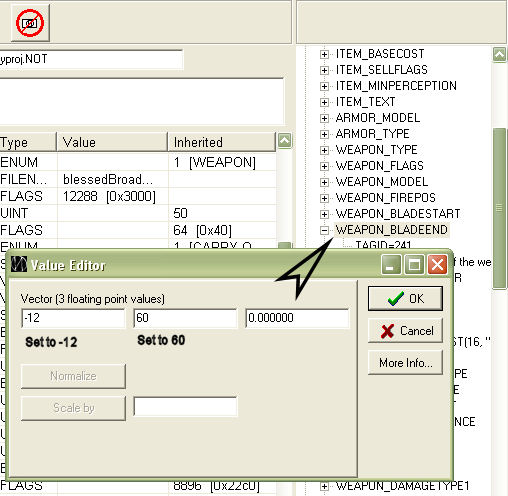
-The first tag we grab is WEAPON_BLADESTART. Set the values as shown in the image.
-Now setup our blade's end with the WEAPON_BLADEEND tag. Set the values as shown in the image.
-Now the striketrail particle effect should show right.
-NOTE: We can change the particle trail too by changing the WEAPON_TRAIL tag's value. (Not covered in this tutorial)
-Now let's start adding some 'special' characteristics to our new sword.
-We're going to make our sword replenish the user's blood over time and even increase their bloodpool while they keep the weapon equipped. To this we need ITEM_EFFECT tags.
-Add the ITEM_EFFECTNAME0 tag to our sword and input the name ef_increasebloodot.
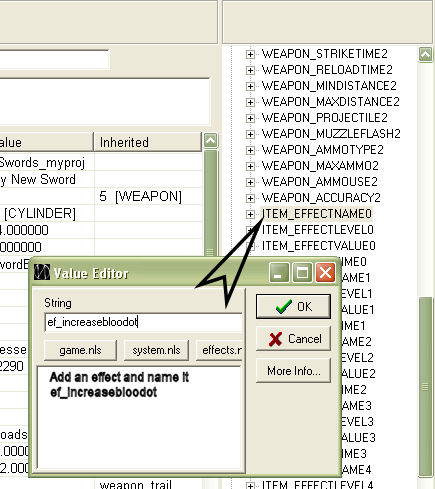
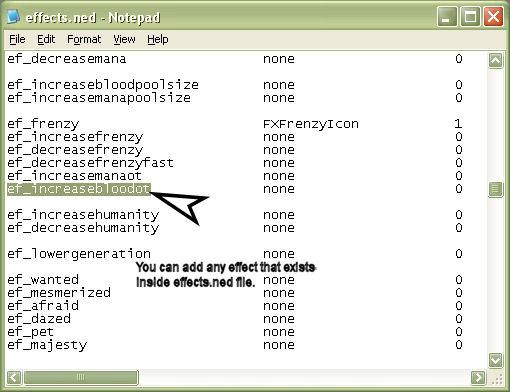
-The ITEM_EFFECTNAME tags look up available effects from the effects.ned file located in Resource.nob's misc folder.
-You can open the effects.ned file with Notepad if you want to see the whole list of effects available in the game.
-Now we need to setup either a level or a value to this effect. What's the difference?
-Well ITEM_EFFECTLEVEL is an array list limited to values 0-5 that are defined in the effects.ned file, containing preset values.
-With the ITEM_EFFECTVALUE tag we can use our own custom value not located in effects.ned.

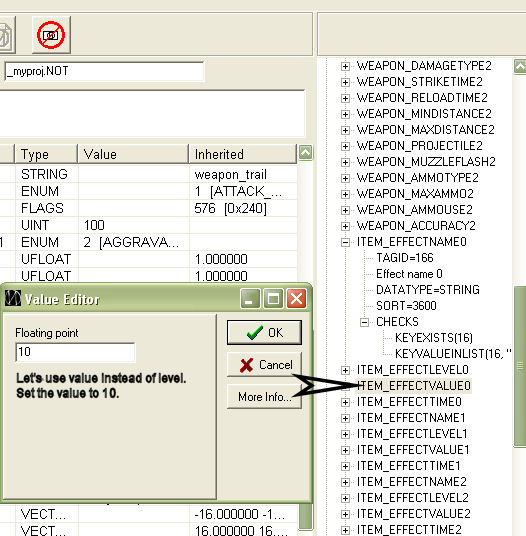
-We're going to use the ITEM_EFFECTVALUE0 tag for our ITEM_EFFECTNAME0 tag's value.
-Input a custom value of 10. That way ef_increasebloodot will increment our bloodpool 10 points every 6 seconds.
-Now let's add ITEM_EFFECTNAME1 to our weapon and give the ef_increasebloodpoolsize effect.
-Add the ITEM_EFFECTVALUE1 and set its value to 50 so that our bloodpool size increases by 50 points.
-Now I think would be a good time to add a little bit of balance to our sword by apply some restrictions.
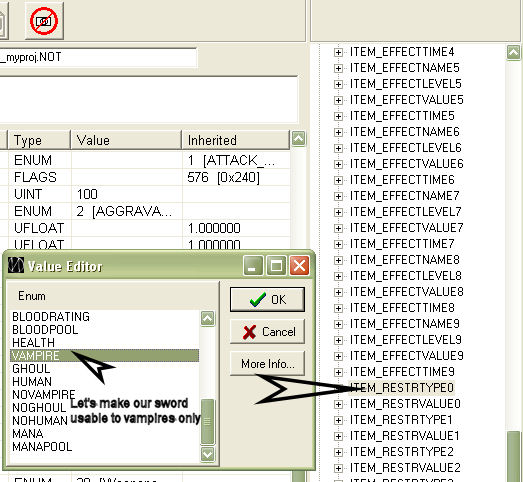
-First let's add the ITEM_RESTRTYPE0 tag to our sword and pick a restriction on the list.
-We're going to make this sword usable by Vampires only.
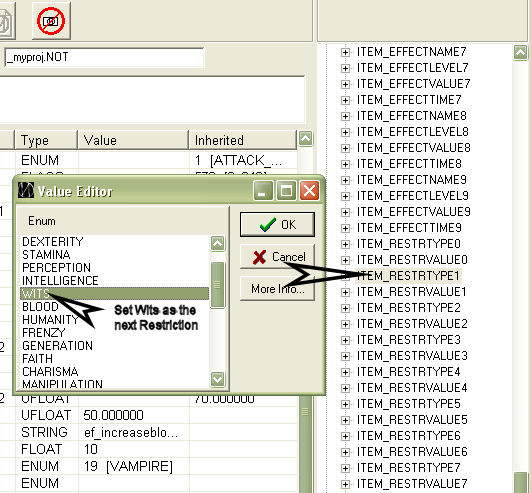
-Now let's apply another restriction by add the ITEM_RESTRTYPE1 tag.
-I would think that a Vampire would need to be gutsy to use a Sun sword like this.
-Let's choose WITS for our ITEM_RESTRTYPE1 value.
-Let's setup the value requirement by adding the ITEM_RESTRVALUE1 tag.
-Set the tag value to 40. This will cause the sword to require a minimum Wits of 40.

-Now we can add more restrictions too - as many as there are tags.
-Let's add another stat restriction, but setup the restriction to require a user's stat to be NO HIGHER than a value.
-To do this apply the ITEM_RESTRTYPE2 tag and choose a stat (Appearance).
-Add the ITEM_RESTRVALUE2 tag and set it's value to -20.
-This will require the user's Appearance to not exceed a value of 20 to be able to equip the sword. (It's for ugly people only.)
-NJow we're almost finished. We should name our sword.
-Let's change the DESCRIPTIONID to something more unique so that in the game we can tell it apart from the other swords.

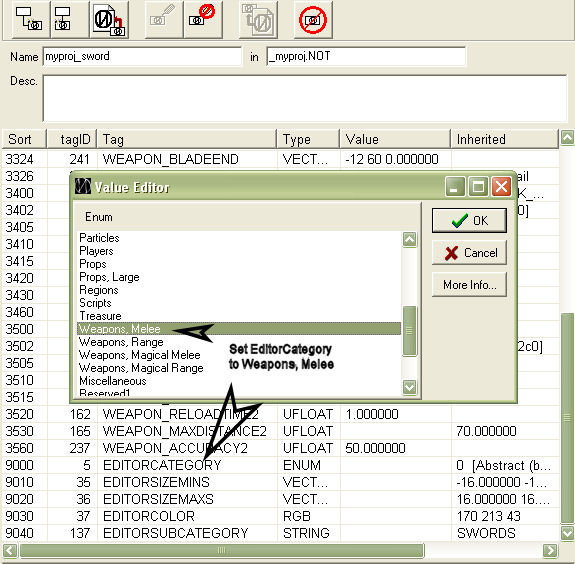
-Last but not least is we need to categorize this weapon by editing the EDITORCATEGORY tag.
-Let's choose Weapon, Melee off the list. You could choose Weapon, Magic Melee if you feel like it.
-You're done. Save your new template file by clicking on it's name and pressing the Save Template File icon.
-Now to figure out how to spawn the new sword in the Redemption game.
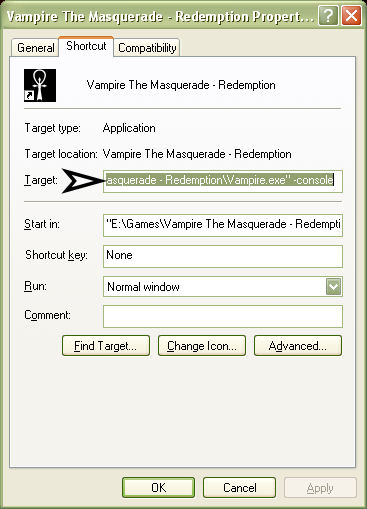
-Create a shortcut of Redemption to your desktop.
-Right-click the shortcut and go to properties.
-At the end of the target line after the "(last quote) input -console then press OK.
-If you're using a mod shortcut like AoR, you don't need to do the 3 previous steps. Most mods already have console enabled.
-Run your game using that shortcut or a mod shortcut.
-Once you are running either a singleplayer game or multiplayer press ~.
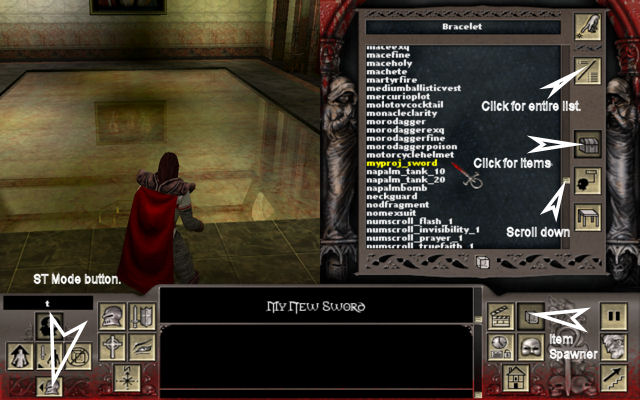
-In the black box that appears at the top of the screen type in addthing [name of sword template]
-Your new sword should appear.
-If you go into multiplayer, you don't need console. Just use ST mode as shown in image:
ENJOY!!
If you find something to make poisonous or disease projectiles dont forget to tell me how please 
After some testing, you will have to do java. There's no other way to do this. Here's a script I came up with:
public class PoisonProj extends Codex {

	public void destroyed(int guid, int captureID)
	{
		CodexProjectile proj = new CodexProjectile(guid);

		CodexActor owner = new CodexActor(proj.GetProjectileOwner());
		CodexActor target = new CodexActor(owner.AIGetTarget());

		int distance = RangeFinder(proj.GetGUID(), target.GetGUID());

		//Check potential hit
		if(distance <= (proj.GetCollideRadius() + target.GetCollideRadius()) * 2){
			target.AddActorEffectByValue("ef_poison", 0, proj.GetProjectileDamage(), owner.GetGUID(), 0);
		}
	}

	public int RangeFinder(int shooterGuid, int targetGuid)
	{
		float shooterPos[] = new float[3];
		float targetPos[] = new float[3];

		CodexActor shooter = new CodexActor(shooterGuid);
		CodexActor target = new CodexActor(targetGuid);

		if(shooter.GetLocationNum() == -1 || target.GetLocationNum() == -1)
			return(999999);

		shooterPos = shooter.GetPosition();
		targetPos = target.GetPosition();

		float distance1 = (shooterPos[0] - targetPos[0]);
		float distance2 = (shooterPos[1] - targetPos[1]);
		float distance3 = (shooterPos[2] - targetPos[2]);

		double distance = Math.sqrt(distance1*distance1 + distance2*distance2 + distance3*distance3);

		return((int)distance);
	}

}
Applying this script to the projectile template of your weapon should get the desired effect.