When I started to work on my first Unity Android game two weeks ago, I had a lot of questions that I didn't find the answers for as easily as I would have liked. Hopefully this blog will help some people get started.
The tools you need:
- Unity Android
- The Java SDK (Oracle.com)
- The Android SDK (Developer.android.com)
- An Android market developer account (Market.android.com)
Additional stuff I chose to involve in my projects:
- HeyZap social networking SDK (Heyzap.com)
- An Admob account(Admob.com)
- A MobClix account (Mobclix.com)
- The "Instant Ads Android Plugin" by VNL from the Unity Asset Store
- Zubhium for beta test distribution Zubhium.com
- A forum to try to recruit beta testers Forum.xda-developers.com
Additional stuff I will probably use in my projects in the future:
- ScoreNinja for high score tracking (Scoreninja.appspot.com)
The general approach:
- Create your core app with no plug-ins or extensions
- Test Test Test
- Get it to deploy onto your Android device
- Test Test Test
- Add plug-ins and libraries one at a time
- Test Test Test
- Get betas out to testers
- Test Test Test
- Deploy to the Android Market
Step 1: Create your core app
If this is your first time developing a Unity Android app, get your game as matured as possible without integrating third party plug-ins or libraries that result in .jar files or other things getting dropped into your plug-ins folder which only work on the Android device you're testing on. You may see "Android Manifest" cross your path as you visit websites learning how to do those integrations. Bookmark them all in your browser, but don't mess with your manifest just yet.
As you develop, keep these important things in mind:
- Don't assume Screen.width and Screen.height will be the usable screen area. Hyperspace Pinball, for instance, has a 3D playfield. It looks fine on an iPhone and iPad, but the sides get clipped off on an HTC Thunderbolt. So, I had to write a script to change the camera rectangle to support a minimum aspect ratio of 2:3. Tiltz for Android has persistent ads at the time of this writing, so I had to make changes to make it so the camera pixelRect and OnGUI always stay away from the banner area. I also had to intercept OnGUI and use GUI.DrawTexture with a plain black texture to cover up the unused render area so you don't get graphical glyphs appearing in places the camera doesn't render at.
- Minimize the number of OnGUI calls. Don't even call it if it's not doing anything...because even if they do absolutely nothing, they still cost you some performance.
- If you have Unity Full, use the profiler early and often! Don't get tricked into thinking your app is fast because it is on your powerhouse development computer.
- Every time you deploy to the phone, look at the build size! I try to keep mine under 20 mb since I write simple yet graphically detailed games. I may have lost thousands of downloads of my iOS apps because I wasn't paying attention to that.
- Don't rely on touch phases firing correctly nor on touch values like touchDelta. Please read this post for details: Answers.unity3d.com . I have first-hand experience with the same issue the author wrote about.
- Android has its own accelerometer axes. If you already wrote an iOS game, and you do a straight up conversion, you will find everything falling to the left side of your screen. Make sure you account for this.
- Try to use the GUILayout utility functions instead of using the GUI functions for rendering configuration menus. This goes back to what I said about controlling the aspect ratio. I had to rewrite all of my menus because my old design assumed usage of the full screen dimensions (and that code was otherwise not thought out very well).
- If you are using Unity's GUI/GUILayout controls for configuration menus, view the post at Answers.unity3d.com that discusses how to make the controls sensitive enough for phones to detect user interaction.
- Androids have standard back buttons. Use them in your menus. More info at Answers.unity3d.com
Step 2: Build and deploy your app onto your Android device if you haven't already.
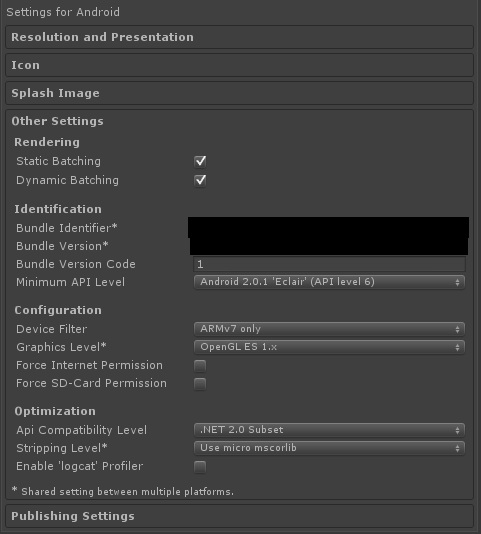
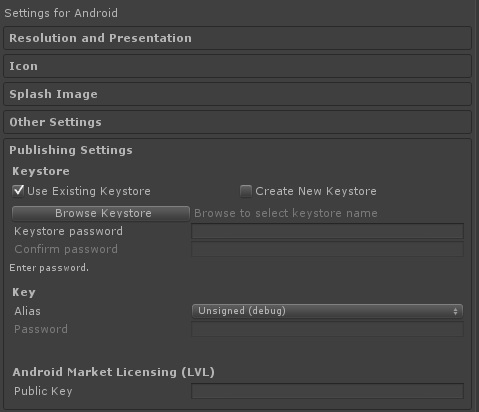
Here are screenshots of my Android player settings SO FAR in the development process:
- The splash screen is Center (only scale down). My splash screen image is twice as tall as it is wide...it's the only way I could get it to look good. (Note: It was reported to me that it looks terrible in a high resolution device, I'm going to have it scale to fit in the future)
- I use OpenGL ES 1.x. My games don't need anything fancier; and testing under 2.0 caused my device to crash and reboot.
- I didn't mess with the publisher settings.
- I didn't mess with any Android-Manifest.xml files. You don't need to worry about that right now.You need to make sure it will run on your device before you go further.
Step 3: Add plug-ins and libraries one at a time
Being new to Android development, I'm still trying to understand exactly how Android-Manifest.xml works and the minimal text it requires to be functional in an app. What I figured out so far is that it tells the device the requirements of the app (does it need internet access? accelerometer support?), and what libraries to load it with. Some third-party plug-ins require this, others do not. For instance, HeyZap didn't require me to make any changes (that I know of yet) to Android-Manifest.xml . The "Instant Ads Android Plugin", on the other hand, did. I also found that Unity generates one, and you can find it in the temp folder in your project. Here's what worked for me:
- The first library that requires customizations to Android-Manifest.xml usually comes with its own Android-Manifest.xml. After importing the library and xml into Unity (the xml always goes in Assets\Plugins\Android), I opened the xml and made sure the package name and version were correct at the top of the main element.
- For every subsequent library, I would back up my existing Android-Manifest.xml, then import the new one, then merge the two together. Most of the work was identifying which elements to add into the main one. If one had a higher version requirement of something than the other as specified in some XML element, then I'd retain the highest version requirement.
- I made sure to do general testing for all existing libraries in between each library addition. If something in one of them broke, then I knew what changes caused it. I won't go into the exact details of how I integrated the libraries I did; there's too much to write and I'm still new at things. I may get around to writing a blog about that, though.
Step 4: Get betas out to other testers
Once your app passes your own developer testing, you need to get other people to test it. Just today I learned of Zubhium.com which acts as a hub for test distributions. This is also the time to start looking at Android forums for people willing to test your apps.
I can tell you that I did not have to do anything special with the build settings to make this work; a friend of mine got the app from Zubhium after I posted it without any issues.
Step 5: Deploy to the Android Market
I haven't gotten this far yet, but when I do, I'll probably write another blog.
Conclusion
Well, that's all I have for now. Check out these bookmarks that helped me gather information:
Market.android.com
Developer.android.com
Developer.android.com
Support.google.com
Support.google.com
Weston-fl.com
Unity3d.com
Unity3d.com
Drupal.technicat.com
Forum.unity3d.com
Zubhium.com


