Tutorial originally created by skreWball. Mirrored here for archival purposes.
Note unfortunately the example file he uses in this tutorial was not archived. Note despite being labelled as "part one" there was no part two.
Player Model Tutorial: Part one
You should read the Weapons Model tutorial if you haven't already. This tutorial is basic and you should be familiar with importing models and textures before you attempt importing player models. Go to the weapons tutorial
Get yourself a copy of Milkshape and Gwynhala's Rune SuperCoolModel Exporter for Milkshape 3D
Ok so here we go. This is going to be a tutorial on how to get a Player model into the game. I will write a second part explaining severed limbs and pain skins very soon. As I said before, this may not be the correct way to import player models but it works : )
Our first step is to make a player model . I have made one just for the tutorial. Meet Mr. Happy. The Rasta Viking.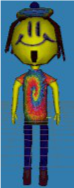
Here is the Player skeleton that we need to make the rune players playable. Now this file is Mr. Happy he is in .3ds format, I created him in Milkshape then exported him as a .3ds file. He is the correct size so all you have to do is import him into the Player Skeleton Milkshape file.
Ok now open Milkshape then open PlayerSkeleton.ms3d.
Go to file---Import---AutoDesk 3ds
Then click the double arrows on the new window that pops up >>
Select happy.3ds then click "ok"
Now you should see something like this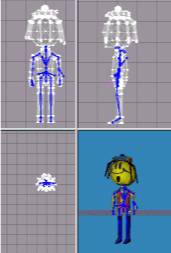 .
.
You can line the model up to the skeleton if it's not already.
DO NOT MOVE THE SKELETON AT ALL. You player model will not work if you do.
Now that we have our skeleton and model we have to assign vertex's to joints in order to make the player model move. Think of it as Bones and Skin. Every vertex has to be assigned or it will not move with the player.
Click on the joints tab, you will see a list of names. These are all the joints in the skeleton. We do not have to assign every joint. Joints with the word BASE in it DO NOT get assigned (ie. Base, base_torso, base_chest) Nor do the joints with the name Attach.
Time to start assigning
Click on the Model tab, the select, then Vertex.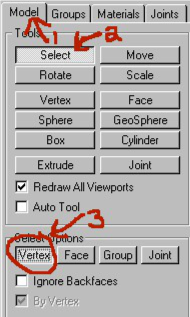
Click on the joints tab and then click on "Pelvis" the joint will light up in Blue. Select the vertex's around the pelvis of the model, the vertex's turn Red when you select them.
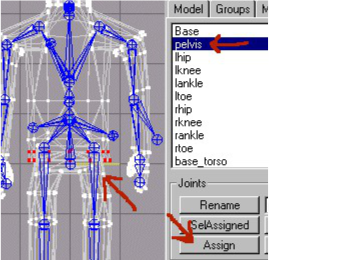
Now the vertex's are attached to the pelvis.
When you have a certain joint selected you can click on "SelAssigned" ![]() and the vertex's that are attaches will light up. Take a look at my model (happy_assigned.ms3d) to see what vertex's are assigned to what joint. You can also use the "Ragnar.ms3d" file that that is included in Gwynhala's Rune SuperCoolModel Exporter for Milkshape 3D .
and the vertex's that are attaches will light up. Take a look at my model (happy_assigned.ms3d) to see what vertex's are assigned to what joint. You can also use the "Ragnar.ms3d" file that that is included in Gwynhala's Rune SuperCoolModel Exporter for Milkshape 3D .
Once you have all the vetrex's assigned, you can export the player as a .Scm. When you are asked for "Rune Joint Tweak File (.txt) select the "RunePlayerTweaks" file in the folder where you downloaded everything. It will also tell you that the joints have no key frames, this is ok we are not animating the skeleton so we can just click ok and ignore these messages.
Now we can import the player model :)
Fire up runeEd and import your .scm file. Make sure you change the package name to Happy or whatever you names your player. save the skeleton and then load it. Import your texture make sure you name it the exact same as the default blue texture that is shown. I named my .scm MRhappy so my texture name is MRhappyhappy.
Go to Pawn in classes, expand it
Pawn
-PlayerPawn
  -RunePlayer
Highlight RunePlayer. click New. Then copy the code from another playerclass paste it into your players code.
Go into your players defaults, Change the "SubstitueMesh" to your newly imported mesh. Save your playerclass. You also have to compile the changed script's, do this by hitting F7.
Bingo now the player is playable :) You can add the player to a map like you would a weapon or decoration to test it. If you assigned the Vertex's wrong you will know it. If that is the case goback to milkshape and check how they were assigned. Use "Ragnar.ms3d" and "Happy.ms3d" to cross reference the assigned vertexes.
Once your happy with the model, you have to create a n .int file. This is mine
Public
Object=(Name=happy.happy,Class=Class,MetaClass=RuneI.RunePlayer,Description="Happy")
You also have to addObject=(Name=happy.happy,Class=Class,MetaClass=RuneI.RunePlayer,Description="Happy") to your Runel.int file to make the player selectable within rune. Finally Open your Rune.ini and add ServerPackages=happy
under the [Engine.GameEngine] line
That's it for now.. Soon I will finish off the tutorial and tell you how to change severed limbs and pain skins. But this is a good start. I am so happy that a lot of you are using the weapons tutorial, I had a chance to check out some of your work and it looks great!! So let me know how this tut works out for you. Happy modeling !!
skreWball