EDIT: 1/30/2022 - An FBX plugin for Alias Maya 6 has been located. So you can import/export meshes using animations. It has been reuploaded here.
Introduction
F.E.A.R runs on the Lithtech engine created by Monolith back in 1998. It uses a proprietary model format and proprietary plugins for import/export. The model files the game uses are different compared to prior Lithtech engine games. It uses “model00c” as an uncompiled editable model file that can be freely modified, and “model00p” as a compiled model file that can be run in the game.
Adding new gun models is remarkably straight forward albeit very obtuse if you don't know what you're doing. After much trial and error I've figured out a reliable method to not only import new gun models but also incorporate new animations. This information was documented absolutely NOWHERE and most likely contributed to to the modding community that surrounded this game abandoning it very soon after release. Once you have imported a gun model for the first time, importing another one or tweaking the animations will become effortless. The same process for importing guns is also the same for importing character models, albeit the latter requires much more work.
This tutorial will be gradually updated with screenshots and further information as it becomes apparent to me. If you have questions please post them in the comments
What you will need
-
The F.E.A.R SDK (It's recommended to download a fanmade version of the sdk referred to as “FEAR Public Tools v2. As it removes the copy protection from Monolith's sdk. )
-
Alias Maya 6 (This can now be located on Archive.org)
-
(Optional) preferably a more modern 3D program to make meshes in such as Blender
-
(Optional) an image editor such as Photoshop
Installing the F.E.A.R plugins
This was unfortunately not documented in the F.E.A.R SDK documentation and I had to learn this through lots of trial and error.
After Alias Maya 6 has been installed (note this must be 6.0 or 6.1. Later versions like 6.5 will not work) navigate to your Maya 6 folder and copy the "bin" folder from the Maya 6.0 folder in FEAR public tools/dev/tools into your root Maya 6 folder.
Now go to your My Documents folder. Navigate to Maya/Scripts and extract the contents of FEAR public tools/dev/tools/maya 6.0/scripts into this folder
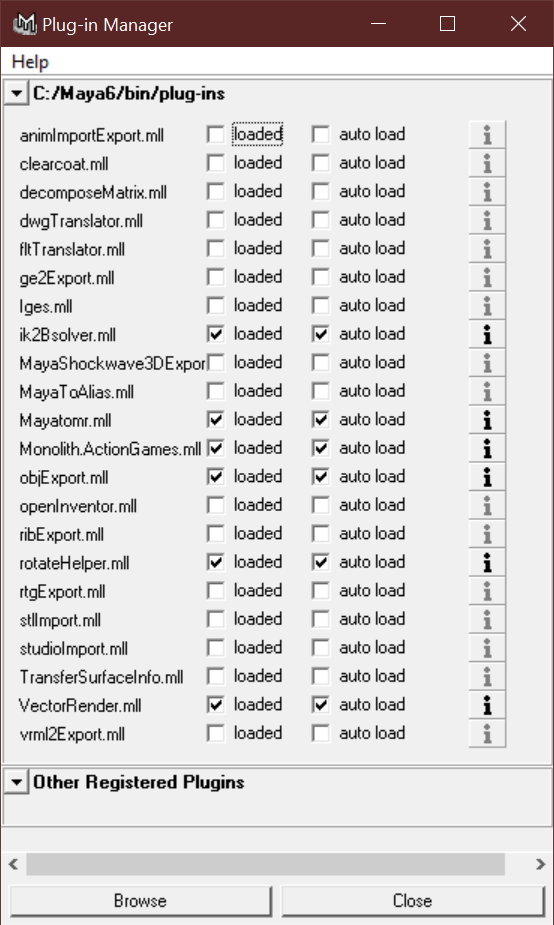
After this start Maya 6.0 up, go to window>Settings/Preferences>Plug-in Manager and make sure to tick "Monolith.ActionGames.mll". I would also suggest ticking "Objexport" as this will be invaluable if you want to use another program like Blender to edit models for this game.
After this a new panel should appear at the top labelled "Monolith". Click on this and click "tabbed panel". This is the Monolith tabbed panel and will allow you to import and export models and animations from F.E.A.R. into Maya 6.0 and export back into a state that can be read by modeledit, the game's proprietary model viewing program.
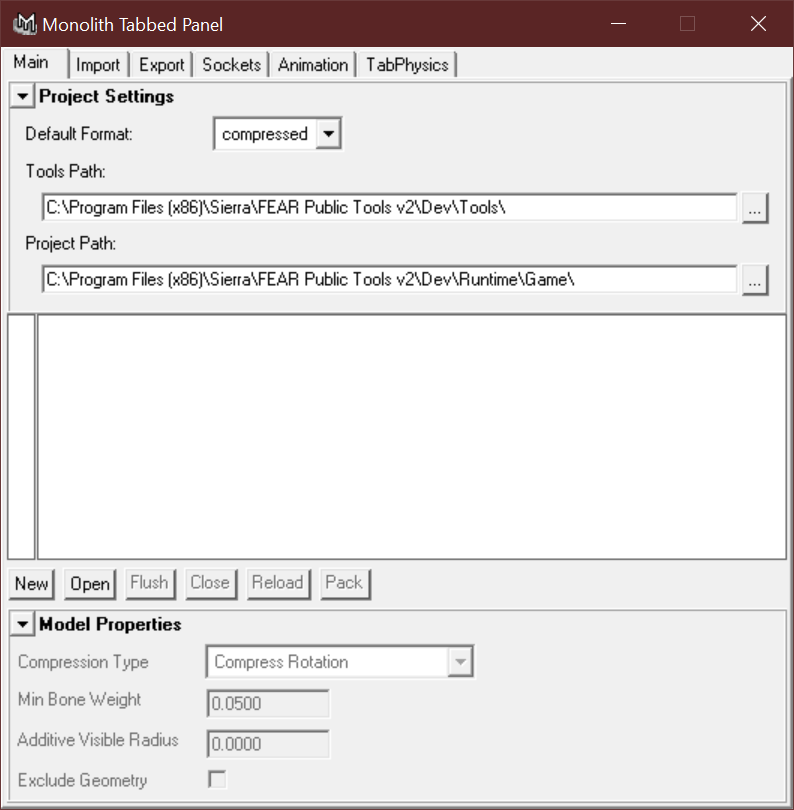
The Monolith Tabbed Panel
The F.E.A.R SDK allows you to replace existing gun models as well as add completely new weapons to the game for the Pointman to use. For the purposes of this tutorial we will go over how to replace an existing model.
Once you open the Tabbed Panel it will complain about the Havok physics plugin not being loaded. This is normal as Monolith never released it.
There are 6 tabs at the top. “Main”, “import”, export”, “sockets”, “animation” and “physics”.
Main
“Main” is where you select specific models. It is good practice in general to copy an existing model file. (IE: The AT-14 Pistol) into the same or a different directory and rename it to what weapon you plan on replacing it with. IE: If you plan on replacing the pistol with a different one, say a Beretta. It is recommended to copy the existing pistol.model00c file, paste it, and rename it to “beretta.model00c”. Then select beretta.model00c in the monolith tabbed menu. As opposed to creating a new one from the Monolith tabbed panel or overwriting the existing file. The reason you don't want to do the former is the developers of F.E.A.R added physics properties to most of the models in the game that are baked into the model file. Creating a new one will lack this. Saving over the existing one isn't recommended as you might want to go back to the vanilla model to edit it again. This isn't as important for replacing guns but is absolutely necessary once you begin replacing player animations or if you want to add new character models to the game as they will lack physics if you create a new file as opposed to editing an existing one.
Anyway, to make a long story short. Always copy the existing weapon or character you plan on modifying, paste it somewhere and rename it, then always work from this newly copied file.
Import
Once you have selected the model you want by opening it in “Main”. Go to import and select it from the dropdown menu.
You're given a few options here. “All”, “Skeleton”, “Skin”, and “Socket”. All imports everything. Which is typically what you want. “Skeleton imports only the model00c file's skeleton. Generally you don't want to do this as it's easier to import all, pose your new model mesh and delete the existing model. But the tabbed panel gives you the option. “socket” are areas on the model where the engine can place additional models or effects. A good example is if you want to add a silencer to a gun or a muzzle flash you create a socket for it. This also applies to character models, if you want to add a gun into a character's hand you add a socket for it. Sockets are typically added in ModelEdit so it will be covered a little later.

Another important detail with “import” is it lets you view specific animations by double clicking them. IE: If you want to view the reload animation and change it you double click it in import.
Export
Once you are done, or if you want to test a model you can export it from here. The tabbed panel lets you export specific things like just the polygons, just the sockets or just the animation changes. The most important settings are shapes and animations. This will always overwrite what already exists in the model00c you are editing.
Sockets
Sockets allows you to make a new socket which allows for the engine to add things like effects and models onto the gun. For example, a silencer needs a socket placed on the barrel of the gun inorder to be placed and removed later. Or the muzzle flash. You can also make a new socket in modeledit
Animation
Animation allows you to view animation weight sets
These are all the options in the Monolith tabbed panel. Now I will go over the specific steps as to replacing a weapon
Replacing a weapon model
For starters it's recommended to start from a specific weapon. IE: The Assault rifle, the pistol, the shotgun etc. For a variety of reasons but the biggest is due to the way the game handles animation. All of the player's first person animations are actually the player's third person ones just viewed in first person. This is very different to most other first person shooters, including other Lithtech games.
This makes it much easier to replace weapon models however it makes producing quality animations much harder. There are tricks in order to get around this in Maya which I'll document when we get to reanimation
For the purposes of this tutorial we will pick the pistol. Copy the file Pistol.model00c and rename it. Then import it and import All
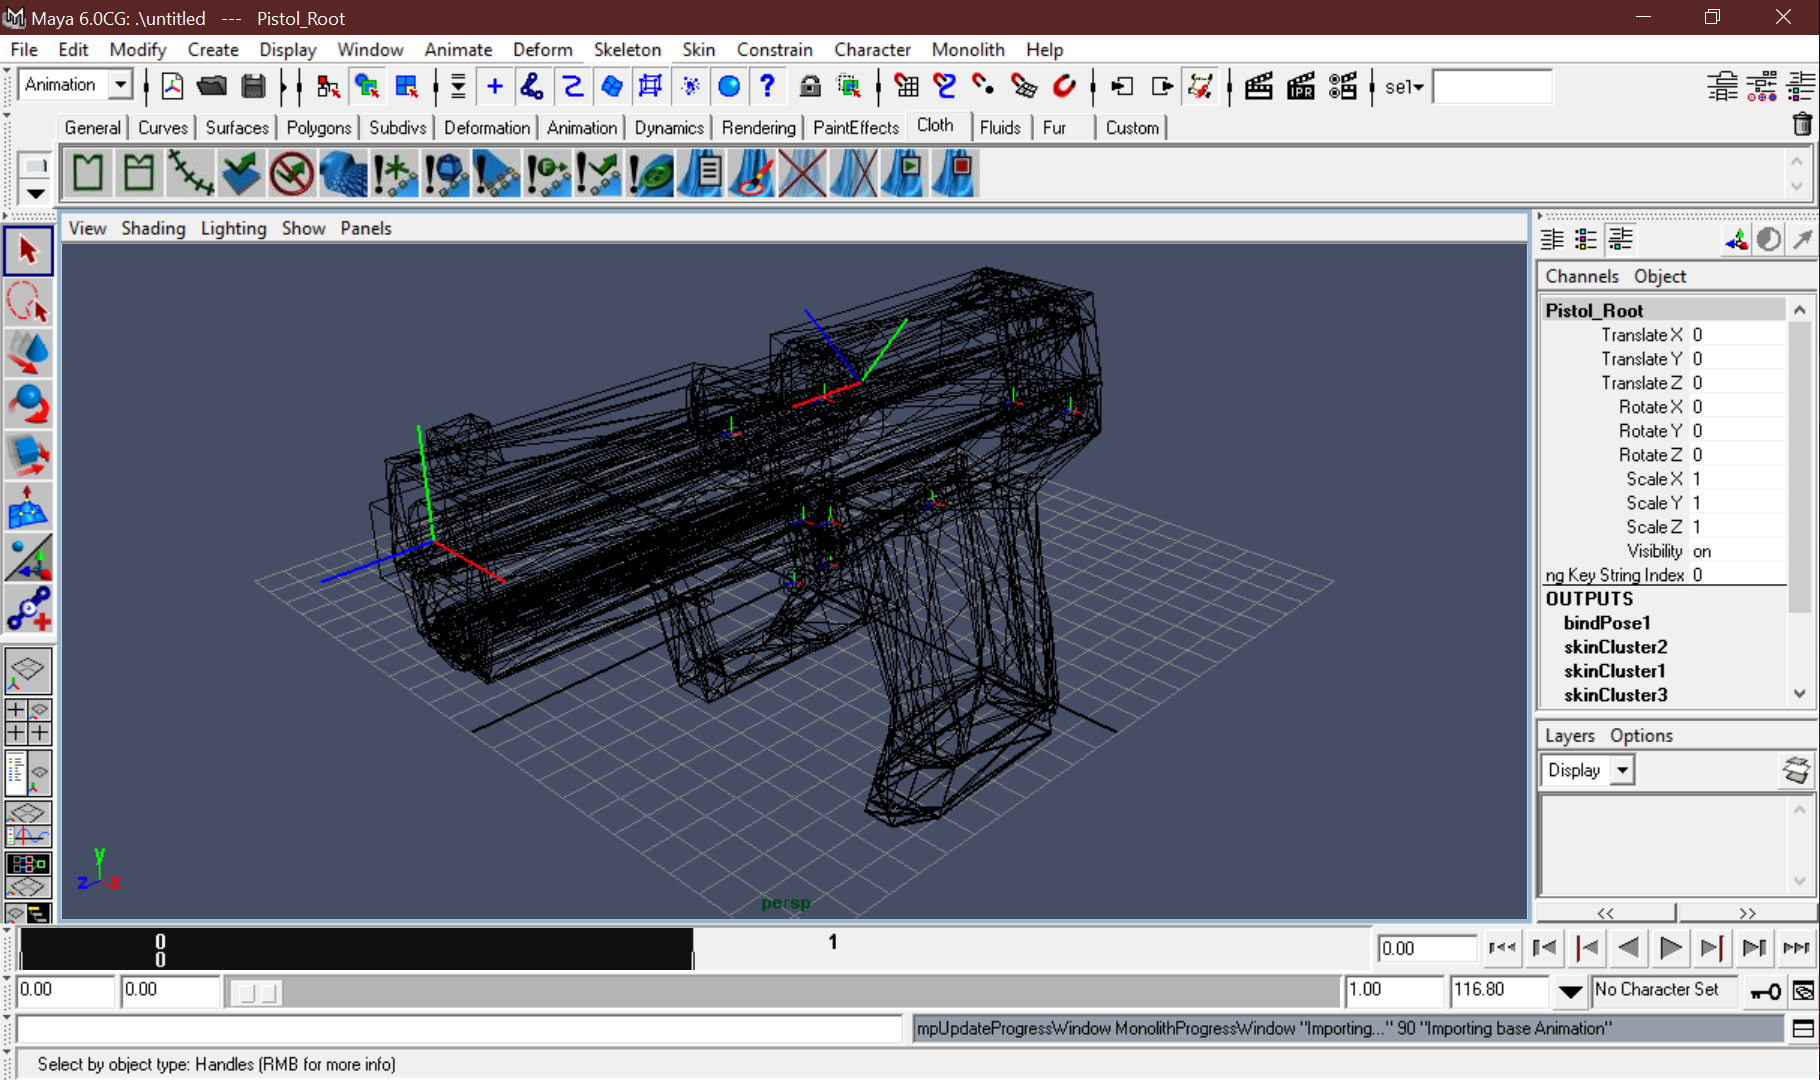
To change from wireframe to solid click shading at the viewport and in the dropdown menu select “smooth shade all”. Additionally click “shade options” and “xray”. This will make the model partially transparent which is invaluable when selecting bones.
Now import your gun model. It will most likely be a much smaller or much bigger size. Scale the model bigger or smaller by going to the scale tool (press R and drag the yellow cube). Scale your new pistol until it is roughly in a similar place to the vanilla pistol mesh.
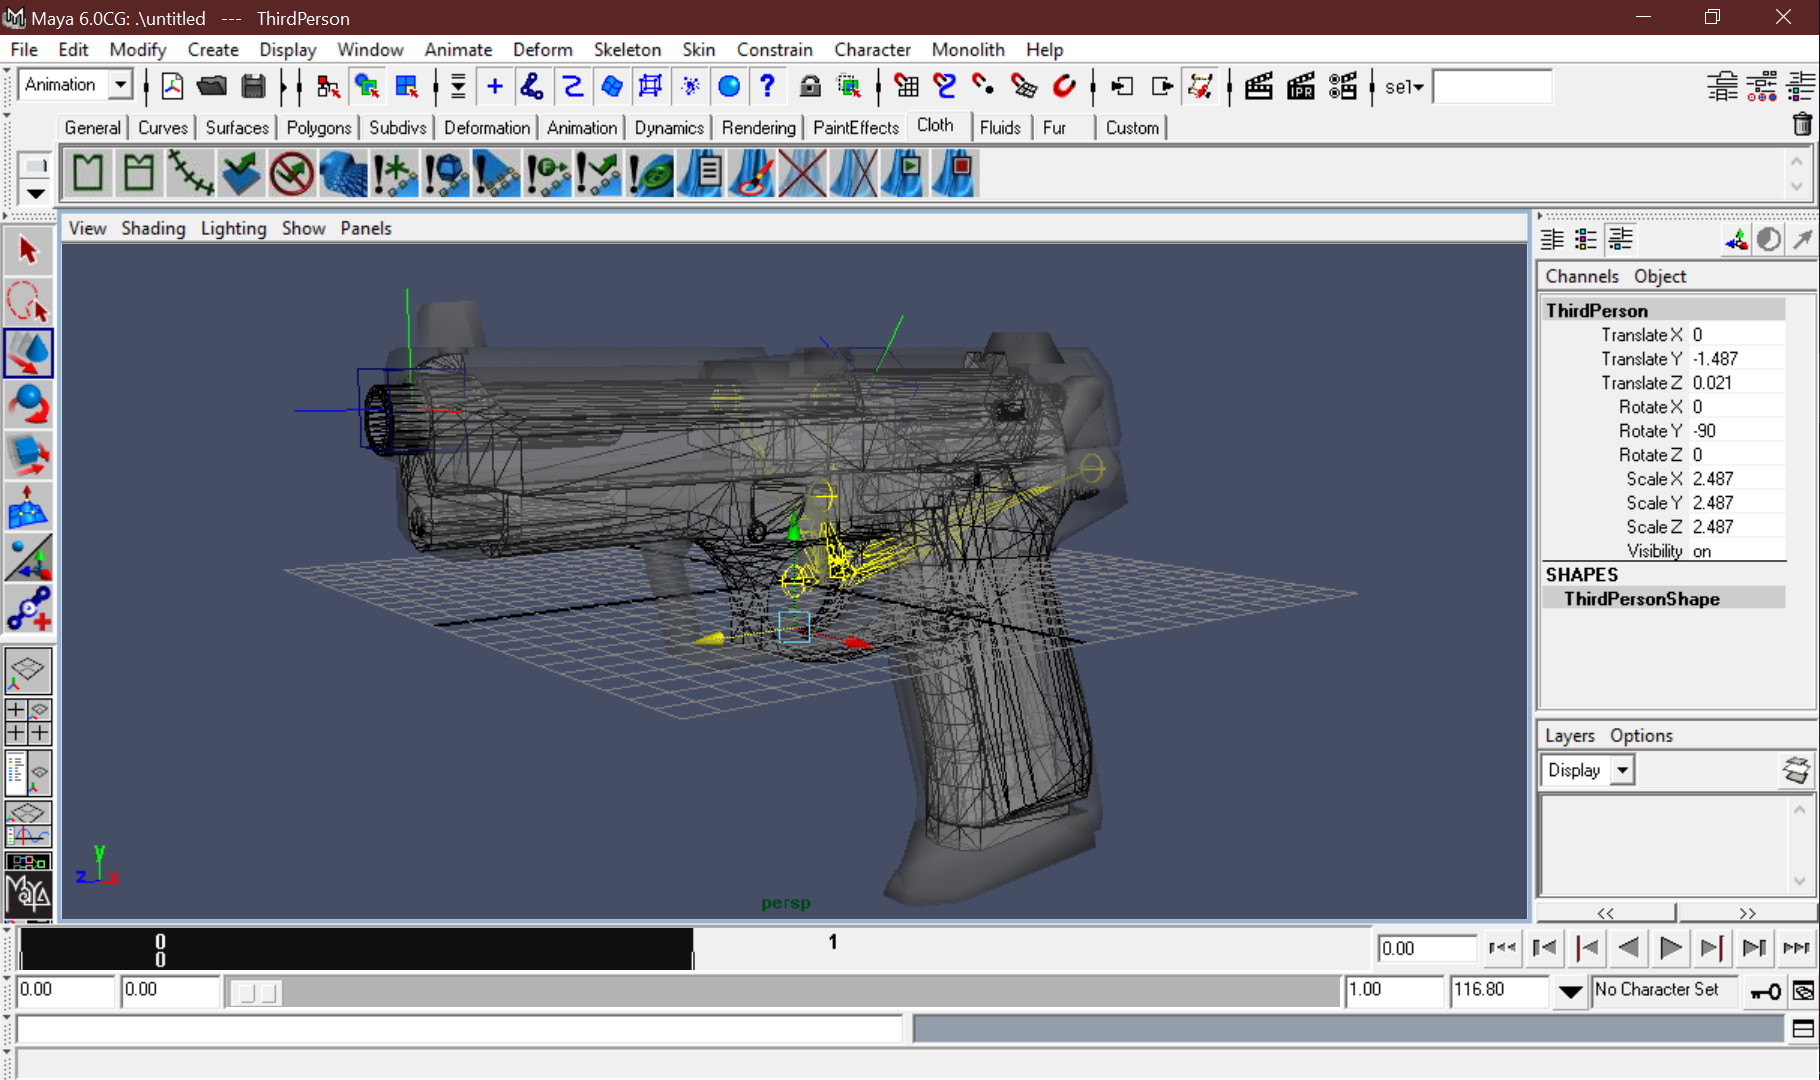
Now delete the original mesh.
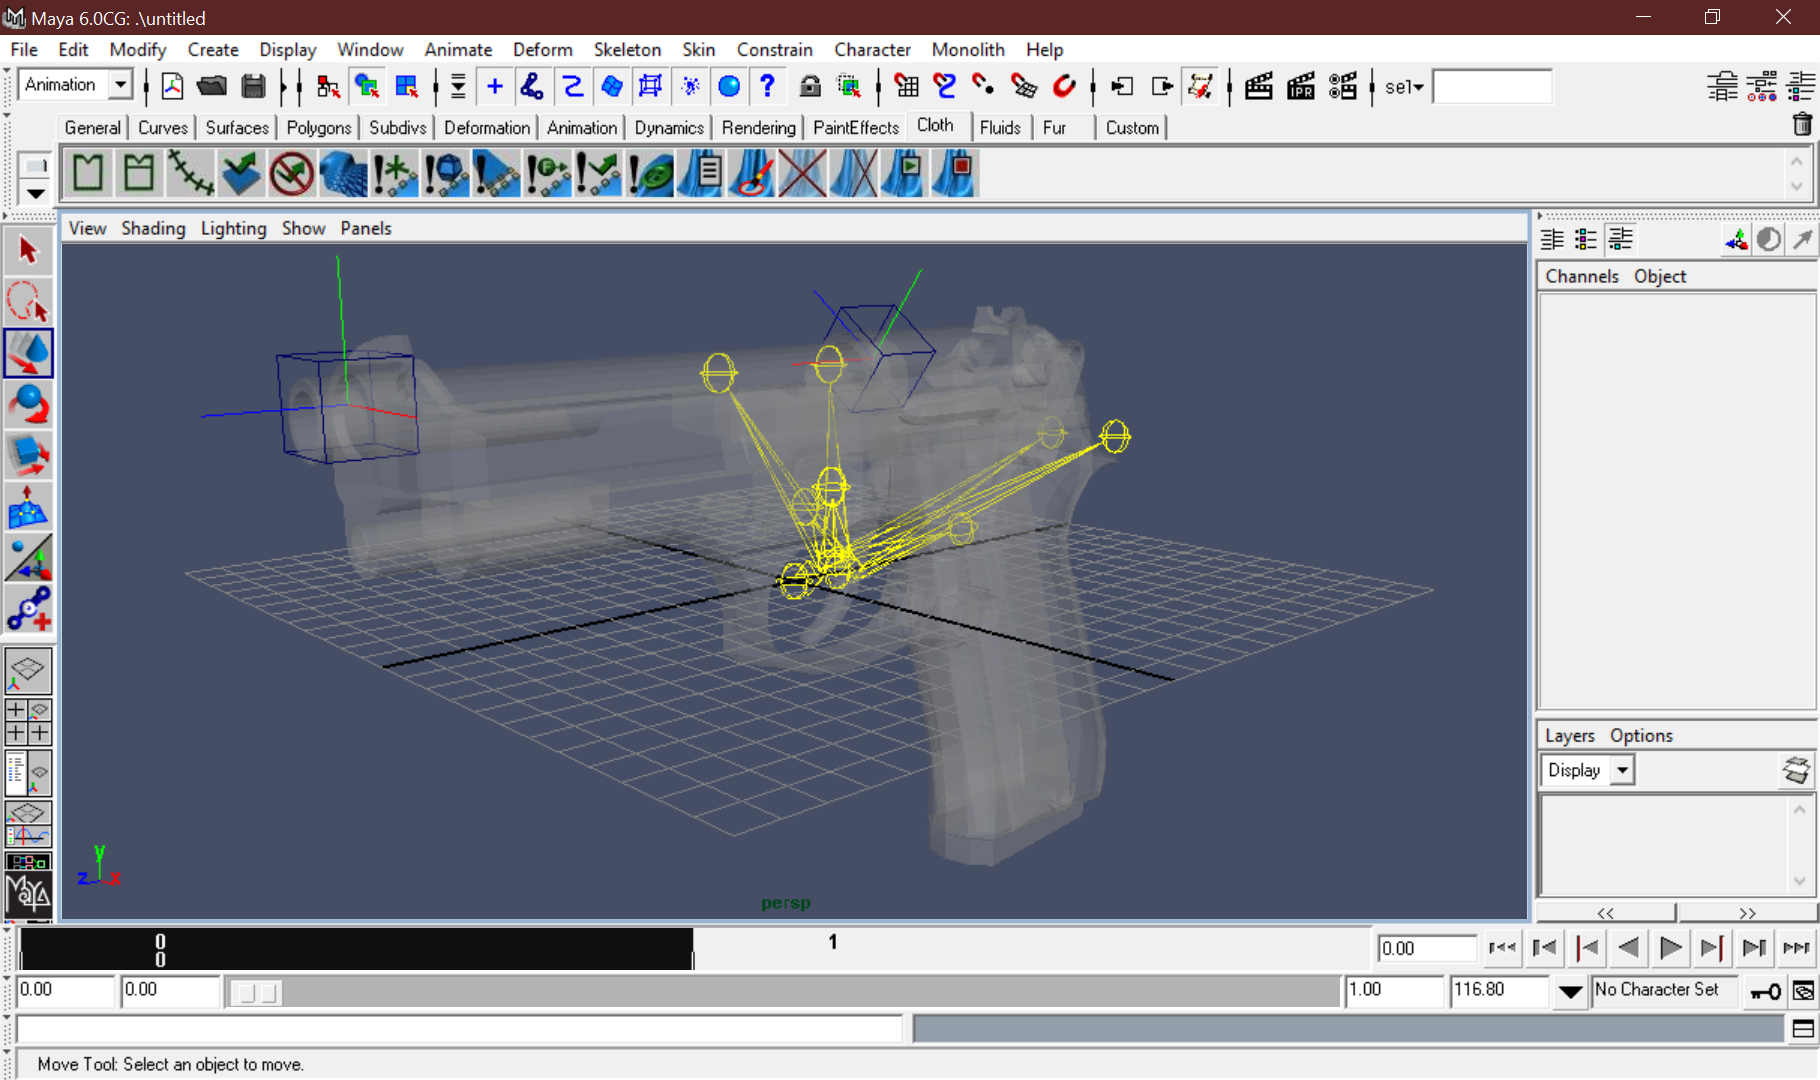
We are now 1/3rd the way done. Now we must rig the mesh
Rigging the weapon
Rigging the model is the most complicated and potentially time consuming step. For this tutorial we won't go too in depth with weight painting. I'll just show you how to rig the mesh and how to fix the model's rig.
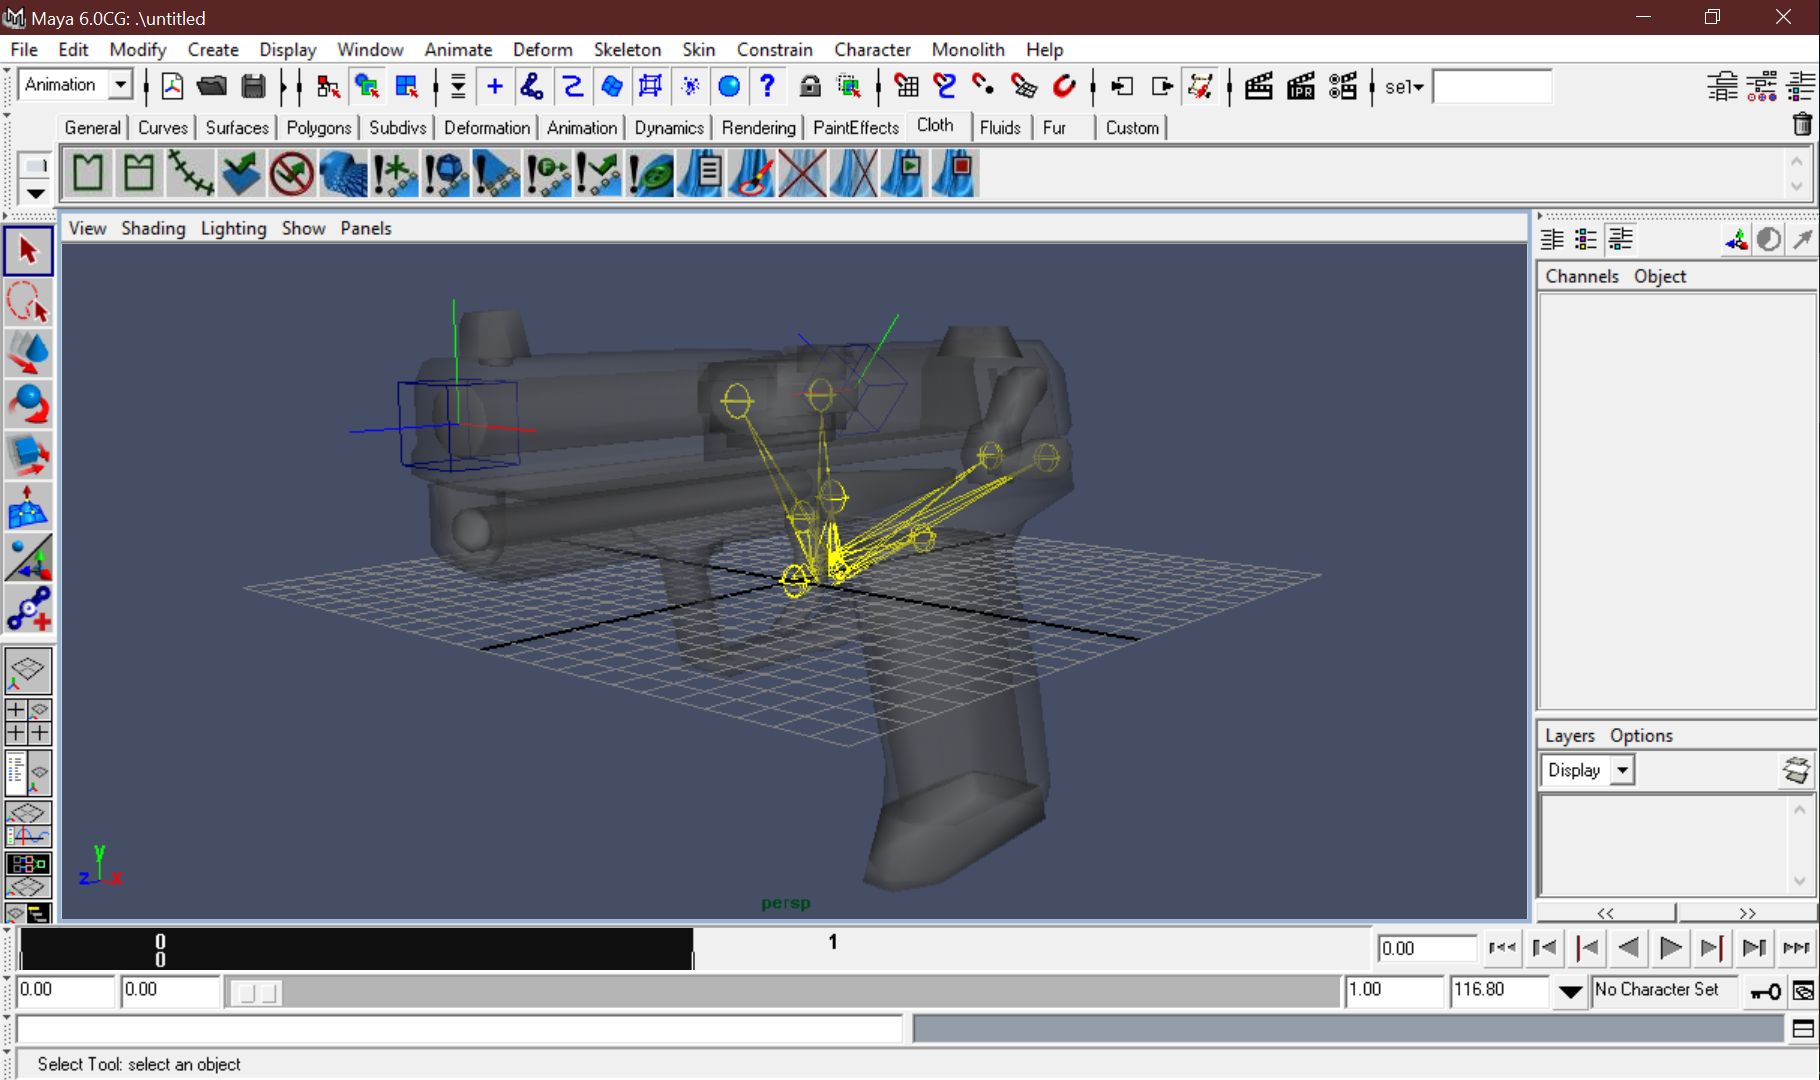
Select all the bones (there is usually a master bone somewhere in the base that'll select all of them). Now select your mesh and go up to the menu at the title bar labelled “Skin” and select bind skin>Smooth bind
The mesh has now automatically been rigged. However this is a very clumsy and slipshot rig, you'll notice if you move some or all of the bones the incorrect parts of the mesh will move improperly. (The hammer will move part of the slide etc).
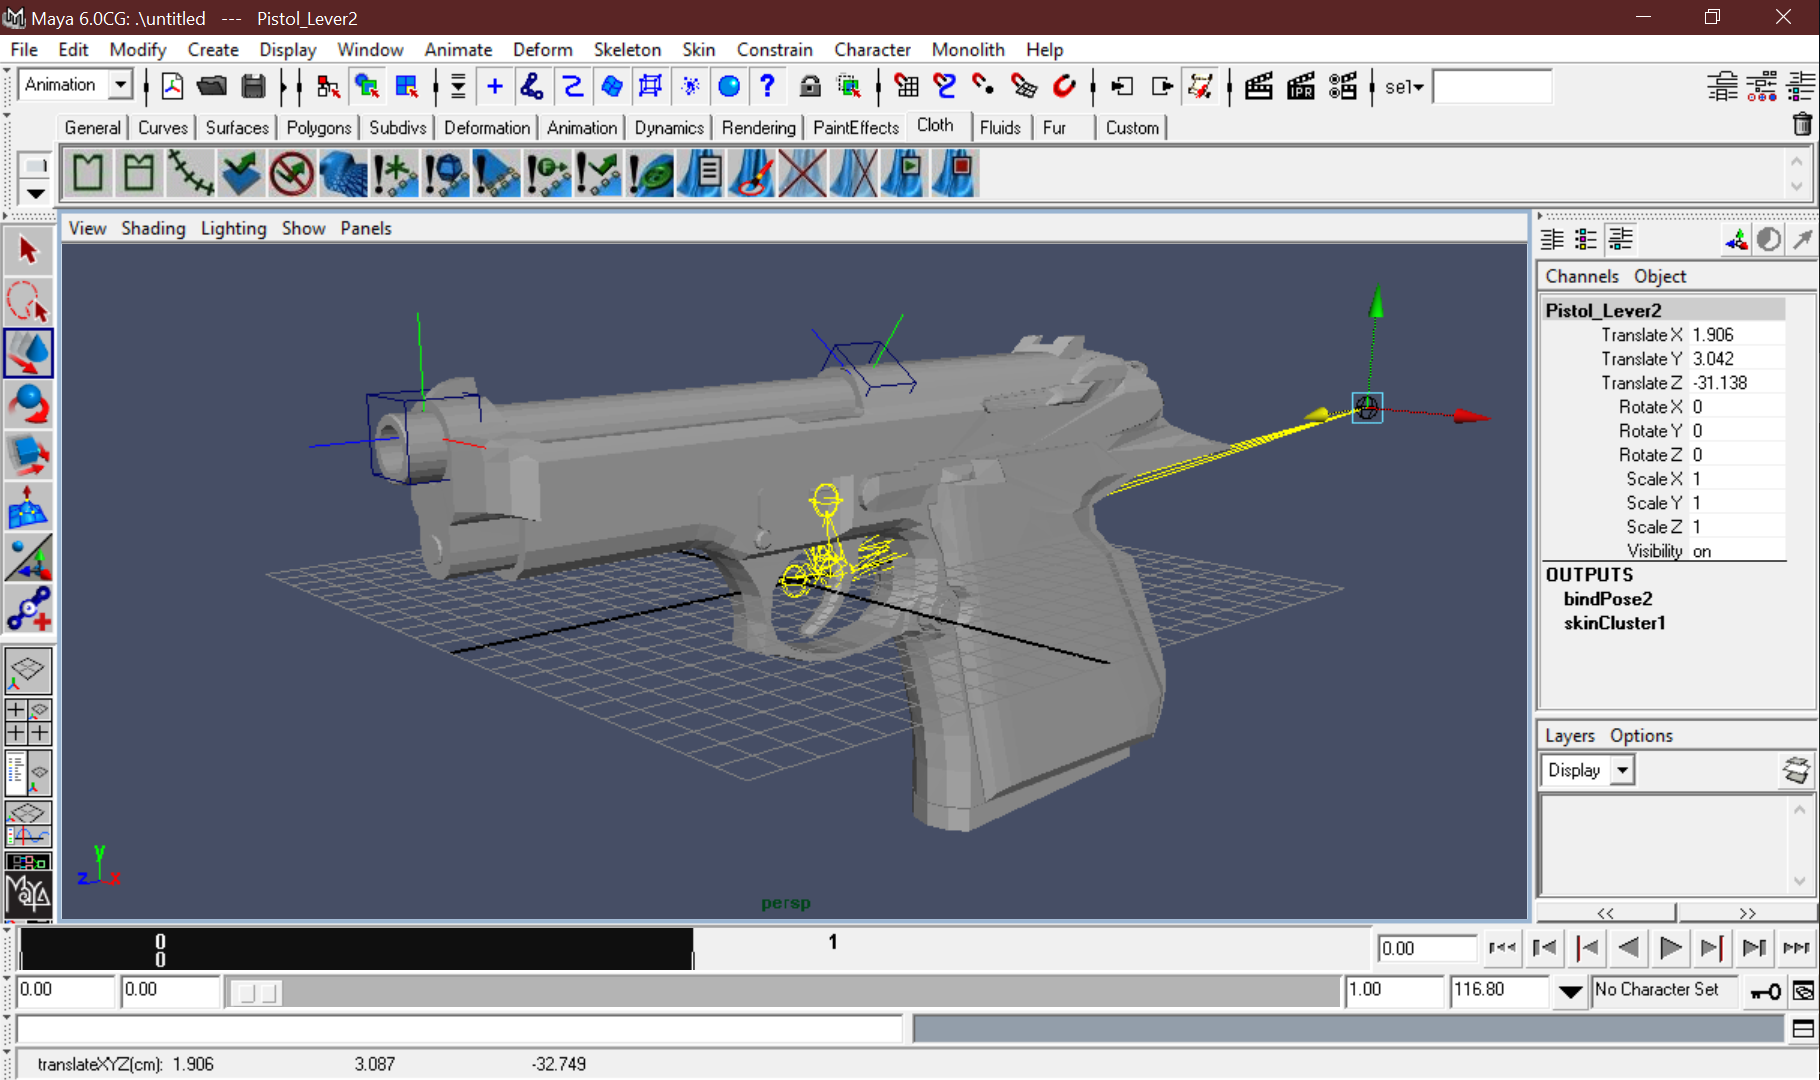
To fix this go to Skin>edit smooth skin>Paint skin weights
This will allow you to pick precisely what polygons are associated to which bone. So when the slide bone moves backward in the animation, only the slide part of the mesh moves.
Alternatively if your mesh is in multiple pieces you can bind the bones of the mesh individually but this is beyond the scope of this tutorial.
Exporting the model
The model is essentially done. Because we have not changed any animations it should work once we export it in model edit.
Go back to the tabbed panel. Select your copied file you made before and click “export”. Make sure you select everything.
Now navigate to your sdk folder and find the model file. Either double click it or go to dev/tools/modeledit.exe and open it with modeledit.
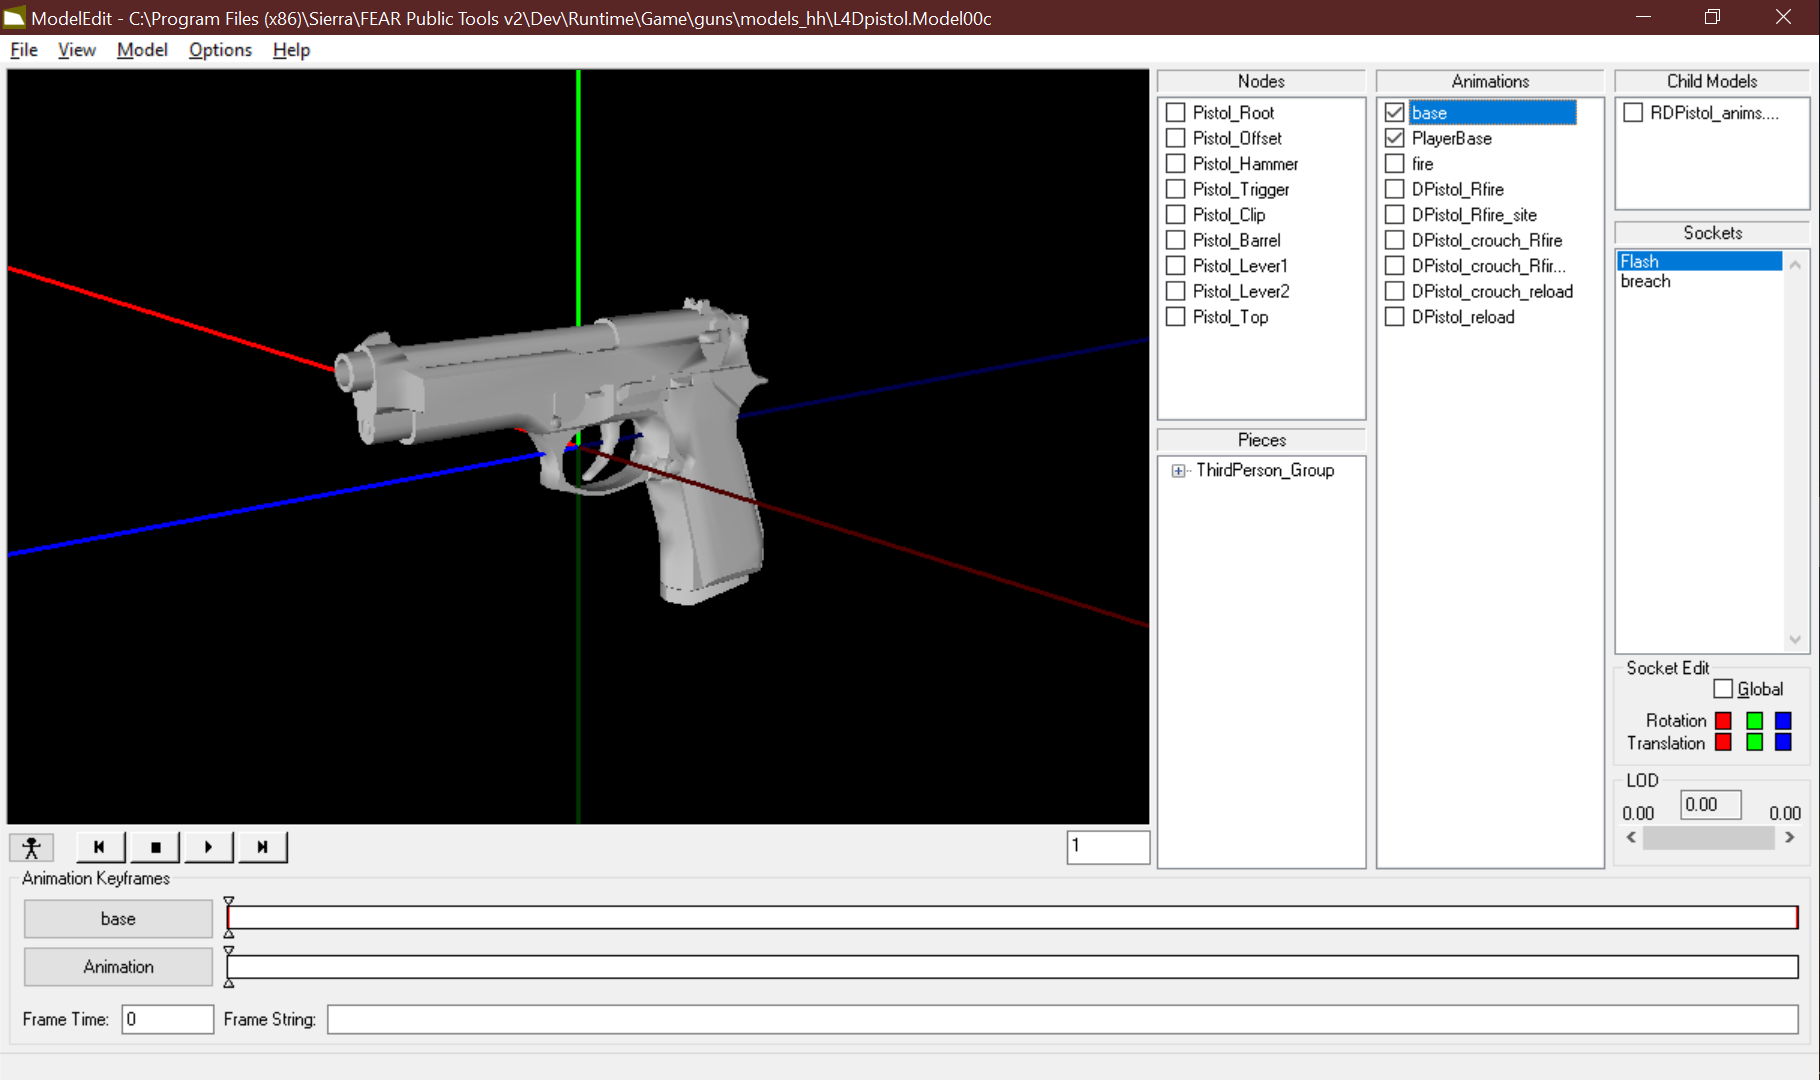
Modeledit is Monolith's model viewer program that they have used ever since Shogo Mobile Armor Division. It mostly allows you to check your models various attributes and assign animations to it from other files. I'll go over the intricacies of this program further in a future tutorial. For now open up our model file.
To export the mesh as a file the game can actually view, go to File>Save and Compile. It will ask you to navigate to where the model file is and will mistake your file for a world00c file. Click the dropdown menu to “all files” and select your model file. After this it will compile your model file into a model00p file which the game can now use.
Testing the model
The gun is now all set to be in the game. There's two ways you can get it into the game. The fastest possible method is to rename the vanilla weapon model (in this case pistol.model00p) to something else and name your model file to the original name. Then start the game and equip the gun.
Alternatively you can go the more time consuming route and edit the database to point to your new model file. This is better suited in my opinion once you are ready to release your mod.
And that's it. Load up the game and pick up a pistol and it should work. The easiest way to do this is to create a test level in the game's level editor and spawn the gun somewhere and run over it.
There is your gun. To give it textures you'll need to create a shader file via the game's level editor and edit the database to point to it. I'll amend the tutorial in the future to include instructions on how to do this.
That's it for now. I'll add onto this tutorial with instructions on how to fix animations and textures. For now these are the bare minimum instructions on how to get a new weapon skin to load in the game.
If you have any questions I suggest PMing me on moddb or joining the F.E.A.R speedrunning discord server. There's a "modding" room there now.


Top notch tutorial bud! Great job! :)
Remember one thing, this is only for weapon and character models. If you want to make world models like vehicles, buildings, furniture and other prefabs, you need 3ds max 7.. Which is also an ancient version of 3ds..
Technically you don't NEED 3dsmax 7. You can just use the level editor. It's recommended you use 3dsmax mostly to make really complex objects like vehicles.
If anyone needs 3dsmax they can also PM me since I also have it. If there's sufficient demand I can post a tutorial on making prefabs although it's fairly trivial to do.
Hi brother. Can you post some 3dsmax modifications to LTA's teaching? I really need help, I am looking forward to it.
Unfortunately there isn't a plugin for 3dsmax for lta. Only Maya. It seems when Monolith made this game the people involved with making characters used Maya and the people who made maps used 3dsmax. This also applies to prior Lithtech engine games like NOLF2/Tron 2.0.
There is a Blender plugin for .lta which is included with the tron 2.0 sdk you can download with the Killer App mod but you're better asking the ldso guys how it works since I've never used it.
Fortunately, I have found a cracked copy of 3dsmax7, and the lta import and export plugin. I want to change my own weapon model for crossfire. I don't know how to do it. Can you research it? If you need tools, I can For you, please help me! I really want to replace my own model.
CrossFire to F.E.A.R Mods video :www youtube.com/watch?v=vVteEzA7imI&t=105s
This looks great. Can you release some of your source files?
CrossFire to F.E.A.R Mods video :www youtube.com/watch?v=vVteEzA7imI&t=105s
Dayum, good guide !!!
Do you know how to change fire rate ? I was over all attributes in GDBedit, but didn't find fire rate anywhere. I see there is guide for models and animations too in sdk help. Can you imagine akimbo style rpl Submachinegun with increased fire rate ? Yikesss !!! This may be actually doable.
I've asked around about this and I've determined the fire rate of the weapon can only be altered by editing the source code from the sdk and creating a new dll. Changing the animations doesn't alter the fire rate, and there aren't values for it in the database.
I tried finding out how to remove the 3 round burst from the various guns but I'm not a programmer so it's not something I can do myself.
Late, but its called firedelay in the Database, but its also on the keyframes of the animation,
will be easier to talk if people joined the Discord instead, can find the link here: Steamcommunity.com
Nice tutorial, recently was my first time making new skeletal meshes and this came in handy :]
Hey, man. Where i can find Havok Physics Plugin? It need that plugin to show the tab
It was never released by Monolith.
Then, how to show it without Havok Plugin?
The Havok plugin is only used to generate physics. It isn't necessary to import meshes into the game.
hi sorry i know its 2023 now but i need your help, i cant find an activation Key for Maya 6.0, i tried to use the one in the link you send but the key seems not complete, thank you for your hard work and help pls.
I'll send instructions over PM.
I can't make sense of that keygen either, I must be either a complete halfwit or keygens weren't meant for mongoloids back then.
EDIT: This link works like a charm Archive.org and the folder C:/flexlm needs to be created prior in order to work.
also can i give you a files, pls help me extracting 3D models from, i used QuickBMS and worked till i got .Model00p file, so pls pls pls help and thank you again. here is the link for one file, its Arch00 but not from fear , its another game.
Drive.google.com
sorry but your tutorial is working only with .Model00c , but the files i got contain only .Model00p
Model00p files cannot be opened with Maya. Model00p files are compiled. The only reason this tutorial is possible is because Monolith released all the Model00c files with F.E.A.R's SDK.