RGM TUTORIAL BY SMALLCOMB
In this tutorial I will show you how to make a game in RGM. In no time at all you will be creating your own maps with custom monsters, treasures, props, pick-ups & weapons.
This tutorial is for people that would like to get an idea on how Raycasting Game Maker works and would like to make their own standalone game.
We start off by downloading Raycasting Game Maker engine here - Moddb.com
Install the engine to your computer.
Open up Raycasting Game Maker.
It will start off in a plain untouched world. To open up the 20 different worlds select open "World-Load" which is located at the very top left of the screen, now you can choose a level between 1 & 20 to open up. They'll all be blank, ready for you to make something.

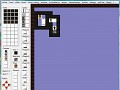
For now I will show you how to set up your own basic map. Firstly select" World/New" and open up a new level.
Here is a screen shot showing the layout of the engine:

1. This is the Main area where you will be going most of your work and all of your game assets will be dragged onto. This is a top down view of your map.
2. These arrows move around your top down map view or if you deselect your mouse on a blank area (right click) you can click on a blank map area hold down left click and move your mouse around.
3. Here is the selection of your pick-ups (Treasure) such as ammo, health and World Key. Simpley drag and click these assets into your world. Treasure can be edited by selecting In Game Items - Import Treasures. Here you can edit the texture and amount of points per pick up/type. You can edit the key, ammo and health by selecting In Game Items & then selecting its item name.
4. These are sprites which is a 2D image made up of 1 or more images to form a still prop image or when destroyed an animation event. These sprites can be edited in the sprite menu along the stop menus. Simply drag and click these objects into your world.
5. These are wall textures which will make up your geometry of your world. To import new wall textures click on the walls menu and import. You can also have animated walls (see wall road sign animation for example) to add these to you map click on the wall you would like and simply draw it onto your map.
6. This is the top menu bar. This is where most of your game editing of assets and game changes will occur.
Notable ones include:
Sounds - here you can edit and all the sounds into the game.
World - this opens new game packs, saves and loads worlds (levels).
Tools - here you can edit the map walls fill the world with walls or change textures around more easily.
Floor+ Ceiling - here you can edit the floor and ceiling textures. You can only have 1 floor and 1 ceiling texture per world like with the doors!
Game Bitmaps - here you can edit game bitmaps such as game menus, weapons, bullets, Game & the Hud.
Settings - this is very important here you can change the password to open up game paks, and access a setting menu. In the Game Settings you can change the name of the game, Game controls, turn on or off Shader (which makes it dark or not). Most importantly the maximum amount of levels which tells the game how many worlds to save when game is made is also done in Settings.
Game- here you can choose the Game's .exe icon plus create the game and start it. You must save the world before you can create the game.
7. This area includes Enemies, Door, Next Level Door and Player Spawn. To add these items simple click on the item and click in your world. To edit enemies click on the Enemies menu in the top menu bar, here you will be able to change and edit the zombie's sprites as well as edit there power, speed and health plus choose if they can shoot or not. Door 1 is that door for that world which opens sideways. You can only have 1 door texture per world to edit the door texture select from the top menu bar doors/ Import Door Textures. The Next Level item is the texture that the player needs to reach with the game key to finish the map. You can have multiple next level exits in your map to edit this texture select from the top menu Doors/ Import next level door texture. Next item is Player this is simply where the player will spawn when he starts this world.If you need any more information please click on the "?" button in the top menu bar (far right) and click on help. Lots more useful information in there as well!
Okay, now that we got basic understanding of the game engine out of the way let's build our first standalone game which for now is 1 map. Make sure you're in new map then press save as map 1 then in game Settings make sure Max levels is set to 1. Now with the hard part out of the way let's start mapping!
I will leave it up to you how you would like to design your map with the walls and props provided.
Once you are happy with your map design follow this check list
1. Are the walls surrounding the map borders (is a MUST)?
2. Player spawn put in?
3. Exit key put in?
4. Next level door put in?
5. Weapons, props, ammo, and health included?
6. Enemies included?
7. Have you set up you're floor and ceiling texture for that world?
8. Have you added doors into you map?
9. Have you made sure you're Game settings are correct, 1 world only?
10. Pick Up items included for players to find? Once your are happy with those 10 points save you're world and select create game.

Now that the game is saved where you told it to save on your computer you can find it and open the exe or in the game engine select Game/execute Game to play! Here is the tutorial map in game and in Engine.

Remember to post your games here, at ModDB! :D

wolf_rgm 1sec ago says:
Hi what is the maximum size (bmp,png) to animate weapons in RGM v5 ?
128х148 or higher ?
Hi what is the maximum size (bmp,png) to animate weapons in RGM v5 ?
128х148 or higher ?
weapons are max 128x148 as far as I know, if there is a way to make them bigger let me know!
when i click create game it says making the game with a loading bar then says "Error: 1 Files Missing"
try running rgm as administrator
Update to RGM 5. Or if you got it, just put a exit key in the game so the player can finish the level.
Same for me
This comment is currently awaiting admin approval, join now to view.
My weapon sprites wont be accepted they are in bmp format and are at 64x74 the same as another premade weapon, but it still says its too small
What is the size needed for the key so you can import bitmaps?
Whenever i import my weapon bitmaps they do not show up in game.
Whenever I import the enemy sprites they have this white pixelated outline to them? Even when the sprites are completely clean?
This comment is currently awaiting admin approval, join now to view.
Did you check to make sure that the white pixelated outline on the sprites are RBG (0,0,0)? Perhaps through compression there is an off-white (ie. RBG (3,1,4)) that is outlining the enemies, which may not be detectable to the eye when looking at the sprite file. Try filling the background of your sprites as black and see if those off-whites show.
Hope this helps!
I'm trying to upload an icon but it keeps saying icon incompatible upon creating the game. I used an icon maker to create a .ico. Anyone know how to fix this?
Hi there, I'm trying to make a game with a unique game.pak per level. So far I have the .exe. file in a folder with the RGM file, and 3 pak files (game.pak game1.pak and game2.pak). The different game.pak's load fine in the editor but when I test the game all the levels use the last game.pak saved.I'm saving each world before exporting the game.pak so I don't know waht I'm missing? Has anyone else had this same problem?
Also , is there a way of stopping the enemies dropping ammo when they are killed (Psi Project managed to do it)?
Anyone actually got multiple game.pak's working in a single game? I've bought most of the RGM games on Steam and it seems they are all limited to just 5 enemy types which suggest they are all made with just the one game.pak .
Managed to get the multiple game pak's working. I needed to start from level one with each new game pak.
I'm having trouble with that. Could you write up a quick couple lines on how to properly use multiple packs in a single game?
You have to treat each game pak as a separate game. So if I want to make a 10 level game with 2 unique game paks, I would set the game pak password. Set max levels to 5 in the game settings menu. Create levels 1-5 (these will become levels 6 -10). Once these are saved just make a copy of the game.pak file and rename it game2.pak. From this point you won't edit the last 5 levels any more. Now go through levels 1- 5 and change anything you want add new enemy animations and weapons etc.
When you play through the game you will get the 'All levels completed' message when you finish level 5 but then you will continue on to the other levels.
The main thing to remember is each game pak must share the same password and have a level 1. The last game pak you create will be the first one that is played.
Hope this helped.
I am using RGM 4.6.2
Exactly the info I needed. Thanks!
please can you advise me how to create an animated wall, step 5 I do not understand at all,, thx
When you look at your 'walls' palate in the editor. Place the 4 wall frames in a row from left to right. The animation only works when you place the wall at the beginning of the sequence (so the frame on the left). Whenever you change any walls you will have to go into the 'Walls' menu, select 'Import Wall Textures', check the 'Animate' box for the row with the animated sequence. Then set the speed of the animation from 1-10. This speed will effect all animated wall if you are using more than one.
Hey, I wanted help to add some things to my project, but I'm not finding a solution, if any of you can help me ...
1. Is there any way to add an option of difficulty equal to what exists in Doom?
2. Is there a way, when the player goes through a door, that a long audio (1 minute, 2 minutes maximum) will be played?
3. Is there any way to create a fake wall? Where the player can cross it like a ghost
There is no way of adding a difficulty setting.
I tried to create a fake, destructible wall by making it a sprite. It only worked when placed in a long narrow corridor. The edges are not precise when placed next to normal walls, but the illusion worked at a distance.
Thanks friend, since the comment I started to do a text game, a horror and suspense adventure, so maybe I won't be back to RCM anytime soon, but thanks anyway.
Sorry for the mistakes, I'm Brazilian and I don't know English, I use Google translator.
how do i make a gun for RGM?
This comment is currently awaiting admin approval, join now to view.
This comment is currently awaiting admin approval, join now to view.
This comment is currently awaiting admin approval, join now to view.
почему вылетает ошибка при создании игры? "1 Files missing!"
This comment is currently awaiting admin approval, join now to view.
This comment is currently awaiting admin approval, join now to view.