For quite some time I've wondering about a specific visual issue: jagged lines on textures ingame. I thought the dds compression is to blame. More on how that works is here. This is one of the most prominent examples of this issue that I could find:

I highly recommend opening images in a new tab to see them in their native resolution, as that will become crucial later on.
This kind of visual artefact would be extremely immersion-breaking to me so I decided to once again investigate, whether there is anything else besides compression that would contribute to the problem.
One of the most obvious errors are the jagged diagonal lines. Perfectly horizontal or vertical lines seemed to be acting correctly. Or at least there was no jaggedness. That further supported my theory of a compression issue.
Since the error was dependent on light direction, I thought the gloss map (aka Alpha channel for your normal map) is being heavily butchered. However, after opening the corresponding map and looking at the alpha channel I found out that the compression wasn't so harsh at all. I decided to fill the entire gloss map with a single grey value, but when opened the model with updated gloss map the error was still there, pretty much unchanged.
Using elimination method I could quite confidently tell that there is something wrong with the normal map (or bump map. I'll get to the difference between those two later). And this is where is gets a bit technical.
First, we need to understand what a normal map is. Don't get this confused with a bump map.
Having spoken to a games' artist developer that was in the industry during the 2005 period, technical jargon was the least of their concerns. And apparently so was the blue channel of their normal maps.
A bump map is GREYSCALE image used to fake height or offset pixels.
A normal map is a 2 channel image that includes detailed surface information to fake geometry based on lighting direction.
Here is an example of a normal map that was created using the Nvidia Photoshop plugin, in its full RGB state:
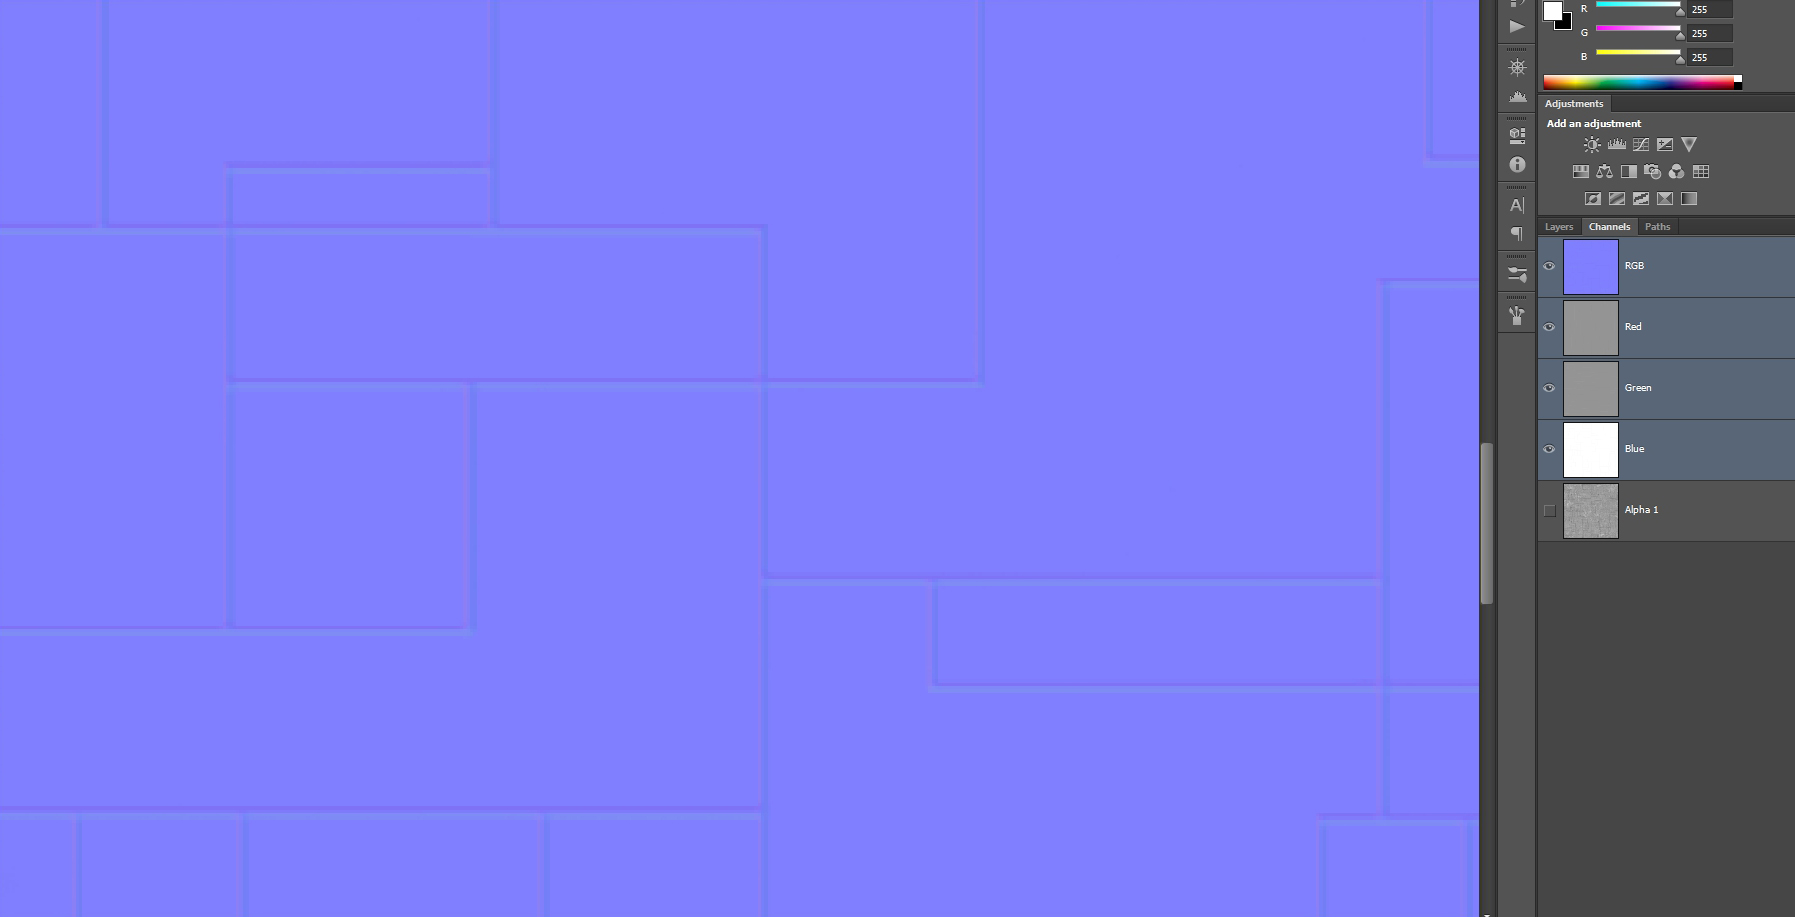
However, the engine isn't necessarily interested in the all of the RGB channels together like with a diffuse/Albedo. It's interested in the RED and GREEN channel.
Here are the channels shown on their own in the order of RED/GREEN/BLUE/ALPHA

------------------------------------------------------------------------------------------------------------------------------------
------------------------------------------------------------------------------------------------------------------------------------
------------------------------------------------------------------------------------------------------------------------------------
------------------------------------------------------------------------------------------------------------------------------------
I've drawn light directions on the Red & Green channel to help you understand what is the channel's purpose. The reason why they are predominantly grey (50%) is because that is its neutral value. If it gets brighter that means that if lit it's going to fake the surface going up. Down for darker values. It doesn't "move" the geometry. It only fakes it via light.
I also included the Blue channel, but I haven''t drawn any kind of direction, since that's the perpendicular axis.
The way to think about these light directions could be visualised with a gizmo in 3dsMax:

Trying to fake any kind of geometry with the blue channel is redundant, cause you would be altering which direction is the surface/pixel facing. Which is why in modern game engines normals maps are specially compressed by totally discarding the blue channel. And I that thought that was the case with Alamo shaders as well. But it isn't. Why not? I can only speculate, but I reckon it due to time constraints and the fact that this was new technology. Another reason why could have been overlooked, is that most of the vanilla normal maps weren't baked, but created from a bump/height or desaturated diffuse, because in that case the blue channel is very subtle.
So now that we should understand how normal maps work, we should wonder what happens if we try to kill the blue channel. I filled the Blue channel with 100% white and this was the result:

Two major things happened: Jagged lines are gone and so are the extremely dark lines as well. Keep in mind that previously we had those extremely dark lines despite shining a light pretty much directly on it. Only two things combined SHOULD cause that: Extremely dark diffuse with extremely dark gloss. Neither of that was the case in our scenario.
So what was happening there? First the dark lines:
If you take a look that blue channel from the previous normal you can see that there are dark areas. They aren't very prominent, because this normal was made via a plugin and not baked. If it was baked or created from a proper height map (like in Substance Painter for example) it would be much darker. And so what happens is that light hits the surface, but because the pixel is darker than white it kind of alters its direction and thus will not properly reflect light. If it was fully black if would be "facing the other way". It just wouldn't get properly lit.
As for the jagged pixelated lines; that has to do with both compression and the blue channel. If there was no compression you would just get the dark lines, but because there is compression happening, pixels blur together and so you end up with only partially dark lines and those are the jagged ones.
I've a series of experiments with Jeroen(imo) ships to illustrate differences between Blue channel on/off and Alpha channel (gloss) variance:
Light is perfectly perpendicular to the model and parallel with camera
1.) Untouched BLUE channel / Untouched Alpha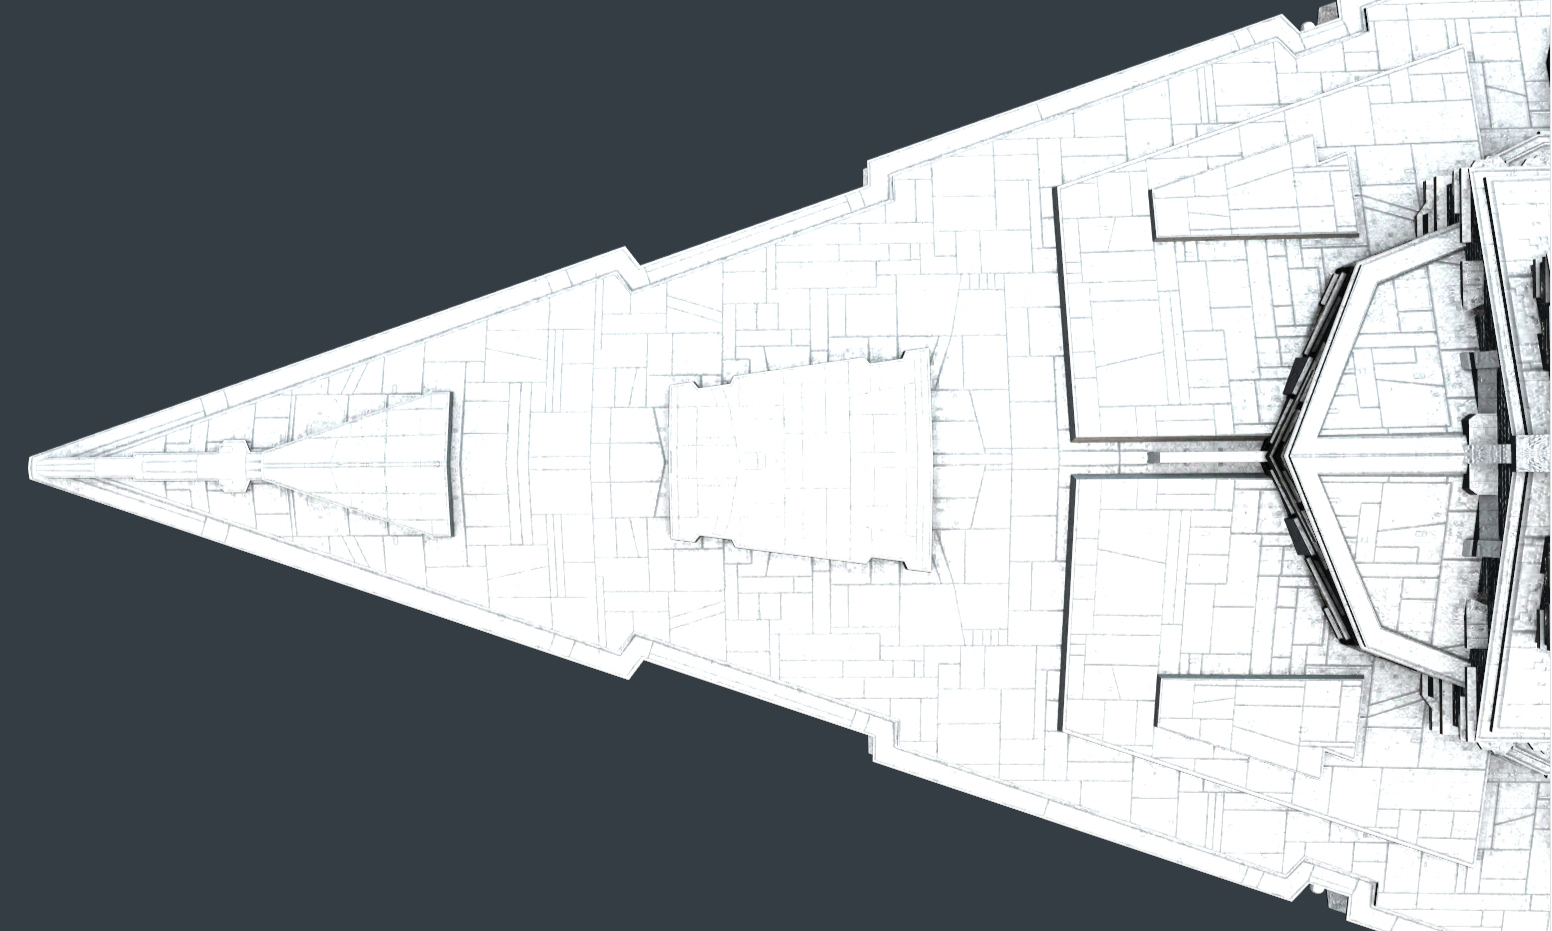
------------------------------------------------------------------------------------------------------------------------------------
2.) White BLUE channel / Untouched Alpha
------------------------------------------------------------------------------------------------------------------------------------
3.) Untouched BLUE channel / Flat Alpha (filled with 50% grey)
------------------------------------------------------------------------------------------------------------------------------------
4.) White BLUE channel / Flat Alpha (filled with 50% grey)
------------------------------------------------------------------------------------------------------------------------------------
Hopefully this article helped to clarify a couple of things. I'm not saying you should go ahead and fill all your blue channel 100% white, because most of the normal maps were created using a plugin and the difference can be so subtle that it is simply not worth the time. However, there are cases (especially the ones where the normal map was baked or painted in SP) where the difference is quite substantial.
So go ahead and kill the blue channel!
Enpremi, a community member


That all went in one eye and out the other, but thanks for finding stuff like this, it improves the game each time, freakin' amazing.