Tutorial originally created by Dave Foster and posted at Morrowind-oblivion.com. Mirrored here for archival purposes.
- Step 1
Open up the CS and arrange it to suit your needs. Go into the preferences and navigate to the 'misc' tab. Set the autosave option to save every five minutes, then close the preferences screen. I have had a lot of crashes with the Oblivion CS, although they weren't attributable to the mod making process. You may get an error when you attempt to save this preference. If so, ensure that there is a folder called 'backup' in your 'data' folder, then create a file with notepad called 'AutoSaveDEFAULT.bak' and save it in the backup folder. Now, if you get a crash in the middle of your work, you will only lose five minutes at the most. Should you need to restore to this backup file, just take a copy of it, move it into the 'data' folder, move your current .esp file somewhere else, then rename the backup file to the name of your original .esp file. It's probably advisable to unload any other Oblivion mods before proceeding.
- Step 2
See the image below for the exact placement.
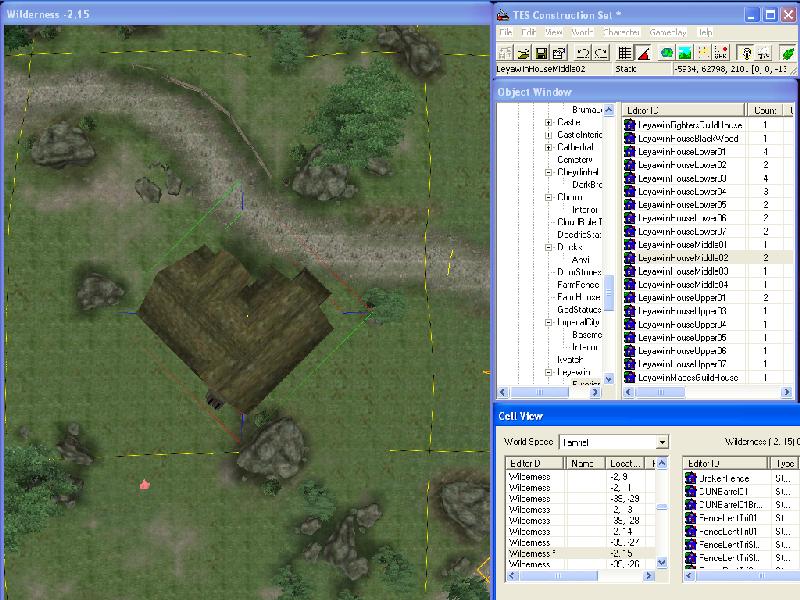
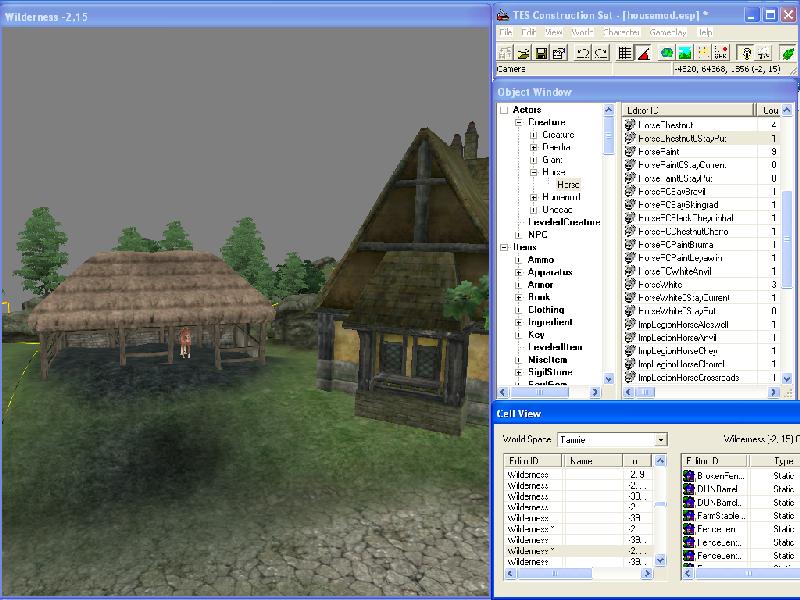
In the Cell View window select Tamriel in the drop down box, then in the EditorID column find WeyeExterior. This cell is on the western end of the Talos bridge (Through west gate of the Imperial City). Open the cell scroll the map until you see the Wawnet Inn, select it, then switch to top-down mode ( The T key ). Ensure that grid lines are set to on so that you can view the individual cells of the map ( the B key ).Zoom-in or out a bit so that the cell almost fits your render window ( use the mouse wheel for zooming ). Now scroll the map to the west until the render window is focussed on the cell "Wilderness (2, -15). This is where you are going to locate your new house. In the centre of this cell is a small bunch of rocks that need to be moved. I moved them just to the north-west a bit, close to the path. Now, in the Object Window, scroll to WorldObjects - Static - Architecture - Leyawiin - Exterior. In the right pane select the "LeyawiinHouseMiddle02". Hold the left mouse button, select the house, then drag it into the render window. Rotate the house 45 degrees (select house by holding down right mouse button and move mouse to right) so that it is facing towards the north-east, then slowly lower it into place with doorstep just above the ground ( select house and hold with left mouse button, hold down Z key, and move the mouse backwards ). The image below shows how it should look. Look at the top of the render window bar and confirm the location as being Wilderness -2,15 as per the image.
Save the mod. Go to the menu, File - Save, and save as "housemod.esp".
- Step 3
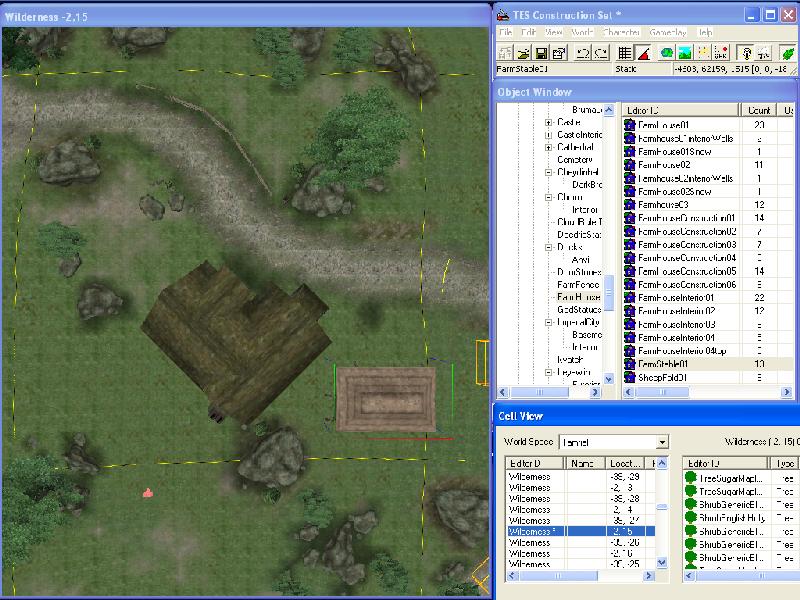
Now for the stables. In the Object Window, navigate to WorldObjects - Static - Architecture - Farmhouse. Select the FarmStable01 and drag it into the render window, just to the right of the house. See the image below for positioning. Lower into place, and keep it within the boundary of the cell. Now, we need to remove the grass texture from within the stable so that auto-generated grass will not be seen growing inside. To do this, go into the land editing mode. Press the H key. Set the Edit Radius to 5, and ensure that Flatten/Soften Vertices check boxes are not checked. Select the texture to be "TerrainBurnedGround02". Centre the circle on the stables and click the right mouse button 4 times, until you see the outside of a black circle forming on the ground. Exit land editing by pressing the H key again.
Save the mod again. Just File - Save, this time.
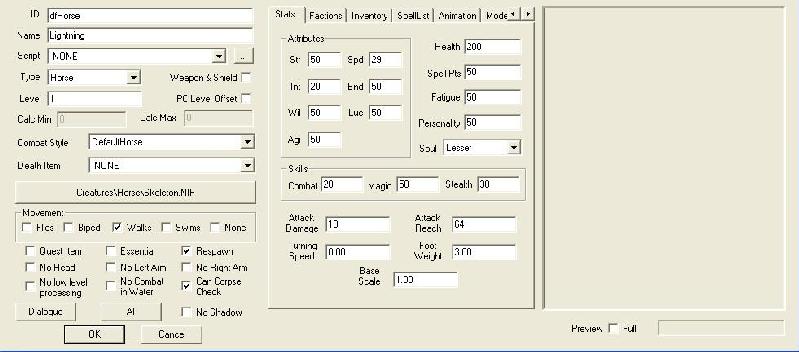
Now we need a horse for the stable. In the object window, navigate to Actors - Creature - Horse - Horse. Select HorseChestnut0StayPut in the right hand pane, then drag it into the render window over the top of the stable. See the image below for how it looks now, and the image below that for what follows next. Double-Click on the horse to open up the Reference window. Now, click on the button "Edit Base". This is the stats form for the horse. We want to make some changes to this object, so we need to change it's ID to something else. In the ID field, type in the word dfHorse, as per the image. Give it a name of your choice in the Name Box. At the request, "Create New Object?", click YES. Now, in the Reference form go to the TAB "Ownership". In the NPC drop-down box, find and select "player". This gives ownership of the horse to the player - so you can't be nabbed for horse theft. Click OK to close the Reference Form. Now, lower the horse into the stable as per the third image below.
Save the mod again. File - Save.

- Step 4
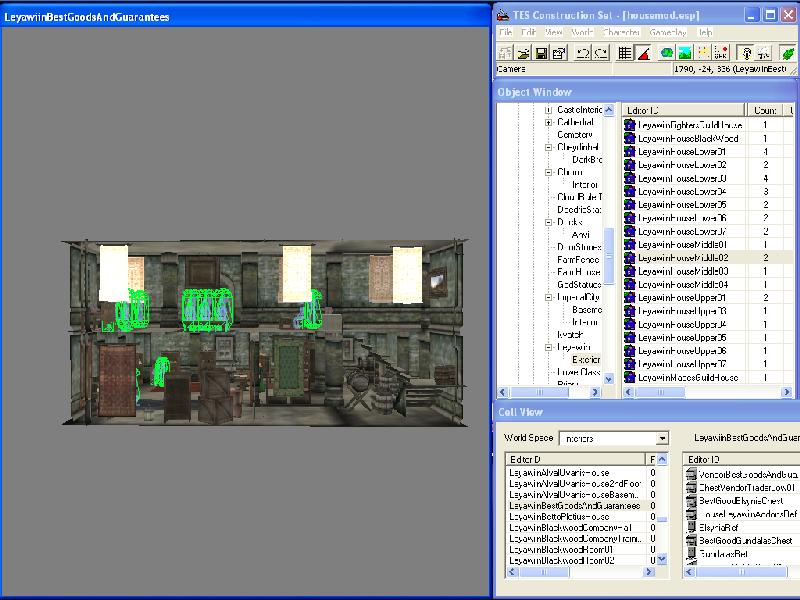
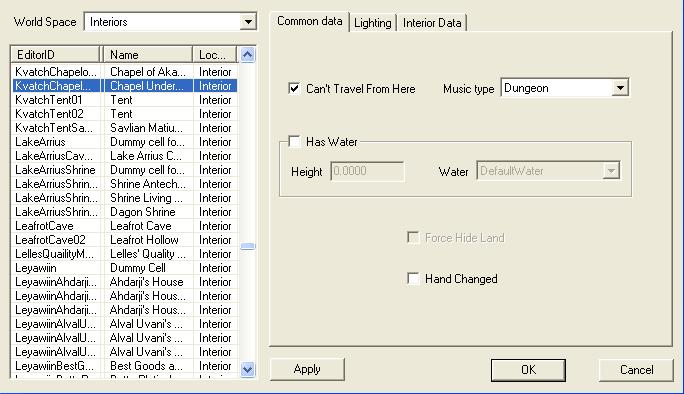
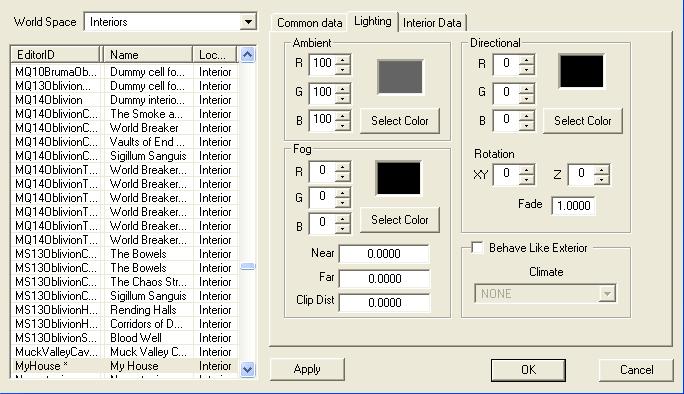
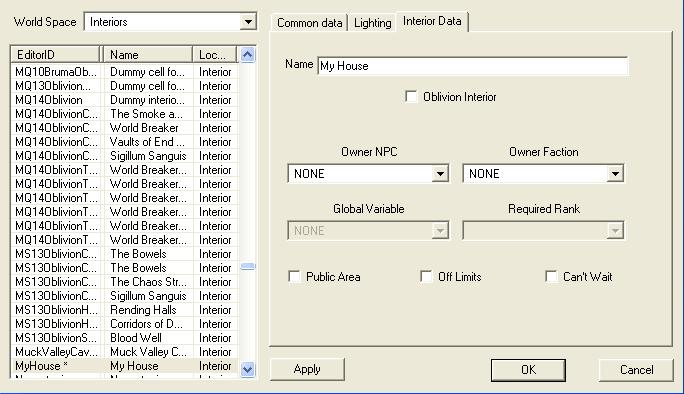
That's the exterior done for the moment, but I think we should now give it a more meaningful name. So, select it in Cell View, left-click and hold on it until it's in edit mode, then change the name to "MyHouseLocation". Now for the interior. As with all mods to interiors, you should look for quick ways to create them. This usually involves finding a similar, existing interior that's already in the game, and copying it. Then, make your own changes to it later. So, we're going to use a game interior that already exists for this type of house. In the Cell View window, select "interiors" in the World Space drop-down box. Then scroll down this list and select "LeyawiinBestGoodsAndGuarantees". Double-Click to see it in the render window. See the first image below. This is what we'll be basing our house's interior on. So, we need to create a new interior cell first before we can copy and paste. In the Menu, select World, then Cells. Make sure the World Space drop-down has "Interiors" selected. See second image below. In the EditorID column, right-click, New, type in MyHouse, then OK. Find this ID in the list now, and select it. See the third image below. Leave the Common Data tab as it is. Select the lighting tab and type in the values in the image i.e. 100 for each of the Ambient RGB colours. Tab to Interior Data and insert the name "My House" into the Name box. Leave everything else as it is. Click the Apply then the OK buttons. See the last image below.
The Cell View now shows "MyHouse". But, we now want to go back to the Leyawiin interior so as to copy it. Find it again in the cell view window and double-click on it so it shows in the render window. Make sure you can see all the interior, then click within the cell (but outside the floor plan )with the left mouse button and hold it down whilst tracing a rectangle around the plan. Release the button, and all the objects will now be selected. Copy (CTRL-C). Now, find "MyHouse" again in the Cell View window, double-click to get it in the render window, (IMPORTANT: make sure the render window is selected), then copy all objects into it (CTRL-V). Zoom out a bit to see all the objects that are now in the "MyHouse" cell.
Save the mod again. File - Save.
- Step 5
We now have an exterior cell containing our house, and an interior cell that represents everything that is inside our house. We now need to create doors for both the interior and exterior views, which will allow us to connect the two worlds together. We would normally create an internal door here, but in our case, since we copied the interior, we already have an internal door. For a view of the external and internal doors in the render window, see the first two images below. The second image shows the internal door and teleport marker once the external door has been connected to the interior, in the following steps
First, go to the exterior view of the house and place a door object in the empty door frame. To do this, in Cell View, select Tamriel in the World Space drop-down, then scroll down to our external cell, "My House Location". Double-click on your external cell to get it into the render window. Click on the house, zoom-in a bit if necessary, then whilst holding down the shift button, spin the house around until the door frame comes into view. Zoom-in to it.
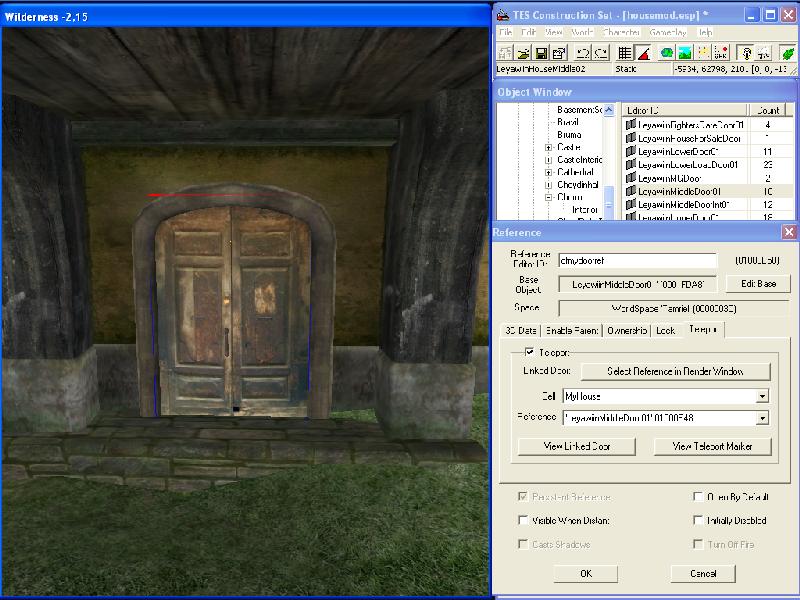
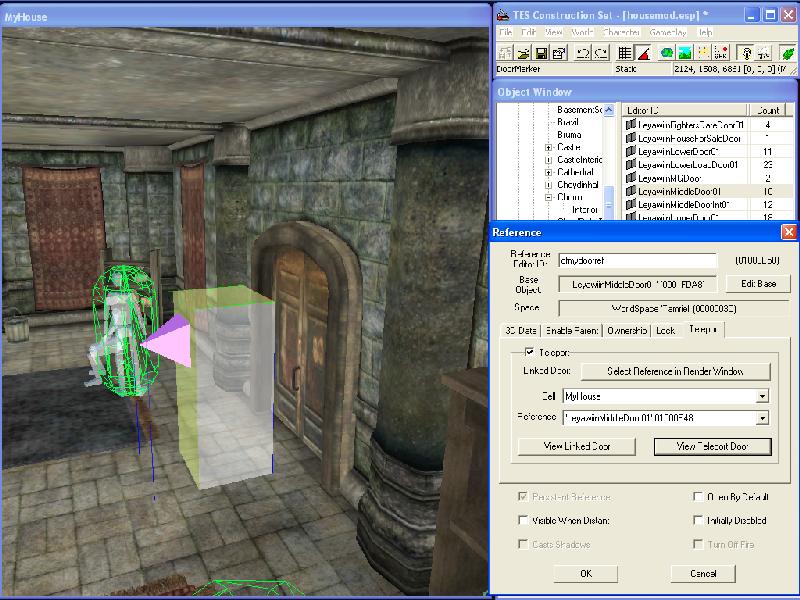
In the Object Window we need to find a door to place within the empty door frame. Navigate to WorldObjects - Door - Architecture - Leyawiin, and in the right-hand pane select the door "LeyawiinMiddleDoor01". Drag this door into the empty door frame, manoeuvre it into position by pushing, pulling and spinning it into place. Ensure that the handle is pointing outwards. Double-click on it to bring up the Reference Form. Select the Teleport Tab, and check the teleport box. This enables the Cell and Reference drop-downs. For the Cell, select "MyHouse" and for the Reference select "LeyawiinMiddleDoor01". Now click on the "View Teleport Marker" button on the Reference Form. This will take you to the internal teleport marker, which will be selected in the render window. You may need to spin the interior around until you can see it. Once you can see it, then dismiss the Reference Form by clicking the OK button. You can see this in the second image below.
The teleport marker needs to be moved to the correct place in the interior, and it needs to be pointing inwards. Drag the marker to the correct position, then spin it around so it points inward. See this in the third image below.
Save the mod again. File - Save.

- Step 6
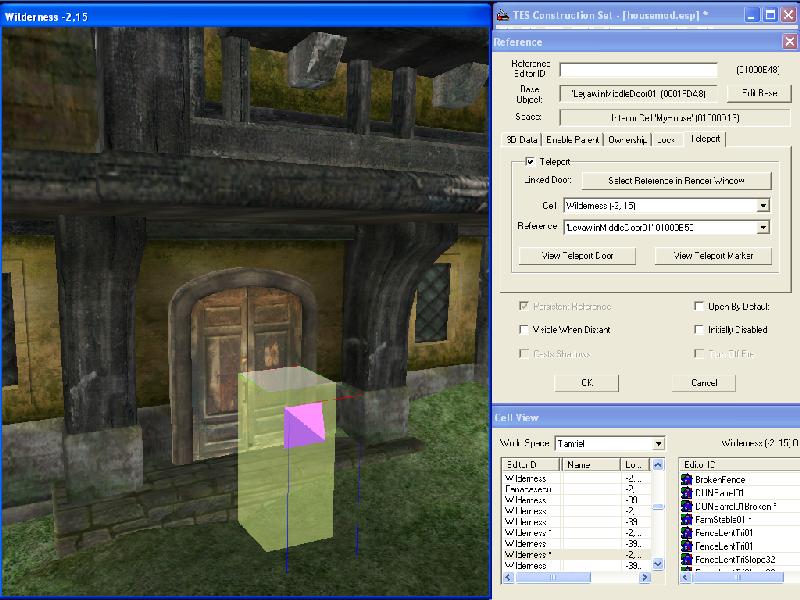
The first image below shows the exterior before the teleport marker has been created. We now have to connect the internal door to the external door in the exterior cell containing our house. Double-click the internal door to bring up it's Reference Form. Then select the Teleport Tab and check the Teleport Box. This enables the Cell and Reference drop-downs. For the Cell, select "MyHouseLocation" and for the Reference select "LeyawiinMiddleDoor01". Now click on the "View Teleport Marker" button on the Reference Form. This will take you to the external teleport marker, which will be selected in the render window. The second image below. You may need to spin the interior around until you can see it. Once you can see it, then dismiss the Reference Form by clicking the OK button.
The teleport marker needs to be moved to the correct place in the exterior, and it needs to be pointing outwards. Drag the marker to the correct position, then spin it around so it points outward. See this in the third image below.
Save the mod again. File - Save.

- Step 7
We need to revisit the interior now since, at the moment, we have everything that we copied from the original interior cell. We do not want this since this is our new house for storing stuff we've bought or found during our travels. This is not about getting free stuff before we've done anything. So, select the "MyHouse" interior in the render window, and move to the lower floor. On this floor we find the original proprietors of the inn. We should delete both of them, unless of course, you think you may need a butler and a maid sometime. If you decide to keep them, then change the ID's and save them as new NPC's.
Near to where you found the NPC's is a cupboard called "CupboardVendorsSmithArmor" Delete this ( and the bread on top ). Remove all the armour and weapons that you see lying around. Remove any static, clutter stuff that you don't want in your new house. If you decide you want to re-decorate and put in new furniture, then do so at your own discretion.
Finally, and quite importantly, the bed upstairs. This will have ownership on it, making it illegal for you to sleep on it. You need to change the ownership by double-clicking the bed to bring up the Reference Form, click on the Edit Base button to bring up the stats screen, then select the ownership Tab and select "player" in the NPC drop-down box.
Just a note on the interior cell North Marker. This needs turning to take account of the fact that our house is pointing towards the north-east now.
Finally, save the mod again. File - Save.
- Conclusion
Well, that's it. All you need to do now is test the mod to check that it works as expected, in particular, the teleport doors. Good luck, and I hope you found this tutorial useful.
You can get direct to the location of your new house using the Console.
Type in : COC "MyHouse" to get there. Happy modding...