Light volumes are great effects to create good looking visuals in games. A well placed light volume can hugely increase the atmosphere and they are actually pretty easy to create. It's time create some light shafts for Source Engine.
Please note that this tutorial requires knowledge about creation of Source Materials - Textures and usage of Hammer Editor. If you don't know how to create textures for Source Engine and how to apply textures to faces in Hammer, you should start learning.
First of all, we need an application to create our texture. In this tutorial I'll use Photoshop but you can use other applications after you understand things you need to create this texture. It's quite simple.
Open Photoshop and create a new image. If you want to create long light shafts, sizes should be proportional to 1 for width and to 4 for height. Something like 256*1024 is nice but you can use 128*512 or 512*2048 if you want to. Using square textures will do too if you wish to create short light shafts.
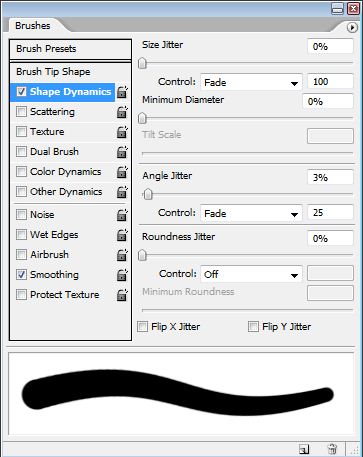
Create your new image and make sure its background is transparent before you do. Now choose brush tool (shortcut is B) and set its diameter to something around 30. Also open brushes tab and make sure it looks like this:
Then choose white as your brush color and create something like this:

Just make sure colors are gathered on top and they are not too close.
- Now go to: Filter > Blur > Motion Blur
- Set Angle to 90 and Distance to 500. Apply this twice.
- Then go to: Filter > Blur > Gaussian Blur
- Set Radius to 12.5 and apply this twice.
Now our texture is ready! Export your texture (if you have VTF plugin for photoshop this will be easier). Convert it to VTF with Eight Bit Alpha. Create a VMT file like this one:
"UnlitGeneric"
{
"$basetexture" "effects/lightshaft"
"$additive" 1
"$nocull" 1
"$translucent" 1
}
Name of the texture is "lightshaft.vtf" and it is in ".../materials/effects/" folder. After arrangements are done you are ready to launch Hammer.
Open a map and create a brush that is sized around 128 for width and 512 for height. Create something smaller if you wish, but I'm making this for a huge room. Just make sure its proportions are around 1 to 4 and you'll be alright. Now apply your new texture to one of the big faces of your brush or apply it to all of your big faces. It depends on where you are going use the light volume of course, but to make it more visible I'll apply them to all big faces for this one. After applying the texture in Face Edit Sheet, hit "Fit" to make your texture fill the face entirely*. Rest of the faces (especially top and down) are going to have invisible texture (just type invisible to texture browser). After that's finished, turn your brush into a func_brush.
Time to make final adjustments! Open properties window of your brush (while it is chosen press Alt+Enter) and do these:
- Render Mode: Additive
- Disable Receiving Shadows: Yes
- Disable Shadows: Yes
- Solidity: Never Solid
Well, that's about all. You need to create a good window scene to truly enjoy your new light volume. Shift drag your brush and create a couple of copies (don't forget to activate "texture lock"), then mix them as you fit. It's not as good as a specifically created static model can be but since you know how to create texture now, you can easily create a static mesh for your light volumes in a 3d application.
I hope this tutorial will be helpful to you.

In this tutorial I didn't create a seamless texture so my texture can't repeat in a face but it's not that difficult to do since seams won't be that noticeable in a light shaft on horizontal line. Probably they'll be tillable horizontally anyway. Also you can stretch this texture as much as you want and it won't look bad at all.


Nice tutorial, thanks!
I hope it helps :)
Very nice tutorial here, Thanks :D
Wow, explains all and creates a superior effect!
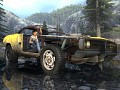
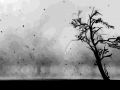
Cool tutorial mate. Here´s a slight improvement over yours, to add motion to the light shafts. Ok so the $Basetexture is a similar beam texture to what you have, and $texture2 is a texture that looks like a bunch of small dust particles. It scrolls over the beam´s shape. It takes a few tries to balance the brightness on the two materials, since its an additive effect, but once the beam is visible its pretty damn cool. Did this in Flesh also, so if you have that just check out the beam effects coming from windows etc. =D
"unlittwotexture"
{
"$baseTexture" "lightshaft"
"$texture2" "dust"
"$nocull" 1
"$additive" 1
"$translucent" 1
"$model" 1
"$no_fullbright" 1
"Proxies"
{
"TextureScroll"
{
"texturescrollvar" "$texture2transform"
"texturescrollrate" 0.02
"texturescrollangle" -135
}
}
}
That's great mate, I'll try that out and add to tutorial.
Also looks like I forgot to use ("nocull" 1). It's necessary.
Thanks :)
Thanks.
Very nicely put together in a clear and easily understandable format.