In this tutorial, you will learn how to create a basic Combine assault. An assault is a series of key points that the soldiers will follow in an organized fashion, clearing the area around the points of enemies along the way. These can be very simple or very complicated, but I will try to keep it as simple as possible, although it does require intermediate knowledge of Hammer.
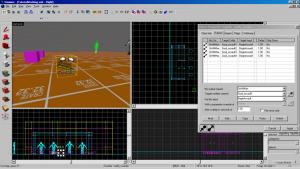
Start by creating a basic room, as I have done here. The exact size of it doesn’t really matter, but it should probably be about 1024 units long by 1472 units wide.
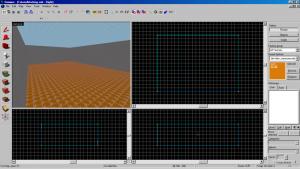
Next, set up a wall or small house that you want to be assaulted by the combine. I’ve made a crude building with windows.

Optionally, you can create a structure for the soldiers to enter from.
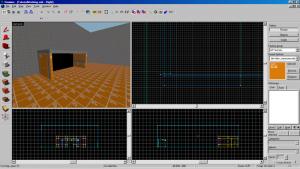
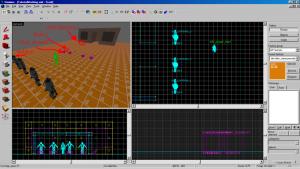
Next up, go to your entity tool and create four of the “npc_combine_s”. (Create them in front of your entry structure, if you made one.)
Enter the names of the soldiers as “Soldier1”, “Soldier2”, “Soldier3”, and “Soldier4”. None of the other properties need to be changed for now. The only flag that should be checked is “Fall to ground”.
This is what it should look like so far.
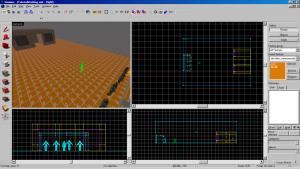
I recommend placing in an “info_player_start” (as I’ve done in the photo) and testing the map, just to make sure that there are no leaks or compile errors so far. If it works, the map will come up, the Combine will peg you like a Light Bright™, and all is well.
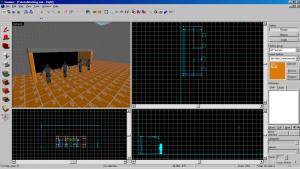
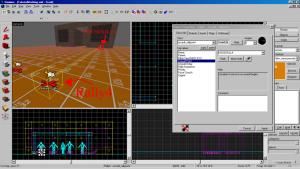
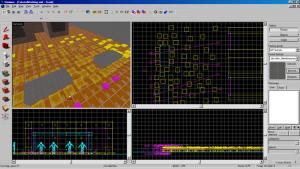
Next, using the entity tool, create four of the “ai_goal_assault” entity. Where they go doesn’t matter, but for simplicity’s sake I’ve placed them in the center of the map. I highly recommend you do the same.

Name the “ai_goal_assault” entities “Goal_assault1”, “Goal_assault2”, “Goal_assault3”, and “Goal_assault4. It’s a good idea to place them corresponding to their respective soldier, i.e. the “Goal_assault1” entity should be placed in front of “Soldier1”, as in the photo.
The properties for the “ai_goal_assault” entities should be as follows.
Name: (Already done)
Actors to affect: (Soldier that it’s placed in front of)
Rally point set: (None for now.)
Search type: Entity Name.
Start Active: Yes.
Assault cue: Entity system input.
Rally Point Selection method: Priority, Distance (default)
Make sure that you set the “actors to affect” property. If you miss this step, the entire process will screw up, and we don’t want that.
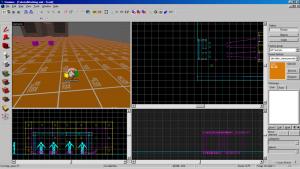
Create four “assault_rallypoint” entities in the center of the map. The placement of these really DOES matter, as it is where the Combine will run to, and wait for the others to get into position, before starting the assault. I’ve placed them just in front of my “ai_goal_assault” entities. Name them “Rally1”, “Rally2”, “Rally3”, and “Rally4”, yet again in front of their respective soldier.
The properties should be as follows.
Name: (Already done)
Parent: (None)
Pitch Yaw Roll: (Leave blank)
Assault point: (Leave blank for now)
Assault Delay: (This is how long that the soldier will wait at the rallypoint before starting the assault. It’s optional. In mine, I’ve set it to 0.)
Rally Sequence: (The animation the soldier will use when waiting at his rallypoint. This is optional, but I’ve used “CombatIdle1” as it looks slightly more natural.)
Priority: 1
Force Crouch: (Optional. It’s useful if the rallypoint has the combine hiding behind a low wall. I have it off.)
Urgent: No. (It will have no effect here.)
After placing the rallypoints, go back to your ai_goal_assault entities. Under the property “Rally point set”, enter the name of the rally point in front of it, i.e. for the “Goal_assault1” properties, you enter the rally point as “Rally1”.

Remember that I’ve placed the “ai_goal_assault” entities in the center of the map, behind where I wanted the rally points. This makes everything much easier to configure in the long run.
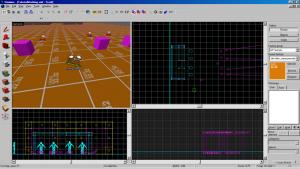
Next, create four “assault_assaultpoint” entities. These are where the soldiers will attack, after all have readied at their rallypoints. Create them in front of your house, preferably in some sort of line.
Name them whatever you want, but I’ve used “HOUSEKILL1” through “HOUSEKILL4”. Once again, place them in front of their respective soldier… you know the drill by now.
All of the properties (besides the name) for the “assault_assaultpoint” entities are optional. If you want, later you can set the “Next assault point” category to another “assault_assaultpoint” that you create, perhaps going around the side or back of the house. But it’s best not to do this now. Return to your “assault_rallypoint” entities. Set the “Assault Point” property to the name of the “assault_assaultpoint” in front of it, i.e. “Rally4”’s Assault point is “HOUSEKILL4”. If this is done correctly, a thin purple line should appear, linking the rallypoint to the assaultpoint.
(Note: Rally 4’s line linking it to HOUSEKILL4 in my picture is yellow because it’s selected, if you didn’t catch that.)
It’s time to test the map again. Create an “ai_relationship” entity.
It doesn’t matter where. The properties should be as follows.
Name: (Not necessary)
Subject(s): Npc_combine_s
Target(s): !player (This means you. Don’t forget the exclamation point.)
Disposition: Like
Radius for subject: 0
Disposition priority: (Some high number. I’ve done 10, which is enough.)
Start Active: Yes
Reciprocal: (Meaningless. Set it to either.)
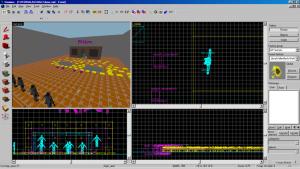
After setting the ai_realationship properties, I suggest moving your “info_player_start” off to the side, so you can get a better view.

Run the map. The compile process should be starting to take quite a while at this point. Once your map opens, if you’ve done everything correctly, the soldiers won’t attack or even look at you. They will all run forward to their rallypoint and stay there, as we haven’t triggered the assault yet. If this happens SAVE YOUR MAP after returning to Hammer.
Ok, now for something kind of tricky, but rewarding. Create a “math_counter” somewhere on the map. I’ve placed it in the middle.
Set the properties to:
Name: Counter
Initial Value: 0
Min legal value: 0
Max legal value: 4
The purpose of the math_counter is to make sure all of the Combine get to their rallypoint and are ready to go, before beginning the assault. It is especially useful if they come from different areas, or if they enter in a line. Go to your assault_rallypoint entities, and enter the “Outputs” tab. Click on “Add” at the bottom. Enter the following.
My output named: On arrival.
Target entities named: Counter
Via this input: Add
With a parameter override of: 1
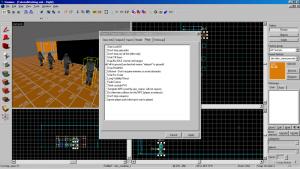
This means that when a combine arrives at their rallypoint, it will add a value of 1 to the counter. When the counter reaches the value of 4, the counter “Hits Max”, meaning that it has reached its maximum legal value that you set. Set these outputs for every “assault_rallypoint” and return to your “math_counter”. You’re almost done! Click the “Outputs” tab. You need to add four outputs here. I will write out the first one for you.
My Output Named: OnHitMax
Target Entities Named: Goal_assault1
Target Input: Begin assault
After a delay in seconds of: (However many you want. I did 1.)
Fill this out for every “ai_goal_assault” as in the photo.
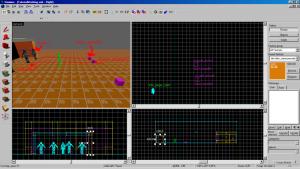
Lastly, use your entity tool and create lots of “info_node” entities. If you created a wall or other obstacle for the Combine to rally behind, it is especially important that you place the nodes all around the obstacle. In mine, I went a little crazy with them, but it’s better to have too many than not enough.
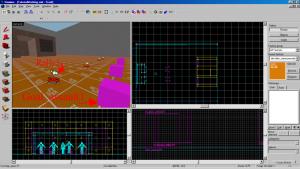
At this point, you’re essentially done, if all you want them to do is run forward to rally, pause, and then run forward again. But this tutorial was just to get you started on the basics. There are many possibilities with the ai_goal_assault. Create cover, multiple assaultpoints, create enemies to fire on the advancing soldiers, create a maze for them to clear, make reinforcements that enter halfway through the battle, have a dropship drop them off before beginning the assault. In mine, I’ve placed a low wall for the combine to rally behind and three citizens for them to fight.
I hope that you have enjoyed this tutorial. If you have any questions or feedback, feel free to email (hambandito@gmail.com) me.
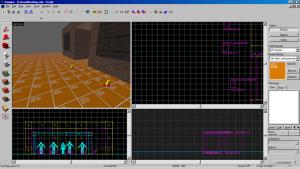
The finished map
-Psalm


Any feedback would be greatly appreciated. :-)
hey i was wondering wether its possible to do somthing similar to this for zombies?
Why is this tut in the "coding" section? o.o?
Anyway, good one. I miss single-player sequence scripting so much :D
Whoops. :0 Changing to mapping section. Thanks r2d2rigo.
Nice one! Right now i dont need this kinda info... Make one where they kick a door open!!!! Anyways... Two Thumbs up!
Funny you should mention that... the Combine kicking open a door tutorial was the next one I was going to do... look for it in the next few days. :)
Thank you SO much...my dream of fighting off waves of combine with a magnum and infinite ammo are now a reality...yet another awesome tutorial from Psalm. Keep it up!
you are very helpful in the amount of tuts you put are they are greatly appreciated
Will this work in Garry's mod?
Oh my god!!!
Please someone help me!!!!!
Today, I accidentally closed my tools bar in SDK hammer editor
and i cant take it back!
please help me!!!
i cant do anything without that tools bar!
is it still messed up?
realy nice tutorial ^^
Thx the tutorial, it was helpfull to me ;)