Tutorial originally posted to Massassi.net. Mirrored here for archival purposes
Basic Mapping Tutorial: Page 1
This is the first in a series of tutorials designed to teach both beginners and experienced mappers how to use the Serious Editor. The Serious Editor is the mapping tool that shipped with Serious Sam, and is the tool Croteam used to create all the maps in Serious Sam.
The Serious Editor is a very powerful tool, but by its design, there are some limitations that have to be worked around by the mapper. These limitations and their workarounds will be discussed in detail in later tutorials. This is a basic tutorial designed to walk the reader through the following objectives.
- Become familiar with basic navigation.
- Learn how to create "rooms" and other architecture.
- Learn how to place lights.
- Learn how to place enemies.
- Learn how to save and test a basic map.
These are the main objectives, but understand that there are many steps to each of those, and other details will be discussed as well. If you are new to mapping in general, this is a good place to start. If you have experience with other mapping tools, but are new to mapping for Serious Sam, this is also a good place to start. There will be some theory that you will probably already know, but there are differences in the Serious Engine that will be discussed.
This tutorial assumes you have purchased the full version of Serious Sam. You cannot get the Serious Editor anywhere but the Serious Sam CD.
You must have chosen the "full" installation option in order to have the editor installed. If you haven't done so, the best way to get the editor off the CD is to uninstall and then reinstall the game. Once the installation is complete, you can find the Serious Editor under the Start menu, Programs, Serious Sam, Extras, Serious Editor. Note that if you didn't choose the default for creating start menu program groups, it might be elsewhere. Just look under the "Extras" folder.
Some things to note right off the bat. Also in the extras folder you will find the Serious Modeler, the tool used for creating and animated weapons, enemies, etc. The Serious Modeler is not covered in this tutorial. You will also find an SDK help file, which contains a tutorial on creating a basic room. You might note that that's one of the objectives here, but try going through that tutorial, and then you'll understand why I chose to write a new one. It's fairly complex and hard to understand. Finally, there is another "Extra tutorials" folder that contains tutorials submitted by other authors. It's a good idea to read through them, once your comfortable with the material presented here.
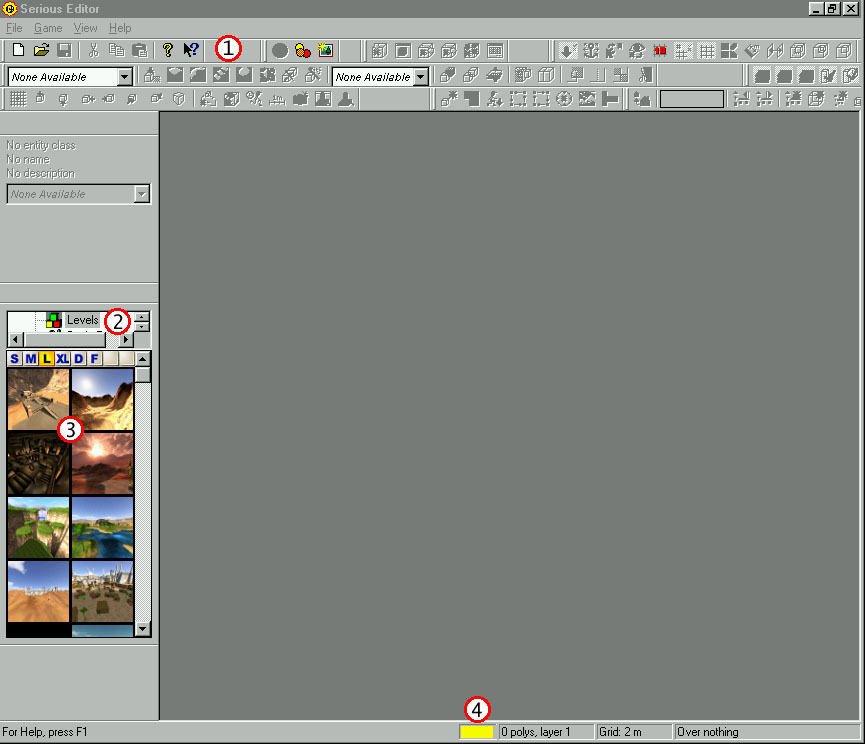
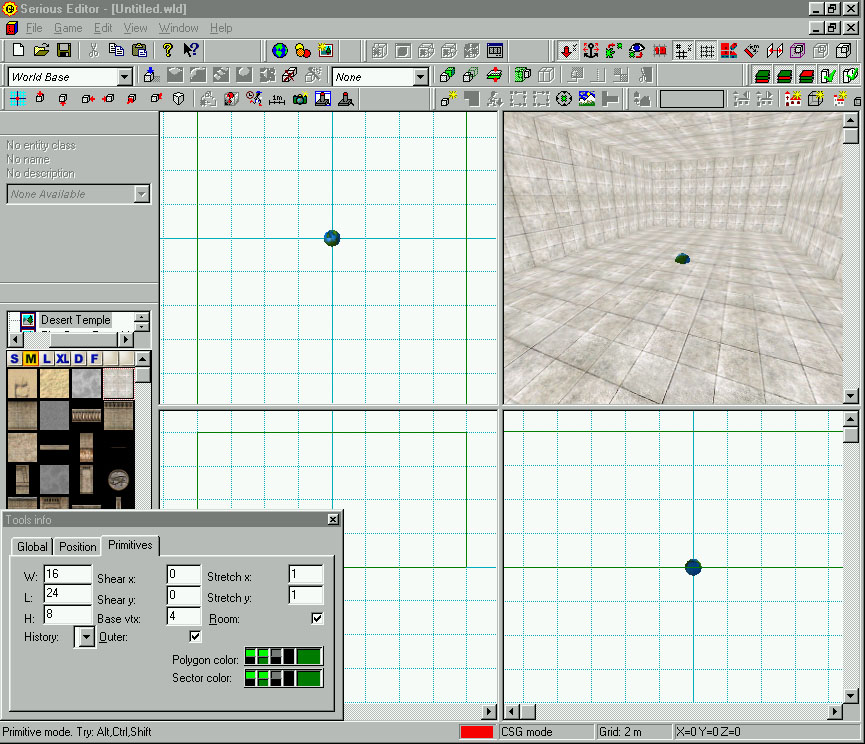
With all that out of the way, it's time to start the Serious Editor! It may take a few seconds to boot up, depending on the speed of your computer. A good way to ensure that it will run as fast as it should is to close all (or at least most) of your other applications. Once the editor is up, you should see a blank window like this:
If you see a window divided into 4 squares, it means you have opened a map somehow. Just use the file menu and click on close to get rid of it.
The main areas we are focusing on in this tutorial have circled numbers by them. Please familiarize yourself with these areas using the table below. Please don't bother yourself with memorizing them. This tutorial will discuss each area in detail. Please note that these aren't all the areas we will discuss in this tutorial, these are just the basic ones that you need to be familiar with for the moment.
It is very important to remember to watch the mode indicator. If you are in a mode that is different from the one discussed in certain areas of this tutorial, the editor will appear to be acting up (as when you press a certain key, the expected action will not happen, something else will). If something doesn't happen as it should, double check your mode indicator!
Basic Mapping Tutorial: Page 2
Now it's time to actually start up a map. We will start with a blank map. To get this, all you need to do is choose the file menu, then new. You should then be presented with a window that is divided up into the following four views. Please note the numbered areas and use the key below to learn what they are.
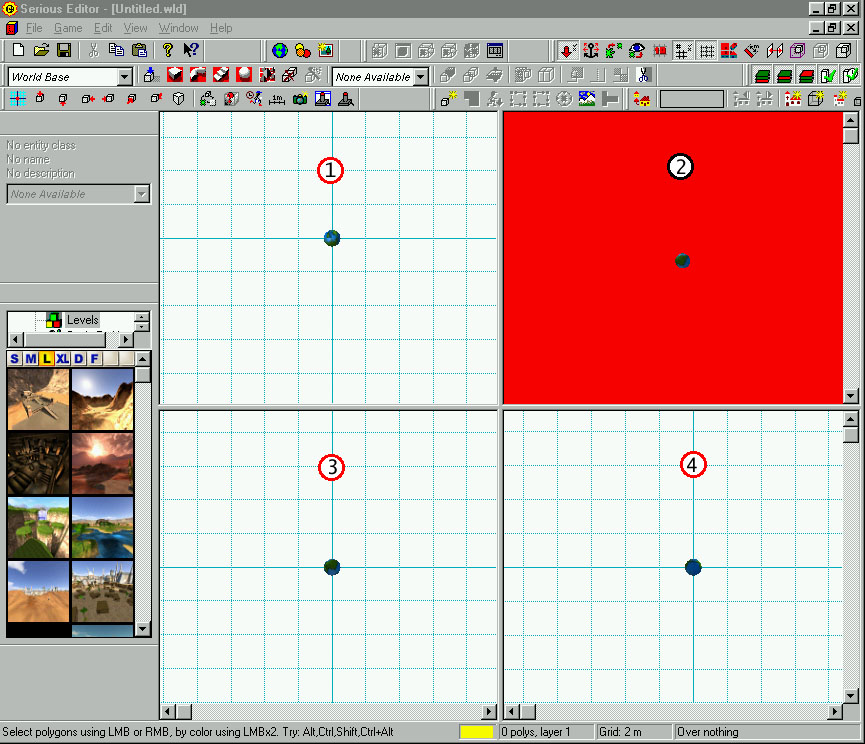

You should notice a small world in the very center of each view. This world is the first "brush entity" in our new map. However, it's an "empty" brush which means it doesn't actually show up in game. It's basically a marker for the exact center of your map.
Now for some notes about how the Serious Engine, and more importantly, the Serious Editor, views the map you are currently looking at. There are two options, and what you do first is what makes this decision for you. The editor can either see the world as fully solid (like a huge block of clay), or as completely empty. This is a very important thing to understand, so I will go into it a bit more deeply.
First of all, we will discuss the option of the world being made out of a solid mass, or block of clay. If you have a block of clay, the only way to make a map out of it is to use some tool to dig hollow spaces out of the center of the block of clay. Once you have a hollow space, or "room," you can then add more clay into that space to form architecture, like beams or buildings or whatever.
On the other hand, if you have a completely empty world, you must add blocks to it to create rooms. For example, you could create a house out of lego blocks. The important thing to remember about this is that you can't have spaces between legos that lead to the outside, where there is nothingness. Holes into the nothingness are called leaks, and can cause some very serious problems.
So, how do you get the world to think of that space as you want it to? Well, your very first action is what decides the issue. If you place a hollow "room," the outside space becomes an infinitely huge block of clay. If you place a standard architecture brush (like a beam, or a wall), the outside space becomes infinite nothingness.
Now, something that's been suggested time and again by numerous level editors is this: Never, ever start with a solid piece of architecture! Always start with a room. There are many reasons for this, but it seems that the most important reason is because it's easier and it helps prevent leaks. If you prefer editing each individual wall or whatever, the best idea is to simply create a huge "room" and then build your other architecture inside of it.
So, how do we go about creating the first room? It's actually very easy! Perhaps not as intuitive as other editors, but once you get used to it, it will become second nature. The first thing you need to do is create a "conus primitive" (which is just a fancy way of saying create a brush). To do this, you use the "Create Conus Primitive" button (![]() )
)
When you do this, the following window will pop up. Also notice that the mode indicator has switched to red, letting us know that we are now in the CSG or layer mode.
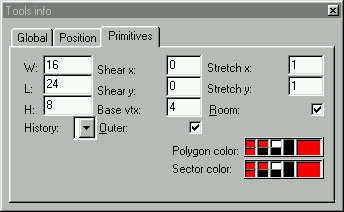
Now, don't worry if the values in your boxes are different. I didn't want to reinstall Serious Sam just to figure out what the default values were!
This box is very important, you should practice these steps with different values so you can learn exactly how it works. I will explain most of it, but there is nothing that can help as much as practice. The following table explains the commonly used boxes (the others will be covered in later tutorials

Please copy the values I have above into your boxes. This will ensure that you have a similar project. Having a similar project is important because when creating brushes, I will give you exact values to type in for position, etc., and if you have a different project, these positions won't work correctly for you.
Each time you type in a new value, press the [Enter] key on your keyboard. This will update the view in the map windows and the 3D perspective view. This allows you to see exactly what you're creating as you're creating it. Please note that this brush is currently not part of the world! This is a nice feature because you can play around with the brush before you actually add it. Unlike a lot of editors, in the Serious Editor, once you add a brush to the world, it can get pretty complicated if you later need to move or delete it. I will discuss this in greater detail later.
Basically what you're doing now is creating a new brush. Not that complicated. You type in the size you ant, the position you want, and then you add it to the world (later steps). It is important to understand what is going on, because if you don't, you will easily become lost in the news few sections of this tutorial.
Those of you coming from other editors may be wondering about these steps. In other editors, you use the mouse to draw boxes, and those boxes are your brushes. Once you have these boxes drawn, you may use a "hollow" type function in order to hollow it out. In the Serious Editor, it works differently. As we've discussed, if you create this brush as a "room" it will be hollow, but if don't, it will be solid. As far as I know, there is no way to "draw" a new brush with the mouse in this editor.
Basic Mapping Tutorial: Page 3
Once you type in the values (and make sure the "Room" box is checked!), it's time to pick a texture for the inside of the room. Please understand that there is no outside - outside of it is just solid clay. Right now you are texturing the inside of a hole dug in some clay.
Picking a texture is fairly straightforward, but it involves our first use of the virtual directory tree. As mentioned before, the virtual directory tree holds all sorts of great things. If you just move your mouse over it, and click, it should expand, showing you a tree view of all the resources we have to pick from.
Since we're looking for textures, probably your best bet would be to click the little plus sign next to the word "Textures" (makes sense, doesn't it?).
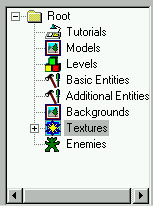
This will expand the textures branch and let you choose from different texture sets. Please double-click the Desert Temple set. You will have to wait a little bit for all the textures to load.
What you will see next are a bunch of thumbnails of all the textures under the Desert Temple texture set. Just above the textures, however, you will see a bar that looks like this.
![]()
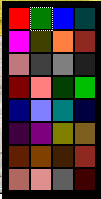
This bar controls how the textures are rendered in the menu there. Small, Medium (default), Large, Extra Large, Name, and Full Path (I'm not sure what D and F stand for, but you get the idea). For this tutorial, I will be referencing textures by their position in the medium view (for example, first row, second column). If you want to make sure everything will be the same for you, please make sure this bar has the "M" selected.
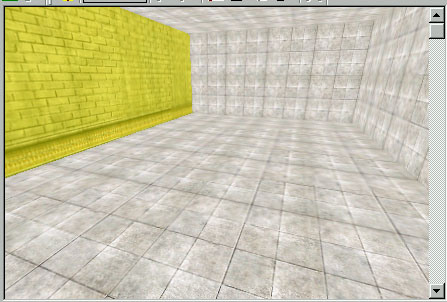
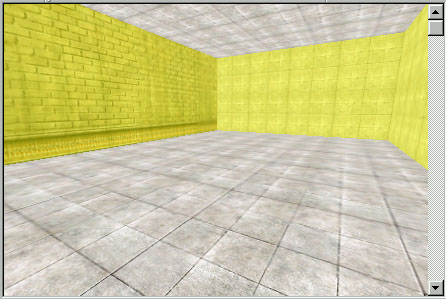
Now to choose a texture. Please choose (double-click) the texture in the first row, fourth column. It is a simple brick texture. Your view should now look something like this.
Remember what I said before... This new brush isn't actually part of the world until we add it to the world. At any time during this process, if we make a mistake, we can use the Cancel CSG button (![]() ) to completely undo the brush. Don't use it now! Just remember that it's there in case you need it.
) to completely undo the brush. Don't use it now! Just remember that it's there in case you need it.
Back to adding it to the world... To add it to the world, you use the [+] key on the numeric keypad. Once you press this button, the brush will be added to the world, for good. Period. More information on how to manipulate brushes after the fact in a later tutorial (only a very limited tool set).
You should now notice a couple of things. First, the small world in the center of the map has disappeared. This is because it now has an actual brush to worry about. Second, the upper right window (3D perspective view) has turned completely black. This is because there are no lights in your map. We will discuss adding lights shortly. Third, the mode indicator has changed. I have tried this a few times, and sometimes it indicates yellow (polygon mode), but other times it indicates black (vertex mode).
So, now that it's completely dark, how are we supposed to edit it? It's very simple, either we add lights, or we turn on "full bright" rendering mode. We will discuss adding lights later, so for now, we will turn on full bright rendering mode. This means that the whole map will be lit (no shadows whatsoever) until we turn off full bright. In the Serious Editor, this is known as toggling shadows. You toggle shadows using the shadow toggle button (![]() ) You can also use the h key on your keyboard to perform this same function.
) You can also use the h key on your keyboard to perform this same function.
Once you click it, the 3D perspective view should show you the actual rectangular room that was created.
Soon, we will go into navigation, which is basically how you move yourself around the different views. Before we go into that, however, we can do a quick play test of the map.
"Oh no!" you say, "now we have to compile it?" Wrong! You don't have to compile the maps in Serious Sam. In fact, you don't even have to save this map before you test it. All you have to do is press the t key. This will cause the 3D perspective view to actually load the map into the engine (which is running as you are editing, if I understand correctly). You can then use your normal controls to walk around your one room map. You should also have a pistol, so you are welcome to shoot designs into the walls.
Warning! When you test a map, a quick save will automatically be created. This is important to remember because if you're like me, and you test your map a lot, it's very easy to push your actual game play quick saves off the bottom of the list! So, it's a good idea to use a full save after you're done playing Serious Sam (to ensure it won't get overwritten).
All you have to do to quit the testing mode is press the [Esc] button on your keyboard. One important thing to remember is the fact that you're actually in the engine. This means that if you use the [~] key, you can bring down the console and type in cheat codes. Some useful ones are fly, ghost (no clip), all weapons, etc. You can get a list of cheat codes in our console commands reference.
Basic Mapping Tutorial: Page 4
Now we're at the very important navigation section. It is very important that you learn the navigational controls. The best way is simply to practice, practice, and practice some more. It can take a week or so of using the map editor before you're fully comfortable with the navigation, especially if you are moving from a different editor that you are already used to.
First of all, all navigation takes place with the space bar depressed. From now on, space bar key will be referred to as [Space]. Other important key definitions are left mouse button which will be symbolized as [LMB], right mouse button which will be symbolized as [RMB], and both mouse buttons which will be symbolized as [LMB + RMB]. I will not bold them every time, they are just bolded here for emphasis.
Now, when you move or scale your viewer in one window, it will move and scale all the windows! You cannot move them independently, as far as I know. This is important to remember. It can be a little frustrating at first, but as the Serious Sam mappers have noted, once you get used to it, it is a pretty good way to handle things.
So, let's try a bit of moving around. We will start with the TOP view (upper left pane). Hover your mouse over the center, hold down the [Space] key, click and hold the [LMB], and then move the mouse around. All four views should be moving around. This technique is used to scroll the map around to get to different places. You can use this technique in any of the four views. Please try it in the other views, especially the 3D perspective view.
The second navigational control we will learn is how to zoom in and out. This is very similar to scrolling, but it uses the [RMB]. So hover your mouse above the top view, hold down the [Space] key, depress and hold the [RMB], and then move the mouse up and down. This will zoom your viewer in and out in all four windows. There are a couple of things to take note of with the zoom controls. First, if you move the mouse left or right, it will behave as if it was the scroller ([LMB]). This is nice to know as if you're trying to zoom in on something in particular, you can scroll as well as zoom. Second, if you scroll in or out, the grid size actually grows and shrinks. You may have to zoom farther than just one step to see it, but it's important to remember. It will allow you to get those little details with a smaller grid.
The third navigational control we will learn is how to rotate the viewer. This only applies to the 3D perspective view, and as such, it only works in the 3D perspective pane. So hover your mouse over the center of the 3D perspective pane, depress and hold the [Space] key, and press and hold [LMB + RMB] (both mouse buttons). Then, move the mouse around. This will rotate the viewer. Note that the other windows do not change, only the 3D perspective window changes.
There are some things to remember. If you move the mouse beyond the boundary of the pane you are working in, it will stop. You will then have to let go, move your mouse back to the window, repress the keys, and keep going. Also remember to always depress and hold the [Space] key when you are trying to navigate. Otherwise, you can get some other strange occurrences (other features that we haven't discussed yet).
Finally, there are some important navigational shortcuts that you should get used to using. These shortcuts allow you to quickly traverse the map in just a few clicks. First there is the simple "teleport" which allows you to teleport to any point you can see (and click on) in the 3D perspective view. All you do here is hold down the [Space] key and double-click the [LMB]. You are instantly teleported to the place you double clicked.
Second and last is the "teleport and 2x zoom" which allows you to teleport to a specific point and zoom in on it. To do this, simply hold down [Space] and [Ctrl] (control key), and click the [LMB] anywhere in the the 3D perspective view. You are then teleported there and zoomed in. You can use the same method with the [RMB] to teleport and zoom out.
Those are the important navigational tools that are used in the Serious Editor. As I said before, there is no good way to learn them other than to practice and then practice some more. After you work on a few test maps, you should feel comfortable with the navigational controls. Next up is selection and grouping (colorizing)...
Basic Mapping Tutorial: Page 5
The objective in this section is to learn the ins and outs of grouping, or in Croteam terms, colorizing. It's a very simple concept. If you group all walls in a certain room together, you can quickly texture (or edit in other ways) them by only having to choose a texture once. Rather than use the term "grouping," however, we will stick with Croteam's choice of "colorizing" for this tutorial. The reason they use the term colorizing is because when you group specific selections together, you actually choose a color for that group. It's an interesting way to handle things, but once you get used to it, it is not a problem.
So, we should still be in polygon mode, as indicated by the yellow bar in the mode indicator. If you are not in polygon mode, please press the [p] key. If this does not switch you to polygon mode, and your mode indicator shows red (CSG/layer mode), you have done something wrong. You can try hitting the cancel CSG button (![]() ) If this removes your room, then you never actually added it to the world, so go back a few steps where it instructs you on how to add your room to the world.
) If this removes your room, then you never actually added it to the world, so go back a few steps where it instructs you on how to add your room to the world.
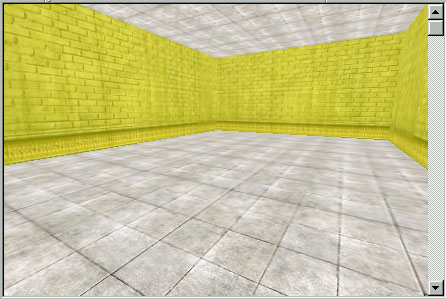
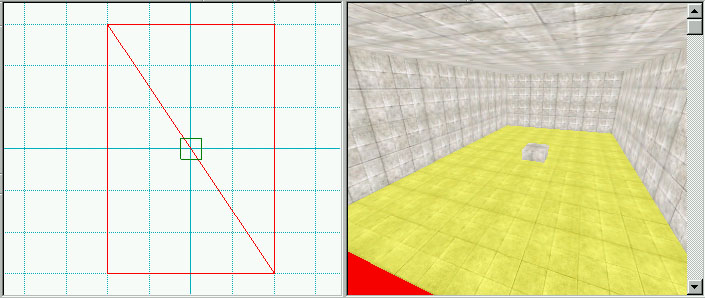
Now, try clicking once with the [LMB] a wall in the 3D perspective view. It should be selected, as indicated by a yellow overlay on the surface. This tells you that that surface is selected, and if you select a texture from the virtual tree, it will be applied to the selected surface only. Now, try changing the texture on your wall to the one in the first column, second row down. You should see something like the image below (you may have selected a different wall, or be zoomed at a different angle, don't worry!).
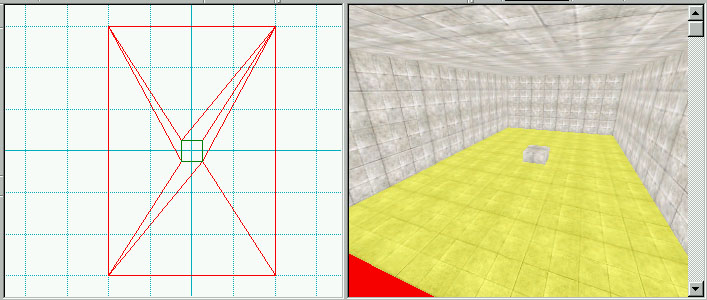
Now the idea of coloring becomes very apparent. Wouldn't it have been nice to be able to apply that texture to every wall in the entire room, rather than doing them one at a time? Sure it would have, and this is accomplished by colorizing (or grouping, one last time). Try this, double click ([LMB]) the wall you just retextured. Every surface in the entire room should now be selected. If you were to select a texture now, all selected surfaces would be retextured. If you did it, please switch it back to the original texture before moving on.
The reason all the surfaces got selected when you double clicked is because they are all designated as one color. All surfaces in one polygon are colorized together upon creation; it is up to you to change them if you want to. So how do you change them? First of all, we want to make sure we have only all the walls selected. Since everything is currently selected, we need to deselect the floor and the ceiling. To do this, you hold down [Shift] and you click the one you want to deselect with the [LMB]. Do this to the floor. Notice how it is no longer selected. Try it again with the ceiling. You can verify that all walls are selected by rotating your viewer around the room.
Now, we want to colorize these so they're grouped together. Now, be a bit careful on following these instructions as some users have complained that their colorize menu quickly disappears. What you have to do is press the [c] key, but do not move your mouse while doing it! As soon as your mouse moves beyond the edge of the color selector, the selector will disappear. So, once you press the [c] key, you are presented with a small box full of different colors. Select a color to colorize the selected surfaces.
Simply select a color with your [LMB]. The menu will disappear. Understand, nothing will look different! You should still have the same surfaces selected, and they should still be in yellow. Coloring is only actually seen in a different view. To see it, simply press the [2] on the numeric keypad. This will change your 3D perspective view to a colorized version. To get back to the normal view, simply press the [1] key on the numeric keypad.
So... If you can only see it in that very strange view, why would you want to colorize something? Simple. They are still grouped even if you can't see the color in your normal editing view. To see this, try double clicking the floor of your room. You should notice that it does not automatically select the entire room any longer. Same with the ceiling. By colorizing the walls, we have effectively removed the colorizing from the other surfaces. Now, double click a wall. Every wall should now be selected. You can use this to texture all the walls with the same texture we applied to the original wall.
Some other things to note very quickly. If the yellow overlay bothers you when you're trying to view textures, you can turn it off and on with the [z] key. Even though the yellow overlay is gone, the surfaces will still be selected. Be careful to both keep track of when it is off and on, but also to keep track of which surfaces you have selected and colorized.
In the next section we will discuss how to build some basic architecture.
Basic Mapping Tutorial: Page 6
Now we will discuss adding normal architecture. For simplicity, we will construct a column with a base and a top, similar to the one in the basic room tutorial that shipped with the editor. There are many important concepts in this section, so pay attention!
First of all, we're going to use the CSG add button (Create Conus Primitive) once again. This is what we used to create our original room. So, just click the create conus primitive button (![]() ) You should be presented with a dialog box just like the one we used to create the room last time.
) You should be presented with a dialog box just like the one we used to create the room last time.
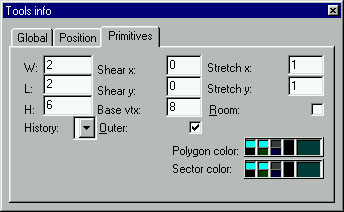
The original values should still be in all the boxes. Those need to be changed, otherwise we would be creating a brush that's exactly like the first one at the exact same point on the map. Not a good thing. So, change the values to the ones below. Make sure you also uncheck the "room" box. In the position tab of the dialog box, every box should have a "0" in it.

Just in case you don't understand, let me make it a bit clearer. What you're doing in this step is adding a new brush to the world. Since it's not a "room" brush, it will be a solid box. The Base vtx box allows you to create brushes with more vertices... You would choose 8 for an octagon, for example. The height, width, and length boxes determine the size of the brush that you want to create. Remember, the changes you make won't actually show up in the editing windows until you press the [Enter] key. You can edit the values to get just the shape and size that you want as many times as you want. When you're completely satisfied, that's when you would add it to the world.
Once all the values are there, and the brush is showing up as it should (a small square in the center of the room), we are ready to add it to the world. Remember from earlier that we used the [+] key on the numeric keypad to add the room to the world. However, this is not what we are going to do here. See, if we add this brush to the same "worldbase" (similar to layers in other editors), we won't be able to easily edit it later. So what we are going to do is "layer" it to its own layer.
So, all you have to do to layer it is press the [l] key (that's a lower-case L, not a one numeral). When you press the [l] key, you will notice that we're out of CSG mode and into entity mode. And your new box should be selected (blue).
Some very important concepts here. This newly layered brush can be moved around freely on the map. Simply hold down [Ctrl] on your keyboard, then click and drag the brush around with your [LMB]. Now, had we actually added this brush to the world with the [+] key, this would not be possible. Also, since this is not a part of the original room, none of the original room's surfaces were cut to accommodate this new brush. If you had added it directly to the old worldbase, the surface would have been cut into sections. There is a comparison shot below.
This shot shows the floor of the original room when we did not add the base of our column to the existing worldbase.
This shot shows the floor of the original room when we did add the base of our column to the existing worldbase. Notice that it's cut up into many more triangles.
Anyway, as I've mentioned, the advantages to adding the architecture to its own layer are many. You can freely move the architecture around, you can delete it separately if you need to, and it doesn't split the surrounding surfaces into many different triangles.
So, what are the disadvantages? Well, if you add every piece of architecture as it's own worldbase (layer), your list of worldbases will get extremely long and hard to manage. I have found that it's best to add things from similar areas or architectural features to it's own layer, but of course you can do it however you'd like.
What was that about your list of worldbases? Well, if you look to your toolbar, you will see a drop down menu that contains all your layers. You should currently have two, both called World Base.
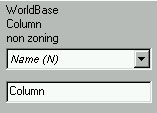
So, how do you tell them apart? You have to name them! This is a very easy process, but it's important. First of all, click the small block you made (in the blue entity mode). Then look to the left of your editing windows. You will see a grey box that shows certain properties for your current selection. Currently the drop down menu will probably say Anchored or something similar. Click the drop down arrow, then click the Name parameter. This will bring up a box that allows you to type a new name for your layer. Simply type "Column" or something similar. Be sure to press [Enter] after you are done typing.
Another important point to make here. In the top layer drop down box (the one that originally displayed two World Base entries), you will notice that it now contains one layer called World Base, which is your original room, and one layer called Column, which is the small column base you just added. I'll bold this because it's important. When you add anything else to this world with the [+] key, it will be added to the currently selected layer or worldbase. So, if you want to add a column top, and you want to make sure it's part of the Column layer, make sure the layer selection box displays the correct layer.
Basic Mapping Tutorial: Page 7
Now that we have the column base, we want to create a column top. We will do this before we add the center simply because it's easier to copy and paste the current box, then move it to the top of the room, than it is to recreate it using the conus primitive dialog box.
So, in entity (blue) mode, make sure your small box is selected (click it with [LMB]), then use the standard windows copy/paste keys. If you're not familiar with them, get familiar with them! Use [ctrl]+[c] for copy, then move your mouse a little somewhere else, and press [ctrl]+[v] to paste. You will notice that a new box, identical to your original one, was added to the world. It was also added on it's own layer, which means you can move it around separately from the other 2 layers. This may not be quite clear, since the layer box only displays two layers, but you can move them independently. However, this is because the new brush has the same Name field as the original brush. To get a new layer to show up, you'd just edit the new brush's name field to something other than Column.
So, how do you move around the brushes? It's easy, just hold down [Ctrl], and click and drag it (in any view) with your [LMB]. Move this brush so it's directly centered above the original one, but also make sure it's on the ceiling, not the floor. You may have to use two views to get it positioned correctly. Below I have shown the perspective view as well as the side view.
Now that the brush is positioned correctly, we should add it to the Column layer. To do this, select the Column layer from the drop down menu at the top. Then, select the top brush that you just added. Now, use the [+] key on the numeric keypad to add it. When you select either the top or the bottom, both brushes will be selected. This is because now they are part of the same entity. You cannot split them back up as far as I know. You can edit them using the clipping tool or by manipulating their vertices, but we will go into that in a later tutorial.
When you move this entity around now (holding down [Ctrl] and click/dragging with the [LMB]), both the base and the top will move around together.
Now we will add the actual column between the base and the top. Make sure the brush is back to the center of the room (or the position information on the new column brush won't line up - you'll simply have to move it manually as shown above). Click the create conus primitive button to add a new brush. This one will have the following dimensions and properties. Remember to leave the room box unchecked, and remember to edit the number of vertices so we get a shape nicer than a cube.
When you start creating the brush, you will notice that it's not perfectly centered. You can move the brush around while you're in CSG mode. That is, before you actually add it to the world. Simply move it up so it's directly centered between the base and the top. Use the side view to make sure the elevation is correct, and use the top view to make sure it's perfectly centered. Once everything looks good, make sure the layer selector shows Column and use the [+] key on the numeric keypad to add it to the Column layer. Alternately, you can use the [l] key (lower case L) to make it as a new layer, then you'll have to position it, then add it to the Column layer later.
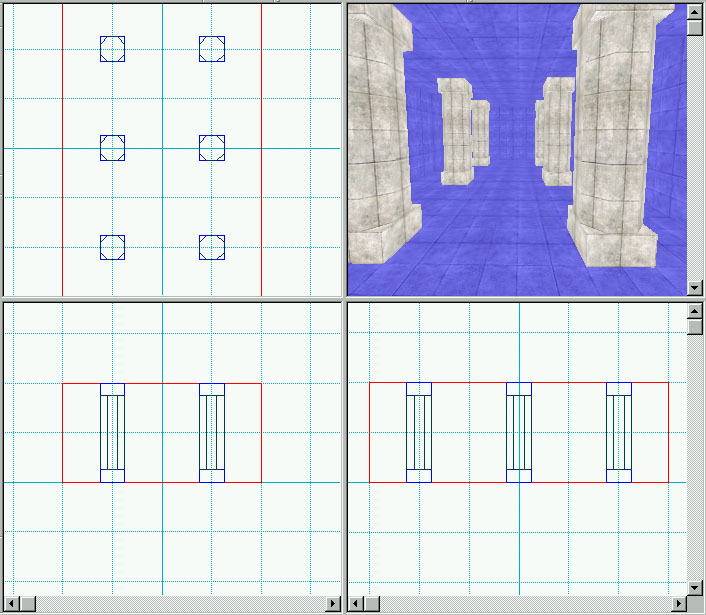
Now your column is entirely one entity, and it can be copied and pasted as many times as you want. You can also move it to wherever you want it. Remember, when you add new columns, you can choose to add them as part of the Column layer, but if you do, you won't be able to move them independently of each other. The best idea is to position them all where you want, and then if you are 100% satisfied that that's where they'll stay, you can add them all together.
So, use the copy and paste functions ([Ctrl]+[c] and [Ctrl]+[v]) to create another 5 columns, and move them so they line the edges of the room. Remember to do this in entity mode (blue). The positioning doesn't have to be exact, as we're pretty much done with adding architecture in this tutorial. Next comes lighting!
Basic Mapping Tutorial: Page 8
Lighting is very important; it sets the mood and the atmosphere of your map. The Serious Engine has a very interesting way of handling lights. I first thought they were fully dynamic, but in one level, I blew apart a statue, and the statue's shadow was still left on the wall! Anyway, we will only cover basic lighting here. We will cover how to add normal lights, how to adjust their range, and how to change their color.
The first thing you have to do to work with lighting is turn the full bright setting back off, or rather, turn shadows on. Remember, we turned them off at the beginning of the tutorial. To turn the shadows back on, press the [h] key. The [h] key toggles shadows, so remember it. You can also use the toggle shadows button on the toolbar.
Lights are entities which are accessed from the Basic Entities section of the virtual tree. Simply click the virtual tree to make it expand, then double click with the [LMB] on Basic Entities. The light entity looks like the following image.
![]()
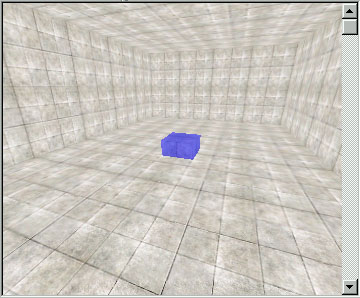
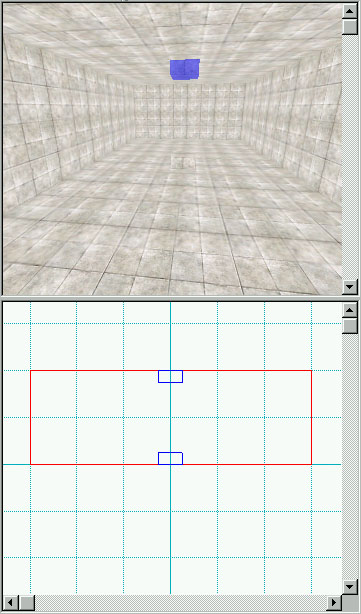
To place a light entity in your map, simply click and drag it from the virtual tree to any of your four editing windows. You can move it after the fact by holding down the [Ctrl] key and moving it with the [LMB]. Place it in the center of the room somewhere, and you should end up with something like this.
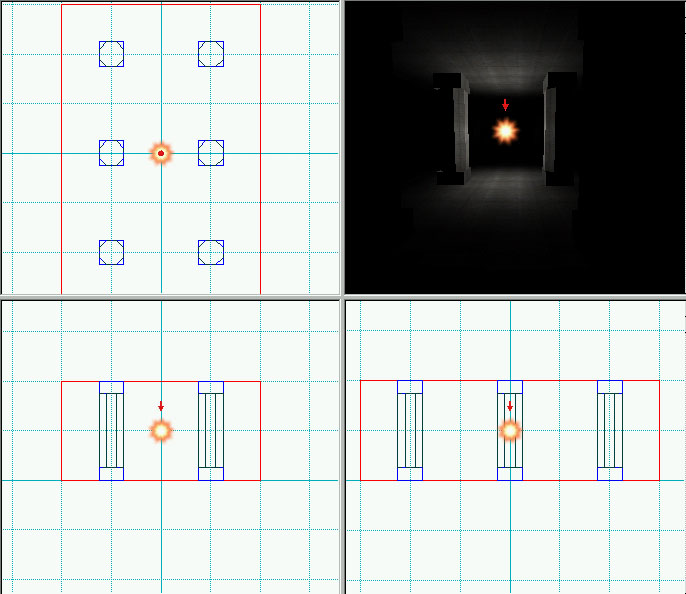
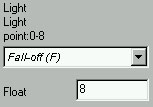
There are only two light properties that we will talk about in this tutorial. The first is the fall off, or range, of the light. This is basically how far the light will extend in all directions. To edit the fall off, we use the entity property drop down list (same one as we used to assign a name to our architecture entities previously). So in the left hand pane, click the drop down menu, and scroll down to the fall off option.
When you select this, you should notice a green sphere of influence around the selected light. This just lets you know how far the light should extend to. Remember, though, if there is architecture in the way, that architecture will cast shadows, so places that the light should reach will still be dark.
To extend the range of the light, simply change the value in the box to a higher value. To decrease the range of the light, make the number smaller.
Now we will discuss the second property we will be addressing here, which is the lights color. To adjust the color of the light, you simply select the color property from the drop down menu. You will be presented with a standard Serious Editor color box as shown below. Simply double click the area the arrow is pointing to, and then choose a color.
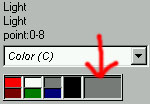
If you don't want to color the light, by all means, skip that step. Remember, colored lighting looks really, really bad when it's over-used, so be careful. But this isn't a tutorial on creating good lighting right?
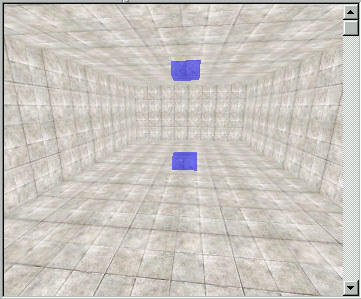
Generally, areas are not lit with only one light. You must use quite a few to get the lighting effects you want. So, use the standard [Ctrl]+[c] and [Ctrl]+[v] to copy your light around the room, making sure the areas you want get lit up correctly.
Earlier, I said we'd learn another way to texture... Well, read on for more on this.
Basic Mapping Tutorial: Page 9
We're nearing the end of this tutorial! The only things left are to discuss some advanced texturing as well as placing enemies, both of which are pretty straightforward.
First of all, let's do texturing. Switch back to polygon mode using the [p] key. Now, click with the [LMB] on any surface in the 3D perspective view. It should show up yellow now, unless you turned off the yellow overlay. You can turn the yellow overlay on and off using the [z] key on the keyboard. I generally leave it on, but it's personal preference.
All our columns are probably using the same texture, which makes them very boring. So, let's retexture them. It is important to note that if you were actually working on a map for release, you'd probably texture the column first and then copy/paste it where you needed it. That way, you wouldn't have to retexture the same column over and over. Since this is just a tutorial map, however, we only have to texture one of them to get the concepts down.
First of all, select a surface on the side of one of the columns. Go to the textures section of the virtual tree and double click a new texture. Since it is selected, if you use [Ctrl]+[c], it will copy the texture and the texture coordinates (these are used to actually align the texture - so it's not only copying the texture, but also how it's aligned). You can then select another surface, and press [Ctrl]+[v] to paste the texture. Try it a few times!
Now, this is all well and good, but if you're texturing a large amount of surfaces, there is a much faster way to do it. The mouse in Serious Editor has what I like to call active selection. This means that if you don't have anything selected, whatever is under the mouse pointer will be selected automatically if you use copy or paste. This means that you can simply hover the mouse over a texture, copy it, then move it over another texture, and paste it. You don't actually have to click each texture.
This also works for lights, brushes, etc.
Now we will discuss adding enemies. This works exactly the same as adding lights. First of all, go to the virtual tree and select Enemies. You will see a list of all the enemies in the game. This might seem confusing, since you remember fighting a lot more bad guys than that, right? Well, all other enemies are based of the ones listed here. We will discuss getting the other ones in a later tutorial.
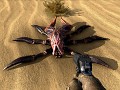
Simply decide which enemy you want, then click/drag it with the [LMB] to any of the four editing windows. Once it's placed, you can hold down [Ctrl] and click/drag the [LMB] to move it around (you should be getting used to holding down [Ctrl] to move things around by now...). Remember to place an enemy that will actually fit in the room. I tried placing a "Devil" in this small room and it didn't work very well!
Well, that's about it for this tutorial. There are many advanced topics that were not covered here, but they will be covered in later tutorials. If you have any editing questions whatsoever, feel free to ask in our forums. There are many talented editors that will be happy to help you out.
- Brian