Configuring Graphical Options for Grimm
Please read the special notice for AMD/ATI users in the section below.
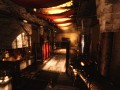
Grimm Quest for the Gatherer's Key includes Sikk Mod, a feature filled mod that allows for graphical enhancement beyond the ordinary capabilities of the Doom 3 engine. Because of this the system requirements quickly go up depending on which features you enable or not. The highest quality features like Screen Space Ambient Occlusion, HDR and ambient lighting require a strong computer and video card.
You do not need to have Sikkmod installed to run Grimm!
Grimm also does not change anything in your normal Doom 3 game!
Grimm gives you the option to bypass Sikk Mod completely, you can turn off all advanced features making Grimm run basically like the original Doom 3 does, especially in lower quality modes as well (low, medium). Of course, these quality modes are less immersive than the higher quality modes that offer crisper textures and better lighting.
I have included several configurations that will allow you to quickly set several recommended settings for Grimm in the graphics menu. These options configure many graphical settings for you and will save you 'tinkering time'. The basic options like resolution, texture and quality modes still need to be set from the main menu.
Important
Grimm uses an auto executing configuration file called 'autoexec.cfg' it resides in the root folder of the game. Never edit or delete this file as it contains important settings that are required for Grimm to work properly.
Things that get adjusted automatically depending Quality Setting
The Doom 3 engine knows 4 quality settings: Low, Medium, High and Ultra. There are many differences between these modes and Grimm adds even more functionality to these. Many dynamic aspects are based off these settings. For instance, burning objects only cast light in high and ultra quality modes. All breakables drop movable shards are removed after 4 seconds in Low quality mode and stay for over 14 seconds in Ultra quality mode. Some effects aren't shown at all in Low quality mode. Low and Medium quality modes compress textures and texture size. Overall you can say that in low and medium quality modes many textures look more blurry than in higher quality modes, including some HUD elements and menu elements.
Ambient Lighting
When turned on, the ambient lighting options are controlled by Grimm. You can set your own values in the CVars and they will take effect, but they will reset upon map load. Each hub has it's own distinct ambient colour that translates in these settings.
Screen Space Ambient Occlusion and alpha transparent planes (sprites)
One flaw of this technique is that transparent planes cannot be calculated correctly, this shows in visible edges around some alpha transparent planes. I have found a workaround for this by reversing the plane normals and fooling the engine into still drawing the plane. But this doesn't work always and it's hard manual labour so to say. So you'll see these issues pop up with SSAO enabled. It shows less when HDR is also enabled, so when you enable SSAO and want less artefacts then make sure to enable HDR. You can also play around with the SSAO settings themselves. Grimm defaults to it's recommended settings but you can tweak and adjust as you desire.
Advanced console options for Sikk Mod
For reference I will provide all relevant render cvars and options available from Sikk Mod in Grimm on the next page. For support regarding any of these options, please reply to this tutorial!
SPECIAL NOTICE FOR AMD/ATI USERS
The AMD/ATI Catalyst Control Center AI has known issues with Grimm and SikkMod. These issues can result in garbled screens and other random anomalies. These issues can easily be fixed by turning off Catalyst Control Center AI completely while running Grimm (or Sikkmod and most other graphical enhancements mods for Doom3).
There are many other known issues with the Catalyst Control Center AI so the general recommendation in all of these situations is to turn it off. Remember if you are experiencing the same issues in other games there could be an issue with the card in which case I will always refer to your manufacturer.
1) Open up Catalyst Control Center
2) Under the "Graphics Settings" tab click 3D
3) Click "All Settings"
4) Scroll through the list until you see "Catalyst A.I."
6) Check the "Disable" box.
7) Cick OK.
The AI should now be turned off.
ps: Got to love rogue AI! :)
// Rendering Related CVARS
//-------------------------------
r_useSoftShadows Enable Soft Shadows postprocessing effect
r_softShadowsBlurFilter Blur method used for the shadow mask: 0 = No Filter; 1 = Box Filter; 2 = Poisson Filter; 3 = Gaussian Filter
r_softShadowsBlurScale Sample offset scale for the blur filter
r_softShadowsBlurEpsilon Set the blur depth difference factor for the blur filter
r_useEdgeAA Enable edge anti-aliasing
r_edgeAASampleScale Set the sample offset scale for edge detection
r_edgeAAFilterScale Set the filter offset scale for blurring
r_useHDR Enable High Dynamic Range lighting
r_hdrToneMapper Tone mapping method: 0 = Reinhard (RGB); 1 = Reinhard (Yxy); 2 = Exponential; 3 = Filmic (simple); 4 = Filmic (complex)
r_hdrAdaptationRate Eye adaptation rate
r_hdrMiddleGray Middle gray value used in HDR tone mapping
r_hdrWhitePoint Smallest luminance value that will be mapped to white
r_hdrBlueShiftFactor Blue shift blend factor
r_hdrDither Enable dithering
r_hdrDitherSize Sets the size of the dither threshold map
r_hdrLumThresholdMax Minimum luminance value threshold
r_hdrLumThresholdMin Maximum luminance value threshold
r_hdrBloomToneMapper Tone mapping method, specific to bloom: 0 = Reinhard (RGB); 1 = Reinhard (Yxy); 2 = Exponential; 3 = Filmic (simple); 4 = Filmic (complex)
r_hdrBloomMiddleGray Middle gray value used in HDR tone mapping, specific to bloom
r_hdrBloomWhitePoint Smallest luminance value that will be mapped to white, specific to bloom
r_hdrBloomThreshold Bloom luminance threshold
r_hdrBloomOffset Bloom luminance offset
r_hdrBloomScale Intensity scale amount for bloom effect
r_hdrBloomSize Size of the bloom effect
r_hdrFlareGamma Gamma curve for the flare texture
r_hdrFlareScale Intensity scale amount for lens flare effect. 0 = Off
r_hdrFlareSize Size of the lens flare effect
r_hdrGlareStyle Glare Style to use with HDR lighting. Value range: 0 - 11
0 = Off
1 = Natural
2 = Star
3 = Cross
4 = Snow Cross
5 = Horizontal
6 = Vertical
7 = Star (Spectral)
8 = Cross (Spectral)
9 = Snow Cross (Spectral)
10 = Horizontal (Spectral)
11 = Vertical (Spectral)
r_hdrGlareScale Intensity scale amount for glare effect
r_hdrGlareSize Size of the glare effect
r_useBloom Enable bloom postprocessing effect
r_bloomBufferSize Bloom render target size:; 0 = 32x32; 1 = 64x64; 2 = 128x128; 3 = 256x256; 4 = 512x512; 5 = 1024x1024
r_bloomBlurIterations Number of times the blur filter is applied
r_bloomBlurScaleX Amount to scale the X axis sample offsets
r_bloomBlurScaleY Amount to scale the Y axis sample offsets
r_bloomScale Amount to scale the intensity of the bloom effect
r_bloomGamma Gamma curve for the bloom texture
r_useSSIL Enable Screen-Space Indirect Lighting postprocessing effect *Experimental*
r_ssilRadius Set the sample radius for ssil
r_ssilAmount Set the contribution factor for ssil
r_ssilBlurMethod Blur method used for the ssil buffer: 0 = Gaussian; 1 = Bilateral
r_ssilBlurScale Set the blur scale for the ssil buffer
r_ssilBlurQuality Set the blur quality for the ssil buffer
r_ssilBlurEpsilon Set the blur depth difference factor for the ssil buffer
r_useSSAO Enable Screen-Space Ambient Occlusion postprocessing effect
r_ssaoMethod Set the ssao method: 0 = Crytek; 1 = HDAO; 2 = ABAO; 3 = PBAO; 4 = HBAO (low); 5 = HBAO (medium); 6 = HBAO (high); 7 = Ray Marching; 8 = Volumetric Obscurance
r_ssaoRadius Set the sample radius for ssao
r_ssaoBias Set the angle bias for ssao (darkening factor for Crytek's)
r_ssaoAmount Set the contribution factor for ssao
r_ssaoBlurMethod Blur method used for the ssao buffer: 0 = Crytek; 1 = Box; 2 = Gaussian; 3 = Bilateral
r_ssaoBlurScale Set the blur scale for the ssao buffer
r_ssaoBlurQuality Set the blur quality for the ssao buffer
r_ssaoBlurEpsilon Set the blur depth difference factor for the ssao buffer
r_ssaoBlendPower Set the blend exponent for the ssao to scene final combine
r_ssaoBlendScale Set the blend scale for the ssao to scene final combine
r_useSunShafts Enable Screen-Space Volumetric Lighting (Sun Shafts) postprocessing effect *Experimental*
r_sunShaftsSize Set the sun shafts size
r_sunShaftsStrength Set the sun shafts strength
r_sunShaftsMaskStrength Set the sun shafts mask strength
r_sunShaftsQuality Set the sun shafts quality
r_sunOriginX Set the sun's origin along the X axis (used for sun shafts & lens flare)
r_sunOriginY Set the sun's origin along the Y axis (used for sun shafts & lens flare)
r_sunOriginZ Set the sun's origin along the Z axis (used for sun shafts & lens flare)
r_useLensFlare Enable lens flare postprocessing effect *Experimental*
r_lensFlareStrength Set the lens flare strength
r_useDepthOfField Enable depth of field postprocessing effect. Value range: 0 - 2; 0 = Off; 1 = Automatic Focus; 2 = Manual Focus
r_dofBlurScale Set the blur scale for depth of field postprocessing effect
r_dofBlurQuality Set the blur quality for depth of field postprocessing effect: 0 = Box Filter; 1 = Poisson Filter; 2 = Gaussian Filter; 3 = Bokeh!
r_dofNear Set the near distance for depth of field postprocessing effect (r_useDepthOfField = 2 only)
r_dofFar Set the far distance for depth of field postprocessing effect (r_useDepthOfField = 2 only)
r_dofFocus Set the focus distance for depth of field postprocessing effect (r_useDepthOfField = 2 only)
r_dofConditionAlways Depth of field condition: Always on
r_dofConditionCinematic Depth of field condition: Cinematics
r_dofConditionGUI Depth of field condition: GUI Active
r_dofConditionReload Depth of field condition: Reloading
r_dofConditionTalk Depth of field condition: Talking
r_dofConditionZoom Depth of field condition: Weapon Zoom
r_useMotionBlur Enable motion blur postprocessing effect. 0 = off; 1 = Camera; 2 = Accumulation; 3 = Camera + Accumulation
r_motionBlurScale Set the motion blur scale. Works similar to shutter speed. Higher values == stronger blurring
r_motionBlurMaskDistance Don't do motion blur if framerate is below this value
r_motionBlurFPSThreshold Set the motion blur mask distance. Used to mask the view weapon.
r_motionBlurMinThreshold Set the motion blur min sensitivity threshold. Screen won't blur until threshold is passed. Lower values == higher sensitivity
r_motionBlurMaxThreshold Set the motion blur max sensitivity threshold. Blur strength won't pass threshold.
r_motionBlurFactor Set the motion blur blend factor
r_motionBlurLerp Set the motion blur blend lerp factor
r_motionBlurQuality Set the motion blur quality. Value range: 1 - 4; 1 = 8 samples; 2 = 64 samples (virtual); 3 = 512 samples (virtual); 4 = 4096 samples (virtual)
r_useColorGrading Enable color grading postprocessing effect. Parameters need to be set manually in the material.
r_colorGradingParm Parameter to allow specific color grading stage to be used in the material
r_colorGradingType Color grading type: 0 = math; 1 = lut
r_colorGradingSharpness Sharpness level when color grading is enabled
r_useCelShading Enable cel shading postprocessing effect
r_celShadingMethod Set the cel shading edge detection method. Value range: 0 - 2 ; 0 = RGB; 1 = Luminance; 2 = Depth(incomplete)
r_celShadingScale Set the cel shading scale. Higher values == thicker outline
r_celShadingThreshold Set the cel shading threshold
r_useFilmgrain Enable filmgrain postprocessing effect
r_filmgrainBlendMode Set the grain blending mode. Value range: 0 - 3; 0 = gl_one, gl_one; 1 = gl_zero, gl_one_minus_src_color; 2 = gl_dst_color, gl_one; 3 = gl_one_minus_dst_color, gl_one
r_filmgrainScale Set the grain scale
r_filmgrainStrength Set the grain strength. Value range: 0.0 - 1.0
r_useVignetting Enable vignetting postprocessing effect
Greetings!
Im having a problem, when i load the game everything seems to start fine, but when i start to play the FOV is messed up and i dont know why, how can i fix this?
Sorry for the late reply, didn't notice this post.
Do you have an ATI card?
indeed, i have an ATI HD6850
Did you turn off ATI Catalyst AI?
yes, i did.
Try setting the quality to high or ultra.
Do you have any subfolders in the grimm directory, or do you have any other mods installed? Sometimes these files can interfere with Grimm.
i've updated the drivers, when i have a chance i'll try to play the mod again, also i dont have other mods installed, i dont have any subfolders in the mod directory, and i was playing in ultra, so i guess the problem is the drivers.
It's always a pain to figure out these issues. Usually it's drivers, usually it's a setting, usually it's some old mod etc..etc.. But sometimes the issues aren't that obvious. I can help you more in depth if you register an account at this forum: Doom3world.org then you can also give me a screenshot of what's happening and I can ask some more in depth questions.
I am the user called 'BloodRayne' there. You can begin a new thread, or PM me with any issues so we can figure it out.