
Tutorials originally written by Trevor. Mirrored here for archival purposes.
If you wish to discuss Doom 3 modding I recommend joining the Id Tech 4 discord server here.
Notes
These tutorials are about the Doom 3 SDK. They aren't scripting tutorials. You should already know how to program in C++ before you get started because I won't be explaining any syntax along the way.
Tutorial 1 for SDK 1.0
Text Messages Part 1
by Trevor Hogan
idStr (id Strings)
You'll need to know how to work with the idStr class if you want to manipulate strings in Doom 3. idStr is a comprehensive string class comparable to the STL's std :: string and is defined in idLib/Str.h. Check out the class definition for an idea of what functions are available. Here's a short introduction.
idStr string1;
idStr string2;

string1 = "hello";

// id has overloaded sprintf to work with idStr
// see Str.h:254 and Str.cpp:1503

int oranges = 5;

sprintf( string2, "I have %d oranges!", oranges );

// you can also initialize an idStr in its constructor

idStr string3( "goodbye" );

// idStr supports c_str( ) just like std :: string

const char *cstr = string1.c_str( );
If you've worked with std :: string before then you shouldn't have any problems with idStr. There is one major difference however - colours. Here's an excerpt from my copy of idLib/Str.h (your copy may be different if you have a newer version of the SDK).
// color escape character
const int C_COLOR_ESCAPE                  = '^';
const int C_COLOR_DEFAULT                 = '0';
const int C_COLOR_RED                     = '1';
const int C_COLOR_GREEN                   = '2';
const int C_COLOR_YELLOW                  = '3';
const int C_COLOR_BLUE                    = '4';
const int C_COLOR_CYAN                    = '5';
const int C_COLOR_MAGENTA                 = '6';
const int C_COLOR_WHITE                   = '7';
const int C_COLOR_GRAY                    = '8';
const int C_COLOR_BLACK                   = '9';
If a string contains "^x" where x is an integer from 0 to 9 then Doom 3 will interpret that character sequence as a colour change. All subsequent text will be printed in the specified colour as defined in the above code. Doom 3 respects colour escape characters both in the console and in the HUD. Here's an example (note that I'm running this line of code once every frame so it fills my console).
common->Printf( "Regular Text ^1Colour 1 ^2Colour 2 ^3This should be yellow!\n" );
Console Messages
As you've already seen, printing messages to the console in Doom 3 is relatively straightforward. Console printing functionality is exposed through the idCommon class defined in framework/Common.h. Let's take a look.
// Prints message to the console, which may cause a screen update if com_refreshOnPrint is set.
virtual void                        Printf( const char *fmt, ... ) = 0;

// Same as Printf, with a more usable API - Printf pipes to this.
virtual void                        VPrintf( const char *fmt, va_list arg ) = 0;

// Prints message that only shows up if the "developer" cvar is set,
// and NEVER forces a screen update, which could cause reentrancy problems.
virtual void                        DPrintf( const char *fmt, ... ) = 0;
The Doom 3 SDK provides access to the idCommon class through a global pointer called common defined in game/Game_local.cpp and initialized in GetGameAPI. You'll probably use the Printf variant the most and thankfully it works just like the standard C printf (but watch out for that capital P). You may notice that id often calls gameLocal.Printf to print to the console but if you check the source code you'll find that gameLocal's Printf just wraps around common's Printf. I'm not entirely sure why they do this but either method works fine.
HUD Messages
If you've worked with Half-Life before you'll know that printing messages to the HUD can be extremely useful. Unfortunately it's not so easy in Doom 3 but it can be done. Doom 3 does not provide access to any printing or drawing functions in the source code so you'll have to rely on a GUI script to help you. If you're working on a singleplayer mod, open guis/hud.gui and look for the code shown below.
Correction (November 1, 2004): You can print messages to the HUD directly from the SDK. Please see Tutorial 4 for more information.
onNamedEvent Message {
      transition "message1a::forecolor" "0 0 0 1" "0 0 0 0" "5000" "1" "0" ;
      transition "message1::forecolor" "1 1 1 1" "1 1 1 0" "5000" "1" "0" ;
}

// ... snip ...

windowDef message1a {
      rect 21, 261, 638, 10
      forecolor 0, 0, 0, 0
      text "gui::message"
      textscale 0.25
      font "fonts/an"
}
windowDef message1 {
      rect 20, 260, 638, 10
      forecolor 1, 1, 1, 0
      text "gui::message"
      textscale 0.25
      font "fonts/an"
}
The first section of code tells the HUD to make message1a and message1 visible and start a 5 second nonlinear fadeout effect whenever the "Message" event is received. The other two blocks of code define the message1a and message1 objects and give them a default message of "gui::message". At this point you might think this is a dead end but it turns out that "gui::message" actually refers to a variable, not a static string. That's all you need to know about this particular GUI script because the SDK completes the puzzle by giving us an interface to the HUD. One important thing to note is that message1a and message1 are defined in the original singleplayer HUD GUI; you don't need to modify your HUD GUI to make this work. However, if you want to display a bigger message, a message in another location, or a second or third message at the same time then you'll need to modify your HUD GUI. Also, the SDK only seems to use these particular objects when saving a game but other GUI scripts might use them as well. It's probably safe to hijack them for your own purposes but you could always create another set of objects just to be safe.
Alright, it's time to find the HUD interface in the SDK. Open game/Player.h and find the code shown below.
idUserInterface * hud;
The idUserInterface class is defined in ui/UserInterface.h and represents any GUI in the game. This class offers a wide range of GUI functions but we're interested in HandleNamedEvent and SetStateString in particular. If you can get ahold of the player's hud pointer you can change the "gui::message" string and fire the "Message" event like this.
if( hud )
{
      hud->SetStateString( "message", "your text here" );
      hud->HandleNamedEvent( "Message" );
}
So how do you get ahold of the player's hud pointer? One possible method is shown below.
idPlayer *player = gameLocal.GetLocalPlayer( );

if( player && player->hud )
{
      // go for it!
}
For a slightly more practical example, say you want to know what the ground normal is underneath the player for debugging purposes. You could always print it to the console but it's so much nicer to watch it change directly on the HUD. Open game/physics/Physics_Player.cpp and put this code in MovePlayer somewhere after the call to CheckGround.
if( groundPlane )
{
      idStr strGNorm;

      sprintf( strGNorm, "ground normal: ^1%f ^2%f ^4%f",
            groundTrace.c.normal.x,
            groundTrace.c.normal.y,
            groundTrace.c.normal.z );

      idPlayer *pPlayer = static_cast<idPlayer *>( self );

      if( pPlayer && pPlayer->hud )
      {
            pPlayer->hud->SetStateString( "message", strGNorm.c_str( ) );
            pPlayer->hud->HandleNamedEvent( "Message" );
      }
}
At this point I'm still a bit confused about the seperation between client and server so I don't know if this will work in multiplayer games. You might be able to use the chat GUI or you might have to add your own element to the multiplayer HUD (guis/mphud.gui). Go and experiment!
Tutorial 2 for SDK 1.0
Buttons, Impulses, and Commands
by Trevor Hogan
User Input
There are four types of user inputs in Doom 3: core commands (this is a general catch all term), buttons, impulses, and custom commands. The engine handles core commands internally and gives the SDK a secondary interface. For example, when you walk forward the engine handles the relevant user input and passes along an intensity value for each local direction (local to the player). This sounds pretty strange since walking doesn't really have an intensity value but stop and consider mousemove for a second; the slower you move the mouse the slower you should walk. The important thing to note is that you cannot poll the engine for the status of the walk forward key on your keyboard. You can only determine the intensity value which makes it difficult to tell if the player is using the keyboard or the mouse to move without using hacks like reading the state of the mousemove button.
Alright, let's get started so take a look at the user input structure in framework/UsercmdGen.h. This is the guts of the user input system.
class usercmd_t {
public:
      int         gameFrame;                                // frame number
      int         gameTime;                                 // game time
      int         duplicateCount;                           // duplication count for networking
      byte        buttons;                                  // buttons
      signed char forwardmove;                              // forward/backward movement
      signed char rightmove;                                // left/right movement
      signed char upmove;                                   // up/down movement
      short       angles[3];                                // view angles
      short       mx;                                       // mouse delta x
      short       my;                                       // mouse delta y
      signed char impulse;                                  // impulse command
      byte        flags;                                    // additional flags
      int         sequence;                                 // just for debugging
Note that the movement intensities are stored in forwardmove, rightmove, and upmove. There's also a variable for button state and another for impulse state but nothing for custom commands. This is because custom commands are handled elsewhere.
Before I move on I should mention that buttons and impulses are also (mis)handled by the engine before being passed along to your mod's code. At least there's an upside - unlike movement commands, buttons and impulses are left in a much more usable state. However, you should still be aware of the engine's penchant for meddling (more on this later).
Buttons
You may have noticed that the buttons variable in usercmd_t (shown above) is stored in a single byte. This means that Doom 3 supports eight buttons in total and unfortunately five are already in use so you'll have to design your mod with a three button limitation in mind. Each button is represented as one bit in the buttons variable so each button can be either on or off and that's it. Since a new usercmd_t is generated each frame buttons are well suited for continuous user input. Open framework/UsercmdGen.h and take a look at the button definitions.
// usercmd_t->button bits
const int BUTTON_ATTACK             = BIT(0); // "_button0" or "_attack"
const int BUTTON_RUN                = BIT(1); // "_button1" or "_speed"
const int BUTTON_ZOOM               = BIT(2); // "_button2" or "_zoom"
const int BUTTON_SCORES             = BIT(3); // "_button3" or "_impulse19"
const int BUTTON_MLOOK              = BIT(4); // "_mlook"
const int BUTTON_5                  = BIT(5); // "_button5"
const int BUTTON_6                  = BIT(6); // "_button6"
const int BUTTON_7                  = BIT(7); // "_button7"
The comments are mine and show the pairing between each button and its console command(s). It looks like core commands, buttons, and impulses all begin with an underscore (e.g. "_forward"). Note that some buttons have multiple names that look like core commands and that one button even overlaps with an impulse (and that "_button4" doesn't seem to trigger BUTTON_MLOOK). Sigh.
Okay, if you've played through Doom 3 before you'll know that these actions are continuous actions. You can hold down the attack button and your gun will fire continously rather than firing just one bullet. Similarly running (sprinting), zooming, showing the scoreboard, and mouselook are also continuous actions. If you want to use a button in your mod, just bind a key to "_button5", "_button6", or "_button7" and check the player's buttons variable for BUTTON_5, BUTTON_6, or BUTTON_7 somewhere in your code. As an example, I bound a key to "_button5" and added this code to the end of idPlayer :: Think in game/Player.cpp.
if( usercmd.buttons & BUTTON_5 )
      common->Printf( "button 5 pressed!\n" );
I only tapped the key once very quickly but the message showed up five times! This is because the player's Think function was executed multiple times while the key was down.
Why can't you just hijack one of the other buttons for your own purposes if you run out of buttons? Well, as I mentioned earlier the engine likes to meddle with things. For example, when the mouselook button is pressed the engine will adjust the forwardmove intensity according to your mouse's movement before passing along the button's state. If you search the SDK for BUTTON_MLOOK you'll discover that the mod code only centers the player's view when the mouselook button is pressed. Everything else is handled by the engine and cannot be disabled so the mouselook button will always be a mouselook button no matter what you do. I haven't researched the other buttons but I wouldn't be surprised if the engine gets involved with them as well.
Important! At the time of this writing button 7 is unusable due to a bug in the engine!
Impulses
An impulse is executed only once when the relevant key is pressed and is not updated continuously like a button. Weapon switch commands and weapon reloading are examples of impulses. Check framework/UsercmdGen.h for an incomplete list - even though impulses 0-29 and 40 are the only ones defined here, I've verified that impulses 30-39 and 41-61 also work. Impulses 62 and 63 don't generate an unknown command but don't seem to make it through the engine so they're probably off limits. As you can see there's a lot of room for growth! To add your own impulse, open game/Player.cpp and look for the PerformImpulse function.
case IMPULSE_40: {
      UseVehicle();
      break;
}
case 60: {
      common->Printf( "impulse 60!\n" );
      break;
}
In this example I held the key down for several seconds but the message showed up only once. If you're making a multiplayer mod you should know that impulses are automatically replicated over the network so the above example will actually print "impulse 60!" on the server as well!
Custom Commands
Custom commands are like impulses except that they're not automatically replicated over the network in a multiplayer game and they can carry arguments. If you've worked with Half-Life before you'll know that console commands in Half-Life are automatically sent to the server for processing; this is not the case in Doom 3. You can use custom commands for client only functions or you can send a custom network message to the server (the "clientDropWeapon" custom command does this). I don't know why id didn't use an impulse for this action but hey, it leaves another impulse available for us to use! To implement your own custom command, open game/gamesys/SysCmds.cpp and scroll to the bottom of InitConsoleCommands.
// this is your new custom command
// the first argument is the name of the custom command (typed in the console)
// the second argument is a custom command function
// the third argument is a flag (see framework/CmdSystem.h)
// the fourth argument is a short description of the custom command

cmdSystem->AddCommand( "sayhello", myfunction, CMD_FL_GAME, "says hello." );
This tells the engine that you want myfunction to be called whenever the user types "sayhello" in the console (or presses a key bound to "sayhello"). Now you need to actually write myfunction so scroll up a few pages to the top of InitConsoleCommands and paste this code above the function body.
void myfunction( const idCmdArgs &args )
{
      common->Printf( "hello user!\n" );
}
Every custom command function takes the same argument, an idCmdArgs object which wraps the typed arguments in an easy to use format. Take a look at the "give" command (Cmd_Give_f) for an example of using arguments in your custom command function. See if you can write a custom command named "addone" that adds one to any number, so "addone 5" would print "6" to the console.
As I said earlier custom commands are not sent over the network so this example will only print "hello user!" in the console of the user who typed the command.
October 30, 2004
Tutorial 3 for SDK 1.0
Tracelines
by Trevor Hogan
Vectors
Tracelines are one of the most important modding tools you'll ever use but you'll need to know what a vector is first. I'm not going to write yet another generic 3D math tutorial so I'll just point you in the direction of a fairly decent tutorial written by Phil Dadd.
You should know how to add and subtract vectors, how to normalize a vector, and how to multiply a vector by a scalar. If you think you're ready, read on!
The Problem
Imagine you were hired by id to write this amazing new game, Doom 3. You work as hard as you can for several months and eventually you run into a couple of problems. Problems like calculating the (ideal) path of a bullet and determining if it hit a monster or not (and where it hit). Or whether or not the player is aiming at a monster so the crosshair can be coloured red. Or deciding if a monster can see the player and therefore should attack. This may come as a surprise but these problems can be solved with tracelines! Alright, enough talk. First I'll go over how to use tracelines in a script then I'll cover tracelines in the SDK.
Tracelines in a Script
In this example I'll be looking at the crane claw from Alpha Labs 3. If you can't remember it, it's the level where you have to clean up the toxic waste barrels by picking them up with a remote controlled claw.
Open script/map_alphalabs3_crane.script and take a look at the crane_cmd_pickup function.
// ... snip ...

begin = $crane_trace_start.getWorldOrigin();
end = $crane_trace_end.getWorldOrigin();

sys.trace( begin, end, '0 0 0', '0 0 0', MASK_SOLID|CONTENTS_RENDERMODEL, $crane_hang );
bindEntity = sys.getTraceEntity();
if ( !( !bindEntity ) && ( bindEntity != $world ) ) {
      bindJoint = sys.getTraceJoint();

      // ... snip ...
I chopped a bit of code off the beginning and the end but the important stuff is all there. Don't worry if you don't understand any of this; I'll be explaining it in detail soon. Before we dig in let's take a look at the sys.trace definition in script/doom_events.script.
// Returns the fraction of movement completed before the box from 'mins' to 'maxs' hits solid geometry
// when moving from 'start' to 'end'. The 'passEntity' is considered non-solid during the move.
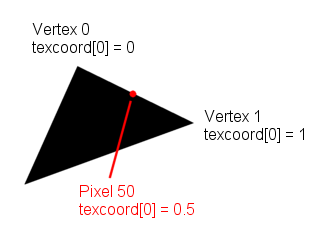
scriptEvent float trace( vector start, vector end, vector mins, vector maxs, float contents_mask, entity passEntity );This function, sys.trace, performs a traceline. The first two arguments define a start vector and an end vector. Doom 3 will travel along an imaginary line joining these two vectors and stop at the first entity it encounters. The third and fourth arguments are for performing a "tracebox" - i.e. you can tell Doom 3 to move an imaginary box down the line and stop when any part of the box hits an entity. The fifth argument tells the game what it should stop the trace for (solid objects, monsters, players, and more). The last argument specifies an entity that Doom 3 should ignore when performing the trace (useful when a trace is started from inside an entity).
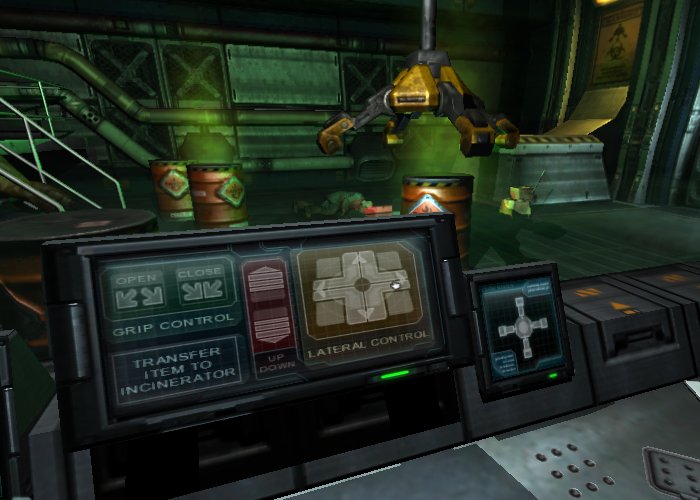
Okay, the crane_cmd_pickup function is executed when the player presses the "CLOSE" button on the crane GUI (see screenshot). The first thing it does is return if the claw is already carrying a barrel (not shown in the code above), then it performs some miscellaneous cosmetic junk (also not shown) and finally the real work begins. The script prepares for the first traceline by defining a start vector (begin) and an end vector (end). Then the magic happens.
begin = $crane_trace_start.getWorldOrigin();
end = $crane_trace_end.getWorldOrigin();

sys.trace( begin, end, '0 0 0', '0 0 0', MASK_SOLID|CONTENTS_RENDERMODEL, $crane_hang );
This traceline is fired from the crane claw to the ground in search of a barrel. Since the third and fourth arguments are '0 0 0' it's a pure traceline and not a tracebox. The last argument excludes the crane itself from the traceline since we don't care about the crane.
bindEntity = sys.getTraceEntity();
if ( !( !bindEntity ) && ( bindEntity != $world ) ) {
      bindJoint = sys.getTraceJoint();
Next the script asks the traceline if it hit an entity by calling the getTraceEntity function. If it hit something and that something wasn't the world (i.e. the floor) it grabs the closest joint and stores it in bindJoint. The rest of the function is pretty mundane and just binds the barrel to the crane so that it moves with the crane. I'll spare you the details.
I hope this example helped you understand how to use tracelines. Now we'll learn how to use tracelines in the SDK and write our very own traceline from scratch.
Tracelines in the SDK
The idClip class provides access to traces in Doom 3. Check out these two sexy functions in game/physics/Clip.h
// special case translations versus the rest of the world
bool TracePoint( trace_t &results, const idVec3 &start, const idVec3 &end,
                 int contentMask, const idEntity *passEntity );
bool TraceBounds( trace_t &results, const idVec3 &start, const idVec3 &end, const idBounds &bounds,
                 int contentMask, const idEntity *passEntity );
TracePoint performs a traceline and TraceBounds performs a tracebox. As an example let's write some code to display the health of the entity we're aiming at on the HUD. Open game/Player.cpp and scroll to the very end of idPlayer :: Think. Add this code.
trace_t trace;
idVec3 start;
idVec3 end;

// start the traceline at our eyes

start = GetEyePosition( );

// end the traceline 768 units ahead in the direction we're viewing

end = start + viewAngles.ToForward( ) * 768.0f;

// perform the traceline and store the results in trace
// stop the trace for monsters and players
// and ignore this (the player) since we started the trace inside the player

gameLocal.clip.TracePoint( trace, start, end, MASK_MONSTERSOLID | MASK_PLAYERSOLID, this );

// trace.fraction is the fraction of the traceline that was travelled
// if trace.fraction is less than one then we hit something

if( ( trace.fraction < 1.0f ) && ( trace.c.entityNum != ENTITYNUM_NONE ) )
{
      idEntity *ent = gameLocal.entities[trace.c.entityNum];

      // you could have also used gameLocal.GetTraceEntity( trace ) here
      // gameLocal.GetTraceEntity returns the entity's master entity if it exists
      // search the SDK for more examples

      idStr strHealth;

      sprintf( strHealth, "Entity Health: %d", ent->health );

      if( hud )
      {
            hud->SetStateString( "message", strHealth.c_str( ) );
            hud->HandleNamedEvent( "Message" );
      }
}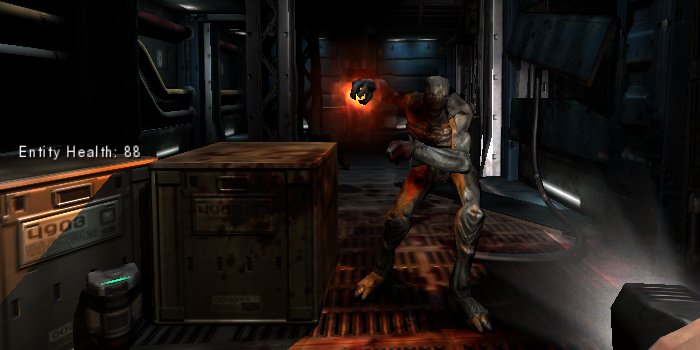
Very cool and very easy. If you don't understand how I'm displaying the entity's health on the HUD, please review Tutorial 1. Finally, if you're feeling adventurous try changing the health message to display in red when the entity is nearly dead.
November 1, 2004
Tutorial 4 for SDK 1.0
Text Messages Part 2
by Trevor Hogan
Debug Visualizations
Before I talk about fonts I'd just like to point out id's excellent debug visualizations. Debug visualizations are rendered in 3D coordinates so they aren't very useful for rendering to your two dimensional screen but they can be useful for displaying debug info inside your mod's levels. Doom 3 already makes good use of debug visualizations so if you want to see an example just open up any original Doom 3 map and type "g_showTargets 1" in the console. Doom 3 will draw a ton of lines and text to the screen showing you exactly how the level works. I can't think of very many examples where you'd want to write your own debug visualizations but the capability is there if you need it. For example, say you coded a System Shock 2 style security camera but you were having trouble with it seeing the player too easily. You could draw the security camera's view frustum using the debug visualizations and adjust it according to what feels right to you. Anyway, open renderer/RenderWorld.h and take a look at the idRenderWorld class.
//-------------- Debug Visualization  -----------------

// Line drawing for debug visualization
virtual void DebugClearLines( ... ) = 0;
virtual void DebugLine( ... ) = 0;
virtual void DebugArrow( ... ) = 0;
virtual void DebugWinding( ... ) = 0;
virtual void DebugCircle( ... ) = 0;
virtual void DebugSphere( ... ) = 0;
virtual void DebugBounds( ... ) = 0;
virtual void DebugBox( ... ) = 0;
virtual void DebugFrustum( ... ) = 0;
virtual void DebugCone( ... ) = 0;
virtual void DebugAxis( ... ) = 0;

// Polygon drawing for debug visualization.
virtual void DebugClearPolygons( ... ) = 0;
virtual void DebugPolygon( ... ) = 0;

// Text drawing for debug visualization.
virtual void DrawText( ... ) = 0;
These functions are intended for debug usage only so you probably don't want to use them in the final version of your mod. As you can see idRenderWorld includes several functions for drawing lines, arrows, circles, boxes, and more (in case you're feeling artistic). The code is fairly straightforward and there are quite a few examples already in the SDK so I'll leave the rest to you.
HUD Messages Revisited
If you read my first tutorial on text messages you may remember that I said it was impossible to print messages to the HUD directly from the SDK. Well, I was wrong. Open renderer/RenderSystem.h and look for this code.
virtual void DrawSmallChar( int x, int y, int ch, const idMaterial *material ) = 0;
virtual void DrawSmallStringExt( int x, int y, const char *string, const idVec4 &setColor, bool forceColor, const idMaterial *material ) = 0;
virtual void DrawBigChar( int x, int y, int ch, const idMaterial *material ) = 0;
virtual void DrawBigStringExt( int x, int y, const char *string, const idVec4 &setColor, bool forceColor, const idMaterial *material ) = 0;
You can use these four functions to print text to the screen directly from the SDK. Let's take a look at DrawBigStringExt. The first two arguments specify the top left corner of the message in virtual 640x480 screen coordinates - this means that (639,479) represents the bottom right corner of the screen no matter what your actual screen resolution is (i.e. the engine will scale your text to the correct position). Remember that screen coordinates are different from regular coordinates; (0,0) is the top left corner of the screen and increasing Y moves down the screen. The third argument is the actual text to display and the fourth argument specifies the default colour (red, green, blue, alpha). The forceColor argument tells Doom 3 if it should respect colour change sequences and the last argument specifies the material (i.e. the font). The only font you can use with these functions is the "textures/bigchars" font unless you make your own font.
To demonstrate how to use these functions I'll print the player's current speed on the screen. Open game/Player.cpp and find the DrawHUD function. Add this code to the end of the function.
idStr strText;

sprintf( strText, "Speed: %f", GetPhysics( )->GetLinearVelocity( ).Length( ) );

// the string will be drawn at (100,200) on the virtual screen
// it will be coloured white and be partially transparent (alpha 0.6)
// colour change sequences will be respected
// and it will use the "textures/bigchars" font

renderSystem->DrawBigStringExt( 100, 200, strText.c_str( ), idVec4( 1, 1, 1, 0.6 ), false, declManager->FindMaterial( "textures/bigchars" ) );
Fonts
There's one final way to print messages to the screen, this time using the game fonts "an", "bank", and "micro". I'd like to say thanks to Brian from id Software for showing me how to use the font structures in the SDK. If you open up renderer/RenderSystem.h you'll see a ton of stuff for working with fonts but strangely enough there aren't any functions. Let's fix that by writing our own text rendering function. Scroll to the bottom of the file and add this code (above the #endif of course).
extern fontInfoEx_t font_an;
extern fontInfoEx_t font_bank;
extern fontInfoEx_t font_micro;

void PrintMessage( int x, int y, const char *szMessage, idVec4 colour, fontInfoEx_t &font );
This tells the compiler that we're going to declare three fontInfoEx_t structures and a PrintMessage function in a .cpp file somewhere. We can do this anywhere so open game/Game_local.cpp since we'll need it later and add this code near the top of the file just above the GetGameAPI function.
fontInfoEx_t font_an;
fontInfoEx_t font_bank;
fontInfoEx_t font_micro;

void PrintMessage( int x, int y, const char *szMessage, idVec4 colour, fontInfoEx_t &font )
{
      renderSystem->SetColor( colour );

      for( const char *p = szMessage; *p; p++ )
      {
            glyphInfo_t &glyph = font.fontInfoSmall.glyphs[*p];

            renderSystem->DrawStretchPic( x, y - glyph.top,
                  glyph.imageWidth, glyph.imageHeight,
                  glyph.s, glyph.t, glyph.s2, glyph.t2,
                  glyph.glyph );

            x += glyph.xSkip;
      }
}
The PrintMessage function works by iterating through each character in the message. It looks up the current character in the glyph table for the font (a glyph is just a character) and draws the character's image to the screen. Then it shifts to the right to make room for the next character and moves on. Note that this function won't respect colour change sequences (it will just print "^x" directly to the screen) but you should be able to rewrite it so it does - give it a shot!
There's one thing left to do - we have to initialize those fontInfoEx_t structures. Scroll down a few pages to idGameLocal :: Init and add this code to the end of the function.
const char *szLang = cvarSystem->GetCVarString( "sys_lang" );

renderSystem->RegisterFont( va( "fonts/%s/%s", szLang, "an" ), font_an );
renderSystem->RegisterFont( va( "fonts/%s/%s", szLang, "bank" ), font_bank );
renderSystem->RegisterFont( va( "fonts/%s/%s", szLang, "micro" ), font_micro );
Now you can print messages to the screen using the builtin fonts. Open game/PlayerView.cpp, find the SingleView function and add this code right after the call to DrawHUD (as shown).
player->DrawHUD( hud );

PrintMessage( 100, 100, "Hey there! This text was drawn with the an font.", idVec4( 1, 1, 1, 1 ), font_an );
PrintMessage( 100, 120, "Hey there! This text was drawn with the bank font.", idVec4( 1, 1, 1, 1 ), font_bank );
PrintMessage( 100, 140, "Hey there! This text was drawn with the micro font.", idVec4( 1, 1, 1, 1 ), font_micro );
November 1, 2004
Tutorial 5 for SDK 1.0
Weapon Scripts Part 1
by Trevor Hogan
iddevnet
Here's some handy information on weapon scripts which you should read first.
Script Objects
Weapons in Doom 3 are almost entirely controlled by weapon scripts so you'll need to understand how the SDK interfaces with scripts before you make any major changes. Weapon scripts have a lot of control over weapon attributes and behaviour so SDK intervention is usually not required but some changes like alternate firing modes do require editing the SDK.
It looks like scripting in the game code is handled by the idProgram object in idGameLocal but you won't usually access this object yourself. Instead, every entity in the game, including weapons, has an associated idScriptObject called scriptObject (see game/Entity.h). Weapon scripts are actually objects (classes) so this makes sense. The scriptObject is your entrypoint to the weapon script - you can access script functions and link variables to the script from here. Note that each player owns a single weapon object which is reused when the player switches weapons. This is unlike other games where each weapon tends to have a seperate object.
Other than the scriptObject weapons also have an idThread object which executes the currently running function in the weapon script. The path of execution is pretty convoluted so I'll summarize it here.
The engine calls idGameLocal :: RunFrame
  which calls idPlayer :: Think
    which calls idPlayer :: UpdateWeapon
      which calls idWeapon :: PresentWeapon
        which calls idWeapon :: UpdateScript
          which calls thread->Execute( )
            which executes the currently running script function
If you're confused you should know that Doom 3 is singly threaded so scripts are not run in parallel beside the game code. Whenever an idThread's Execute function is called it executes until the script exits by terminating or calling "waitFrame" or something else halts the thread. For example, the "weaponState" event calls thread->DoneProcessing( ) in the SDK which halts the thread. I'll explain this in more detail later.
There's a whole lot of stuff going on behind the scenes so I'll cover script variables first then weapon states and finally script events.
Script Variables
Script variables are extremely cool. You can associate an idScriptVariable with a string defining a variable name to be accessed through the script and then the variable can be accessed through both the SDK and the script itself. If you give the variable the same name in both the SDK and the script it's almost like the variable transcends into another dimension. Riiight. Anyway, there are five types of script variables: booleans, floats, ints, vectors, and strings. Take a look at the idWeapon class in game/Weapon.h.
// script control
idScriptBool                  WEAPON_ATTACK;
idScriptBool                  WEAPON_RELOAD;
idScriptBool                  WEAPON_NETRELOAD;
idScriptBool                  WEAPON_NETENDRELOAD;
idScriptBool                  WEAPON_RAISEWEAPON;
idScriptBool                  WEAPON_LOWERWEAPON;
These are script variables. Let's take a look at how they're linked to a script. Open game/Weapon.cpp and find idWeapon :: GetWeaponDef. GetWeaponDef is called whenever the player switches weapons so it's kind of like a weapon constructor. It handles clearing out the previous weapon and loading the new weapon def and everything inside it (models, scripts, sounds, and more).
WEAPON_ATTACK.LinkTo(         scriptObject, "WEAPON_ATTACK" );
WEAPON_RELOAD.LinkTo(         scriptObject, "WEAPON_RELOAD" );
WEAPON_NETRELOAD.LinkTo(      scriptObject, "WEAPON_NETRELOAD" );
WEAPON_NETENDRELOAD.LinkTo(   scriptObject, "WEAPON_NETENDRELOAD" );
WEAPON_RAISEWEAPON.LinkTo(    scriptObject, "WEAPON_RAISEWEAPON" );
WEAPON_LOWERWEAPON.LinkTo(    scriptObject, "WEAPON_LOWERWEAPON" );
These variables have to be relinked every time the player switches weapons because the script object is reloaded (they're unlinked in idWeapon :: Clear in case you're worried). The first argument is the scriptObject to link the variable to and the second argument is the name the variable will be accessible through inside the script. Since these variables have the same name in both the SDK and the script, you can set WEAPON_ATTACK to true in the SDK and it automatically becomes true in the script as well. This is why weapon firing can be confusing; the idWeapon :: BeginAttack function doesn't actually fire the weapon, instead it sets WEAPON_ATTACK to true and lets the script handle the rest. The script detects the change in weapon_pistol :: Idle and changes the weapon's state to "Fire". Note that the pistol still hasn't actually been fired yet but weapon states are pretty confusing so I'll talk about them before continuing.
Weapon States
Every weapon has a state associated with it. Weapon states are actually script functions so a weapon in state "Fire" is currently executing the weapon script's Fire function. The ideal state (this is the state we want to move to) is stored in idWeapon :: idealState and is set through the "weaponState" event (more on events later). Just remember that the idealState variable stores the name of the function to be executed next or nothing if the currently executing function should be resumed.
Back to the weapon firing example, at this point the pistol's state has been changed to "Fire". The game code unloads the old thread and recreates it, this time starting in the weapon_pistol :: Fire function. This is important. When the weapon script calls "weaponState" it's actually terminating the current execution path and starting over again in a different function. So the weapon_pistol :: Fire function is now executed which calls launchProjectiles (an event) to actually fire the weapon. About time, eh?
There's a lot of stuff to remember here so I'll summarize a bit. Thread execution is performed in idWeapon :: UpdateScript. This function executes the current script function, checks to see if "weaponState" was called, and if it was it calls SetState which destroys the old thread and recreates it in the new state (i.e. the newscript function). It does this until the script terminates without calling "weaponState" or until 10 iterations pass, whichever comes first. I don't know what would happen if you allowed your script function to terminate - after all, every script function in script/weapon_pistol.script ends with a call to "weaponState". Let's take a quick look at idWeapon :: SetState in game/Weapon.cpp.
func = scriptObject.GetFunction( statename );
if ( !func ) {
      assert( 0 );
      gameLocal.Error( "Can't find function '%s' in object '%s'", statename, scriptObject.GetTypeName() );
}

thread->CallFunction( this, func, true );
state = statename;
As you can see it searches the scriptObject for the function with the same name as the state. Then it calls thread->CallFunction which tells the thread to switch execution to the new function. It does NOT execute anything at this point, it just makes some changes to the thread's stack and performs some other boring interpreter crap. Can you believe that some people actually spend time studying these things (lexers, parsers, and interpreters)? Just kidding... not! Note that the third parameter is true which means the thread will clear its stack (check the function definition in game/script/Script_Thread.cpp). This removes the thread's history of function calls which makes it as if the thread was starting execution for the first time.
Another thing to remember is that Doom 3 isn't threaded so even though script execution is controlled with an idThread object it's not actually running as a thread.
Script Events
You've seen how variables can be shared between the SDK and the weapon script. You've seen how the SDK can call and execute a script function. Now we'll look at how threads can call functions in the SDK; these are called script events. Open game/Weapon.cpp and take a look at the event definitions near the top of the file.
const idEventDef EV_Weapon_Clear( "<clear>" );
const idEventDef EV_Weapon_GetOwner( "getOwner", NULL, 'e' );
const idEventDef EV_Weapon_Next( "nextWeapon" );
const idEventDef EV_Weapon_State( "weaponState", "sd" );

// ... snip ...

CLASS_DECLARATION( idAnimatedEntity, idWeapon )
      EVENT( EV_Weapon_Clear,                               idWeapon::Event_Clear )
      EVENT( EV_Weapon_GetOwner,                            idWeapon::Event_GetOwner )
      EVENT( EV_Weapon_State,                               idWeapon::Event_WeaponState )
Events are linked to the script through some extremely cryptic macros which I don't understand so I won't pretend to. Rest assured that at some point the script interpreter translates event calls in the script to function calls in the SDK.
The idEventDef constructor takes three arguments. The first is the event name as seen by the script. The second is a string representation of the function arguments. The third is a character representation of the function return value. Take a look at game/gamesys/Event.h for the character codes.
#define D_EVENT_VOID                      ( ( char )0 )
#define D_EVENT_INTEGER                   'd'
#define D_EVENT_FLOAT                     'f'
#define D_EVENT_VECTOR                    'v'
#define D_EVENT_STRING                    's'
#define D_EVENT_ENTITY                    'e'
#define D_EVENT_ENTITY_NULL               'E' // event can handle NULL entity pointers
#define D_EVENT_TRACE                     't'
So the "getOwner" event takes no arguments and returns an entity. The "weaponState" event takes a string and an integer and returns nothing.
The CLASS_DECLARATION and EVENT macros seem to do the actual linking. In this case the EV_Weapon_State event is linked to the idWeapon :: Event_WeaponState function. When a script calls "weaponState" the idWeapon :: Event_WeaponState function is called. Let's take a look (it's in game/Weapon.cpp).
void idWeapon::Event_WeaponState( const char *statename, int blendFrames ) {
      const function_t *func;

      func = scriptObject.GetFunction( statename );
      if ( !func ) {
            assert( 0 );
            gameLocal.Error( "Can't find function '%s' in object '%s'", statename, scriptObject.GetTypeName() );
      }

      idealState = statename;
      animBlendFrames = blendFrames;
      thread->DoneProcessing();
}
As I mentioned a long time ago the "weaponState" event actually terminates thread execution. You can see this here with the call to thread->DoneProcessing( ). The only other thing this function does is set idealState to a new state - it doesn't even switch execution to the new state. This is because thread execution is handled elsewhere, so let's tie this all together.
Scripts are executed by the UpdateScript function. If a script calls "weaponState" then the game sets idealState to the desired function name and terminates execution. Now the UpdateScript function loops and discovers that idealState is not empty so it calls SetState which restarts the thread at the beginning of the new function (the SetState function also clears idealState). It executes the new thread and if the script once again calls "weaponState" the process will repeat itself. Otherwise the thread will terminate normally (say by calling "waitFrame") and idealState will be clear so UpdateScript will return.
There are a few more subtleties with weapons but this tutorial has gone on long enough. At this point you should have a general idea of how weapons work even though I haven't talked about specific examples yet.
November 4, 2004
Tutorial 6 for SDK 1.0
Shaders Part 1
by Trevor Hogan
What are Shaders?
Let me start with a quick disclaimer - I'm pretty new to vertex and pixel shaders myself so I'm learning this stuff as I go. If I make any errors I'll try to fix them as soon as possible but I make no guarantees.
So you've heard that Doom 3 uses this cool new technology called vertex and pixel shaders but you're not sure what they are or how to use them. Don't worry, I'll start with the basics and explain everything as I go. It's probably easiest to explain what a shader is by looking at an example. In Doom 3 shaders are used to create the heat haze effect you see near fires, explosions, and steam pipes. The same shader also powers the refraction effect you see when you look through glass windows. In a slightly more mundane example Doom 3 also has a main shader which generates all the cool global effects like normal and specular mapping.
There are two types of shaders, vertex shaders and pixel shaders. Vertex shaders are also known as vertex programs and pixel shaders are also called fragment programs. In most cases you'll write shaders in pairs - only rarely does a shader stand by itself (although we'll be doing just that today). In a nutshell, shaders are tiny programs written in an assembly like language that run on your video card and process individual vertices (vertex shaders) or pixels (pixel shaders). Shaders are a fairly new innovation - just a few years ago all vertex and pixel data on the video card moved through the "fixed function pipeline" whether you wanted it to or not. The fixed function pipeline runs the same way all the time so most games that use the fixed function pipeline tend to have a very similar look (e.g. old Quake engines and old Unreal engines). Now you can replace the fixed function pipeline with your own shaders and exert greater control over the rendering process!
A word of warning before we begin. Many advanced shaders are extremely mathematical in nature so you'll need to know your linear algebra if you're going to write something like a cel shader. I'll try to explain what I'm doing as I go but I'll be assuming you know how to work with vectors and matrices, the dot product, the cross product, and all that junk. Let's begin!
Shaders in Doom 3
Doom 3 shaders are stored in ".vp" and ".vfp" files in the glprogs directory in pak000.pk4. VP files store vertex programs and VFP files store (surprise) vertex and fragment programs. VFP files generally store a pair of shaders which are designed to work together. Doom 3 shaders are written according to the ARB (that's the OpenGL Architectural Review Board) specifications. These specs are extremely technical in nature and are very hard to read but you should know where to find them, so here's some links.
Let's take a quick look at one of the Doom 3 shaders, interaction.vfp. This is the main shader I mentioned earlier. Here's an excerpt.
# perform a dependent table read for the specular falloff
TEX   R1, specular, texture[6], 2D;

# modulate by the constant specular factor
MUL   R1, R1, program.env[1];

# modulate by the specular map * 2
TEX   R2, fragment.texcoord[5], texture[5], 2D;
ADD   R2, R2, R2;
MAD   color, R1, R2, color;
This code is from the end of the file and is actually part of the pixel shader, not the vertex shader. Without actually analyzing the code we can still make a few observations. First, comments seem to start with a pound sign, #, and cover the rest of the line. Second, each line starts with a short three or four letter character sequence all in capitals and is followed by some more text seperated by commas. Finally, each line ends in a semicolon (you WILL forget this at least once).
Since shaders are actually computer programs it should come as no surprise that they take a set of inputs and produce a set of outputs. For a vertex shader the input is a vertex and the outputs can be just about anything (this will be covered in another tutorial). The entire vertex shader is run once per frame on every single vertex to be rendered. It has no notion of triangles or objects; all it knows about is a single vertex. Let's do some quick calculations - if Doom 3 is rendering 30000 vertices at 30 frames per second then your vertex shader will run 900 thousand times per second! Wow! Okay, for a pixel shader the input is a single pixel and the output is a colour value. The entire pixel shader is run once per frame on every single pixel to be rendered. This is important! Pixel shaders do not run once for every pixel on the screen, they run once for every pixel to be rendered! A single screen pixel can be influenced by more than one pixel shader (imagine a player standing behind a glass window) or none at all. Now let's redo those vertex shader calculations - say Doom 3 is running at 800x600 at 30 frames per second and your pixel shader is influencing every single pixel (a big assumption). In this case it will run at least 14.4 million times per second! This should indicate how important it is to write fast shaders without wasting cycles. If you're confused about my calculations, note that even though I used 800x600 as a lower bound pixel shaders do not run on the final screen pixels so the screen resolution may actually have nothing to do with it. Got that?
Whew. Let's take a look at "post process pixel shaders", the easiest type of shader to write.
Post Process Pixel Shaders
I'm going to skip vertex shaders for now and talk about pixel shaders; specifically, post process pixel shaders. A post process pixel shader runs after everything else has been rendered and modifies the already rendered pixels on the screen. In Doom 3, a pixel shader that specifies _currentRender as a fragment map is designated as a post process shader and, unfortunately, will be rendered translucently even if you don't want it to be. However, with a few tweaks to the SDK you can get around this limitation by rendering the model twice. I'll go over how to do this in another tutorial.
Hold on a second! All of a sudden I'm talking about fragment maps and something called _currentRender? Sorry, I was getting ahead of myself. Remember when I said that shaders take a specific set of inputs? Well, pixel shaders generally take textures called fragment maps as inputs. These textures can contain anything you want and don't actually have to be graphical textures in the traditional sense (although this is usually the case). For example, you could pregenerate a texture representing a nontrivial function, say sin(x). The (x,y)th pixel of this texture could contain sin(x) in the red component (probably scaled by 255). In Doom 3, pixel shader inputs are specified in a material file and _currentRender just happens to represent the current render, i.e. the pixels already on the screen.
I know I've done a lot of talking so far but now we need to go over some pixel shader commands before we can write one.
Simple Pixel Shader Commands
As I said before shaders are written in an assembly like language. This means that each line represents one instruction and the first token in the line (i.e. the first word) is the name of the instruction. The other tokens specify a list of parameters seperated by commas. Here's a list of simple pixel shader commands from the ARB specification. Vertex shaders use a different set of commands although there is some overlap.
3.11.5.18  MOV:  Move

The MOV instruction copies the value of the operand to yield a
result vector.

MOV  a, b;

copies the value of b onto a.
3.11.5.2 ADD: Add
The ADD instruction performs a component-wise add of the two
operands to yield a result vector.
ADD a, b, c;
adds b and c together (component-wise) and stores the result in a.3.11.5.19 MUL: Multiply
The MUL instruction performs a component-wise multiply of the two
operands to yield a result vector.
MUL a, b, c;
multiplies b and c together (component-wise) and stores the result in a.3.11.5.15 MAD: Multiply and Add
The MAD instruction performs a component-wise multiply of the first two
operands, and then does a component-wise add of the product to the
third operand to yield a result vector.
MAD a, b, c, d;
multiplies b and c together then adds d (component-wise) and stores the result in a.3.11.6.1 TEX: Map coordinate to color
The TEX instruction takes the first three components of
its source vector, and maps them to s, t, and r. These coordinates
are used to sample from the specified texture target on the
specified texture image unit in a manner consistent with its
parameters. The resulting sample is mapped to RGBA as described in
table 3.21 and written to the result vector.
TEX a, b, c, TARGET;
samples texture c at texture coordinates b using texture target
TARGET and stores the result in a.That was a very short list but it's all we'll need for today. Many more commands are listed in the ARB spec in case you're interested. Note that in all the instructions the destination variable (result) is the first parameter and the other variables (operands) follow after. You might be wondering why there's a Multiply and Add command since both MUL and ADD already exist; so what's the point? It turns out that shader instructions take exactly one cycle to execute so the MAD command performs both operations for the price of one! Shader speed is directly related to the number of instructions in the shader so replacing a multiply and an add with a MAD can save you a lot of processing time.
Shaders operate exclusively on vectors so every command expects vector inputs and outputs. Every variable in a shader is a four component vector and these vectors can represent coordinates (x, y, z, w) or colours (r, g, b, a). Shaders can also define constants and temporary variables to be used during execution. Finally, shaders access inputs and outputs in a particular format. Let's go over pixel shader inputs and outputs now.
======
INPUTS
======

program.env[0..n]:
  - program environment variables
  - specified by the engine so you cannot change these
  - same for every pixel shader in the game

program.env[0] (specific to Doom 3):
  - the 1.0 to _currentRender conversion
  - multiply a value from 0.0 to 1.0 by this to get the real screen coordinate

program.env[1] (specific to Doom 3):
  - the fragment.position to 0.0 - 1.0 conversion
  - multiply fragment.position by this to get a value from 0.0 to 1.0

fragment.position:
  - the pixel's coordinate (not necessarily screen coordinate)

fragment.texcoord[0..n]:
  - texture coordinates
  - generally set by the vertex shader and read by the pixel shader
  - used with the TEX command
  - advanced vertex shaders may store unrelated data in fragment.texcoord

fragment.texture[0..n]:
  - textures
  - specified with the fragmentMap command in the material file
  - used with the TEX command

=======
OUTPUTS
=======

result.color:
  - the pixel's colour
Alright, there's only one more thing to learn: swizzling and write masking. Swizzling allows you to duplicate, mix, and match vector components in your operands. Let's take a look at an example.
# this multiplies each component of b by the first component of c

MUL  a, b, c.x;

# or

MUL  a, b, c.xxxx;

# this multiplies the first two components of b by the first component of c
# and the last two components of b by the second component of c

MUL  a, b, c.xxyy;

# this performs a normal multiplication

MUL  a, b, c.xyzw;
Swizzling is very powerful and can save you an instruction or two if you're smart about it. You can also prevent an instruction from writing to one or more of the result vector's components by masking. Here's another example.
# this copies the first component of b onto a

MOV  a.x, b;

# this copies the first and third component of b onto a

MOV  a.xz, b;

# here's a combination swizzle and mask
# this copies the first component of b onto the second component of a

MOV  a.y, b.x;
In both examples you could have interchanged x, y, z, and w with r, g, b, and a.
A Colour Stripper Shader
Finally, a real example! Let's write a post process pixel shader to strip the green and blue components from the screen leaving only the red component. First we need to create a material so add this code to one of your material files.
textures/postprocess/redshader
{
      {
            vertexProgram     redshader.vfp
            fragmentProgram   redshader.vfp
            fragmentMap       0                 _currentRender
      }
}
This specifies a new material with a single stage which uses the vertex shader in redshader.vfp and the pixel shader also in redshader.vfp. The pixel shader will take one texture as a parameter and that texture is the current screen render. Note that by using _currentRender this material is marked as translucent (as if the "translucent" key was present) and that this stage will be rendered last. In this case there is only one stage so it doesn't matter but it would make a difference in materials with multiple stages. Okay, now create a new text file named redshader.vfp in the glprogs directory. Then read this code over, understand it, and paste it inside the file.
#################
# vertex shader #
#################

# the first line specifies the beginning of the vertex shader
# it also specifies the vertex shader version
# we're writing a version 1.0 ARB vertex program
# the OPTION line specifies vertex shader options
# in this case ARB_position_invariant means the fixed function pipeline will handle vertex transformations

!!ARBvp1.0
OPTION ARB_position_invariant;

# this vertex shader does nothing

END

################
# pixel shader #
################

# the first line specifies the beginning of the pixel shader
# it also specifies the pixel shader version
# we're writing a version 1.0 ARB fragment program
# the OPTION line specifies pixel shader options
# in this case ARB_precision_hint_fastest means that we don't require high precision math

!!ARBfp1.0
OPTION ARB_precision_hint_fastest;

# temporary variables
# these are four component vectors

TEMP temp1;
TEMP temp2;

# first we need to convert the fragment's position to the real screen coordinate
# remember from the pixel shader inputs that Doom 3 uses program.env[0] and [1] to do this
# so we multiply fragment.position by program.env[1] and store the result in temp1

MUL  temp1, fragment.position, program.env[1];

# temp1 now stores the pixel's position as a fraction from 0.0 to 1.0
# now we multiply temp1 by program.env[0] to get the real screen coordinate

MUL  temp1, temp1, program.env[0];

# temp1 now stores the pixel's real screen coordinate
# now we need to sample the "texture" for the colour value at the pixel's position
# in this case texture[0] is actually the screen!
# 2D means we're sampling in two dimensional coordinates

TEX  temp2, temp1, texture[0], 2D;

# temp2 now stores the colour value of the current pixel on the screen
# all we have to do is strip the green and blue values
# we can do this with masking
# first we zero the result.color vector since it's undefined right now

MOV  result.color, 0;

# now we copy the current pixel's red component onto the result.color vector

MOV  result.color.x, temp2;

# done!

END
Now you can apply this material to an object in the game and it will strip the screen of green and blue values wherever it's rendered. I applied this material to the player by adding "shader" "textures/postprocess/redshader" to player_doommarine in def/player.def. Take a look!
A Greyscale Shader
Let's make a small change to the colour stripper shader to get a greyscale shader. Converting to greyscale is easy - just take the average of the red, green, and blue values for the pixel. Remove the last two MOV statements in the above shader and replace them with this code.
# we'll accumulate the sum in temp2.x for efficiency
# add the red and green values and store the result in temp2.x

ADD  temp2.x, temp2.x, temp2.y;

# add the blue value to our accumulated sum and store the result in temp2.x

ADD  temp2.x, temp2.x, temp2.z;

# divide by three since we're averaging three values

MUL  temp2, temp2.x, 0.3333333333;

# copy the final colour to result.color

MOV  result.color, temp2;
Can you spot the inefficiency in the above shader? I could have saved an instruction but I didn't. See if you can figure it out.
Well, that's it for today. In the next tutorial I'll go over how to render a post process pixel shader on an opaque object by forcing the engine to render it twice. Hope you enjoyed this tutorial as much as I enjoyed writing it!
November 5, 2004
Tutorial 7 for SDK 1.0
Shaders Part 2
by Trevor Hogan
Shader Parameters
I've already demonstrated how to pass fragment maps to fragment programs with a material file. You might ask if there's a way to pass other types of parameters such as vectors to a shader. Well, you can't pass a vector directly to a fragment program but you can pass it to a vertex program which then passes it on to the fragment program. How does this work? Vertex shaders and pixel shaders both have access to the texcoord[0..n] variables so the vertex shader can dump anything it wants in there for the pixel shader to read (it doesn't even have to be texture coordinates). Hmmm, wait a second... vertex shaders deal with vertices and pixel shaders deal with pixels right? How does the texcoord variable for a vertex tun into the texcoord variable for a pixel? The answer is linear interpolation.
This works out perfectly for us because we'll be dumping the same value on every vertex. This means that the linear interpolation scheme will just be copying the parameter to each pixel unchanged. Got it?
Let's rewrite the greyscale shader from before to shade to a target hue; this makes it much more interesting and dynamic. Shader parameters are specified in the material file and appear in the shader's program.local[0..n] variables. In this case we'll pass a fraction parameter and a target hue to the shader. Here's an example material.
textures/postprocess/colourer
{
      {
            vertexProgram     colourer.vfp
            vertexParm        0                 sinTable[time * 0.1]    // fraction parameter
            vertexParm        1                 0.1, 1.0, 0.9           // target hue
            fragmentProgram   colourer.vfp
            fragmentMap       0                 _currentRender
      }
}
The vertexParm command takes two parameters. The first is the parameter number (e.g. vertexParm 0 will be placed in program.local[0]) and the second is a vector. Our shader will expect a fraction value in parameter 0 and a target hue in parameter 1. Note that you can use the standard material math operations here such as table lookups (e.g. sinTable) and the time keyword.
Okay, before we write the shader we'll need to learn a new pixel shader instruction, LRP.
3.11.5.14  LRP: Linear Interpolation

The LRP instruction performs a component-wise linear interpolation
between the second and third operands using the first operand as the
blend factor.

LRP  a, b, c, d;

linearly interpolates between c and d using b as the blend factor and stores the result in a.
Let's take a look at the shader itself. After you read it over, add this code to a new text file called glprogs/colourer.vfp. Oh, and you should know that the MOV instruction is the same for vertex shaders and pixel shaders (we've only talked about pixel shader MOV's so far).
#################
# vertex shader #
#################

!!ARBvp1.0
OPTION ARB_position_invariant;

# pass the first parameter to the pixel shader (the fraction parameter)
# we'll place it in texcoord[0]

MOV  result.texcoord[0], program.local[0];

# pass the second parameter to the pixel shader (the target hue)
# we'll place it in texcoord[1]

MOV  result.texcoord[1], program.local[1];

# nothing else to do

END

################
# pixel shader #
################

!!ARBfp1.0
OPTION ARB_precision_hint_fastest;

TEMP temp1;
TEMP temp2;

# this code was copied from the greyscale shader
# please see tutorial 6 if you don't understand how it works

MUL  temp1, fragment.position, program.env[1];
MUL  temp1, temp1, program.env[0];
TEX  temp2, temp1, texture[0], 2D;

# now temp2 stores the original pixel colour
# we're going to linearly interpolate between the original pixel colour and the target pixel colour
# calculate the target pixel colour by greyscaling and multiplying by the target hue
# note - we reuse temp1 for efficiency

ADD  temp1.x, temp2.x, temp2.y;
ADD  temp1.x, temp1.x, temp2.z;
MUL  temp1, temp1.x, 0.3333333333;

# now temp1 stores the greyscaled pixel colour
# multiply by the target hue to get the target pixel colour
# remember, texcoord[1] is the target hue passed by the vertex shader

MUL  temp1, temp1, fragment.texcoord[1];

# now temp1 stores the target pixel colour
# linearly interpolate using the fraction parameter (texcoord[0])
# note - linear interpolation is often abbreviated as "lerp"

LRP  result.color, fragment.texcoord[0], temp1, temp2;

# done!

END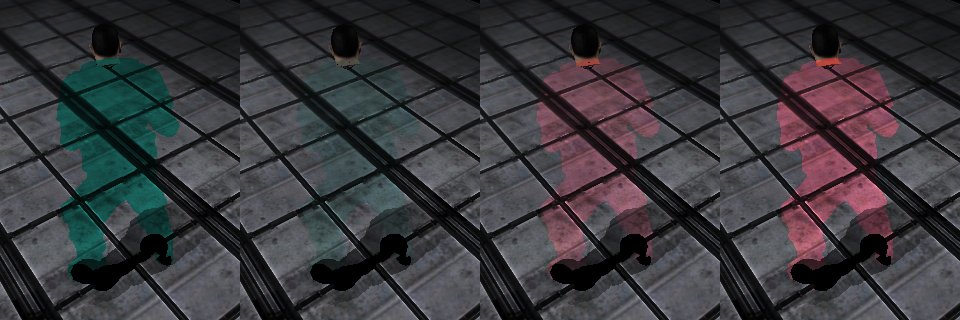
You may have noticed that the glprogs/colorProcess.vfp shader does the exact same thing our shader does. Congratulations, you've written a real shader! There is one small difference however, their shader performs the linear interpolation manually instead of using the LRP instruction. See if you can figure out how it works.
If you're getting annoyed with having to apply a new material to the player (or whatever) every time you make a new shader, there's an easier method but it only works with post process pixel shaders. Just open your console and type "g_testPostProcess <material>" where <material> is the name of your material (e.g. textures/postprocess/colourer). Doom 3 will run your pixel shader on the entire screen.
Rendering Twice
Alright, now let's say you want to run a post process pixel shader on an opaque object. You might try adding one of the above shaders as a new stage to an existing material but the engine will render the object translucently because your shader references _currentRender. The solution is to render the object twice, once as normal and once with your post process pixel shader. Of course this is somewhat inefficient but if you're only running it on a few objects at once it won't make a big difference.
You'll have to make several changes to the SDK to render an entity twice. Triangle rendering is handled by the idRenderWorld class in renderer/RenderWorld.h. All you need to do is create a new renderEntity_t and pass it to the Render World (and update it every time it changes). Since we're not actually creating a new object we can reuse the entity's original renderEntity_t and just override the material. Alright, I've decided to implement this as a new decl parameter called "shader_post" so we'll be working with idEntity. Also, thanks to Brian from id for helping me figure this out.
First open game/Entity.h and look for the protected member variables. Add the two new variables shown below (modelDefHandlePost and shaderPost).
protected:
      renderEntity_t                renderEntity;
      int                           modelDefHandle;
      int                           modelDefHandlePost;     // new
      idMaterial                    *shaderPost;            // new
      refSound_t                    refSound;
Initialize the copied model in the idEntity constructor (the rest of the code goes in game/Entity.cpp).
memset( &renderEntity, 0, sizeof( renderEntity ) );
modelDefHandle = -1;
modelDefHandlePost = -1;                                    // new
shaderPost = NULL;                                          // new
memset( &refSound, 0, sizeof( refSound ) );
Save the copied model in idEntity :: Save and load it in idEntity :: Restore.
savefile->WriteRenderEntity( renderEntity );
savefile->WriteInt( modelDefHandle );
savefile->WriteInt( modelDefHandlePost );                   // new
savefile->WriteMaterial( shaderPost );                      // new
savefile->WriteRefSound( refSound );
savefile->ReadRenderEntity( renderEntity );
savefile->ReadInt( modelDefHandle );
savefile->ReadInt( modelDefHandlePost ); // new
savefile->ReadMaterial( shaderPost ); // new
savefile->ReadRefSound( refSound );Add the copied model to the Render World in idEntity :: Restore (add to the end of the function).
if( shaderPost )
{
      renderEntity_t post = renderEntity;
      post.customShader = shaderPost;

      if( modelDefHandlePost != -1 )
            modelDefHandlePost = gameRenderWorld->AddEntityDef( &post );
}
Free the copied model in idEntity :: FreeModelDef (add to the end of the function).
if( modelDefHandlePost != -1 )
{
      gameRenderWorld->FreeEntityDef( modelDefHandlePost );
      modelDefHandlePost = -1;
}
Update the copied model in idEntity :: Present (add to the end of the function).
if( shaderPost )
{
      renderEntity_t post = renderEntity;
      post.customShader = shaderPost;

      if( modelDefHandlePost == -1 )
            modelDefHandlePost = gameRenderWorld->AddEntityDef( &post );
      else
            gameRenderWorld->UpdateEntityDef( modelDefHandlePost, &post );
}
And finally load the "shader_post" key from the decl file in idEntity :: Spawn (add this code just after the call to ParseSpawnArgsToRenderEntity).
temp = spawnArgs.GetString( "shader_post" );
if( temp[0] != '\0' )
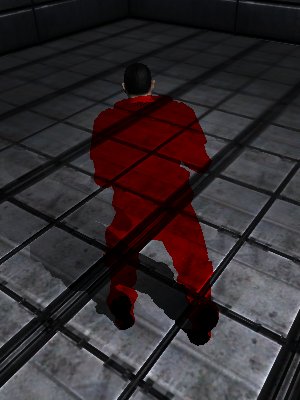
shaderPost = (idMaterial *)declManager->FindMaterial( temp );Now you can add "shader_post" "<material>" to any entity and the engine will render it twice, once as normal and once with the specified material. If the "shader_post" key is not present it will render the entity just once as normal so we're not being wasteful. As an example, I added "shader_post" "textures/postprocess/greyscale" (the greyscale material from before) to player_doommarine and found some imps. In this screenshot an imp's fireball has just exploded to the right and is casting an orange light on everything. Note how the player's face is coloured by the light but the player's body is completely greyscaled. The light is still affecting the player's body because it's brighter than normal, it's just black and white! Awesome!
Tutorial 8 for SDK 1.1
Collisions
by Trevor Hogan
idBounds
id provides an excellent axis aligned bounding box class called idBounds found in idLib (idLib/bv/Bounds.h). idBounds can be used to test for intersections against points, bounds, lines, and more. It works well if you need an axis aligned bounding box but what if you want to test for intersections between more complicated geometry?
Well, as you might expect some intersections are easier (cheaper) to calculate than others. It's computationally fast to check for collisions between an axis aligned bounding box and a point so it's usually a good idea to "cull" the set of entities against an idBounds before checking for more precise collisions. For example, say you wanted to find all the entities within 128 units of the player. First you should define an idBounds centered on the player and completely containing a sphere of radius 128. Then you can check for intersections against a specific subset of entities (this can be done without testing every entity and is very fast). If an entity intersects with your idBounds then you know it's close enough to the player to warrant additional computation. You still don't know if it's actually within 128 units but you know that it might be.
This is how idGameLocal :: RadiusDamage works so let's go over it as an example.
RadiusDamage
Open game/Game_local.cpp and find the RadiusDamage function. This function applies damage according to the passed damageDef to all entities near the passed origin.
if ( radius < 1 ) {
      radius = 1;
}

bounds = idBounds( origin ).Expand( radius );

// get all entities touching the bounds
numListedEntities = clip.EntitiesTouchingBounds( bounds, -1, entityList, MAX_GENTITIES );
After retrieving some miscellaneous damageDef variables the function creates an idBounds centered on the passed origin. It also calls the idBounds :: Expand function which expands the idBounds' dimensions to (-radius,-radius,-radius) and (radius,radius,radius). At this point the function calls the EntitiesTouchingBounds function provided by idClip. EntitiesTouchingBounds fills the entityList array with the appropriate entities and returns the total number found; note that this function is extremely efficient and should be used to cull entities in almost every entity search.
The rest of the function is pretty boring but there is one piece missing - the spherical collision check.
dist = v.Length();
if ( dist >= radius ) {
      continue;
}
During the main loop any entity further than radius units away from the origin will be skipped. That's all there is to a spherical collision check.
idClip
idClip is found in game/physics/Clip.h and provides access to the main collision functions. Collisions are checked in the physics code and are usually determined with tracelines rather than with entity searches. As an example let's take a look at how bullet collisions are determined; interestingly enough all projectiles are handled the same way whether they're bullets or plasma balls or rockets! This means that bullets follow the same physical rules (such as gravity although most projectiles are created with zero gravity) as everything else. Other games such as Half-Life perform completely straight tracelines to handle bullet collisions which are fast and cheap but rather inaccurate over long distances since bullets don't go completely straight in real life. These types of weapons are often called "hitscan" weapons. Anyway, open game/Weapon.cpp and find the Event_LaunchProjectiles function.
proj = static_cast(ent);
proj->Create( owner, muzzleOrigin, dir );

projBounds = proj->GetPhysics()->GetBounds().Rotate( proj->GetPhysics()->GetAxis() );

// ... snip ...

proj->Launch( muzzle_pos, dir, pushVelocity, fuseOffset, launchPower, dmgPower );
This function is only ever called by a weapon script and does quite a lot of stuff; most of it we don't care about. We're interested in the above code where the projectiles are created and launched. Notice how several projectiles can be created at once when a weapon is fired even if they're fast moving bullets (e.g. the shotgun). This is much slower than performing a few quick tracelines but it's more accurate. Alright, projectiles are handled in the idProjectile class so crack open game/Projectile.h. Since we're concentrating on collisions and physics right now, notice that idProjectile uses rigid body physics.
idPhysics_RigidBody physicsObj;
We're jumping all over the place today but it's pretty hard to pin down where projectile collisions are calculated. Open game/physics/Physics_RigidBody.cpp and look for the Evaluate function. How does this function fit into the big picture? Well, idProjectile :: Think is called every frame which calls idEntity :: RunPhysics which calls Evaluate. Notice that the comments above the function mention collisions so we're probably on the right track. This next bit of code appears in the Evaluate function.
// check for collisions from the current to the next state
collided = CheckForCollisions( timeStep, next, collision );
Aha! Let's investigate the CheckForCollisions function.
// if there was a collision
if ( gameLocal.clip.Motion( collision, current.i.position, next.i.position, rotation, clipModel, current.i.orientation, clipMask, self ) ) {
      // set the next state to the state at the moment of impact
      next.i.position = collision.endpos;
      next.i.orientation = collision.endAxis;
      next.i.linearMomentum = current.i.linearMomentum;
      next.i.angularMomentum = current.i.angularMomentum;
      collided = true;
}
The idClip :: Motion function performs translations and rotations using the idCollisionModelManager class provided by the engine. We don't have access to the source code for this class but these functions are supposed to perform semi perfect collision detection (i.e. more precise than simple hitbox collisions). If a collision is detected the CollisionImpulse function alerts idProjectile by calling idProjectile :: Collide which applies damage and all that wonderful stuff.
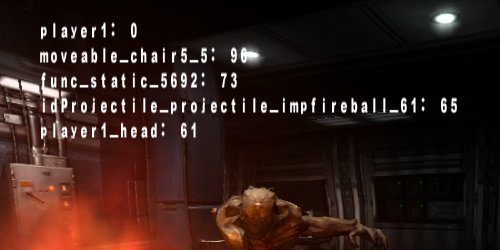
Alright, let's write some code to display a list of nearby entities on the player's HUD. Open game/Player.cpp and find the DrawHUD function. Add this code to the very end.
// perform the idBounds culling first

idBounds bounds = idBounds( GetPhysics( )->GetOrigin( ) ).Expand( 100.0f );
idEntity *entityList[MAX_GENTITIES];
int numListedEntities = gameLocal.clip.EntitiesTouchingBounds( bounds, -1, entityList, MAX_GENTITIES );

// loop through entities

int x = 40;
int y = 40;

for( int e = 0; e < numListedEntities; e++ )
{
      idEntity *ent = entityList[e];

      // find simple distance between the player's origin and the entity's origin
      // a better solution is found in idGameLocal :: RadiusDamage

      idVec3 diff = ent->GetPhysics( )->GetOrigin( ) - GetPhysics( )->GetOrigin( );
      float dist = diff.Length( );

      if( dist > 100.0f )
            continue;

      idStr strTemp;
      sprintf( strTemp, "%s: %d", ent->GetName( ), (int)dist );

      renderSystem->DrawSmallStringExt( x, y, strTemp.c_str( ), idVec4( 1, 1, 1, 1 ), false, declManager->FindMaterial( "textures/bigchars" ) );

      y += 20;
}
The DrawSmallStringExt function works similar to DrawBigStringExt which is explained in Tutorial 4.
You could easily apply this entity search technique to implement an Unreal Tournament domination style game mode or to implement a Front Line Force style morale system (where players in groups get bonuses). Doom 3 uses it for RadiusDamage and for the BFG ball to mention just a few examples.
Tutorial 9 for SDK 1.1
BFG Fun
by Trevor Hogan
Let's Have Some Fun
We've spent a lot of time talking about some pretty dry topics such as tracelines and bounds checking; however, all that stuff is useful. Let's take a break and apply some of the techniques we've learned by messing around with the BFG ball. In this tutorial we'll modify the BFG ball to explode into a dozen plasma balls which ricochet around the room causing mass havoc. Let's start with spawning the plasma balls - we'll deal with the ricochets later.
Spawning Entities
Spawning entities is easy. Just call gameLocal.SpawnEntityDef and setup any initial values on your newly created entity. Projectiles are a little more complicated and provide Create and Launch methods for automating the initial setup. Unfortunately we want to make some fairly drastic changes to the BFG ball and the plasma ball so we'll need to override the idProjectile class with our own classes.
Luckily for us the BFG ball is different enough from a regular projectile that it already has an entirely seperate class to itself (idBFGProjectile in game/Projectile.cpp). Since we want to spawn the plasma balls when the BFG ball explodes, let's take a look at idBFGProjectile :: Explode in game/Projectile.cpp. Add this code to the end of the function but before the return statement.
// get the projectile decl for the plasma ball

const idDeclEntityDef *plasmaDef = gameLocal.FindEntityDef( "projectile_plasmablast", false );

// don't try to create entities on a client, only on the server

if( !gameLocal.isClient && plasmaDef )
{
      // spawn a dozen plasma balls

      idEntity *ent;

      for( int j = 0; j < 12; j++ )
      {
            // this function spawns the entity according to the passed decl dictionary
            // the entity is created in memory but still needs some initial setup

            gameLocal.SpawnEntityDef( plasmaDef->dict, &ent, false );

            // this code assumes the "projectile_plasmablast" decl is actually an idProjectile
            // it would be a good idea to verify this in a production mod
            // e.g. if the decl is modified to spawn a different entity this code will crash

            idProjectile *proj = static_cast<idProjectile *>( ent );

            // calculate a random direction for the plasma ball
            // and use spherical polar coordinates (this math is covered in basic Calculus)

            idVec3 dir;

            float phi = (float)DEG2RAD( 360.0f ) * gameLocal.random.RandomFloat( );
            float theta = (float)DEG2RAD( 180.0f ) * gameLocal.random.RandomFloat( );

            dir.x = idMath :: Sin( theta ) * idMath :: Sin( phi );
            dir.y = idMath :: Sin( theta ) * idMath :: Cos( phi );
            dir.z = idMath :: Cos( theta );

            // the owner is the player
            // the plasma ball starts at the BFG ball's origin
            // the plasma ball is going in a random direction

            proj->Create( player, GetPhysics( )->GetOrigin( ), dir );

            // launch the plasma ball

            proj->Launch( GetPhysics( )->GetOrigin( ), dir, vec3_zero, 0.0f, 1.0f, 1.0f );

            // and don't forget to make it ricochet

            proj->iTotalRicochets = 4;
      }
}
First we grab the plasma ball decl from the engine and then we spawn twelve plasma balls and choose a random direction for each. If you don't understand the math involved in choosing a direction then don't worry too much - you could probably get away with randomizing the x, y, and z components individually. Just make sure to normalize the vector afterwards. Next we call Create and Launch and finally we tell the entity to ricochet a few times. Note that this won't compile right now because iTotalRicochets hasn't been defined yet (we'll add it later). If you want to compile the mod now just comment out the iTotalRicochets line.
At this point you should fire up the mod and shoot off some BFG balls. Although the plasma balls don't ricochet yet it's still looking pretty cool!
Ricochets
Alright, this is where it starts getting complicated. The math behind ricochets is easy in theory but hard in practice. You should be comfortable with linear algebra concepts such as vectors, normalization, projection, and the dot product before continuing.
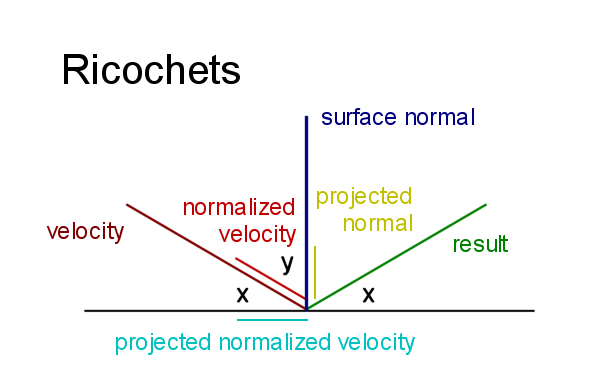
The idea behind a ricochet is that the impact angle (x in the above diagram) is completely reflected; well, this is only true in a perfect ricochet but that's what we're modeling today. Convenient. What we need to do is reflect the projectile's velocity (coloured dark red) across the surface normal (coloured dark blue). So, to do this we'll have to project the velocity onto the surface and then project it onto the surface normal. Then we can negate the projected normal (coloured yellow) and add the two together. Let's do it step by step.
- Calculate the projectile's speed (the magnitude of the velocity) and store it for later.
- Normalize the projectile's velocity since we need to calculate the angle between the velocity and the surface normal (y in the above diagram) for use when projecting onto the surface normal. By normalizing the velocity now we can use the dot product which simplifies to the cosine of the angle because both vectors are normalized.
- Calculate the dot product between the negative normalized velocity (coloured light red) and the surface normal. We have to negate the normalized velocity here because we want an angle from zero to 90 degrees (i.e. a positive cosine and thus a positive dot product).
- Project the projectile's normalized velocity onto the surface.
- Set the result vector to the sum of the projected normalized velocity (coloured teal) and the projected normal (coloured yellow). This vector is normalized since we created the projected vectors from a normalized vector.
- Multiply the result vector by the projectile's speed calculated in the first step.
Whew. That's pretty complicated but I don't know how to explain it any better. Essentially we're just decomposing the projectile's velocity into components based on the wall's surface normal. Then we can negate the component in the direction of the surface normal and reconstruct the final velocity.
Enough math. Let's write some code. I didn't want to write an entirely new projectile class just for this example so we're going to modify idProjectile instead. If you weren't careful this would make every projectile in the game ricochet but we'll set a default of zero ricochets so everything else will behave as usual. Open game/Projectile.h and add these two new member variables to idProjectile.
 projectileState_t state;

public:
      int iTotalRicochets;          // new
      int iCurrentRicochet;         // new
Making these variables public is considered bad programming practice but I don't want to clutter up this tutorial with accessor code. We'll store the total number of ricochets that this entity should perform in iTotalRicochets (default zero) and the current ricochet count in iCurrentRicochet. Let's initialize these variables so open game/Projectile.cpp and find the idProjectile constructor. Add this code to the end of the function.
iTotalRicochets = 0;
iCurrentRicochet = 0;
Now we need to take care of saving and loading so find idProjectile :: Save and add this code to the end of the function.
savefile->WriteInt( iTotalRicochets );
savefile->WriteInt( iCurrentRicochet );
Add this code to the end of idProjectile :: Restore.
savefile->ReadInt( iTotalRicochets );
savefile->ReadInt( iCurrentRicochet );
Okay, now we need to do the actual ricochets. Find idProjectile :: Collide and add this code to the top of the function just after the EXPLODED and FIZZLED check (as seen below).
if ( state == EXPLODED || state == FIZZLED ) {
      return true;
}

if( iCurrentRicochet < iTotalRicochets && collision.c.entityNum == ENTITYNUM_WORLD )
{
      // don't perform the ricochet on the client

      if( gameLocal.isClient )
            return false;

      // read the tutorial to find out what this math does

      idVec3 bounce = velocity;
      float speed = bounce.Length( );
      bounce.Normalize( );
      float dp = -bounce * collision.c.normal;
      bounce.ProjectOntoPlane( collision.c.normal );
      bounce += collision.c.normal * dp;
      bounce *= speed;

      // reset the angular velocity because the physics code may have changed it

      GetPhysics( )->SetAngularVelocity( vec3_zero );
      GetPhysics( )->SetLinearVelocity( bounce );

      iCurrentRicochet++;

      // don't stop the physics simulation

      return false;
}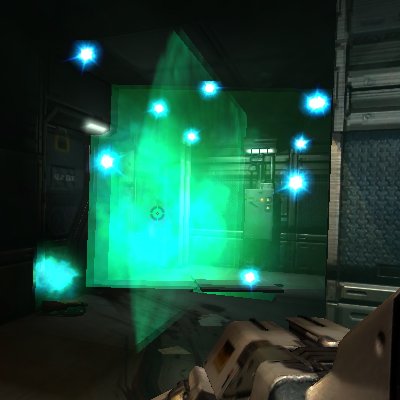
If you're interested you might want to experiment with ricochets some more. The BFG ball looks very cool as it ricochets around the room - maybe you could make it ricochet a random number of times before exploding so you'll never know exactly when it'll detonate. You could also make the plasma balls leave scorch marks on the walls where they ricochet rather than only when they explode.
Finally, note that this code works just fine in multiplayer because everything is handled by the server. The client doesn't predict the new plasma balls or even the ricochets. It may be possible to predict either or both of these events but I'm still not familiar enough with Doom 3's networking code to say for sure.


Nice !
Cheers.