Originally posted on Runegame.com by Arjuna “Holiday” Roka
Mirrored here for archival purposes
This tutorial is for skinning the HOV player models. It borrows heavily from LonghorN’s Rune skinning tutorial: please use his tutorial for skinning the regular player models. That said, I apologize in advance if I confuse you.
I wrote this as a follow along. Download the "GoldTut.zip." This file contains edited textures ready for import, and it corresponds with "Step 2: Creating a texture package" below. The rest of the tutorial follows exactly how to skin using the files in that zip.
Step 1. Exporting Skins
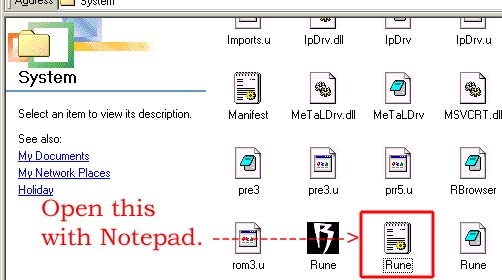
Go to your RuneHOV/system folder. Open Rune.ini with Notepad.
Scroll down about half way and add these lines under [Editor.EditorEngine]
EditPackages=HallsOfValhalla
EditPackages=JunModel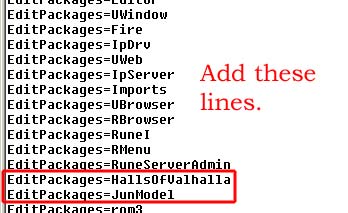
Now start up RuneEd and get yourself something to drink, it should be ready when you get back.
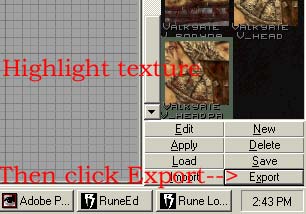
Browse to Textures.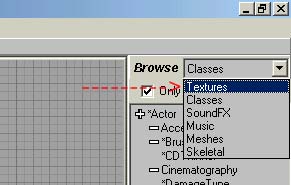
Under that browse to HallsOFValhalla.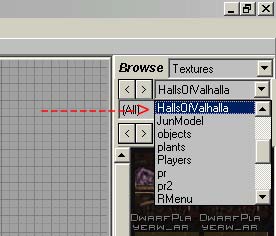
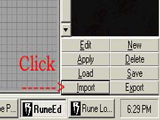
For this tutorial we’ll use the Gold Valkyrie. She has eight textures. But we only need to export six - for some reason she has an extra head and leg texture. Highlight one of her textures by clicking on it once. Then click on the Export button. Do this for all six of her textures.
I made a folder called GoldTut and saved all the exported textures to there. Also note that when you export you have to rename the texture. This is how I named them:
gtarmleg
gtarmlegb
gtbody
gtbodyb
gthead
gtheadb
The “b” denotes the “Blood” or “Pain” skins. And “gt” stands for GoldTut. Pretty clever, huh? It’s a good idea to keep the names of your new textures simple for clarity.
Ok, so now you have a template to work off of. This is where I take them into PhotoShop and edit them. Like LonghorN said before:
“For the sake of continuity I will assume you know how to edit graphic files.”
Step 2. Creating a texture package
For this tut I just edited the Gold Valkyrie’s normal skin with some sort of alien or dinosaur type skin. So you can follow along, grab the zip here.
(Link for GoldTut.zip for download)
Unzip it to it’s own folder.
In RuneEd browse to "Textures."
At the bottom of the browser click "New."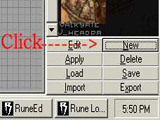
You are presented with a window where you're asked to customize your new texture package.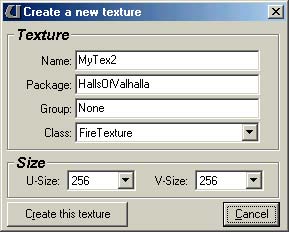
In the "Name" field put whatever you want, it doesn't matter because you will be deleting this anyway. I put “junk.”
In the "Package" field enter the name of your texture package. I put “gt.”
In the "Group" field, leave it at "None."
In the "Class" field scroll to "Texture" and leave the "Size" fields as they are.
Click "Create this texture"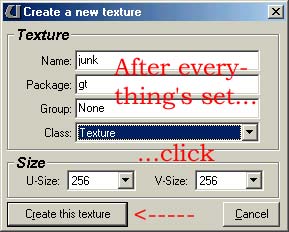
Your screen will look something like this: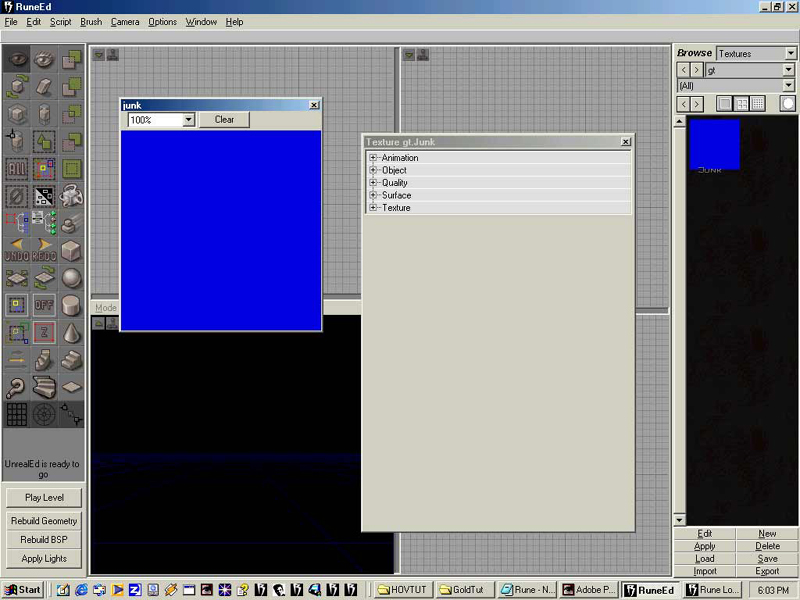
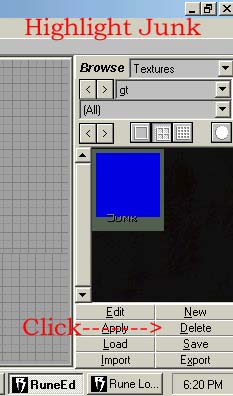
Sometimes the texture will be green or another color, it doesn’t matter.
Close the two windows that pop up. Highlight “Junk” and at the bottom of the browser click Delete.
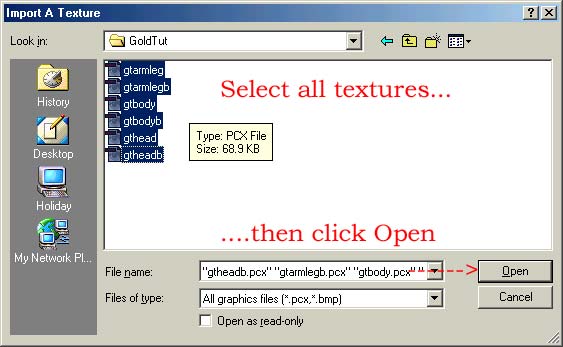
Now you have a brand new empty texture package. It's time to import your new textures. With the browser still on your texture package, at the bottom click "Import"
Browse to the GoldTut folder you downloaded and unzipped. Select all the textures in the folder. And hit Open.
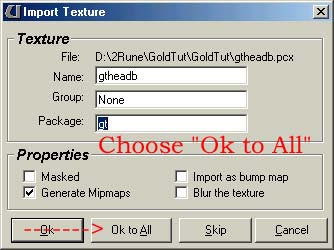
You are presented with this:
Choose “Ok to All”
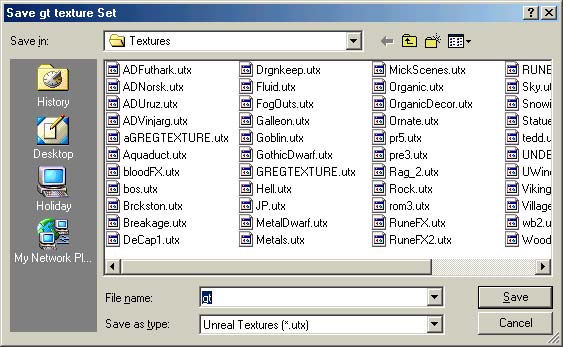
After they import click Save at the bottom of the browser. You’re presented with this:
Click Save. It’s saved as gt.utx in your RuneHOV/Textures folder.
Now we are going to fix the LOD settings.
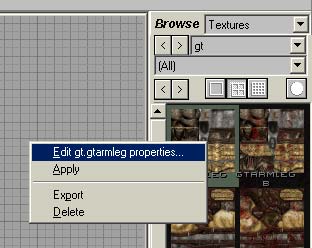
Right-click the top left texture and choose the first option “Edit gt.gtarmleg properties…”
Expand “Quality” and for LODSet, choose the LODSET_Skin from the pull down arrow.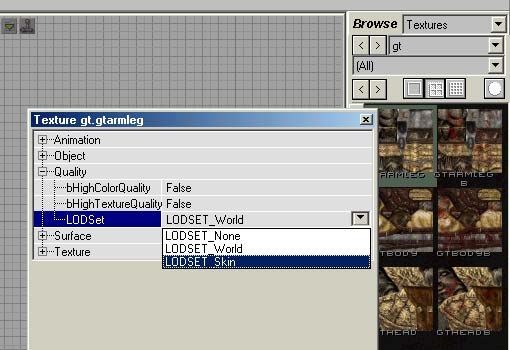
Then close the two windows that pop up and repeat for all your new textures; in other words the five remaining textures in the package.
After you make all your LOD settings to “Skin” click Save again. Overwrite the old package.
Now you have your very own Texture package.
Step 3. Creating the new classes
Ok, this is where it gets thick and saucy. Stay with me. We are now going to make 4 new classes:
1 new class for the Player
1 new class for the Arm
1 new class for the Head
1 new class for the Carcass
Note: for some models you may need to create 2 new classes for the arms, but it looks like GV(Gold Valkyrie) uses just one.
Here we go. One at a time: We already know what character we are skinning for. In RuneEd browse to "Classes." Then, in the class hierarchy tree expand "Pawn > Player Pawn > RunePlayer > PlayerValkyrieWren". Click on PlayerValkrieWren.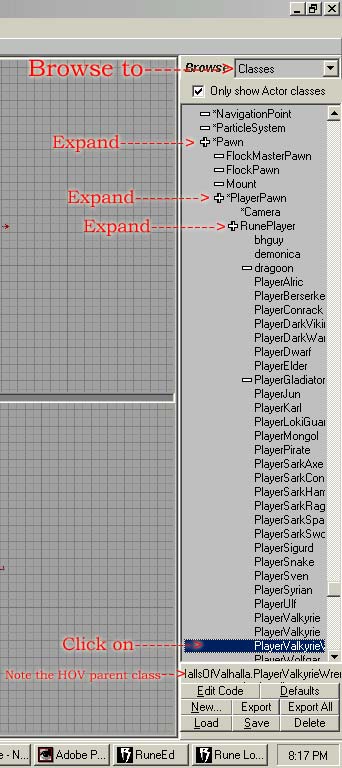
Click New.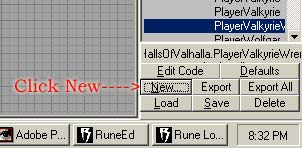
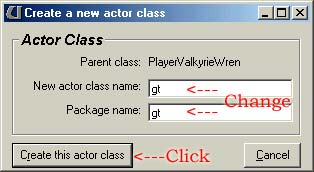
You are presented with this:
Change it to this:
Then click “Create this actor class” Close the window that pops up.
Your class should still be selected, click Save.
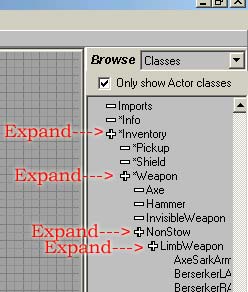
That’s one. That was the player class. Three more to go. These are the severed limb, head and carcass classes. Arms first. Scroll up to the Inventory category locate "Weapon" and expand it. Under Weapon expand "NonStow" and under NonStow expand "LimbWeapon." All of the player model severed limbs are located here.
Click on “ValkyireArm”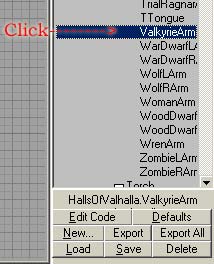
Click on New.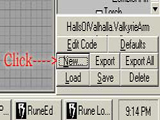
You are presented with this: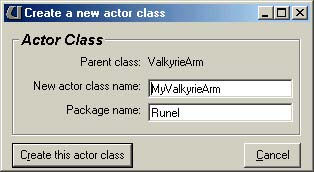
Change it to this: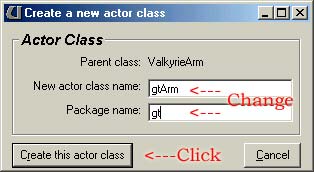
Then click “Create this actor class.” Close the window that pops up.
Now for the Head. The Head class is under the LimbWeapon class. Just scroll up a little and you’ll see it. Expand the head class. And select ValkyrieHead. 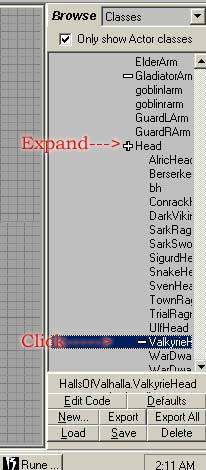
Click New just like before. You’re presented with this:
Change it to this: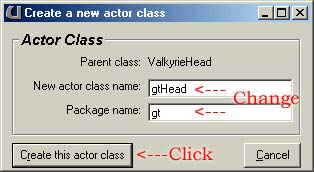
Then click “Create this actor class.” Close the window that pops up.
Lastly the Carcass. In the browser, locate "Decoration" and expand it. Under Decoration find "RuneCarcass" and expand that to find "PlayerCarcass." Click on “PlayerCarcass”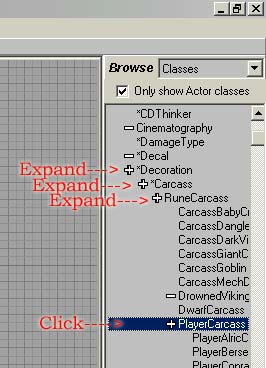
Like before Click New. You’re presented with this:
Change it to this: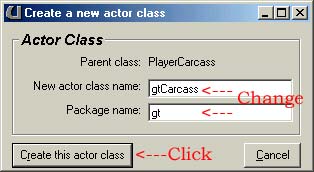
Then click “Create this actor class.” Close the window that pops up. Then click Save again.
Ok. Still with me? So far we have a texture package and all the new classes for our new skin.
Step 4. Binding the textures with the new classes.
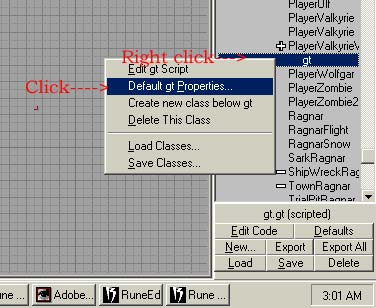
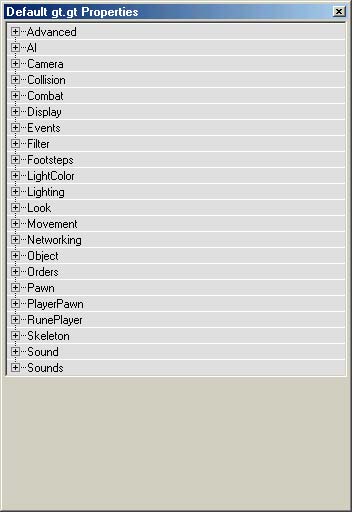
In RuneEd, make sure you are Browsed to "Classes" and your freshly created character class is selected. Now, right-click on your player class and select the second menu item: "Default gt.Properties…" 
You’re presented with this:
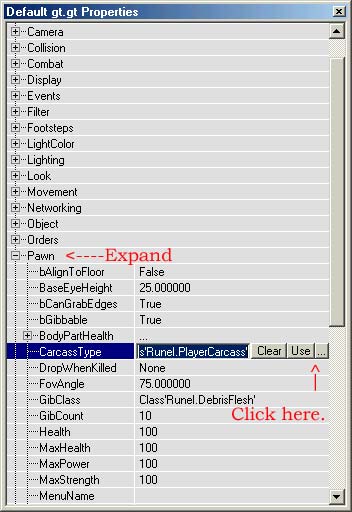
Expand Pawn. Click on the far right of the CarcassType line.
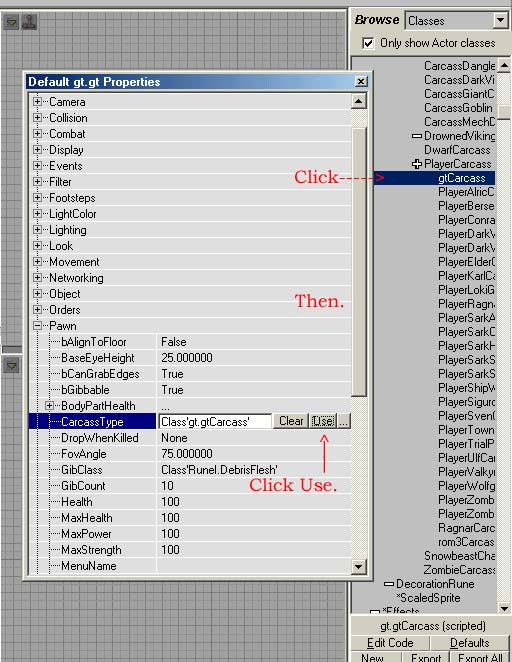
Browse up and click on your gt.Carcass class. Then back on the CarcassType line click “Use.”
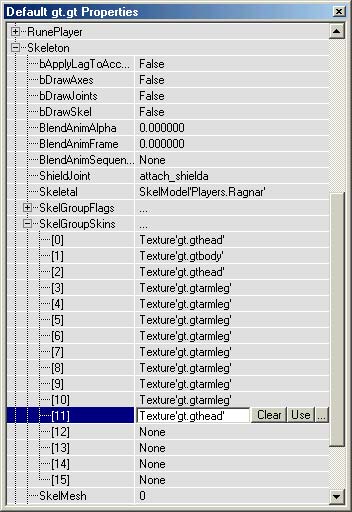
Close the “Pawn” property and expand “Skeleton” then expand “SkelGroupSkins.”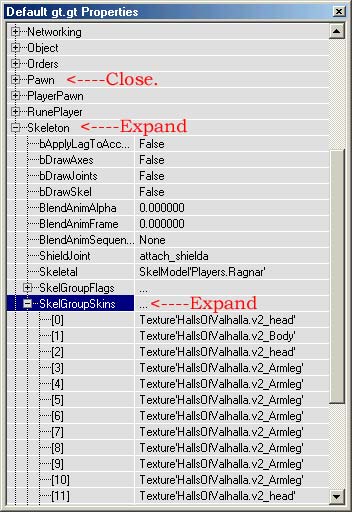
Click on the far right of the first line then click on “…” Our texture package appears.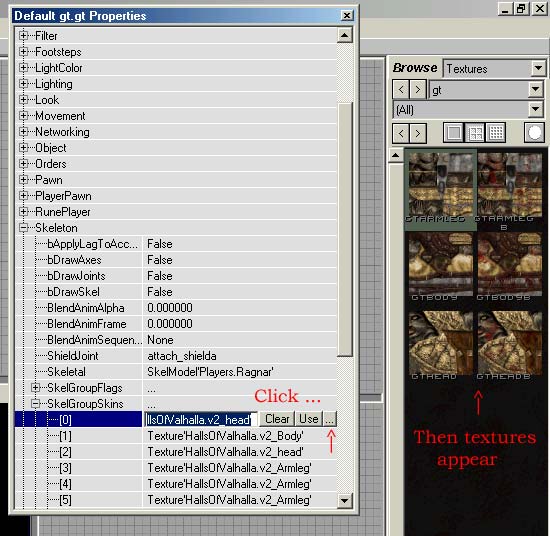
You’ll notice the first texture we’re replacing is the head. Click on the GTHEAD texture, then in the properties box click “Use”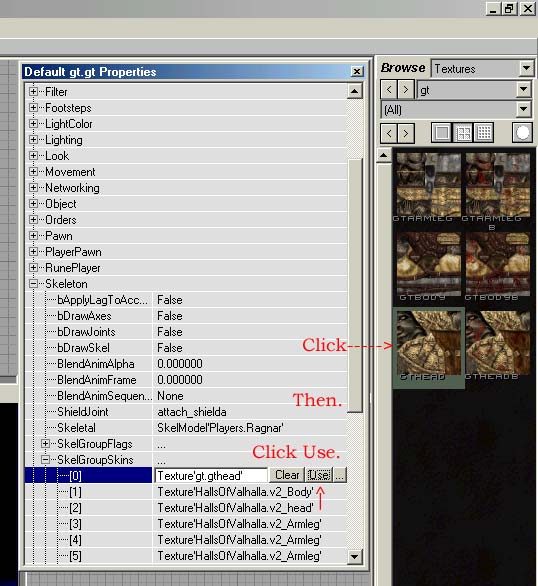
See how it works? Now you need to replace the rest of the textures with the corresponding textures….like so:
Close the window when you’re finished.
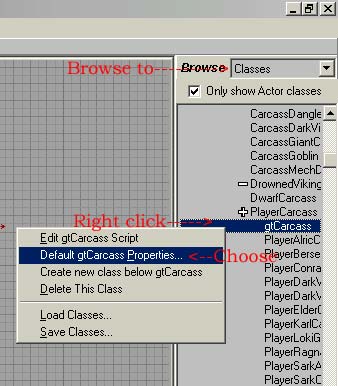
Browse back to Classes. Find and right-click on your gtCarcass class, then choose “Default gtCarcass Propeties…”
You’re presented with this: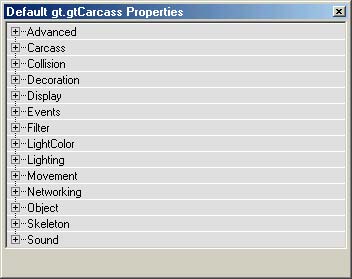
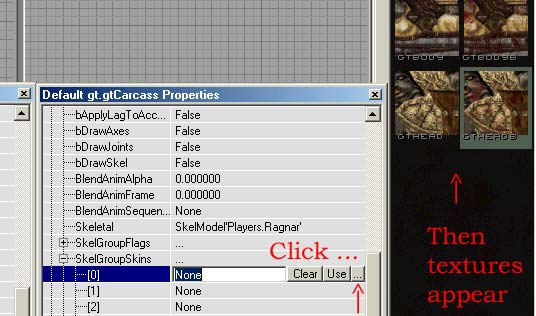
Expand “Skeleton” then expand “SkelGroupSkins” As you can see it’s all blank: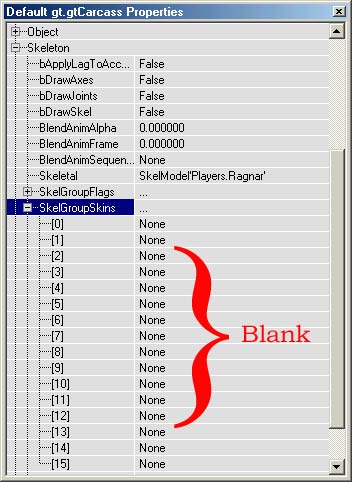
I’m going to pull up my Player class’s default properties for reference.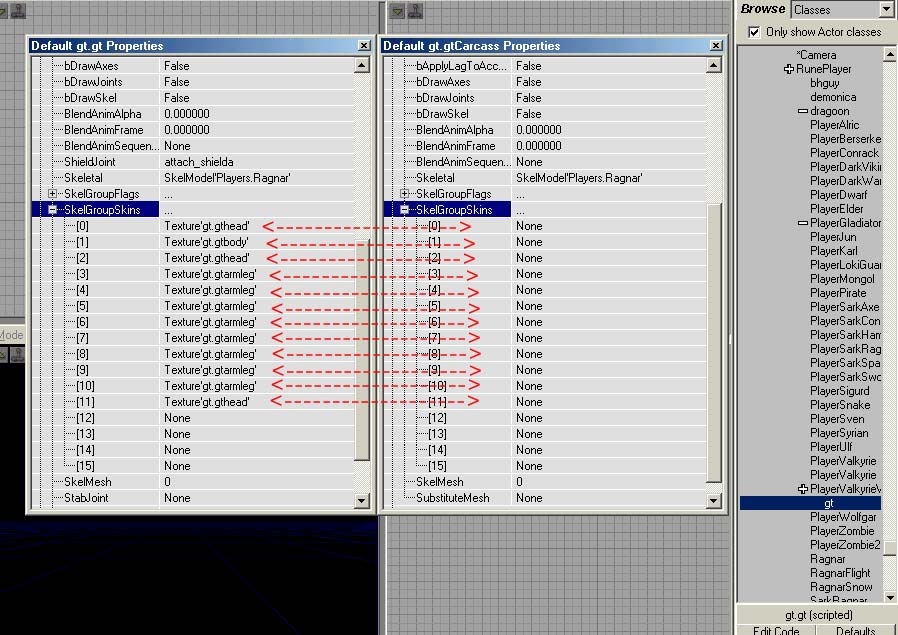
Like before, Click on the far right of the first line then click on “...” Our texture package appears.
Again the first texture that needs to be placed here is the head. Notice now we are going to use the blood textures. Click on the GTHEADB texture, then in the properties box click “Use”
Repeat for the rest of the textures. Using the default properties as reference I place in the rest of the blood textures. It should look like this when you’re done: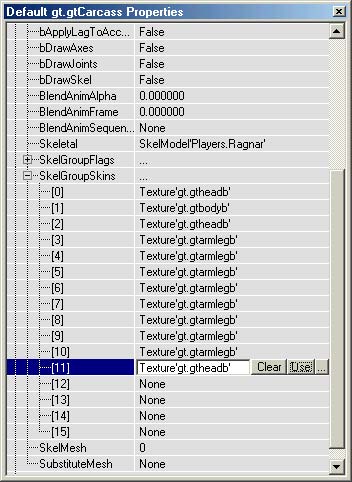
Close this window when you’re done.
Now browse down and click on the gthead class. Right-click and choose “Default gthead_Properties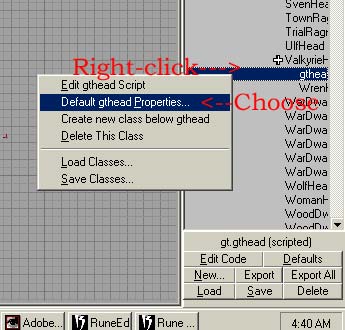
You are presented with gt.gthead Properties. Expand “Skeleton” then expand “SkelGroupSkins”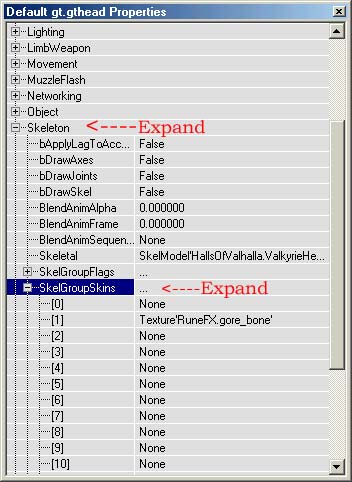
On the [2] line Click “…” Then click on the GTHEADB texture. Now in the properties box click “Use.”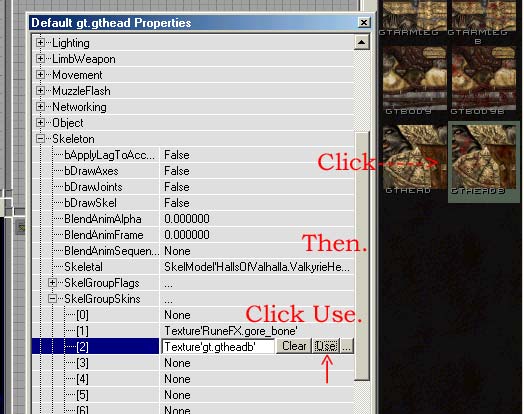
Close this window when you’re done.
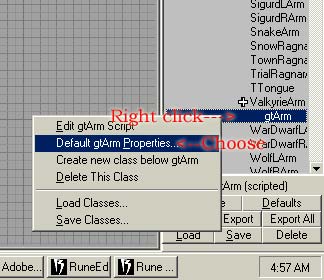
Browse down and click on the gtArm class. Right-click and choose “Default gtArm_Properties
You are presented with gt.gtArm Properties. Expand “Skeleton” then expand “SkelGroupSkins”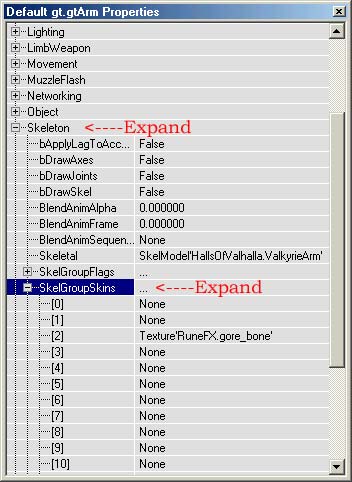
On the [1] line Click “…” Then click on the GTARMLEGB texture. Now in the properties box click “Use.”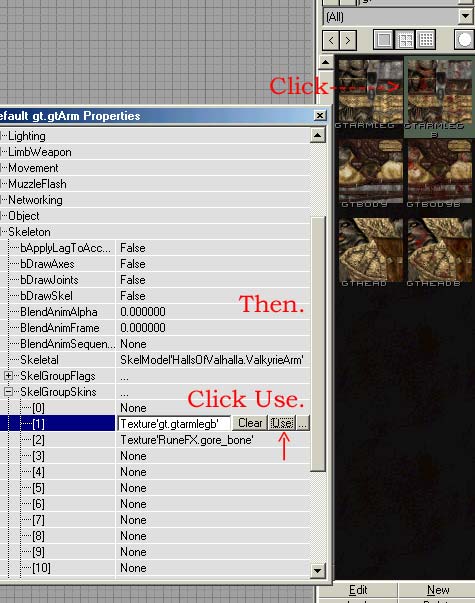
Close this window when you’re done. Still with me? Almost done.
Step 5. Scripting
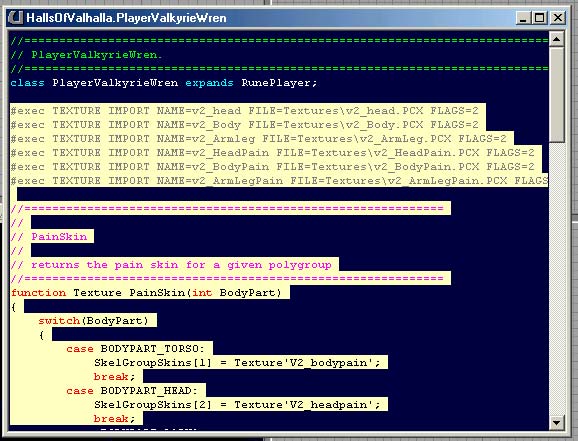
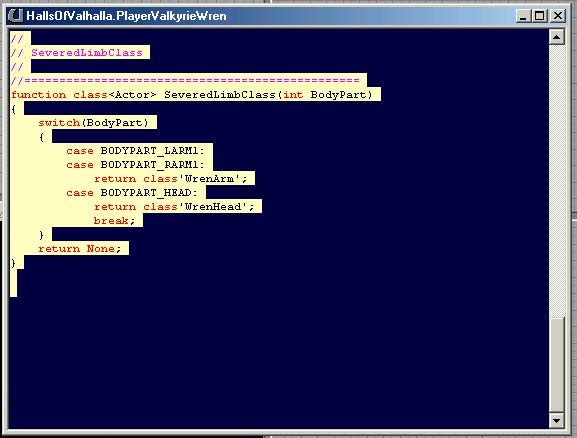
Browse to your parent class. In this case it’s “PlayerValkyrieWren” Right-click and choose the first option “Edit PlayerValkyrieWren Script.”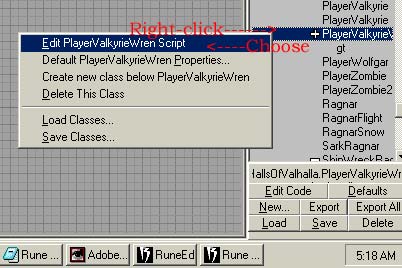
You’re presented with this: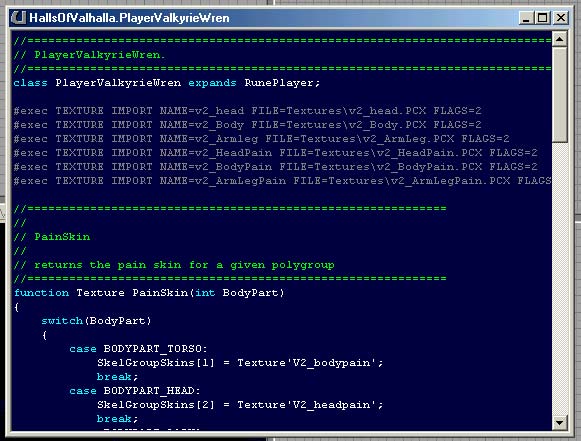
Click-drag and highlight everything from #exec down:

Hit Ctrl-C on your keyboard. This copies everything you just highlighted.
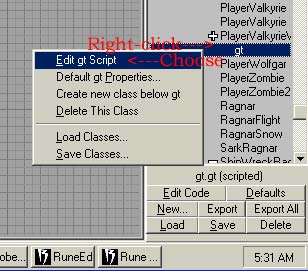
Browse to your new player class “gt” Right-click and choose the first option “Edit gt Script”
You’re presented with this: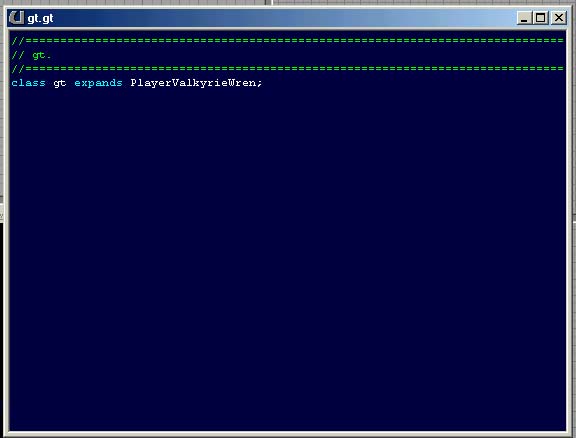
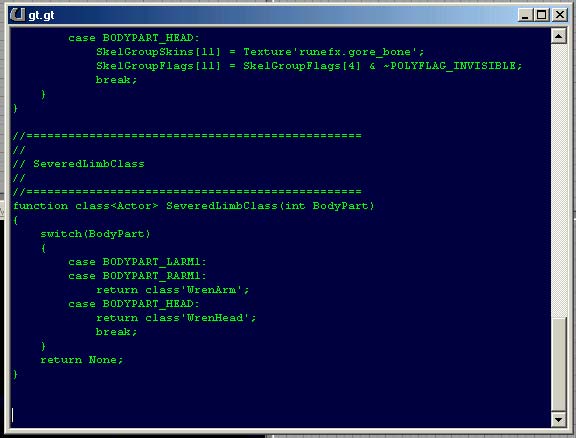
Hit Ctrl-V on your keyboard. This Pastes everything form your parent class.
We’re going to change a few lines. Change the “return class” to ‘gtArm’ and ‘gtHead’ Like so: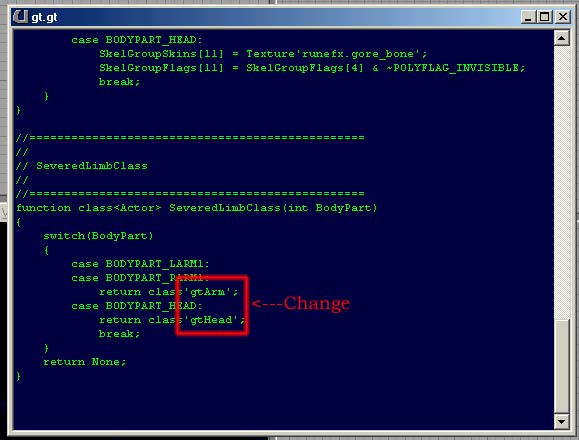
Scroll up a little. We are going to change the default blood textures. From this: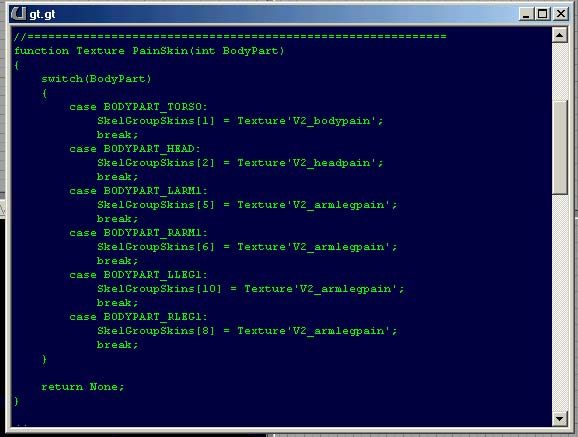
To this: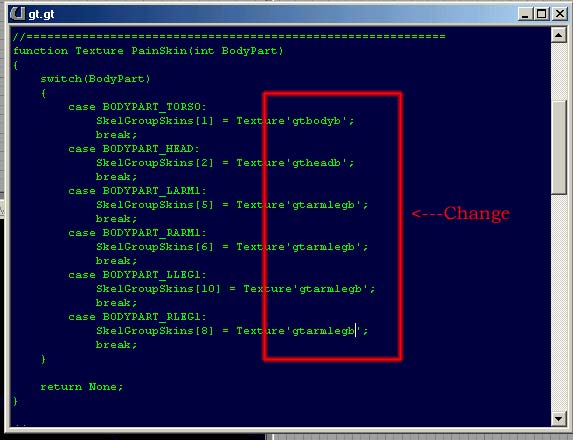
Notice that it’s calling all our blood textures. Close this window when you’re done.
Making sure my new player class is highlighted.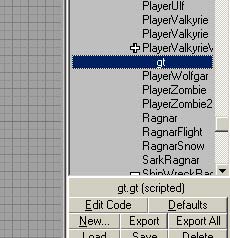
Click on Script, then on Compile Changed Scripts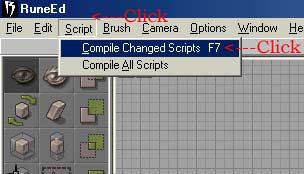
If you did everything right you’ll get this message on the left: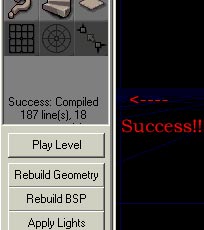
With your new player class still selected click Save one last time. Close RuneEd.
Step 6. Finishing moves
This part is easy and painless too.
Go to your RuneHOV/system folder.
Open RuneI.int with Notepad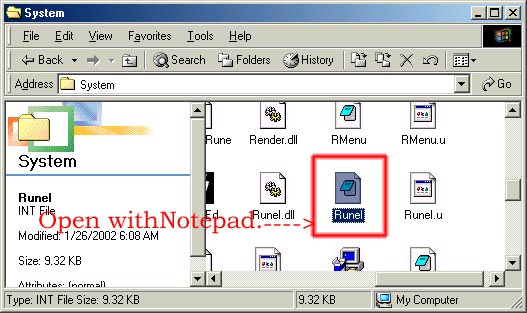
Add this line under [Public]
Object=(Name=gt.gt,Class=Class,MetaClass=RuneI.RunePlayer,Description=”-GoldTut=”)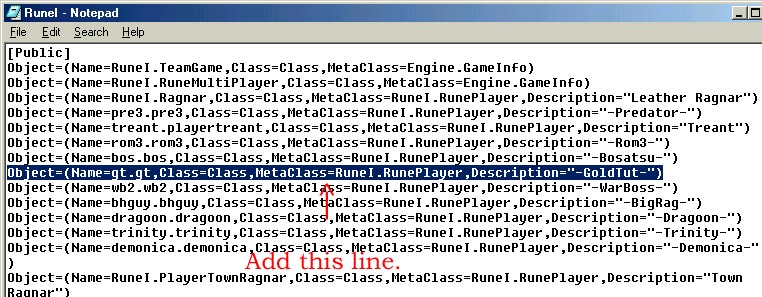
Open Rune.ini in any text editor...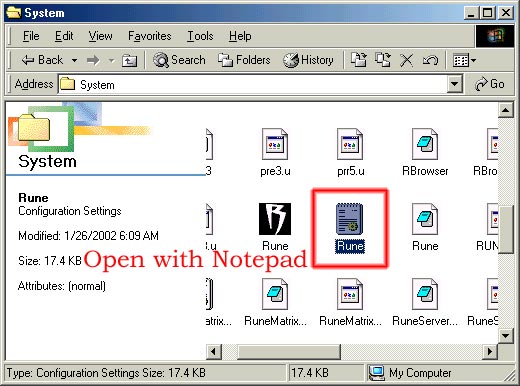
...and scroll to the part that says:
[Engine.GameEngine]
Add this line:
"ServerPackages=gt"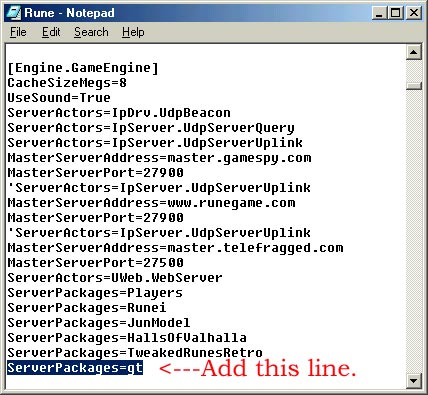
That’s it. You’re done. Fire up HOV and check out your work.


