MechCommander Gold - Darkest Hours
Original campaign merge
Operation 4
"Operation 4 contains some very tough missions. Its difficulty is mostly attributed to low tonnage, mixed with overwhelming enemy forces, both in number and class, that make you severely outnumbered and outgunned. Mission 16 contains a serious bug, so more on that later."
by stud84
Operation 4 - Mission 1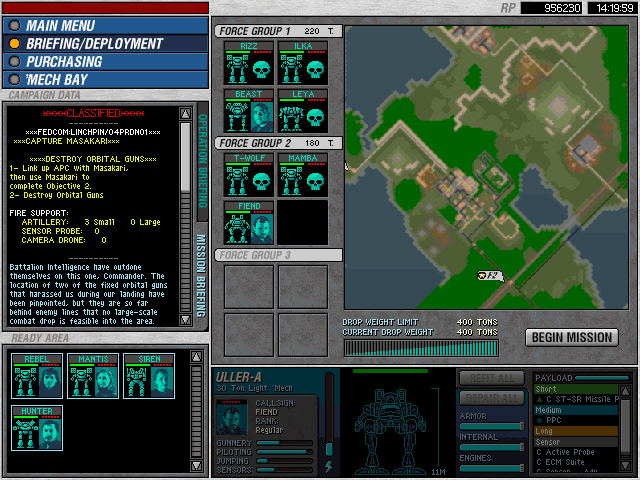
Original 04/01 - Op4 Start
Mission Objectives:
+ Escort APC to the Masakari (2000 RP)
+ Destroy orbital guns (18000 RP)
Maximum Tonnage: 15 tons
Maximum Units: 1
Artillery: 3 small
Logistic Phase: You need a vehicle there. Even a Swiftwind will work fine, as the APC has a laser, though the ideal is a Pegasus hovertank.
The map has a city in its center, and you start on the west, your objective in the north-east, while the Masakari is on the east.
Combat Phase: Immediately move your two vehicles along the road, and when you see an hill, climb it: there's a small vehicle base with 3 Harrasers and one AeroSpace Spotter guarding the road, so you need an other route to reach the city. MOve toward the water, and move aslong the coast, and when you passed the champ, get into the city. During your travel an AeroSpace Spotter and a Swiftwind will notice you and will begin to stalk you, like all other units in the area.
In the city there are 6 Elementals, plus one other Swifwind and an other AeroSpace Spotter. Do not try to fight them, your vehicles will be destroy in seconds. Instead, try to head toward the Masakary: you'll road will beblocked by trees. Put them on fire with a single weapon hit (the APC's laser will work) and while the fire does its work, continue to escape from your enemies. When the road is free of obstacles, exit from the city at full speed and do not worry about your stalkers: they won't follow you.
Head for the Masakari: there are 3 Saracens and one Condor protecting it, but you should be able to get the APC near the Masakari. After your MechWarrior, Firestorm, activates it, destroy the four vehicles, capture the repair base and dock if necessary. Though the Masakari is a J variant, YOU'VE GOT THE POWER!
Now begin to move toward the orbital guns. Climb the hill, and you'll be able to see the vehicles guarding it: there are several LRM Carriers, Condors and Saracens, but the artillery strikes on the most populated groups will do fine. Finish them with your new Masakari and enter the first perimeter. One Rommel with two Ullers J are waiting for you. Disable the vehicle first, the go for the Ullers.
Before destroying the guns, move near the ridge on their norther side, destroy the two AC turrets and the turret control tower, jump on the ridge and capture the warehouses (4 LRM Racks, 1 ER PPC). Now head back to the repair base, dock, and then destroy the orbital guns.
Operation 4 - Mission 2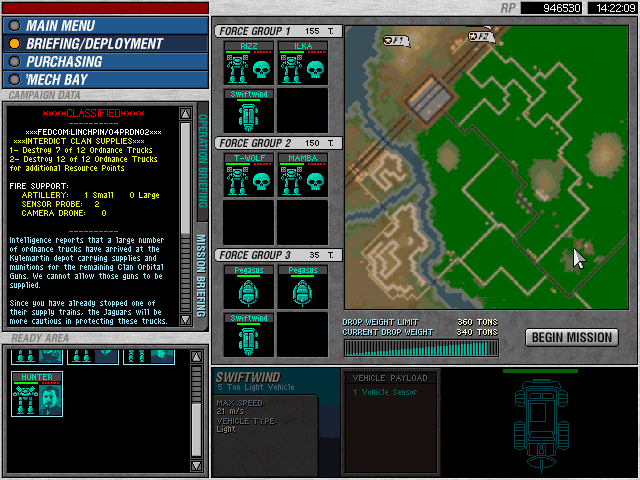
Original 04/02
Mission Objectives:
+ Destroy 7 of the 12 supply trucks (22000 RP)
* Destroy all 12 trucks (15000 RP)
Maximum Tonnage: 360 tons
Maximum Units: 12 (4/4/4)
Artillery: 1 small
Probes: 2
Logistic Phase: You'll need at least six 'Mechs with a minimum speed of 18 m/s. If you can, deploy a light 'Mech with one ECM suite. Half of your forces will be F1, while the other half F2 or F3.
In this mission, F1 will begin at the north of the base, on a hill, while F2 and F3 on its east. The whole area is covered by trees, except few roads and a small river on the left.
Combat Phase: Begin by ordering F2 to destroy the perimetal sensor and the pop-up turret near their positiom, and if you have the ECM equipped unit in this unit, move it near F1 and move your first lance near the bridge on the west. Keep F2 where is it.
The base is well protected by LRM turrets and has four 'Mechs inside: one Hollander W, one Hunchback IIC W, one Firestarter A and one Cougar W, plus three Rommels, without crew, near the barracks.
Once you've positioned your lances, place the only artillery strike you have on the Rommel's crew barracks: this will also destroy a truck. After the artillery strike hit, the alarm will sound and the trucks will begin to move: 4 will try to reach the bridge on the west, just where F1 is. Other four trucks will try to escape from the southern gates of the base, and if you have a third lance, place it near the gate and wait for the trucks. The other four trucks will try to escape from the east gate, where F2 is: two trucks will follow the road, but the other two will turn to south.
Though completing this mission in all of its objectives will bring you a moderate number of RPs, I reccomend to ignore the second group of trucks (the one escaping from the south gate) and capture all buildings inside the base, especially the warehouses: here is it whta you'll find: 2 Standard Sensors, 1 Clan ECM Suite, 2 Ultra ACs, 1 ER Large Laser, 2 Pulse Lasers, 2 Light ACs and 3 Clan SRM Racks.
However, if you want to track down the trucks after this, head south from the base at your maximum speed: the trucks from the south gate will head toward the lower edge of the map, in the center, while the other two trucks (the ones from the east gate which turned south) will exit the map at the lower-right corner of the map.
There are several forces on this map, including LRM Carriers, one Cougar J, one Firestarter W, one Centurion W and one Hunchback IIC W.
Operation 4 - Mission 3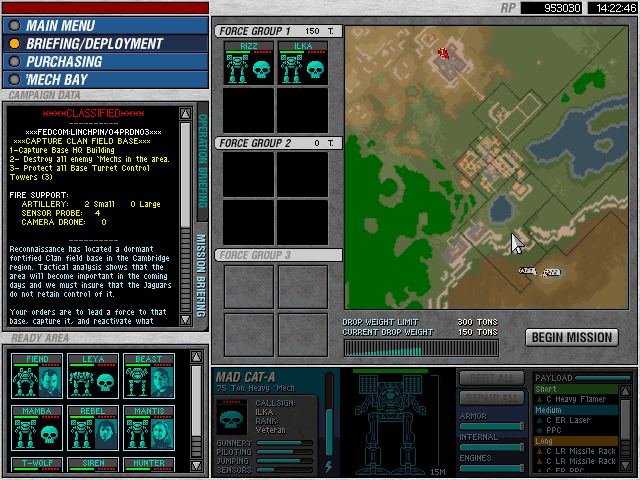
Original 04/03
Mission Objectives:
+ Capture the HQ ( RP)
+ Destroy all 'Mechs in the area ( RP)
* Protect all turret control towers ( RP)
Maximum Tonnage: 300 tons
Maximum Units: 8 (4/4)
Artillery: 2 small
Probes: 4
Recon: 1
Logistic Phase: Deploy 6 fifty tons 'Mechs. Heavier 'Mechs, with their limited number, and light 'Mechs, because they're light, won't be effective as a group of Hunchbacks and Hunchback IICs.
The map has the base on the north, while you start on the south. In the middle there's a city, and there are only to ways to reach the base. One is protected by turrets, while the other is free of stationary defenses. You start on a small hill.
Combat Phase: Immediately move your 'Mechs toward the turret-protected road:
from the lower-right edge of the maps 5 Hunchback IICs (all W configuration) and 3 Swiftwind will begin to move toward the base. Engaging them now will be pure madness, wait to capture the base. The other road is protected by 6 Von Luckers and 4 LRM Launchers, and will lead you toward the city, protected by Condor hovertanks and LRM Carriers.
Use one artillery strike on the first turret control tower, and use your recon camera to reveal the other, and use your second strike on it, then move past the turrets and head toward the base.
DO NOT enter the city, or the vehicles will begin to follow you, and having more enemies at the end of the mission won't be a good idea.
Once you've reached the base, destroy the gates and capture all buildings in it, except the HQ. The warehouses contain 3 Clan Streak SRM Racks and 2 Large Pulse Lasers.
Now the Hunchbacks should be at the base's gates. The LRM turrets will damage them, and if they enter the base, use your 'Mechs to repeal the attack. Be sure to keep all turret towers online. After you repelled the Hunchbacks, repair your 'Mechs and wait for the 'Mechs coming from the upper-right corner of the map.
Let the LRM turrets attack the 5 Ullers J, and finish them with your 'Mechs only if they enter the perimeter. Now it's time to take care of the three Vultures (two A and one W); they should have destroyed most of your turrets, and engaging them won't be easy: try to repair as many 'Mechs as possible, the move out and engage them at short range to negate their advantage over long and medium distances.
After all 'Mechs have been destroyed, go to the repair bases, dock and then capture the HQ. If you want, go to the city, destroy all vehicles, capture the warehouses inside it (4 SRM Racks, 2 Large Lasers, 5 Pulse Lasers, 2 PPCs, 1 Advanced Sensor, 1 Beagle Probe, 1 Guardian ECM), then return to the base, repair and capture the HQ.
Operation 4 - Mission 4
Original 04/04
Mission Objectives:
+ Capture all industrial complex (10000 RP)
+ Defend the captured complex (10000RP)
+ Destroy all enemies in the area (15000 RP)
Maximum Tonnage: 480 tons
Maximum Units: 10 (4/4/2)
Artillery: 1 big
Probes: 6
Logistic Phase: Deploy heavy and assault 'Mechs only. Be sure to have at least one unit equipped with an heavy AC.
The map has the industrial complexes (2) on the north, a small hill on the upper-right corner of it plus a small city. There is a small river partially dividing the north part from the south one. Near the river, on the east there is a paved area protected by an hardened wall.
Combat Phase: You start in the south; on the right there is an hill. Climb it, and this will reveal 2 Lokis W and two Thors W proceding to the industrial complexes. Engage them now, and do not waste the artillery strike attempting to hit them.
Now follow the paved road until the bridge; cross it and you'll reach the repair base. Dock with it and then head north-east, toward the hill on the upper-right corner.
Climb it. You'll notice that some enemy forces are entering the area: in sequence, one Loki A, 2 Firestarters J, one Bulldog and one Von Lucker, a Loki A, two Hunchback IICs (one W and one A) and finally a Thor W.
After you destroted these reinforcements, head toward the city (just follow the railroad) and capture the three warehouses (1 ER PPC, 1 Gauss Cannon, 2 Pulse Lasers) and try to reveal the units protecting the industrial zone without powering them up, and place the artillery strike directly on them. They'll move to attack you. The group of 'Mechs protecting the base consist of at least 8 Firestarters (most J variants) and 4 Hunchback IICs (two A and two W).
After these 'Mechs immediately move into the industrial zone and destroy the four Von Luckers and the three Bulldogs threating the two complexes. If they destroy even one of them, the mission won't be completed and you'll have to play it again. Before capturing the two industrial complexes, be sure to repair your 'Mechs and to capture the eight warehouses in the industrial zone (2 ER Large Lasers, 1 Large Laser, 2 Flamers, 3 Pulse Lasers, 3 LRM Racks, 2 Streak SRMs).
There is an other way to attack the industrial complex: after you visited the city, head back to the starting position, and head north, this time passing from the west. You'll engage the vehicles first, and then the 'Mechs; there is a major drawback however: the enemy 'Mechs outnumber you, and they'll go after the complexes first, and with such a large number, they'll destroy them in seconds.
Operation 4 - Mission 5
Original 04/05
Mission Objectives:
+ Destroy all 'Mechs in the area (20000 RP)
Maximum Tonnage: 500 tons
Maximum Units: 10 (4/4/2)
Artillery: 3 small, 4 big
Probes: 2
Logistic Phase: Only heavy and assault 'Mechs, with a good number of high-power long-range weapons.
The first two lances will begin in the east part of the map, while the third (only two 'Mechs) can be deployed on the west. Deploy two assault 'Mechs with a good speed (18 m/s) here, and the rest as F1 or F2. The east and north parts of the map have dense forests on them, while the west one is desert with a lot of hills and ridges. A river runs through the whole map, and in the east-south-east there is a paved area.
Combat Phase: Begin by moving the F3 'Mechs on the hill at your right to reveal a bridge. Place them near it and have you remaing 'Mechs reach F3 as fast as you can. 5 Cougars (2 A and 3 W) will cross it; destroy them all, and do not let them escape.
After these 'Mechs, place your 'Mechs in the valley on the west, near the city, but in the sand area: the 'Mechs coming from the extreme west (first four Jagermechs, 2 A and 2 W, and then four Lokis, 2 A and two W) will try to escape by taking the road leading north.
Before dealing with these 'Mechs, however, place one big artillery strike on the bridge from where the Cougars came when the four Catapults (using the same vector used by the Cougars) are near them. The first has to be placed at the beginning (the part near you) and then at the end, to trap the Catapults on the bridge; if you are fortunate, these attacks will kill some 'Mechs too.
It is now time to attack the Jagermechs: do not try to intercept them with your artillery strikes, it is better to try to stall them and place an artillery strike directly on them. While you're dealing with the Jagermechs, the Lokis will try to escape: make th first 'Mech of the line fall, and the go after the 'Mechs standing still as the fallen 'Mech tries to regain its feet. Be sure to destroy them all before going after the remainign Jagermechs: the Lokis will try to escape, while the Jagermechs attacks you.
If you where able to trap the Catapults, you may want to visit the paved area at south-west: it is protected by two sets of LRM turrets with two control towers, and the single container has 3 Intermediate Sensors and 3 Streak SRMs inside it.
Operation 4 - Mission 6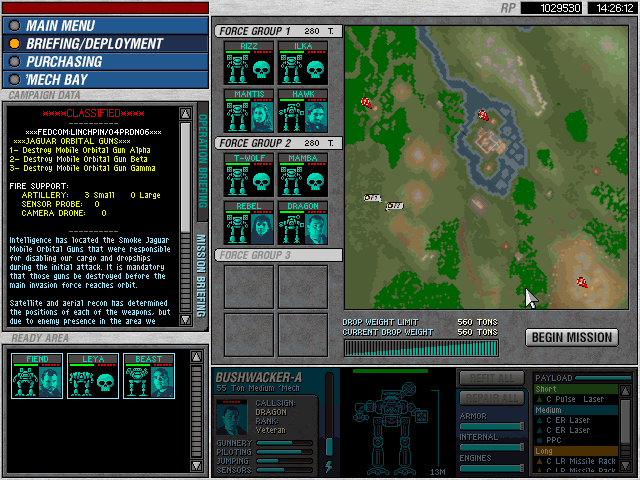
Original 04/06
Mission Objectives:
+ Destroy Orbital Gun alpha (7500 RP)
+ Destroy Orbital Guns beta (15000 RP)
+ Destroy Orbital Guns charlie (22500 RP)
Maximum Tonnage: 560 tons
Maximum Units: 8 (4/4)
Artillery: 3 small
Logistic Phase: Heavy and assaut 'Mechs only one more time, with a good mix of long and short range weapons.
There are three areas with orbital guns in them: one, sorrounded by forests, the second, on an island and a third on a highlands. There are several small hills, plus a small river, sorrounding the island where the second guns are.
Combat Phase: You'll begin near a small hil, on the west. Climb it and destroy the three LRM Carriers nearby. Continue west and destroy the two other vehicles, Von Luckers tanks. Capture the container they were guarding (2 Light ACs) and go for the small hills, at north-east.
After you climbed them, you'll see how the first and the seconds guns are protected, plus a small paved area and 4 vehicles (2 Bulldogs and 2 Von Luckers).
I reccomend to go for the second area first: it is protected by 3 Von Luckers, 2 AeroSpace Spotters, 1 Vulture J and 2 Thors W (plus four LRM Carriers standing still). Try to take out one AeroSpace Spotter first, then go after one Von-Lucker and the Vulture; if you attack not from the bridge, but from the east, the Von-Luckers will block the bridge, allowing you to place one artillery strike on the remaining units; if you are fortunate enough, this strike will take out the remaining vehicles and damage the two Thors; destroy with your 'Mechs all remaining forces, cross the bridge and cripple the LRM Carriers. Capture the Sensor Control building and then the two Reapir Bases. Do not destroy the guns (there are tow guns, one north and one south from the Sensor building) for now, and repair your 'Mechs before going for the first objective.
Before attacking the first orbital gun, destroy the tanks protecting the container (2 Pulse Lasers).
To attack the first area, place two artillery strikes on the four Von Luckers on the east, and attack from the west, where several tankers are.
Go near the tankers, and the force protecting the gun, three 'Mechs (one Vulture J and two Atlases A) and 2 AeroSpace Spotters, will begin to travel toward you. Fire at the tankers to destroy as many units as possible and then destroy all remaining enemies.
Destroy the gun and the Mobile HQ (this will reveal the base previously visited).
Now return to the base for repairs and head south-east to find one container (two Clan ER Lasers) guarded by the usual 2 Von Luckers and 2 Bulldogs. Now proceed in the opposite direction to find the last paved area, this time with 3 Von Luckers and two LRM Carriers; the container has 3 Streak SRMs inside. It is time now tho head for the contacts sorrounding the third place: the four contacts you see are four Atlases (all A variants). After these 'Mechs, repair one more time and begin to approach the objective: the first thing you'll encounter is a perimeter composed of perimetal sensors and pop-up LRM Turrets forming a very thigh circle. Destroy two or three sensors and turrets, and then go for the two Thors A. After these two 'Mechs destroy the two Orbital Guns on this hill, go for repairs the last time and destroy the remaining guns.
Operation 4 - Mission 7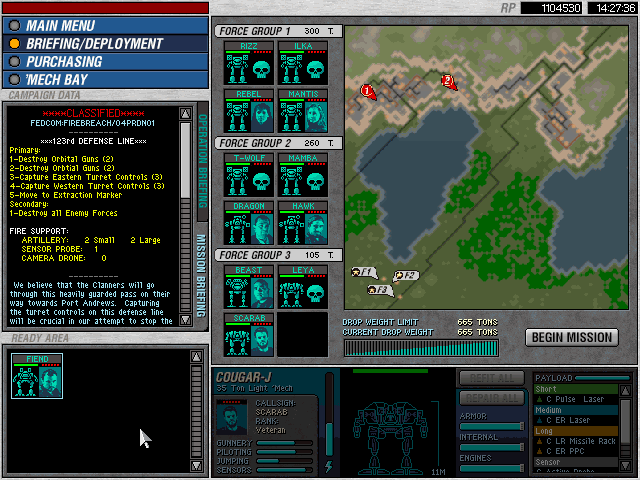
Xenocide 04/01
"Operation Firebreach opens with a really fun mission. Lots of heavy and assault class 'Mechs, so be careful. Very nice tonnage allotment. Mind your tanking 'Mechs!"
by stud84
Operation 4 - Mission 8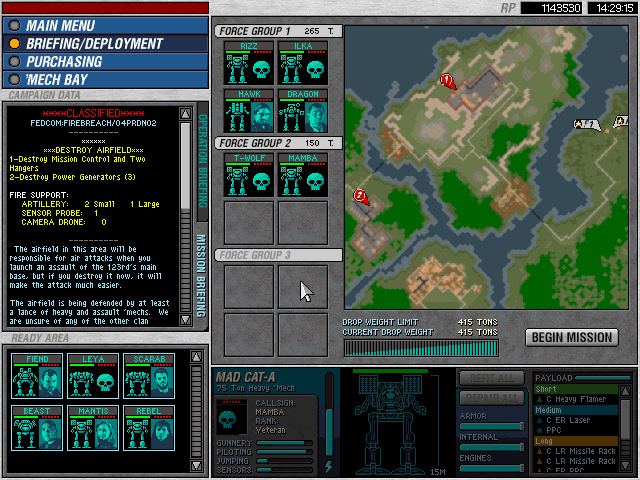
Xenocide 04/02
"A fairly tough mission. There are no 'Mech repair bays and a lot of enemy forces, so you have to manage your tanks carefully. Turrets are very helpful if you capture them, but the damage they do to you as you try to capture them might not be worth it. Use height to your advantage, and you can disable most of them painlessly."
Operation 4 - Mission 9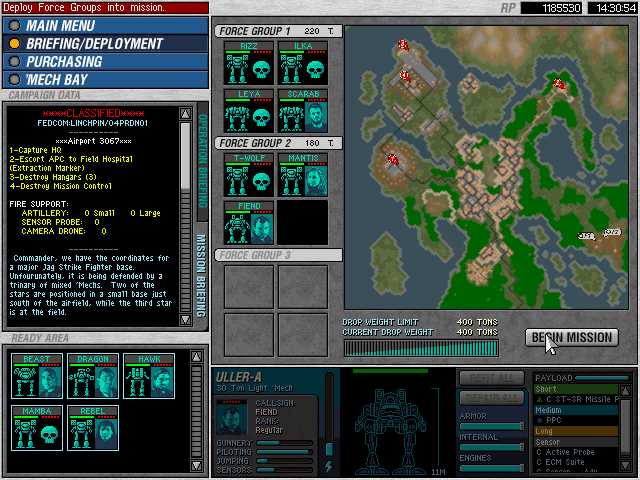
X-Ray 04/01
"Simple escort mission. If you fully clear out the city first before activating the APC, you shouldn't have any trouble with ambushes."
Operation 4 - Mission 10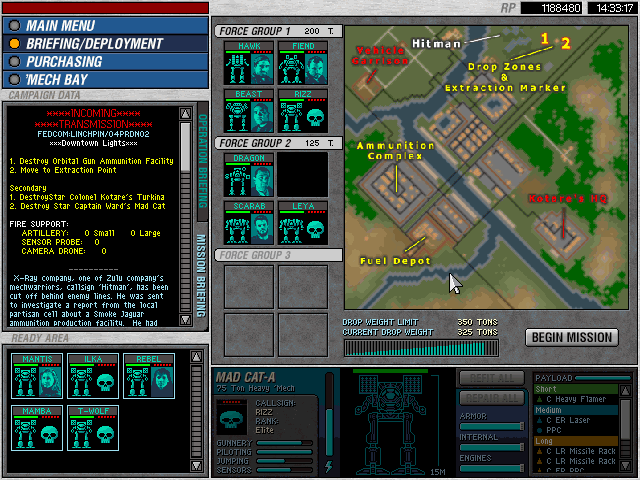
X-Ray 04/02
"Really love the lore in this mission. Kotare is potrayed as a fearsome, vile person, making me want to defeat him even more. Make your way southeast through the forest to take out Kotare and Ward first, and then use the repair bays to heal up. Make sure you capture the turrets before assaulting the southwest, since they will be vital to taking the heat off of your team. There is a VERY large amount of Pilums, Manticores, Bulldogs, and other vehicles that will make your MechWarriors' lives difficult if you don't bottleneck or keep them at range. Additionally, make sure you don't destroy all of the bridges with AoE attacks (Long Toms, Sniper Cannons, etc.), or you could end up not being able to finish the mission."
Operation 4 - Mission 11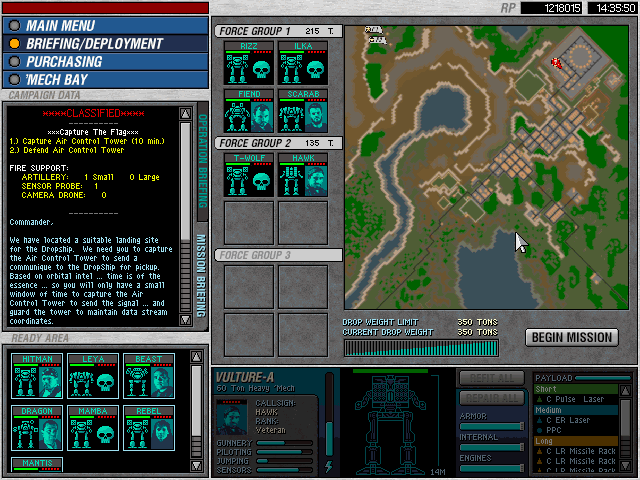
X-Ray 04/03
"Another 'capture the base mission.' Make sure to heal up after you've cleared the base of hostiles, and remember; turrets make better friends than enemies."
Operation 4 - Mission 12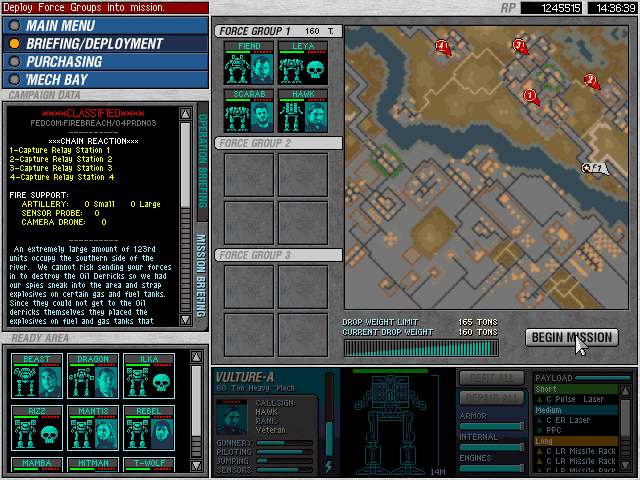
Xenocide 04/03
"This one can appear to be absurdly frustrating, but it's actually quite easy. You will face a few assault mechs, like an Awesome, but you must explode the gas tanks in order to defeat them. Be warned, however, that some of the gas tanks are placed near the objectives, and destroying them automatically fails the mission. Be strategic in how you dispose of the enemy, and you will be fine. The only 'Mech I defeated with my units was the Vulture at the end."
Operation 4 - Mission 13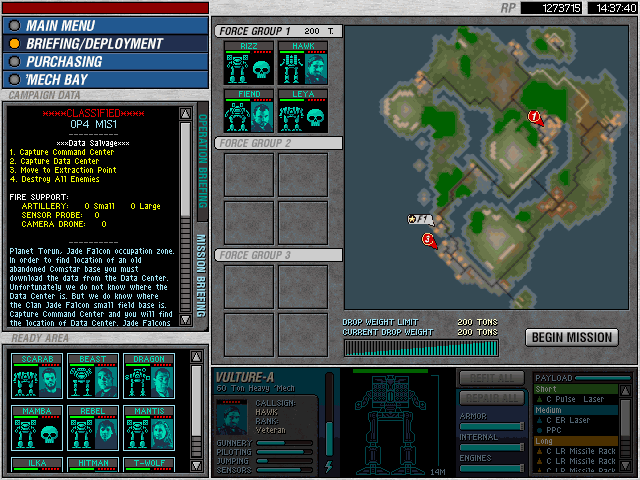
Exodus 04/01
"A contender for the obligatory Absolute Nightmare mission. You are only allowed to bring four fairly weak 'Mechs due to low tonnage, and have to fight a huge amount of enemies, including Cougars, Hunchback IICs, and even a Loki. When you think you've cleared the enemies and are safe, another wave will suddenly appear and swarm you. All of my 'MechWarriors were badly injured and many had lost weapons. I got my girl Blaze and my boy Outlaw here, but the price for them was paid thrice-over. Brutal. Brutal. Brutal."
Operation 4 - Mission 14
Exodus 04/02
"Another contender for Absolute Nightmare. You are only allowed two 'Mechs, have a pathetically low amount of tonnage, and face at least two stars full of 'Mechs, including a Vulture and a Thor. In addition to this, you face multiple dangerous vehicles in large groups. Jump jets are highly recommended, and healing up in mid-battle is almost necessary. As always, capture the turrets along the way. They'll soften up the lances later. Fight alongside the NPC 'Mechs, not after them, and you'll have an easier time winning."
Operation 4 - Mission 15
X-Ray 04/04
" A welcome relaxed break from the previous missions. This is a base assault mission that is fair. Nothing remarkable, and nothing terrible."
Operation 4 - Mission 16
X-Ray 04/05
"Absolute Nightmare contender number three. This is a rough mission that comes in two parts. Part one is comprised of your team of four. Choose your strongest 'Mechs, because they'll face a lot of punishment, and won't get a chance to heal. Your large artillery strike can make your life easier if used on the 'Mechs. Like all missions in this Operation, you will face enemy numbers far greater than your team, so bring AoE weapons like Long Toms and Sniper Cannons. Part two activates as soon as you clear the first objectives. You pilot a Condor light vehicle on a mission to capture MechWarrior barracks in the southeast. You need to move swiftly, however, and clearing the area is your top priority, since the Condor is fairly fragile. Be very mindful of the Aerospace Spotters, since one airstrike will be enough to destroy you and fail the mission, but the Condor is fast enough to evade them if you play intelligently. Use the Aerospace Spotters' airstrikes to make them destroy themselves, and you can bait the Elementals into letting you into the main base. I recommend using a small artillery strike on the southwestern tanks armed with Gauss Rifles, or they will surely destroy you after they overcome the gate. There is a nasty bug with this mission. Upon completion, the MechWarrior in the last position of the formation will be consumed, but his/her BattleMech will be restored to you, unharmed. I tried over five times with different people and this bug happened every time. It is imperative that you use someone you don't care about for the fourth/last position, because they'll be gone for good."
Operation 4 - Mission 17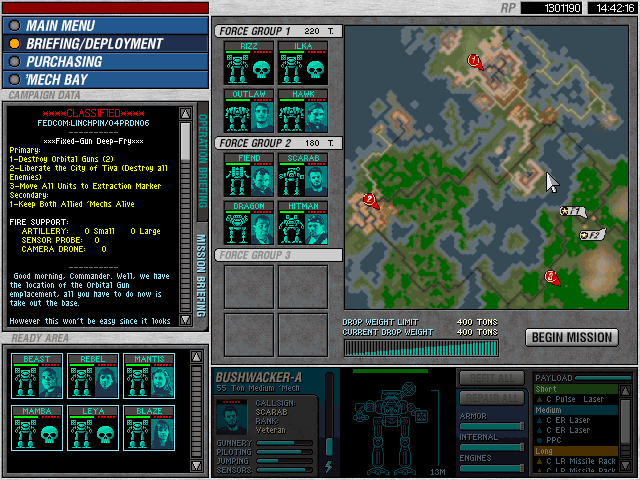
X-Ray 04/06
"Another fairly simple base assault mission, for the most part. First, you must rush to the ally base in order to rescue them from the incoming 'Mechs and vehicles. Saving both allied 'Mechs grants you 30,000RP, which is a huge bonus worth more than the mission, itself. You are provided with a Refit truck and even a repair bay, later, so bring all the ballistic weapons you want."
Operation 4 - Mission 18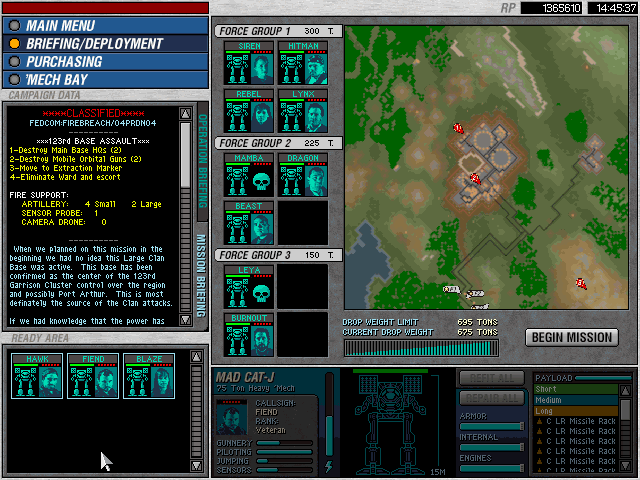
Xenocide 04/04 - Op4 Final
"Another base assault mission that is simple in theory. It makes up for this in difficulty. You will face an overwhelming number of heavy and assault class 'Mechs, in addition to several turrets, minefields, and large buildings that block your sight. Bring a refit truck. It's pretty much mandatory if you don't want to lose anyone. Even then, you'll have to be super careful, since it is easy to be overwhelmed."
"Concluding Comments -Probably the hardest Operation so far. Many of the missions require careful planning, out-of-the-box thinking, and even a fair bit of luck. My guys and girls have made it this far, despite their (and my) blood, sweat, and tears. After everything is said and done, I'll buy them all a round! Onwards to OP5!"
(c) by RizZen & stud84 (2017) - overhauling (2020)