
MechCommander Gold - Darkest Hours
Original campaign merge
Operation 5
"Just beat the campaign! What a ride!"
Operation 5 - Mission 1
Original 05/01 Operation 5 start
Mission Objectives:
+ Escort friendly Captain to extraction marker (45000 RP)
Maximum Tonnage: 500 tons
Maximum Units: 12 (4/4/4)
Artillery: 4 small, 2 big
Probes: 1
Logistic Phase: Heavy and assault 'Mechs with at least a speed of 18 m/s. A variants will be the best, though W varaints will do fine.
The map is a big urban area, with a fortified Clan base on the center. There is an hill near the extraction marker, and the marker itself is on an other hill.
Combat Phase: Send the fastest 'Mech you have to explore the hill on your left, and begin to move all other 'Mechs where the Clan base possibly is. The friendly 'Mechs (2 Catapults W, one Centurion W and one Atlas W with the captain you have to escort) will begin to move as 4 Vultures A attacks them.
The 'Mech on recon duties should have picked up two Vultures A and 2 Hunchback IICs A near the extraction marker: use the artillery strikes to destroy or damage them, and order this 'Mech to join up with the others.
The assault on the enemy base should have begun by now: destroy a fuel tank with a LRM volley, and enter the perimeter, CAPTURE the turret control tower, destroy the four 'Mechs near the entrance (two Vultures A and 2 Hunchback IICs A), and move toward your friendly 'Mechs (mhmm...it should remain only the Atlas...the other 'Mechs would be destroyed): capture the second turret control tower and cover the Atlas' retreat. Do not let the Atlas run away from your cover, it will be death.
Begin to retreat toward the extraction marker; 2 Bulldogs, one Swiftwind and 2 Shreks will move in; destroy the Bulldogs only, the Shreks will go for the control towers and the Swiftwind isn't a threat; in the base there are two containers (1 ER Large Laser and 2 LRM Racks), be sure to capture them.
Keep your 'Mechs near the Atlas, amd enage the remaining 'Mechs near the marker (if any) and let the Atlas reach it.
Operation 5 - Mission 2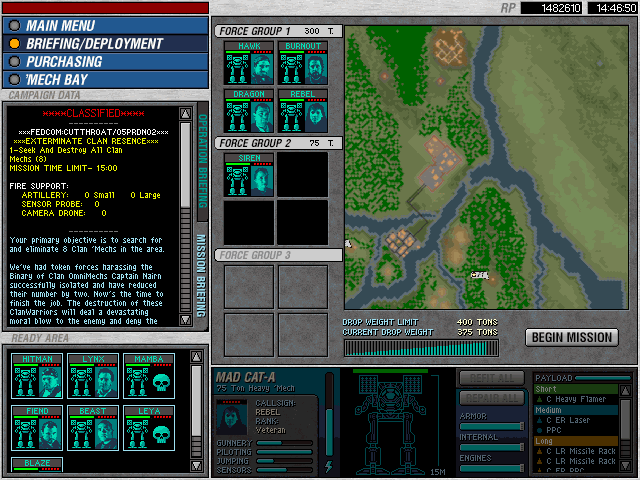
Original 05/02
Mission Objectives:
+ Find and destroy all 8 Clan 'Mechs (30000 RP)
TIME LIMIT: 15 minutes
Maximum Tonnage: 400 tons
Maximum Units: 8 (4/4)
Logistic Phase: Once again, assault and heavy 'Mechs with a speed of at least 18 m/s only. I used an Awesome, a Masakari, a Mad Cat and a Thor, and they performed admirably. As the mission is easy, be sure to salvage at least the Masakari present in this mission.
The map is articulated over three main islands, connected by small stripes of terrain. There is a base on the north east, a city in the west-south-west and a small flat on the upper edge of the map. Deploy your forces as F2 is the best thing.
Combat Phase: Assuming that you're starting from F2 starting position, go right until you see a small stripe of terrain connecting the first island to the other. On the second island there is a Mad Cat W, but it will prefer to run away than fighting you; if you can, destroy it now, it will be a nuissance later on.
Continue to chase the Mad Cat (or head east after the small forest): you'll enter in a small city: if you walk, you'll be able to see the two Hunchback IICs W hidden between the buildings. After them, move past the city and when possible head north to change island (through a bridge this time): follow the paved road intil you enter a base, and proceed east until you find four containers (2 ER Lasers, 1 Clan ECM, 2 Pulse Lasers, 2 Extended Sensors, 6 Streak SRMs, 3 Intermediate Sensors, 2 ER Large Lasers, 1 Heavy AC), one repair base, a sensor array and a turret control tower. If you didn't killed the Mad Cat, it will be here. Capture the control tower, an 2 Thors W will power up. Dispatch them, and go the repair base and dock.
Now head toward the upper-left corner of the map, where a 'Mech contact is awaiting.
Proceed slowly, the are is filled with fuel tanks which can be used as an improper weapon against the Masakari A guarding them. After having damaged them with an explosion, try to salvage it, you'll need it in your next missions.
Now return to the base, and repair if you need to. Head right from the eastern corner of the base, and you'll find a small stripe of terrain connecting the main island to the last one; cross it and two jump-capable 'Mechs, one Thor and one Mad Cat will ambush you. They'll use their jump jets to surprise you, but this will leave you enough time to destroy them when they land. If you started as F1, just start from the end of this paragraph.
Patch 1.9 note: when attacking the Masakari, stay away from the fuel tanks; looks like that with this patch enemy pilots are more prone to attack with those tactics; remember this warning for the next mission.
Operation 5 - Mission 3
Original 05/03
Mission Objectives:
+ Destroy all enemy forces (30000 RP)
+ Capture and defend all four oil derricks (30000 RP)
* Capture Clan HQ (2000 RP)
Maximum Tonnage: 350 tons
Maximum Units: 12 (4/4/4)
Artillery: 3 small, 3 big
Probes: 1
Logistic Phase: If you have two Masakaris, deploy them. Two Masakaris and two Mad Cats will be the best, though they can be substituted with Thors, Awesomes or Atlas if you don't have the Masakaris.
You are going to assault a fuel production facility, so be prepared to set them on fire or escape when needed. The river running through the map divides the land in two halves, but only the left one is of your interest. There's a small hill on the south-west, and the derricks are located on the west, on the south, on the south-east and in the center of the production facility. The HQ is closed by an hardened wall with LRM turrets, and there is a small airfield: though its destuction won't affect this and later missions, destroy it for fun.
Combat Phase: Begin to head south, toward the base: when you spot the first gas tanks, stop your 'Mechs and use the fastest 'Mechs you have to reach the outer wall, and retreat as soon as the LRM carrier behind it fires: its missiles are for the gas tanks, not for your 'Mech.
After this small recon, use your 'Mechs to destroy the two LRM Carriers guarding the gates, destroy the gates themsleves and go into the base, capture the turret control tower and take care of the remainng LRM carrier.
It is now time to begin the exploration of the base; do not capture the derrick for now. Head south-west and the first oil derrick, protected by a Loki A and two Rommels will be in your sensor's range; lure the guards near the fuel tanks and make them explode. Continue to head south west (ignore the derrick for now), capture the warehouse (one Heavy AC) and destroy the two Von Luckers protecting the second derrick.
Return to the base gates, and this time follow the road, first to the offices, then to the hardened wall containing the HQ and other structures. Destroy the turret control tower with LRM fire, and the enter the base: 4 Von Luckers will welcome you; after this party, caoture the wearehouses (4 Clan Streak SRMs, 4 LRM Racks) and dock with the repair base. After you've captured the HQ, the two remaining derricks will be revealed: one i guarded by three Bulldogs, go for them and destroy them from afar; the last one is near the lower-right corner of the map, and is protected by two Von Luckers (though you can't see them).
Approach this position from the lower edge of the map and then go east: you'll find a champ with eight Von Luckers without crew and 2 barracks, plus an active Cougar A. Destroy the 'Mech first and then for the barracks, this will kill the vehicles crew before they can reach them. Capture the two warehouses (2 Extended Sensors and one Clan Active Probe), and begin to head toward the derrick: a Loki A and two Commandos A will try to stop you, and a Masakari A will enter the area behind the last derrick, and will begin to target the outer wall to destroy the derrick by making the gas tanks exploding: however, it will place itself in a fuel tanks field, place one small artillery strike near it (at the limit of the fog of war) and watch the escape pod as it rockets in the air.
Now move to destroy the two Von Luckers and capture the derrick, than capture the one guarded by the Bulldogs and then the third, the one guarded by the two Von Luckers: two Hunchback IICs A will enter the area from south-east, and will stop to destroy the sensor tower: place one small artillery strike on the fuel tanks near them and watch their fireworks.
Before capturing the last derrick, go fro repairs and then capture it. 30 seconds after, 1 first groups of vehicles, 6 J.Edgars will try to destroy the derrick, to keep your 'Mechs near it and destroy them.
The second and last wave will come from the same place: now destroy the tanks to destroy the 3 Condors an the single J.Edgar. Mission completed.
Operation 5 - Mission 4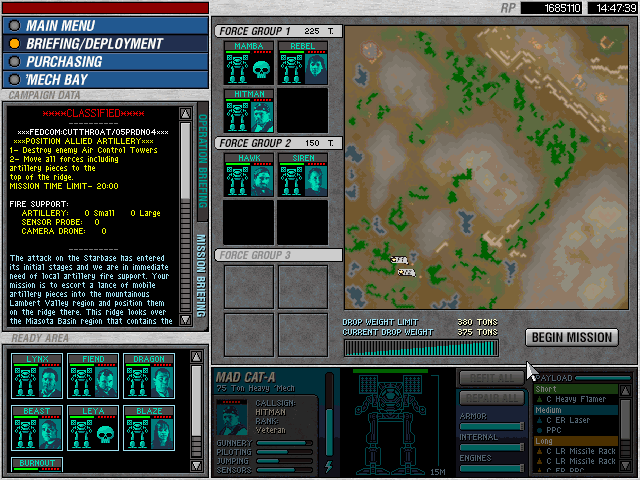
Original 05/04
Mission Objectives:
+ Destroy Air Control Towers (20000 RP)
+ Move all Mobile Artillery Vehicles on the ridge (30000 RP)
Maximum Tonnage: 380 tons
Maximum Units: 8 (4/4)
Logistic Phase: Fast heavy and assault 'Mechs. Having all Clan 'Mechs would be the best thing.
The map is full of large hills, and the rest of the terrain is covered by woods. There is a small enemy base on the extreme north, and the three control towers and the ridge where you have to position the artillery batteries is on the upper-right corner of the map.
Combat Phase: Begin by destroying the 2 Saracens and the Bulldog coming from the east, and then head left. Destroy any patrolling group you encounter (composed of the Saracens and one Bulldog) and climb the every hill you see; on the first hill you'll find a Raven A heralding the coming of two Centurions W and two Hunchback IICs W. Destroy them ASAP, and this time head toward the upper edge of the map. You'll eventually find a small base on the north, with a Raven A, 2 Centurions W and one Hunchback IIC W inside it; the base has a turret control tower and a sensor array, but it is heavily protected by pup-up AC turrets, and you won't have enough time to stage an attack. Begin to head right, and destroy the Catapult and the Hunchback IIC W coming after you. Near the upper right corner of the map there is a small forest, and the AeroSpace Fighters will stage random strike runs on it, and this is the safest way to reach the ridge and the Air Control Towers. Move one of your 'Mechs in the forest, and the 'Mechs in the base in the opposite corner will power up and will come after you. After this battle, move all your 'Mechs and vehicles on the ridge, paying attention to the air raids.
Now you should be on the desert-like terrain: be sure to destroy any pop-up laser turret you encounter, and begin to move near the first Air Control Tower. Every Control Tower is protected by fe pop-up LRM turrets, one Von-Lucker and one LRM Carrier; destroy the garrison forces but ignore for now the Towers:
after you've reached the first tower, four Cougars J will attack you. Destroy them and head for the second an third Tower. Position one or two 'Mechs near each tower, and the Artillery vehicles on the extraction marker, and order to your 'Mechs to destroy the Towers simoltaneously: if you destroy one Tower, the remaining Towers will address the AeroSpace Fighters on the destroyed one, killing everything near it.
Operation 5 - Mission 5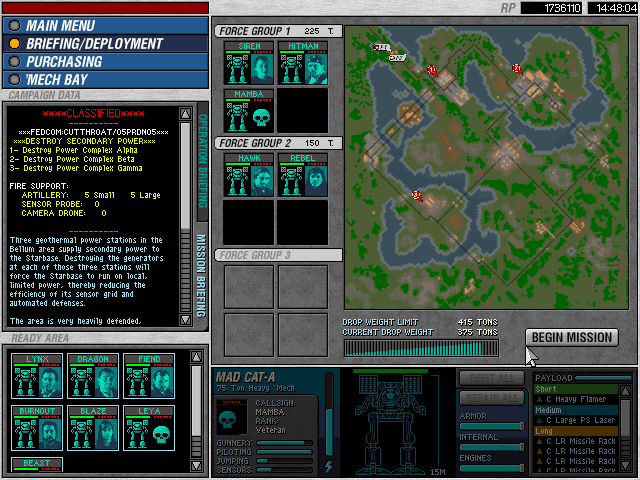
Original 05/05
Mission Objectives:
+ Destroy Power Generator Alpha (10000 RP)
+ Destroy Power Generator Beta (15000 RP)
+ Destroy Power Generator Gamma (15000 RP)
Maximum Tonnage: 415 tons
Maximum Units: 8 (4/4)
Artillery: 6 small, 4 big
Logistic Phase: Assault and heavy Clan 'Mechs only; Inner Sphere heavies can be deployed, but they'll limit you; do not dare to deploy a light or medium 'Mech, the Jagaurs brought here two full Stars of heavies, several heavy vehicles and two Stars of light 'Mechs.
The map has the three power generators on the north, on the west and on the east, and in the center of this triangle there is an other large base. The south part of the map is free, with only small hills and trees covering it. Paved roads link every base to each other: from the first generator to the third there is a two-way bridge, and the road from the first to the second generator features a small paved area with fortified walls.
Combat Phase: Begin to head south until you find two vehicle contacts: those are Shrek PPC carrier, and the area is full of them, sometime with LRM Carrier and Von Lucker escorts; you should notice a some trees on your 'Mechs' right: go behind it and proceed until you can see the two vehicles, and take them out with LRM fire. Continue this way, and destroy the 3 Von Luckers and an other Shrek PPC Carrier blocking your way. A Thor A will try to support the vehicles, but it won't pose a big threat if engaged alone; be careful, it has an Heavy AC, however, so be sure to don't get too close.
Proceed south, and you'll find the first power generator, with one sensor array. Capture the array and ignore the generators for now: two 'Mech contacts are coming to reestablish Clan control over the generator: as these 'Mechs are Masakari A (both), it is better to take advantage of the several fuel tanks located on the Alpha Generator south side. After the first two Masakaris are down, explore the area where the fuel tanks were and capture the various warehouse (4 Flamers, 2 Advanced Sensors, 1 Beagle Probe, 1 Guardian ECM, 2 Gauss Rifles, 4 ACs).
Now return to the first base and, if you want, destroy the three generators; you can do this later, when all enemies have been eliminated, however. Now go toward the third power generator, using the two bridges on the west: the first island has several pressure tanks on it, so do not stop, and proceed toward the second island, and stop there: the other shore is guarded by several LRM turrets behind an hardened wall and two Shreks protecting the gates: use concentrated fire to destroy both PPC Carriers and use the fastest 'Mech you have (a Mad Cat or a Thor) to capture the nearby turret control tower.
Now follow the road and head south, toward the third power generator:
near it you'll found two Thors A, and the four generators are protected by some AC turrets and an hardened wall: destroy the Thors and one AC turret on the north side, enter the perimeter and capture both control towers: now head east and capture the turret tower, then head to the third base: three Masakaris (W, A and J variants) will come toward you: first they'll destroy the turrets near the bridge, and then the AC turrets sorrounding the base; when they'll go after the gate, use your artillery strikes (one or two large strikes and 2 or 3 small ones) on them, then move out and finish them.
It is now time to plan a major assault on the central base: it contains 3 Masakaris W plus four LRM Carriers and two AC turrets defending each gate, but you should be able to divide the Masakaris from the rest of the defendign forces. Note that the three Masakaris will come after you if you decide to assault the second power plant without destroying them. To assault the central base, follow the paved road until you'll see two trees forming a small passage on the south-west corner of the base: use the fastest 'Mech you have to scout the position, and lure the three Masakaris outside the base, and use the remaining artillery strikes to weaken them, then use your 'Mechs to kill them.
Enter the base, destroy the four LRM Carriers and the LRM carrier and the two Von Lucker on the north side and the three LRM Carriers on the south, then caputure all Repair bases (and dock) and warehouses (3 Pulse Lasers, 2 Large Pulse Lasers, 4 LRM Racks and one Heavy AC).
Now head south-east and assault the second, and last, power generator from the south: this site is protected by 10 Ullers W, all shutted down, with their MechWarriors in two separate barracks: destroy the barracks first, and then take care of the 4 LRM Carriers and of the turret control tower directing the two nearby AC turrets. Before destroying any remaining generator, return to the central base and repair.
Side note: the north side of the second site is protected by at least 20 LRM turrets directed by tow control towers and 3 Shreks: if you came from the south, capturing the towers will be easy, and the PPC Carriers will be destroyed by them; if not, use the fastest 'Mech you have to capture the towers and then move the remaining forces.
Operation 5 - Mission 6
Exodus 05/01
"Another base assault mission, and it feels like it's specifically designed to cause great weapon losses and/or MechWarrior deaths. While the tonnage allotment isn't bad, you face such an overwhelming number of enemies at one time. I wouldn't suggest taking a refit truck, since that will take up one slot that could be used on a BattleMech, and here, each slot counts. Lastly, the area south of the base where the Awesome and Mauler are powered down is VERY prone to crashing. I don't know what I did differently to get past the crash, but I got through it somehow. All other attempts to beat this mission again have resulted in failure due to the game crashing."
by stud84
Operation 5 - Mission 7
Exodus 05/02
"A fairly easy escort mission. Don't leave the APCs unattended, since two Masakari will appear over time to harass them. The enemies in this mission (and, in turn, this Operation) love to land headshots, so be extremely careful."
Operation 5 - Mission 8
X-Ray 05/01
"A welcome reprieve from the difficulty that was Mission 6. Defeat each group of enemies individually, and only engage the Awesome's Lance if you're feeling brave."
Operation 5 - Mission 9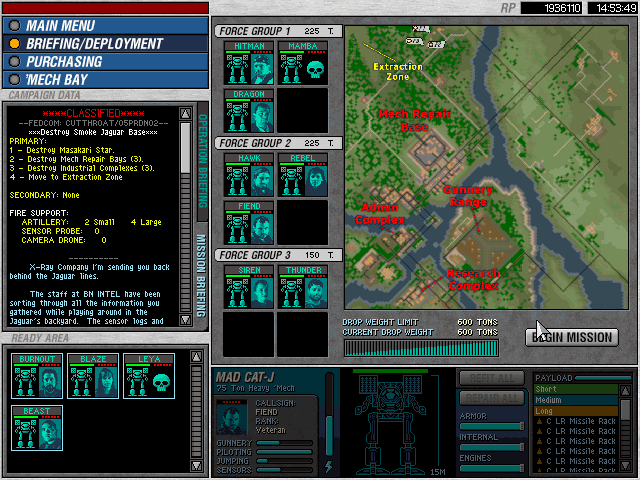
X-Ray 05/02
"An interesting mission. It's a callback to Operation 3 Mission 10, and this time, you must storm the central base and capture it for yourself. This mission was actually a bit nostalgic, and it was fun coming back here, deploying my better 'Mechs and MechWarriors, and watching them conquer the base. I got a real feeling of accomplishment, which is incredibly unique. There are Masakari to the northeast and south, so keep that in mind. Many, many roaming 'Mechs are found on this map. Be very careful, and only destroy the repair bays once all hostile threats have been neutralized."
Operation 5 - Mission 10
X-Ray 05/03
"A bit of helter-skelter back and forth switching. It helps to keep the bridges watched. An Uller will try to rush through your lines in an attempt to blow up the power generators, so be ready for it. The last 30 minutes or so of the mission is nothing but waiting. Watch some YouTube, have lunch, or play with the dog. Seriously."
Operation 5 - Mission 11
Xenocide 05/01
"Super fun escort mission. Make sure you protect the barns, and there's no need to wait the rest of the timer after you've defeated all enemies on the map. One of my favourite missions of Operation 5."
Operation 5 - Mission 12
Exodus 05/03
"Fun escort mission. As always, capture the turrets and they will make great allies. Jump-capable 'Mech will be useful in order to do so. The Atlas is on the west side of the map, hidden in the trees."
Operation 5 - Mission 13
Xenocide 05/02
"You need to hustle for this mission. Turrets here are more trouble than they're worth, so destroy them quickly. Expect many dangerous 'Mechs here, including a full assault class enemy Star. While the last objective is to kill Wirth, you must actually defeat all enemies on the map to win, which can be problematic. There are two areas that contain enemies you might not find, and they are located to the northeast of the repair bays, and west of the main base. Wirth and his Star are located in the middle part of the map, south of the main base area where the orbital guns are. He is guarding a set of orbital guns as well, which are located in the southeast of his landing pad area. Time management is absolutely essential, and you don't want any of your allies to fall if you hope to defeat Wirth's Star. Repair only after you've cleared the main base area, because you likely won't have time to return later."
Help! - I can't finish this mission. I killed Colonel Wirth - but the mission never ends?!?!?
Background story: The original creators from X-Ray campaign made this mission but it was used for Xenocide standalone later. This is the most buggy Xenocide mission that was implemented into the built.
Solution: In order to make the mission finish-able - i changed the "Kill Colonel Wirth" mission objective into an "Kill all enemies" objective. So there is a easy solution to trigger the mission objective:
Kill all enemies = Wirth must be dead = Mission ends succesful
Hint: Keep in mind that there is a cluster of enemies in the north - usually players don't recognize that when playing the mission for the first time.
Operation 5 - Mission 14
X-Ray 05/04
"This mission is completely unplayable. Upon beginning, one member of your group will start alone on the left side of the map, and they must power down so a roaming group of 'Mechs won't find and destroy you. After your main force crosses the bridge to the larger area, you are attacked by an Awesome and its Star of 'Mechs, along with many turrets, including artillery. Their challenge is fine, however, but after this is when the absurdity of the design comes into play. After clearing the small base, you are already greatly wounded, so when you capture the repair bay to heal, it is suddenly attacked by two or three mobile artillery turrets hiding in the nearby forest. Your 'Mech will most likely be destroyed, along with eventually the repair bay. If you want to attack them, you have to spend a great deal of time getting to them, since they're on the other side of the cliff. Of course, they are shooting at you while you close the distance. You don't get any airstrikes to help out, and the turrets have a great deal of health, meaning that there's slim chance of defeating them at all. Add to the fact that they are obscured by forests, so only LRM or Long Tom fire has a chance of hitting them. Even setting the difficulty to easy had no effect. I restarted this one at least six times before I gave up, changed the mission to something else, and proceeded. I really enjoy the challenge in these missions, but this one was pure frustration and absurdity. I am not sure what the developer was thinking, this time around."
Operation 5 - Mission 15
Exodus 05/04
"Exciting war mission. A great battle in the east takes place, between your allied forces against the enemy, and although it's fun to watch, your allies need your help. Once the battle is settled, proceed to the southwest, where the enemy base is present. A full Star of heavy and assault 'Mechs are fortified here, but you can lure them out, one by one, with careful attention to positioning. I shudder to think what would happen if I fought them all at once. Another favourite mission."
Operation 5 - Mission 16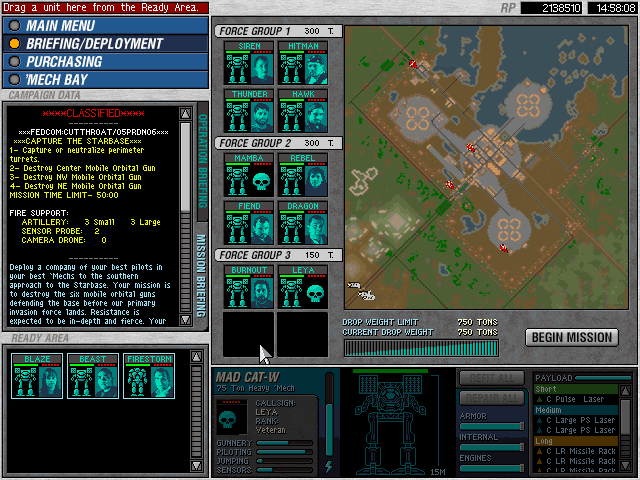
Original 05/06 - Op5 Final
" It plays almost the same as the original vanilla final mission, but it seems a bit more challenging. Going back to the original, I noticed the tonnage allotment is 800, versus this version's 600. There appear to be more turrets and more enemy 'Mechs, compensating for the fact that you are better armed and have more skilled 'MechWarriors, which is understandable, but the lowered tonnage feels a bit unfair. It would've been really cool doing the last mission with a full Company of my best 'Mechs. Despite this, I really enjoyed the different take on this mission. While the basic goals are the same, I really had to adjust my tactics to compensate for the new difficulty. A lot of fun, and my third favourite mission."
Mission Objectives:
+ Destroy the Orbital Cannons (33000 RP)
+ Destroy the Orbital Cannons (33000 RP)
+ Destroy the Orbital Cannons (33000 RP)
* Capture or destroy the perimeter turrets (5000 RP)
TIME LIMIT: 35 minutes
Maximum Tonnage: 600 tons
Maximum Units: 12 (4/4/4)
Artillery: 3 small, 3 big
Probes: 2
Logistic Phase: Assault and heavy 'Mechs only, with a good mix of long and short range weapons. There aren't many vehicles are, but the Clan has a full Trinary inside the base, and it is a assault one.
This mission is set on the starport, the final objective of the whole campaign, so this will be your last mission. The starport occupies two thirds of the map, leaving only a small part of the south-west covered by an hill and some trees. The external perimeter is protected by a double hardened wall with LRM turrets, and inside other heavy walls divide the starport into several sub-sections.
Combat Phase: You'll start on a small hill: proceed on its top and this will reveal 4 Thors W going to the base, to reinforce it. They won't pose a problem, so do not waste ammunition or artillery strikes on them.
After the Thors passed, proceed toward north, inside the small forest: you'll encounter a Loki J patrolling the perimeter, and a second Loki will come to help its mate. After you destroyed the 'Mechs, approach the light wall, but DO NOT step in the area between the light and the heavy wall: it is mined. Destroy the mines and the hardened wall sections, enter the base and destroy all LRM turrets firing at you.
On the left side of your map there is a small hill, inside the base: use one of your jump-capable 'Mechs (you have at least one Masakari J to do this) to proceed on its top: this will make 5 Vultures J to activate, and they'll begin to follow your scout: make him return on its path and prepare to fend off this attack; it is possible that 2 or 3 Vultures will stop in the base or on the hill: place on big artillery strike on them and if necessary, finish them with your 'Mechs.
Now proceed north, to circle the inner perimeter protecting the third (as mission objective number) Orbital Cannon: you'l eventually find the LRM turret control tower and it spower generator: take out both of them, enter the second perimeter and destroy the Cannons: 5 Hunchback IICs w, a Mad Cat A and a Masakari A will move to destroy you; after this battle, explore this sub-section and use the reapir base in it. If you procees east, you'll find one Von Lucker protecting an other repair base, but this is useless for the mission.
Now proceed toward the second Cannon emplacement: you'll find four Cougars W patrolling a second sub-section, and the four Thors W standing still in a column: destroy the Cougars and place one or two artillery strikes on the Thors, but ignore them for now: they won't fire; a Masakari W will attack you:
if you can, capture the turret control tower befoe engaging the Masakari, the several LRM turrets in the area will give you a significant help.
Now move south, and explore this sub-section: 2 Vultures, one Mad Cat and one Thor (all J variant) will jump in it from the south, but the LRM turrets will take care of them, though they'll may need an hand in destroying the Mad Cat and the Thor. After you destroyed these 'Mechs, destroy the Orbital Guns and dock with the nearby repair base (on the east); all warehouses in the starport are empty.
Now it is time to move toward the final Orbital Cannon: proceed along the small peninsula you'll find two Masakaris A guardind the only gate to it, and 5 Hunchback IICs J will jump near you to support them: it is nearly impossible to destroy all 'Mech, and it's better to order to your 'Mechs to run toward the last Cannon, and destroy it: be careful, an other Masakari (this time a J variant) is guarding it; ignore all enemies, and destroy the Cannon ASAP. After all Cannons have been destroyed, sit back and enjoying the (short) ending movie.
(c) by RizZen & stud84 (2017) - overhauling (2020)
Previous Operation <-> Darkest Hours Expansion Campaign Merge


hi, I encountered problem at Operation 5 - Mission 9. Killing all the Masakari but Masakari Omnimech objective still not completed. There's one Masakari at south, another at northeast and three at the repair bay (these three were killed with no pilot crew in it). Am I missing something?
Units need to be active before being count as mission objective trigger.
This comment is currently awaiting admin approval, join now to view.
This comment is currently awaiting admin approval, join now to view.