Articles
Posted
Updated
| Subject
| Author
| Popular Today
| Popular All Time
| Relevance
It has been more than 3 years now since I simply couldn't find the time to map. I have a beautiful and absolutely lovely child who is 3 years old and 4 months, and this was what kept me away from mapping.
Many things have happened in all this time, but I never lost illusion for continuing making maps. I had already decided to focus only in my mod instead of making random P2 maps before this pause on mapping, and I've been developing many things I had in mind during this period. A month ago or so I could finally start revising all instances, models and ideas and polished it all a lot until I got everything working as I wanted.
I am now making the maps for the workshop. I think this is slightly more difficult than to arrange everything to be a mod, since there's the limit of 100MB per map and I've got hundreds of MB of custom content. Luckily, after I limited the usage of textures, rooms and stuff, I managed to reduce the map sizes within the limit :) However, my idea is to anyway release this stuff as a mod, but that will be later, after having developed at least around half of the total number of maps.
There's still a lot work to do, but I'm happy to say that everything is now in a good status.
What's next...
I'll release 3 maps at the same time. The 1st of them will be sort of an introduction, with few gameplay, mainly based in cut scenes to show the beginning of the story. The 2nd one is a tutorial map about how to use some new puzzle elements. And the 3rd one would be the very first real map.
All these 3 maps will take place in a temple. This is where the story begins. There is no portalgun in the beginning and no portals of course.
And there will be more maps in this temple.
This is all I can say for now...
I'll post some screenshots soon meanwhile I finish the first map batch.
Take care.
Jose
Hey guys! I'm sorry for this terrible delay in posting any news of any kind ;D
As usual, I haven't stopped mapping (AT ALL) these 2 months (o_O I didn't notice it was that long LOL). The thing is that I've been quite busy with side projects. Mainly some beta-testing of friends' maps, but also a new map I've been making. Let me share 2 main important and HOT news with you all!
Da-MASK [Chander Test 12 REmix by josepezdj]
This project raised right after completing a map of one of my favourite puzzlemakers, Chander. The thing is that I spent a lot of time playing his Test nº 12 that I found a new solution I wanted to performed, but in order to do so, some changes had to be be introduced in the map. So after having Chander's permission, I've been developing a "REmix" of his map... it has taking me nearly 2 months to complete because I finally made it way more complex and bigger ;D Apart from "drowning" it with a personal style that I use to give my maps :D
The map will be released really soon because I'm almost finished with it now, though it's a hard map. Judging from the lack of replies to The Second Exodus (surely because of the difficulty level) I won't even suggest you to try it. But in the case you still want to play it, just stay tuned to my workshop: Steamcommunity.com
I've made a teaser trailer too, available in my Youtube Channel: Youtube.com
And there's a post at TWP including some pics apart from the promotional trailer: Forums.thinkingwithportals.com
The Enceladus Initiative UPDATE [a Christmas gift ;D]
As I said above I'm so sorry for sort of deviating my work a little from the mod due to side projects. The thing is I like creating and that's what I've been doing :) So concerning the mod, I always wanted to released those 6 first levels as a whole bunch right in the moment I finished with them all. This has some advantages but also some inconvenients. My main purpose was to tell the story how it has to be told, from the beginning to the end, introducing the characters step by step, to include all the custom stuff including the music and soundscapes, the voiceovers, etc.
But lately I've thought of a different approach, I've decided to release the mod by chapters ;D ... due mainly to 2 things/worrries:
1. Mainly, I'd like to to gather more information about my maps' difficullty level, and I'd like to have feedback about the gameplay... I am really concerned regarding this. It's difficult for me not to be a bit tricky or twisted when it comes to puzzle making because I love hard maps, that's the truth. But I've decided to make the mod a bit bigger and to dim the difficulty curve along the mod. However, there are many difficult puzzles already mapped and ready to go! and those will ofc be kept.
2. I'd like to keep the followers of the mod or my work engaged and busy! ;D I think it's a good approach too to be sharing the maps and to let you guys be an active part of the mod's development by playing the maps and giving feedback.
So these could be thee conclusions.
- Feedback is absolutely required for every mapper to continue developing and improving! I urge you all to don't ever stop giving your opinion. If the map is hard, just say. if you like it, say it, and If you want to send me to hell, please say it too :p ...but please do not stay quiet or I won't be able to make decisions about the progression and I'll finally do whatever that comes from my mind.
- As spotted already, a demo will be released. I think I can include 2 maps: one medium difficulty and a hard one. This way I can measure up the community level. NOTE: as I want this demo to be a Christmas gift, I have to hurry a lot! and maybe I cannot prepare the music, effects or voiceovers in time. But the demo will be released with no more delay. Also, the demo maps will be located in the middle of the mod, so there is still no beginning or much story into them, please be noted.
- After that first demo I'll start making the very beginning of the mod, still not mapped, but more or less ccompletely sketched. As soon as the first chapter is ready I'll release it. NOTE: In this case, only after having it complete, including all, story, scenes, music, characters, models, etc. this chapter will be out. And so on with ther rest of chapters ;D
OK, I hope these are good news for you!
Do not forget to comment! Thanks!
jose
Hey guys!
For those who still don't know what Propper is, I'll just say it's a handy tool for turning a bunch of brushes into a prop static, dynamic or physics.
I got very annoyed that there were no such tutorial about the implementation of this useful tool for the P2AT. It looks like nowadays no mapper seems to be interested in using this program, or never managed to finally succeeded implementing it. I really think it's very useful, and my intention was only to describe the process so anyone any time could find the how-to easier that I did...
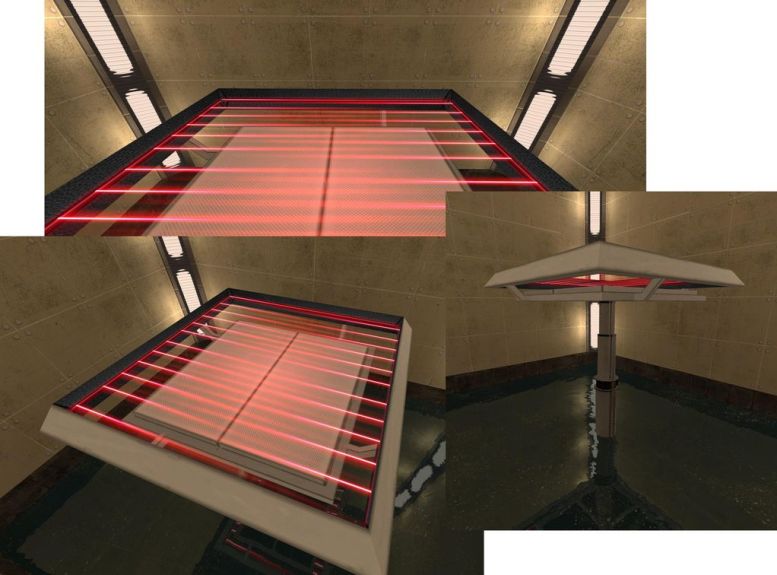
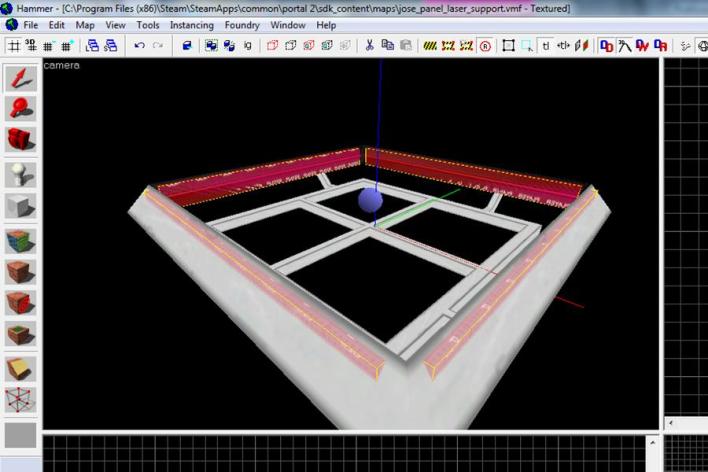
In my particular case, I recently reached the max. number of brushes allowed per map (8192) in one of my maps, because as a newbi I do lots of crazy things while mapping :D. As some of you already saw in the pictures of my mappack, I've got many brushes composing my floors and ceilings, but also many brushes for those slanted light supports I use, or some custom squarebeams I built, so it seems that I easily reached that max no. of brushes. Examples:
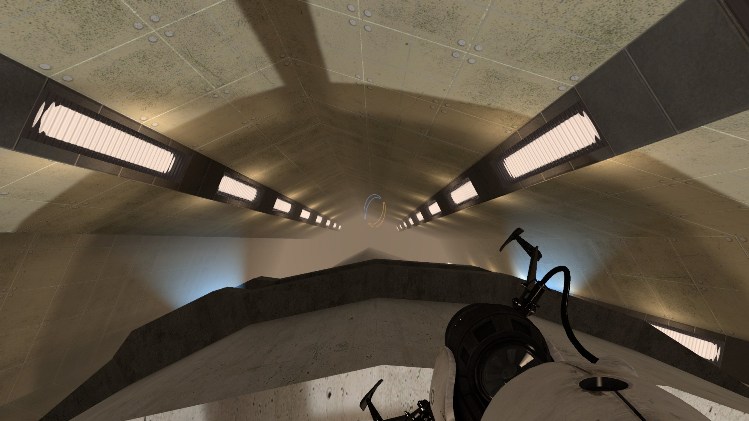
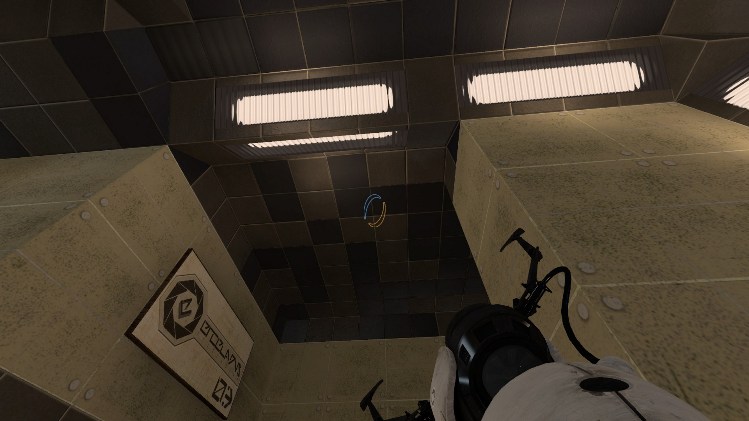
So my usage of this tool is mainly to reduce the number of brushes and to have my own models of the most used supports and stuff I made out of brushes. This tutorial is dedicated to those who don't know modeling or don't have time to learn (like me :D)...
Propper is a modified version of the vbsp.exe (similar to the one we all have into our portal2/bin folder that hammer uses when compile) that outputs a model instead of a .bsp file when compile, but cannot be used with P2 Authoring Tools because it's old, was a modification of an old vbsp.exe and, as there are no more updates since 2011 Jan, it cannot be used directly. But the good news is that we can use it in the old SourceSDK instead and then export the model to Portal2. The only requirement is to own the game Half Life 2 - Episode 1 (well, it can be set up for being used also with Portal (1) or HL2... if anyone needs it, just let me know!).
GETTING STARTED
1. Download the SourceSDK tool from your Steam library > Tools.
2. Then (following a modification of the GameConfig.txt file that Chickenmobile made :thumbup: ), we'll make a txt file named GameConfig.txt with the following code inside and place it into [yoursteamaccountname]/SourceSDK/bin/Source2007/bin folder:
code:
"Configs"
{
"Games"
{
"Half-Life 2: Episode One"
{
"GameDir" "c:\program files (x86)\steam\steamapps\josepezdj\half-life 2 episode one\episodic"
"hammer"
{
"GameData0" "c:\program files (x86)\steam\steamapps\josepezdj\sourcesdk\bin\source2007\bin\halflife2.fgd"
"GameData1" "c:\program files (x86)\steam\steamapps\josepezdj\SourceSDK\bin\source2007\bin\propper.fgd"
"TextureFormat" "5"
"MapFormat" "4"
"DefaultTextureScale" "0.250000"
"DefaultLightmapScale" "16"
"GameExe" "C:\program files (x86)\steam\steamapps\josepezdj\half-life 2 episode one\hl2.exe"
"DefaultSolidEntity" "func_detail"
"DefaultPointEntity" "info_player_start"
"BSP" "C:\program files (x86)\steam\steamapps\josepezdj\sourcesdk\bin\source2007\bin\vbsp.exe"
"Vis" "C:\program files (x86)\steam\steamapps\josepezdj\sourcesdk\bin\source2007\bin\vvis.exe"
"Light" "C:\program files (x86)\steam\steamapps\josepezdj\sourcesdk\bin\source2007\bin\vrad.exe"
"GameExeDir" "c:\program files (x86)\steam\steamapps\josepezdj\sourcesdk\bin\half-life 2 episode one"
"MapDir" "c:\program files (x86)\steam\steamapps\josepezdj\sourcesdk\bin\sourcesdk_content\episodic\mapsrc"
"BSPDir" "C:\program files (x86)\steam\steamapps\josepezdj\half-life 2 episode one\episodic\maps"
"CordonTexture" "tools\toolsskybox"
"MaterialExcludeCount" "0"
}
}
"Half-Life 2: Episode Two"
{
"GameDir" "C:\program files (x86)\steam\steamapps\josepezdj\half-life 2 episode two\ep2"
"hammer"
{
"GameData0" "C:\program files (x86)\steam\steamapps\josepezdj\sourcesdk\bin\source2007\bin\halflife2.fgd"
"TextureFormat" "5"
"MapFormat" "4"
"DefaultTextureScale" "0.250000"
"DefaultLightmapScale" "16"
"GameExe" "C:\program files (x86)\steam\steamapps\josepezdj\half-life 2 episode two\hl2.exe"
"DefaultSolidEntity" "func_detail"
"DefaultPointEntity" "info_player_start"
"BSP" "C:\program files (x86)\steam\steamapps\josepezdj\sourcesdk\bin\source2007\bin\vbsp.exe"
"Vis" "C:\program files (x86)\steam\steamapps\josepezdj\sourcesdk\bin\source2007\bin\vvis.exe"
"Light" "C:\program files (x86)\steam\steamapps\josepezdj\sourcesdk\bin\source2007\bin\vrad.exe"
"GameExeDir" "C:\program files (x86)\steam\steamapps\josepezdj\half-life 2 episode two"
"MapDir" "C:\program files (x86)\steam\steamapps\josepezdj\sourcesdk\bin\sourcesdk_content\ep2\mapsrc"
"BSPDir" "C:\program files (x86)\steam\steamapps\josepezdj\half-life 2 episode two\ep2\maps"
"CordonTexture" "tools\toolsskybox"
"MaterialExcludeCount" "0"
}
}
}
"SDKVersion" "3"
}
{
"Games"
{
"Half-Life 2: Episode One"
{
"GameDir" "c:\program files (x86)\steam\steamapps\josepezdj\half-life 2 episode one\episodic"
"hammer"
{
"GameData0" "c:\program files (x86)\steam\steamapps\josepezdj\sourcesdk\bin\source2007\bin\halflife2.fgd"
"GameData1" "c:\program files (x86)\steam\steamapps\josepezdj\SourceSDK\bin\source2007\bin\propper.fgd"
"TextureFormat" "5"
"MapFormat" "4"
"DefaultTextureScale" "0.250000"
"DefaultLightmapScale" "16"
"GameExe" "C:\program files (x86)\steam\steamapps\josepezdj\half-life 2 episode one\hl2.exe"
"DefaultSolidEntity" "func_detail"
"DefaultPointEntity" "info_player_start"
"BSP" "C:\program files (x86)\steam\steamapps\josepezdj\sourcesdk\bin\source2007\bin\vbsp.exe"
"Vis" "C:\program files (x86)\steam\steamapps\josepezdj\sourcesdk\bin\source2007\bin\vvis.exe"
"Light" "C:\program files (x86)\steam\steamapps\josepezdj\sourcesdk\bin\source2007\bin\vrad.exe"
"GameExeDir" "c:\program files (x86)\steam\steamapps\josepezdj\sourcesdk\bin\half-life 2 episode one"
"MapDir" "c:\program files (x86)\steam\steamapps\josepezdj\sourcesdk\bin\sourcesdk_content\episodic\mapsrc"
"BSPDir" "C:\program files (x86)\steam\steamapps\josepezdj\half-life 2 episode one\episodic\maps"
"CordonTexture" "tools\toolsskybox"
"MaterialExcludeCount" "0"
}
}
"Half-Life 2: Episode Two"
{
"GameDir" "C:\program files (x86)\steam\steamapps\josepezdj\half-life 2 episode two\ep2"
"hammer"
{
"GameData0" "C:\program files (x86)\steam\steamapps\josepezdj\sourcesdk\bin\source2007\bin\halflife2.fgd"
"TextureFormat" "5"
"MapFormat" "4"
"DefaultTextureScale" "0.250000"
"DefaultLightmapScale" "16"
"GameExe" "C:\program files (x86)\steam\steamapps\josepezdj\half-life 2 episode two\hl2.exe"
"DefaultSolidEntity" "func_detail"
"DefaultPointEntity" "info_player_start"
"BSP" "C:\program files (x86)\steam\steamapps\josepezdj\sourcesdk\bin\source2007\bin\vbsp.exe"
"Vis" "C:\program files (x86)\steam\steamapps\josepezdj\sourcesdk\bin\source2007\bin\vvis.exe"
"Light" "C:\program files (x86)\steam\steamapps\josepezdj\sourcesdk\bin\source2007\bin\vrad.exe"
"GameExeDir" "C:\program files (x86)\steam\steamapps\josepezdj\half-life 2 episode two"
"MapDir" "C:\program files (x86)\steam\steamapps\josepezdj\sourcesdk\bin\sourcesdk_content\ep2\mapsrc"
"BSPDir" "C:\program files (x86)\steam\steamapps\josepezdj\half-life 2 episode two\ep2\maps"
"CordonTexture" "tools\toolsskybox"
"MaterialExcludeCount" "0"
}
}
}
"SDKVersion" "3"
}
Obviously, each of you should modify the paths to point to where your SourceSDK is located, maybe they're just the same paths only changing the steam account name josepezdj to yours...
3. Download Propper from moddb. You'll only need 2 files from all included in the .zip file (propper_0.3.zip), the ones located into \sourcesdk\bin\source2007\bin\, which are:
- propper.exe
- propper.fgd
(extract them and place them in [yoursteamaccountname]/SourceSDK/bin/Source2007/bin)
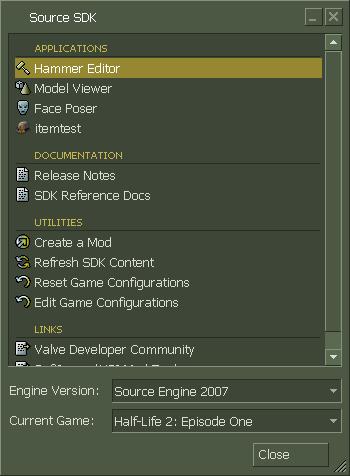
4. Launch SourceSDK and in the bottom part select "Source2007" engine version and the game HL2-Ep1:
5. Then launch Hammer editor and press F9 (Compile) and set the following:
- In the "Normal Mode" check the "Don't run the game after compile" option at the bottom part of the window and then click "Expert..."
- In the "Expert Mode" hit the "New" button. We'll add a new compile mode that we'll name "Propper" with the following settings:
· Command: propper
· Parameters: -game $gamedir $path\$file
Like so:
6. Download GUIStudioMDL and place the file GUIStudioMDL.exe preferrably into Half Life 2 Episode One/episodic/bin folder. This program will allow us to recompile the model for being used in Portal2. Launch it and set the following params:
- Go to: Config > Set EP1 Tools Path and locate your C:\Program Files (x86)\Steam\steamapps\common\portal 2\bin folder
- Go to: Config > Set Orange Box Tools Path and locate your C:\Program Files (x86)\Steam\steamapps\common\portal 2\bin folder
- In the main window, middle height, locate Target Mod or “GameInfo” Path and click the "Add" button and locate your C:\Program Files (x86)\Steam\steamapps\common\portal 2\portal2\gameinfo.txt file.
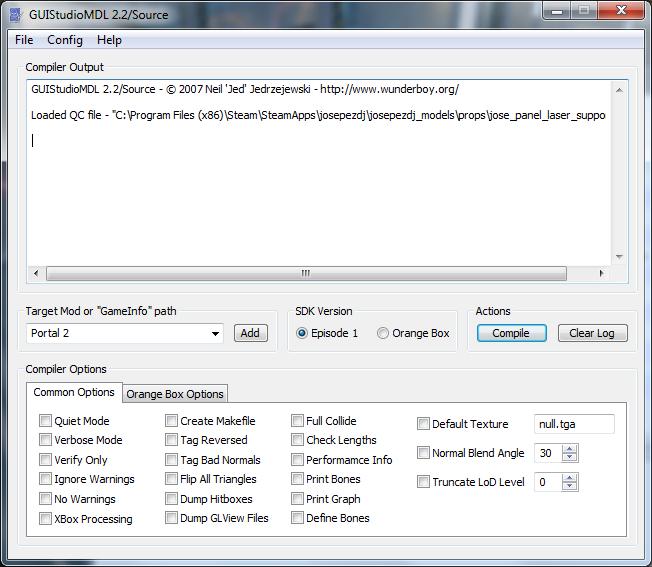
That should be all for having everything set up correctly :D
STEP BY STEP
These are the basic points to follow for turning your group of brushes into a prop_static for example:
1. Make your object out of brushes using the hammer of Portal2 Authoring Tools and save it alone as a .vmf file. When you're finished close the authoring tools.
2. Now you should place the textures used to make your brushes into this folder:
[youraccountname]/Half Life 2 Episode One/episodic/materials
Beware of placing them right into their respective folders as in Portal2/materials. For example if your texture is located into a "metal" folder, make another metal folder into episodic/materials folder, ok? Or your could simply edit the paths inside your .vmt files to make them point to the right new folders. Anyway, you'll surely see check-board-like textures in your brushes after opening the .vmf file in SourceSDK. This is because most of Portal2 texture files (.vtf) are version 7.5 while the old SourceSDK uses 7.2 vtf files version mostly (don't really know if also other versions... but version 7.2 will do). We should modify our textures. The easiest way is to edit the vtf files with a hex editor. Simply open the .vtf file, go to the 9th column (this may vary depending on the editor) of the first line (check out that at the right end of this line it says "vtf"), find the number 05 and change it by a 02:
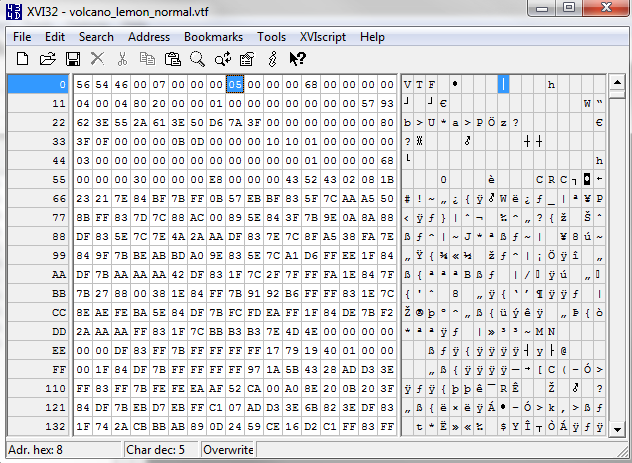
The other way around would be to export the vtf image as a .jpg image file for example, open it with Paint.Net (for example) and save it as a 7.2 version vtf file, but it's more complex.
Important:
- Make sure you modify the vtf version of the files inside episodic/materials folder, not the original ones into Portal2/materials folder, ok?
- Some of the textures you used for your brushes could be stored into the pak01_dir.vpk storage file (located in Portal2/portal2 folder) instead of in Portal2/materials folder. If so, you should use GFCScape to extract them (I'm sure you'll manage to do this, so I won't explain :D)
3. Launch SourceSDK (remember to select Source2007 engine and HL2-Ep1 game as described above), open the .vmf file you created with the P2AT.
4. Then tie all your brushes to a propper_model entity (yes, now this new entity is available!). Let's see this entity's most important properties:

- Name (targetname): give a name to your prop (mainly in the case we would like to use its shape for collisions, explained more below).
- Model name: this is important as this will be the name of your model to refer into Portal2!
- Material path: here you select where do you want your model's texture materials to be placed after making the prop. By default they would be placed into episodic/materials/models/props as shown in the image above.
- Surface property: just pick up one of them. this is important for example for determining its mass or the sound it makes when hits or it's hit by any other thing in-game.
- Physics mesh: this is very important and useful as it will determine collisions of our model (see below for a detailed handling)
- Concave collisions: better set it to Yes as it will define better our collisions.
- Source folder: here you have to enter the complete path of your output folder where the model will be placed. Check in the above image for an example... it can be wherever in your computer but you have to create the folder as Propper won't do it for you!
- Snap to hammer grid: better set it to Yes.
5. Now just Compile the .vmf (F9). The result will not be a .bsp. The output is a model, composed by 4 different files:
- modelname.qc
- modelname.smd
- modelname.phy
- modelname.dx90
(all these files will be saved into the path you specified in "Source Folder")
- Also there's another output: the texture/s used for your brushes/new-model that will be placed into the path you specified in Material Path field, normally into episodic/materials/models/props/[nameofyourmodel] folder.
6. It's time to (re)compile the model just created with GUIStudioMDL to be able to use it in Portal2 with P2AT. This is so easy, just launch the program and go to File > Load Qc. Now browse and locate your output modelname.qc file in the location you set in the propper_models in [1]"Source folder"[/i]. Then press "Compile". The result will be that a new prop model has beeen added into your Portal2 models folder (Portal2/Portal2/models/props).
7. The last step is to copy our prop's texture/s folder from episodic/materials/models/props/[nameofyourmodel] and move it to Portal2/materials/models/props. Hammer (P2AT) will look for the new model's textures into that folder with the name of your prop.
COLLISIONS
It's obviously interesting to take care about collisions for our models. Almost all of us have experienced how some stock models haven't got a collision model and it's necessary to create playerclip textured brushes or func_clip_physics brushes...
Well, collisions must be specified into the Physics Mesh properties field of the propper_model entity. There are mainly 2 options:
- If we've got an already "solid" shape, simple and without hollowed parts and such, the simplest way would be to use right our group_of_brushes/proper_model's name as collisions. This will take the shape of our model to determine its collisions. Example:
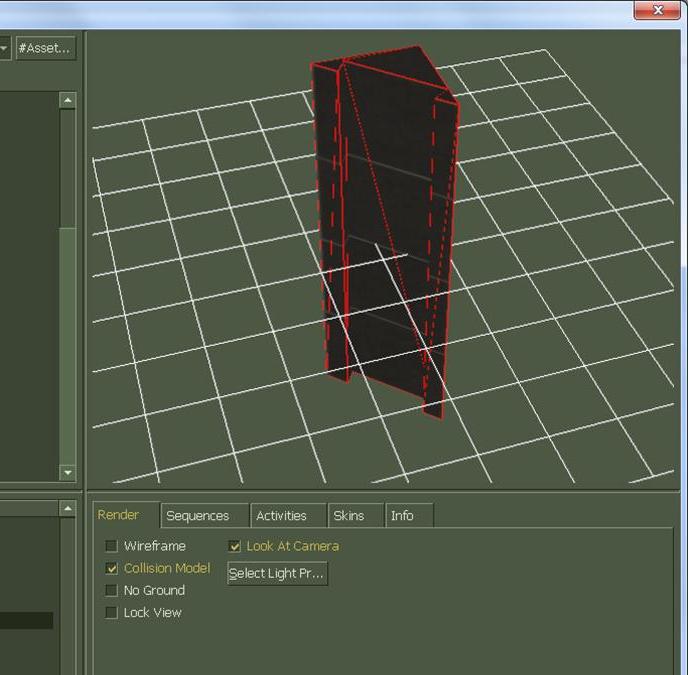
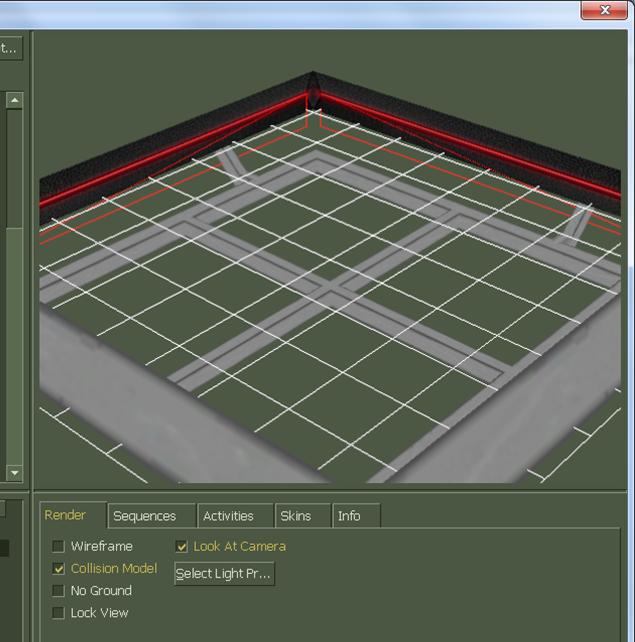
- For more complex models, bigger and for example with hollowed parts, it's recommended to make a collision model ourselves. How? by simply making a func_brush made out of several simple brushes textured with the playerclip texture and named. Then we specify that given name into the Physics Mesh field. Example:
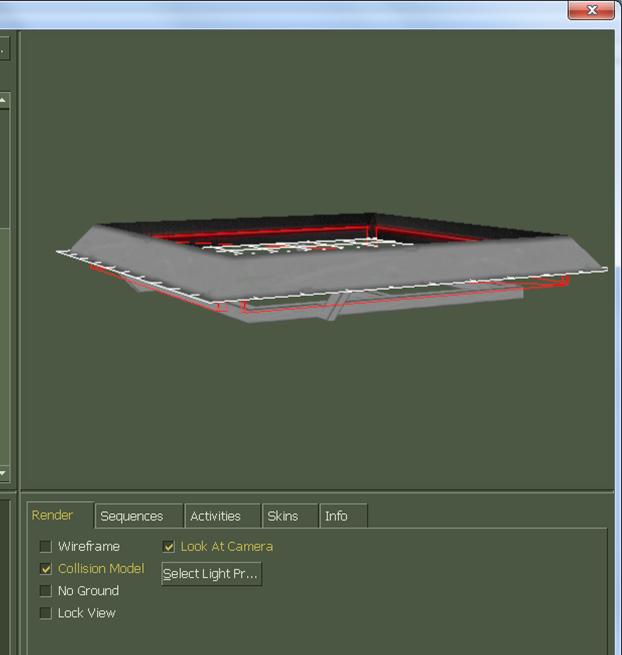
 As the rest of the model will be right under the that white panel, I only wanted the uppermost square-shaped part collisions...
 As the only really important parts I wanted to have collisions were the uppermost square, I made 4 separate playerclip brushes to have those collisions; it's important to note here that it's recommended to make them separated because otherwise the collision would be a plain square-shaped invisible "panel" (joining the 4 corners) and the player won't be able to get through the model!
Collisions result:
That's all. It may look difficult but it's not, believe me, after a first trial you'll see that it's easier than it looks at first sight!
All above is just a simple use of Propper, only to make a prop_static. It's possible as well to make several skins for your prop, or making a prop_dynamic or prop_physics amongst other features that won't be covered here by now :D. Check the additional options for more info.
Hopefully someone else will find this tool the same useful as I do! Please post any doubts, suggestions, corrections, completmentary stuff, etc.
And anjoy this tool! :thumbup:
jose
Profile